
![]() Key Takeaway
Key Takeaway
You can find most of the Crystal Tears by going to each Minor Erdtree in the Lands Between.
Some Crystal Tears are hard to obtain—and for good reason. To become Elden Lord, you must be able to kill a god. Take full advantage of the heavily guarded Crystal Tears in the Lands Between.
Table Of Contents
The Basics of Crystal Tears

Crystal Tears provide you with buffs that make the challenges of Elden Ring much more manageable. While you may not end up using all of it, it’s still better to have a feel of each yourself. After all, Elden Ring is not only about exploring the Lands Between, but is also about exploring play styles that you’re yet to be comfortable with.
For those looking into playing hard mode, you can choose not to use such a mechanic. But to experience the difference Crystal Tears can give, it’s better to get to know more about them first.
Flask of Wondrous Physick
Unlike the Flask of Crimson Tears (HP) and Flask of Cerulean Tears (FP), the Flask of Wondrous Physick is used to give you numerous mixtures of buffs. You can find it inside the Third Church of Marika in East Limgrave. This is also where you can get your very first Crystal Tear: Crimson Crystal Tear (Left).
The Flask of Wondrous Physick allows you to use, mix, and get creative with Crystal Tears. However, it can only be used once per rest. You can customize the Flask of Wondrous Physick at any Site of Grace in the Lands Between.
The Best Wondrous Physick Mixtures

There are over 500 unique Wondrous Physick Mixtures you can try out in Elden Ring. Unfortunately, most of them are only situational. But there are some mixtures that you might want to consider as your go-to, depending on your build and goal.
Exploring and Farming
- Early to Mid Game: Opaline Bubbletear + Twiggy Crystal Tear
- Mid to Late Game: Crimson Bubbletear + Twiggy Crystal Tear
Melee Build Combat
- Early to Mid Game: Opaline Bubbletear + Greenspill Crystal Tear
- Mid to Late Game: Thorny Cracked Tear + Greenspill Crystal Tear
- Late Game: Crimson Bubbletear + Speckled Hardtear
Caster Build Combat
- Early Game: Opaline Bubble Tear + Any-Shrouding/Knot Tear
- Early to Mid Game: Cerulean Hidden Tear + Any-Shrouding Tear
- Mid to Late Game: Leaden Hardtear + Cerulean Hidden Tear
Bow Build Combat
- Early to Mid Game: Opaline Bubbletear + Greenspill Crystal Tear
- Mid to Late Game: Crimson Bubbletear + Greenspill Crystal Tear
Anti-gank Invasions
- Melee Build: Opaline Bubbletear + Leaden Hardtear
- Ranged Build: Cerulean Hidden Tear + Any-Shrouding Tear
Where to Find Crystal Tears
There are currently 32 Crystal Tears in Elden Ring. You can find most of the Crystal Tears by going to each Minor Erdtree in every region. Most of the time, you’ll have to defeat the guardians of the Minor Erdtree to get them. But for some, you can find them elsewhere and they are ready for pick-up.
How to Use Crystal Tears
To use the Crystal Tears, rest at any Site of Grace. Select “Mix Wondrous Physick” on the menu. Notice there are two slots to fill in, which means that you can only use up to two of any Crystal Tears at a time.
Because you can only consume the Flask of Wondrous Physick once per rest, it’s recommended to consider the following factors:
- Location: Where are you heading to?
- Purpose: What are you going to do there?
- Enemies: Who are you going to fight?
- Build: What kind of damage do you do?
- Combat: What type of combat can you do?
The Best Crystal Tears in Elden Ring
Some Crystal Tears are more useful than others. However, it’s important to keep in mind that you have your own unique playstyle. Only you can truly tell which will suit you best.
The following is a list of the best Crystal Tears for you to consider:
- Opaline Bubbletear – Saves you from a one-hit attack
- Crimson Bubbletear – Passive 30% heal
- Regen Crystal Tears (HP and Stamina) – Increases HP or Stamina regen
- Shrouding Cracked Tears – Boosts elemental attack damage
- Windy Crystal Tear – Increases iframes
- Cerulean Hidden Tear – Unlimited FP for 15 sec
- Twiggy Cracked Tear – No rune loss upon death
Early-Game Crystal Tears

Depending on how far into the game you are, certain Crystal Tears are more realistic to shoot for than others. Additionally, there are some that are simply more helpful earlier on. The following are all of the early-game Crystal Tears in Elden Ring.
Limgrave: Crystal Tear Map Location
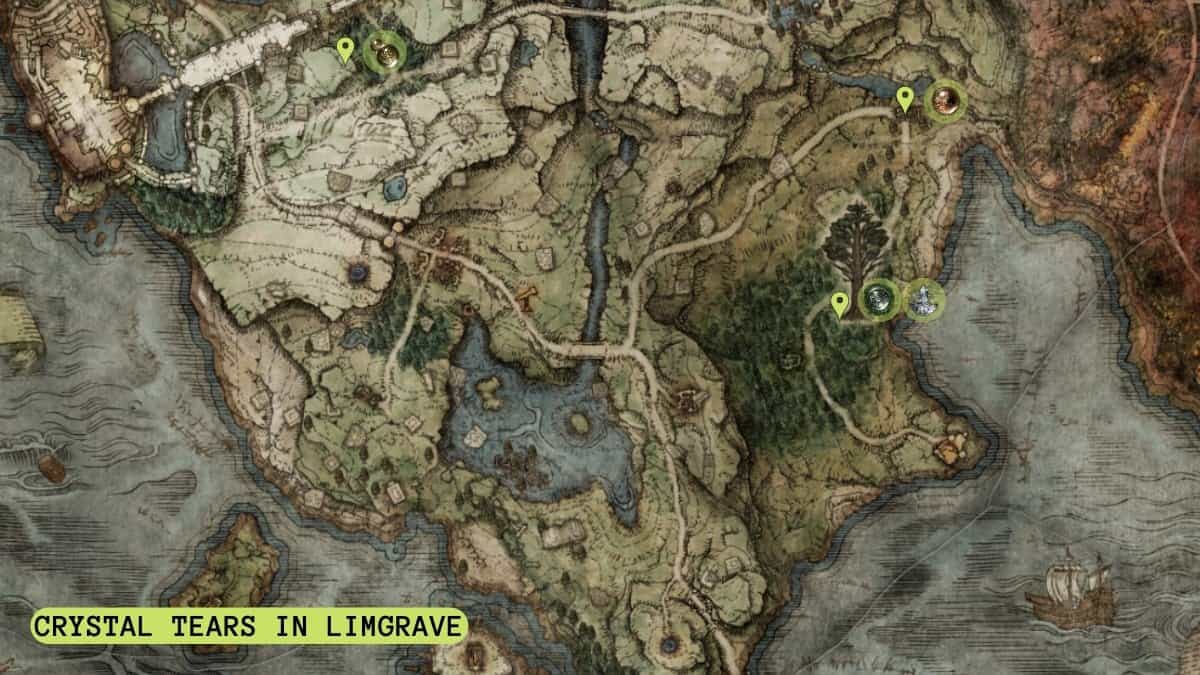
| Crystal Tear | Type | Effect | Duration | Location |
|---|---|---|---|---|
| Strength-Knot Crystal Tear | Stats | +10 Strength | 3 min | Near the edge of a cliff, northeast of Stormhill Shack, West Limgrave |
| Crimson Crystal Tear (Left) | HP | Refills half of your total HP | Third Church of Marika in East Limgrave | |
| GreenSpill Crystal Tear | Stamina | +15% of Max Stamina | 3 min | On an altar bowl under the Minor Erdtree in Mistwood, East Limgrave |
| Spiked Cracked Tear | Offensive | ‣ +15% of Charged Attacks ‣ Stacks with Axe Talisman, Roar Medallion Talisman and Ash of War: War Cry | 3 min | On an altar bowl under the Minor Erdtree in Mistwood, East Limgrave |
Weeping Peninsula: Crystal Tear Map Location
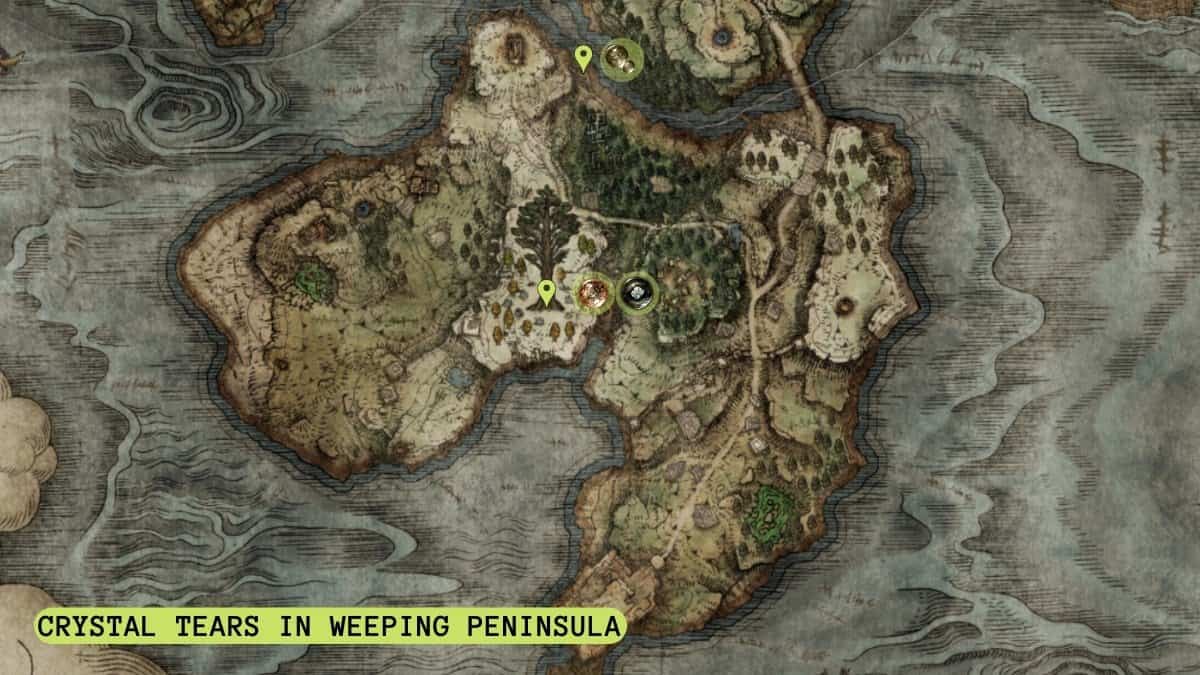
| Crystal Tear | Type | Effect | Duration | Location |
|---|---|---|---|---|
| Faith-Knot Crystal Tear | Stats | +10 Faith | 3 min | On an altar bowl surrounded by Miranda Sprouts, near the cliff north of the Demi-Human Forest Ruins, Weeping Peninsula |
| Crimson Burst Crystal Tear | HP Regen | ‣ Heals 7 HP/sec with a total of 1260 HP ‣ Stacks with Blessed Dew Talisman only | 3 min | Upon defeating the Erdtree Avatar at the Minor Erdtree, Weeping Pensinsula |
| Opaline Bubbletear | Defensive | ‣ +90% all damage negation ‣ Stacks with Uplifting Aromatic | ‣ 3 min ‣ Until you get hit | Upon defeating the Erdtree Avatar at the Minor Erdtree, Weeping Pensinsula |
Liurnia of the Lakes: Crystal Tear Map Location
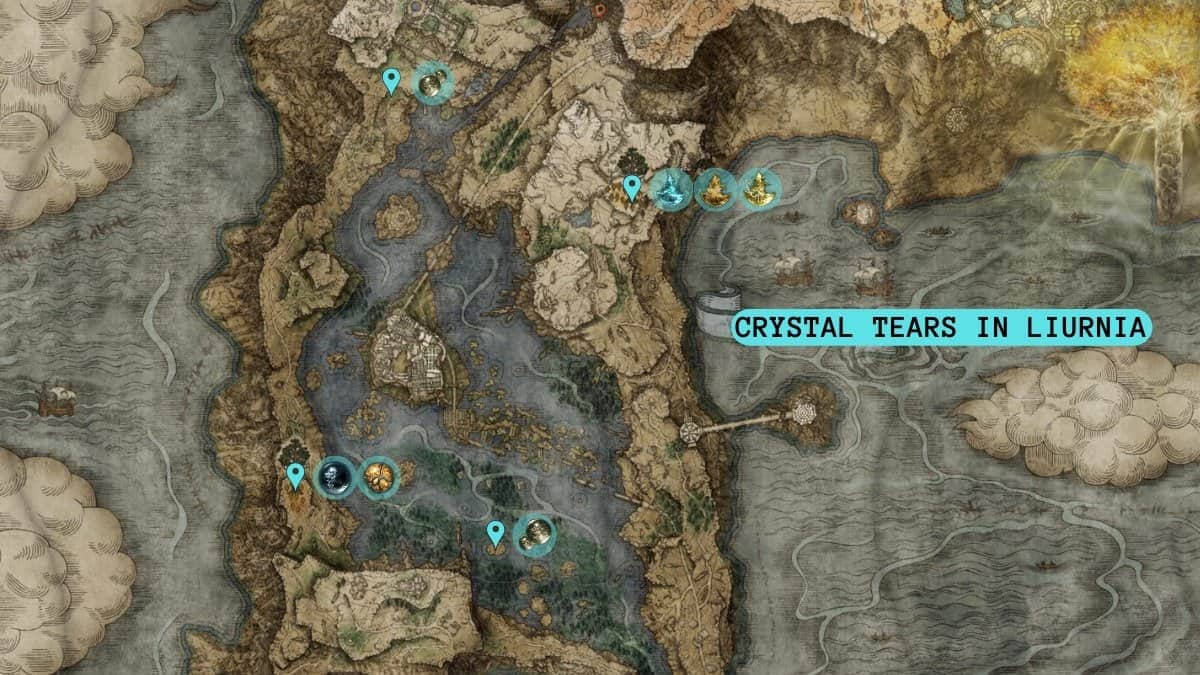
| Crystal Tear | Type | Effect | Duration | Location |
|---|---|---|---|---|
| Dexterity-Knot Crystal Tear | Stats | +10 Dexterity | 3 min | On an island southwest of the Boilprawn Shack, Liurnia of the Lakes |
| Cerulean Crystal Tear (Left) | FP | Refills half of your total FP | Upon defeating the Erdtree Avatar at the Minor Erdtree, Southeast of Liurnia of the Lakes. | |
| Ruptured Crystal Tear (First) | Offensive | ‣ Explodes in 3 seconds ‣ One: Deals 800 Holy Damage with a Radius of 2 meters (300 flat self-damage) ‣ Two: 1750 Holy Damage with a radius of 4 meters (700 flat self-damage) | 3 min | Upon defeating the Erdtree Avatar at the Minor Erdtree, Southeast of Liurnia of the Lakes. |
| Magic-Shrouding Cracked Tear | Elemental DMG | ‣ +20% Magic Damage including Weapon Skills (PVE) ‣ +15% Magic Damage including Weapon Skills (PVP) ‣ Stacks with Terra Magica Sorcery Spell and Magic Scorpion Charm Talisman | 3 min | Upon defeating the Erdtree Avatar at the Minor Erdtree, Northeast of Liurnia of the Lakes. |
| Lightning-Shrouding | Elemental DMG | ‣ +20% Lightning Damage including Weapon Skills (PVE) ‣ +15% Lightning Damage including Weapon Skills (PVP) ‣ Stacks with Lightning Scorpion Charm Talisman | 3 min | Upon defeating the Erdtree Avatar at the Minor Erdtree, Northeast of Liurnia of the Lakes. |
| Holy-Shrouding Cracked Tear | Elemental DMG | ‣ +20% Holy Damage including Weapon Skills (PVE) ‣ +15% Holy Damage including Weapon Skills (PVP) ‣ Stacks with Sacred Scorpion Charm Talisman, Golden Vow Incantation, Ruptured Crystal Tear, and Ash of War: Shared Order. | 3 min | Upon defeating the Erdtree Avatar at the Minor Erdtree, Northeast of Liurnia of the Lakes. |
| Intelligence-Knot Crystal Tear | Stats | +10 Intelligence | 3 min | Below a cliff northeast of the Road to the Manor site of grace, Liurnia of the Lakes. |
Mid-Game Crystal Tears

Just as you’ll want to know which Crystal Tears to pick up in the early game, you’ll want to know what to aim for in your mid-game. The following are all the locations for mid-game Crystal Tears.
Caelid: Crystal Tear Map Location
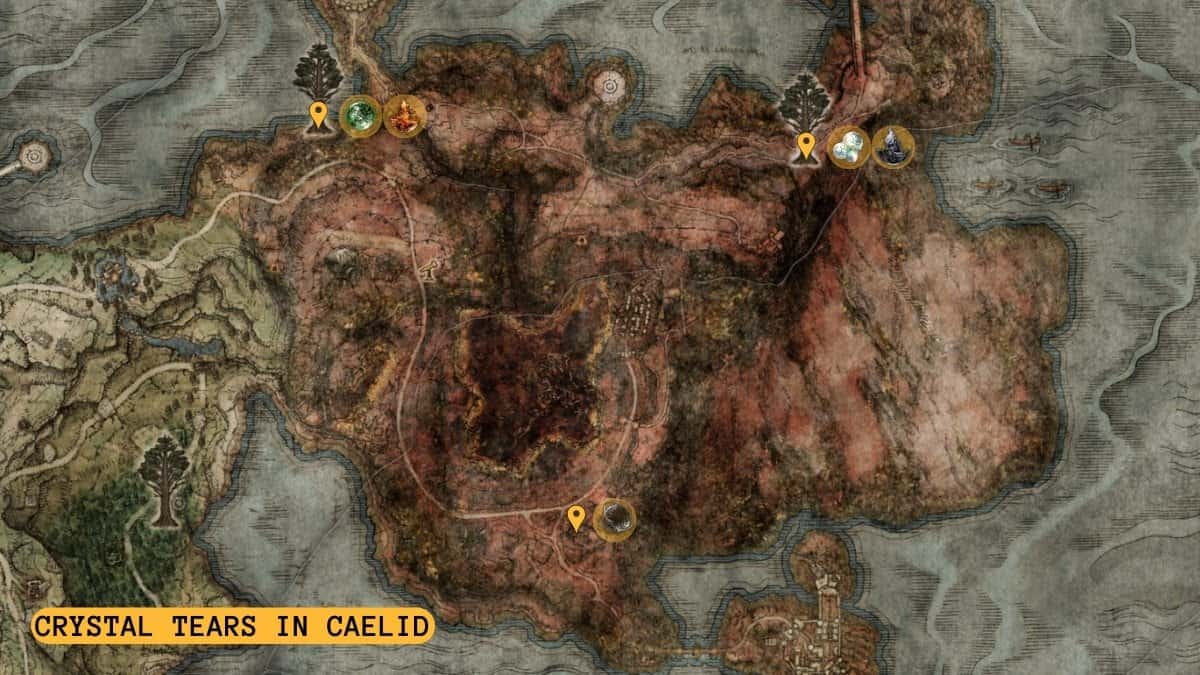
| Crystal Tear | Type | Effect | Duration | Location |
|---|---|---|---|---|
| Greenburst Crystal Tear | Stamina Regen | ‣ About +30% stamina speed regeneration (15 stam/sec) ‣ Stacks with Green Turtle Talisman | 3 min | Upon defeating the Purtrid Avatar at the Minor Erdtree, West of Caelid. |
| Flame-Shrouding Cracked Tear | Elemental DMG | ‣ +20% Fire Damage including Weapon Skills (PVE) ‣ +13% Fire Damage including Weapon Skills (PVP) ‣ Stacks with Fire Scorpion Charm Talisman | 3 min | Upon defeating the Purtrid Avatar at the Minor Erdtree, West of Caelid. |
| Opaline Hardtear | Defensive | ‣ +15% all Elemental Damage negation (PVE) ‣ +10% all Elemental Damage negation (PVP) ‣ Stacks with other Damage Negation Incantation Spells | 3 min | Upon defeating the Putrid Avatar at the Minor Erdtree, East of Caelid. |
| Stonebarb Cracked Tear | Offensive | ‣ +30% Stance Damage ‣ +30% Stamina Damage to blocking enemies | 30 sec | Upon defeating the Putrid Avatar at the Minor Erdtree, East of Caelid. |
| Windy Crystal Tear | Defensive | ‣ Light or Medium Equip Load: +6 iframes ‣ Heavy Equip Load: +5 iframes ‣ +15% Damage Taken (debuff) | 3 min | Below a cliff southeast of the Nomadic Merchant, South of Caelid. |
Altus Plateau: Crystal Tear Map Location

| Crystal Tear | Type | Effect | Duration | Location |
|---|---|---|---|---|
| Purifying Crystal Tear | Boss Fight | ‣ Shields you from Mohg, Lord of Blood's special skill, the Bloodboon Ritual ‣ Use it before the Boss fight starts or when Mohg starts the ritual ‣ Doesn't stop Mohg from healing | Shatters after the Bloodboon Ritual, the final "Nihil!" chant | Upon defeating the invader Eleonora, Violet Bloody Finger at the Second Church of Marika, West of Altus Plateau. |
| Crimsonspill Crystal Tear | HP | +10% of Max HP | 3 min | Upon defeating Wormface at the Minor Erdtree, West of Altus Plateau. |
| Speckled Hardtear | Defensive | ‣ +90 increase on all resistances ‣ Removes all status effect buildups | 3 min | Upon defeating Wormface at the Minor Erdtree, West of Altus Plateau. |
| Crimson Crystal Tear (Right) | HP | Refills half of your total HP | On an altar bowl under the Minor Erdtree within the Capital Outskirts of Leyndell, East of Altus Plateau | |
| Twiggy Cracked Tear | Defensive | ‣ Disables rune loss upon death ‣ Ineffective against Death Blight | 3 min | On an altar bowl under the Minor Erdtree within the Capital Outskirts of Leyndell, East of Altus Plateau |
| Winged Crystal Tear | Defensive | ‣ +4.5 * Max Equip Load ‣ Massively reduces your Equip Load ‣ Law of Regression Incantation Spell removes it | 3 min | On an altar on a cliff west of the Minor Erdtree within the Capital Outskirts of Leyndell, East of Altus Plateau. |
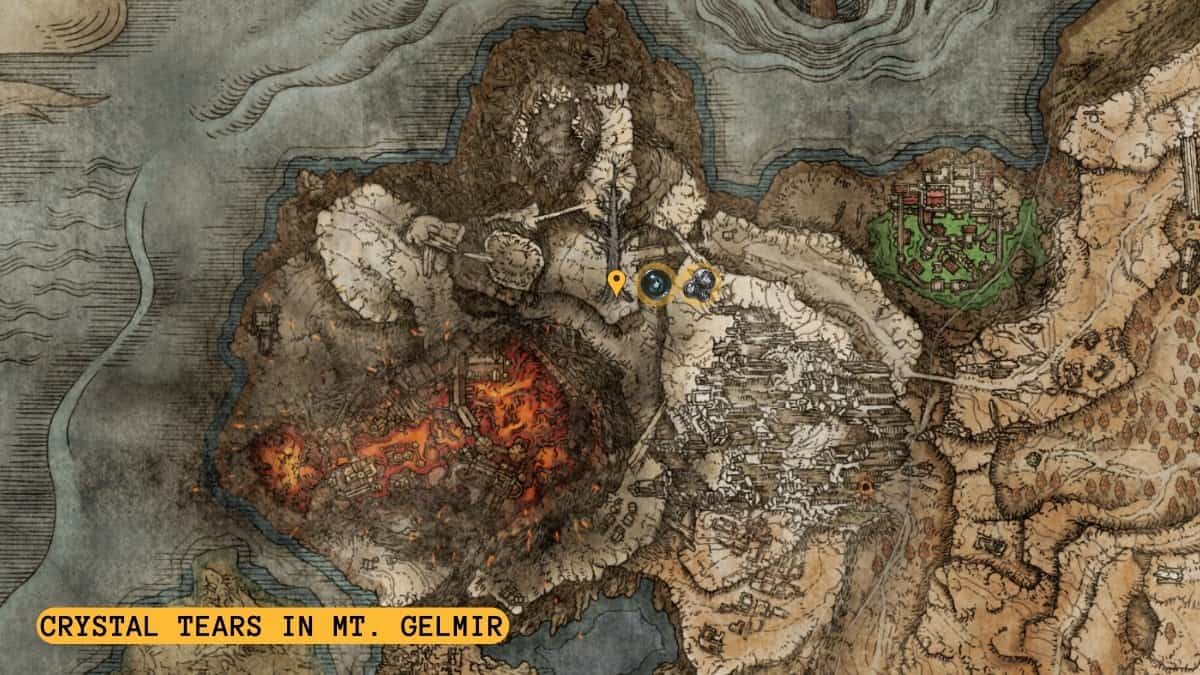
Mt. Gelmir: Crystal Tear Map Location
| Crystal Tear | Type | Effect | Duration | Location |
|---|---|---|---|---|
| Leaden Hardtear | Defensive | ‣ Boosts your poise that prevents you from staggering ‣ Great to use while casting Dragon Incantation Spells and the Comet Azure Sorcery Spells ‣ Effective against Sorcery and Incantation spells, Collosal Weapon or any attacks that easily breaks your poise | 10 sec | Upon defeating the Ulcerated Tree Spirit at the burnt Minor Erdtree, Mt. Gelmir |
| Cerulean Hidden Tear | FP | ‣ Temporarily eliminates all FP consumption | 15 sec | Upon defeating the Ulcerated Tree Spirit at the burnt Minor Erdtree, Mt. Gelmir |
Late-Game Crystal Tears
What makes the late-game in Elden Ring challenging is that the regular enemies and bosses can wipe away your health in one to two hits. Don’t worry though, there are Crystal Tears you can collect in these areas to upgrade your playstyle. The following are all the locations for late-game Crystal Tears.

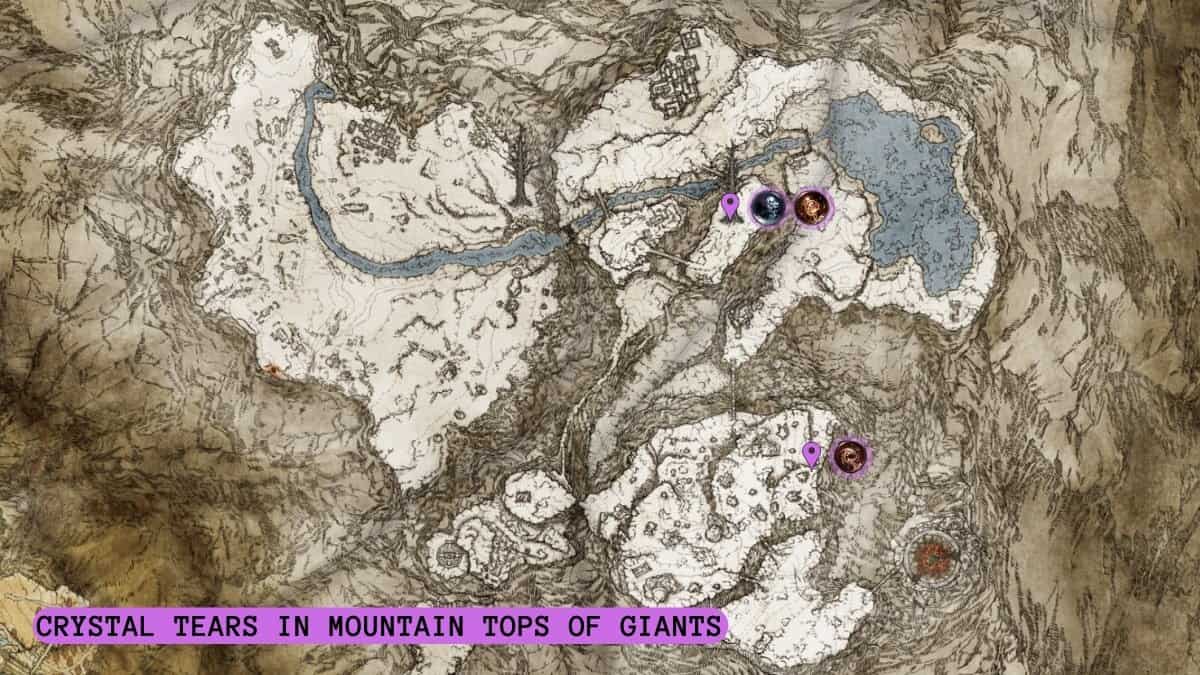
Mountaintops of the Giants: Crystal Tear Map Location
| Crystal Tear | Type | Effect | Duration | Location |
|---|---|---|---|---|
| Cerulean Crystal Tear (Right) | FP | Refills half of your total FP | Upon defeating the Erdtree Avatar at the burnt Minor Erdtree, East of Mountaintops of Giants | |
| Crimson Bubbletear | HP | ‣ Refills 30% of Max HP when your HP down to 20% or lower ‣ Doesn't prevent death from damage kills you | ‣ 3 min ‣ Until your HP hits 20% or below | Upon defeating the Erdtree Avatar at the burnt Minor Erdtree, East of Mountaintops of Giants |
| Crimsonwhorl Bubbletear | HP | ‣ Refills 5% of Max HP when you get hit ‣ Works against the lava pool under Rykard, and Maliketh's Destined Death ‣ Ineffective against Mohg's Bloodboon Ritual | 15 sec | Below a stone throne on the edge of a smaller cliff beyond an Erdtree Branch, northeast of the Foot of the Forge site of grace, East of Mountaintops of Giants. |
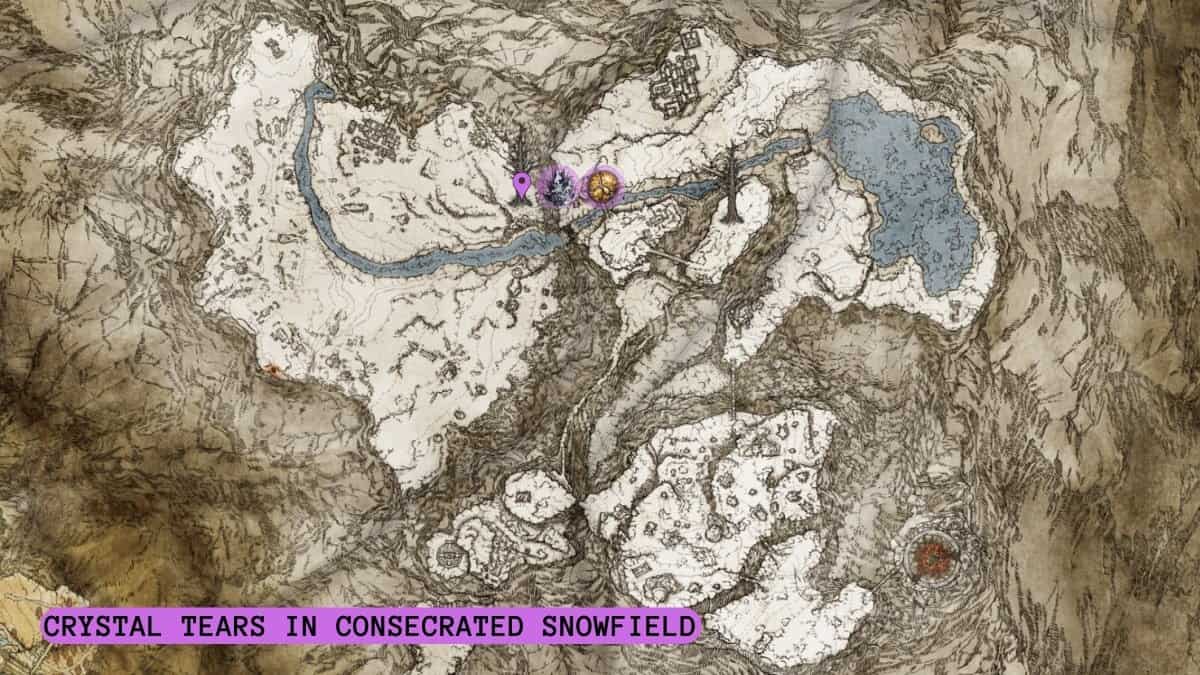
Consecrated Snowfield: Crystal Tear Map Location
| Crystal Tear | Type | Effect | Duration | Location |
|---|---|---|---|---|
| Thorny Cracked Tear | Offensive | ‣ Successively increases your consecutive attack damage (9%, 13%, 20%) ‣ Stacks with following Talismans: Winged Sword Insignia, Rotten Sword Insignia and Millicent's Prosthesis ‣ Stacks with the following Incantation spells: Flame Grant me Strength and Golden Vow | 3 min | Upon defeating the Purtrid Avatar at the burnt Minor Erdtree, East of Consecrated Snowfield. |
| Ruptured Crystal Tear (Second) | Offensive | ‣ Explodes in 3 seconds ‣ One: Deals 800 Holy Damage with a Radius of 2 meters (300 flat self-damage) ‣ Two: 1750 Holy Damage with a radius of 4 meters (700 flat self-damage) | 3 sec | Upon defeating the Putrid Avatar at the burnt Minor Erdtree, East of Consecrated Snowfield. |
Minor Erdtree Guardians to Defeat for Crystal Tears
Most Minor Erdtrees in the Lands Between have powerful guardians that you need to defeat to obtain certain Crystal Tears from them. While some Minor Erdtrees have similar guardians, they all vary in difficulty. They may differ in appearance, health bars, and skills that are unique to them. The following is a list of what you need to know about every Minor Erdtree Guardian.
How to Defeat Erdtree Avatar
The Erdtree Avatar looks like a walking wooden dress with a Ceremonial Staff — it’s headless! Every blow of its staff deals heavy physical damage. But what makes it deadly is it’s Golden Land skill, which deals Holy Damage.
Sure, you can run around it with Torrent; although there’s no guarantee you can make it alive without knowledge. Here’s what you need to know about the Erdtree Avatar and the cheese strategies that you can use against it.
| Damage | Weak | Resistant | Immune | Location |
|---|---|---|---|---|
| ‣ Physical ‣ Holy | Fire | ‣ Poison ‣ Rot ‣ Frostbite | ‣ Bleed ‣ Death | ‣ Limgrave ‣ Weeping Peninsula ‣ Liurnia of the Lakes ‣ Mountaintops of the Giants |
Erdtree Avatar Moveset and Counters
| Attack | Description | Counter |
|---|---|---|
| Slam + Uppercut | Raises staff with both hands over the right shoulder, then slams it down. Followed by an uppercut towards the left. | Dodge inwards, dodge to the left, then attack. |
| Overhead Slam + Uppercut | Raises staff with both hands over it's head then slams it down. Followed by an uppercut towards the left. | ‣ Run towards it, attack, then walk towards its back and attack. ‣ Dodge outward, then keep walking backwards. |
| Double Sweep + Slam | Sweeps staff to the left, then to the right, and slams it down. | ‣ Dodge inward and attack ‣ Dodge to the right, then attack |
| Reaching Slam | Holds the staff with the right hand, raises it while leaping then slams it down. | Dodge inwards, then attack. |
| Holy Slam | Glows, leaps into the air and slams itself to the ground. | Dodge inwards when it hits the ground then attack |
| Stomp + Sweep | Hold staff horizontally with both hands, raises right foot, then quickly slams it to the ground. Followed by a sweep to the right. | Walk towards its back, dodge when it slams its right foot, attack, dodge again for the sweep, then attack. |
| Golden Land | ‣ Holds ceremonial staff to the chest and plants it to the ground, causing a glowing AOE holy blast. ‣ Summons light missiles towards you. | ‣ Keep dodging sideways, while watching out for the Erdtree Avatar. ‣ Quickly, take cover behind the Minor Erdtree to completely avoid taking damage. ‣ Great window to refill HP and FP, or do rebuffs. |
| Clone Summon (Mountaintop of Giants) | Hold ceremonial staff to the chest and plants it to the ground, summoning a clone. | ‣ Lure one away, leaving the other to de-aggro. ‣ Since they share the same Health Bar, you can focus killing only one of them. |
Cheese Strategy
- Early Game: Use Fire Spells or throw Fire Pots with Torrent
- Prepare Fire Spell or craft Fire Pots
- Craft at least one Oil Pot (optional: more damage)
- Call Torrent and go near the Erdtree Avatar
- Throw Oil Pot (optional: more damage)
- Cast Fire Spell once or twice, or throw one to two Fire Pots at a time
- Run until the Erdtree Avatar’s health bar disappears
- Refill FP or craft more Pots
- Repeat steps one through eight until you win
- Mountaintops: Use Fire Spells or Rotten Breath, throw Fire or Rot Pots with Torrent
- Prepare Spells or Craft Pots
- Craft at least one Oil Pot (if using Fire Spells or Pot)
- Call Torrent and go near the Erdtree Avatar
- Throw Oil Pot (if using Fire Spells or Pot)
- Cast Spell or Throw Pots (once or twice)
- Run to the bridge until the Erdtree Avatar’s health bar disappears
- Refill FP or craft more Pots
- Repeat steps three through seven until you win
How to Defeat Putrid Avatar
The Putrid Avatar looks very similar to the Erdtree Avatar, but it’s deadlier. Notice the scarlet-colored parts of its body? Yes, you’ll have to watch out for the Scarlet Rot buildup every time you fight it. Even their Ceremonial Staff deals a higher amount physical damage compared to the Erdtree Avatars.
It can easily kill you with one or two hits if you’re not ready. Here’s what you need to know about the Putrid Avatar and the cheese strategies that you can use against it.
| Damage | Weak | Resistant | Immune | Location |
|---|---|---|---|---|
| ‣ Physical ‣ Holy ‣ Rot | Fire | Frost | ‣ Poison ‣ Rot ‣ Bleed ‣ Death | ‣ Caelid ‣ Consecrated Snowfield |
Putrid Avatar Moveset and Counters
| Attack | Description | Counter |
|---|---|---|
| Slam + Uppercut | Raises staff with both hands over the right shoulder, then slams it down. Followed by an uppercut towards the left. | Dodge inwards, dodge to the left, then attack. |
| Overhead Slam + Uppercut | Raises staff with both hands over it's head then slams it down. Followed by an uppercut towards the left. | ‣ Run towards it, attack, then walk towards its back and attack. ‣ Dodge outward, then keep walking backwards. |
| Double Sweep + Slam | Sweeps staff to the left, then to the right, and slams it down. | Keep dodging towards it s back, then attack. |
| Reaching Slam | Holds the staff with the right hand, raises it while leaping then slams it down. | Dodge inwards, then attack. |
| Rotten Slam | Leaps into the air and slams itself to the ground, leaking clouds of Scarlet Rot to a wide area in front of it. | ‣ Walk towards its back of it while air, dodge when it slam down, then attack. ‣ Run to the side, and dodge sideways twice |
| Golden Land | ‣ Holds ceremonial staff to the chest and plants it to the ground, causing a glowing AOE holy blast. ‣ Summons light missiles towards you. | ‣ Keep dodging sideways, while watching out for the Putrid Avatar. ‣ Quickly, take cover behind the Minor Erdtree to completely avoid taking damage. ‣ Great window to refill HP and FP, or do rebuffs. |
| Stomp + Sweep | Hold staff horizontally with both hands, raises right foot, then quickly slams it to the ground. Followed by a sweep to the right. | Walk towards its back, dodge when it slams its right foot, attack, dodge again for the sweep, then attack. |
Cheese Strategy
- West of Caelid: Use Fire Spells or throw Fire Pots with Torrent
- Prepare Fire Spell or craft Fire Pots
- Craft at least one Oil Pot (optional: more damage)
- Call Torrent and go near the Putrid Avatar
- Throw Oil Pot (optional: more damage)
- Cast Fire Spell once or twice, or throw one to two Fire Pots at a time
- Run to the cliff, wait for the Putrid Avatar’s health bar to disappear
- Refill FP or craft more Pots
- Repeat steps three through seven until you win
- East of Caelid: Use Fire Spells or throw Fire Pots with Torrent
- Prepare Fire Spell or craft Fire Pots
- Craft at least one Oil Pot (optional: more damage)
- Call Torrent and go near the Putrid Avatar
- Throw Oil Pot (optional: more damage)
- Cast Fire Spell once or twice, or throw one to two Fire Pots at a time
- Jump up Spirit Spring, wait for the Putrid Avatar’s health bar to disappear
- Refill FP or craft more Pots
- Repeat steps three through seven until you win
- Consecrated Snowfield: Use Fire Spells or Rotten Breath, throw Fire or Rot Pots with Torrent
- Prepare Spells or craft Pots
- Craft at least one Oil Pot (if using Fire Spells or Pot)
- Call Torrent towards the Putrid Avatar on a cliff left of the Minor Erdtree
- Throw Oil Pot (if using Fire Spells or Pot)
- Cast Spell or throw Pots (once or twice)
- Run downhill until the Putrid Avatar’s health bar disappears
- Refill FP or Craft more Pots
- Repeat steps three through seven until you win
How to Defeat Wormface

The Wormface is a tall and slender cloaked monster guarding the Minor Erdtree in the Altus Plateau. Its face is surrounded with worms that are hungry enough to chew you away. What makes it even more deadlier is the Death Blight it inflicts.
Fighting it can be really frustrating, especially with a low resistance to Death Blight. It also doesn’t help that Death Blight builds up at a speed that you’ll need to be on full alert during the entire fight. When you know enough about the Wormface, you’ll begin to see that it’s not impossible to take down. There are cheese strategies below for you to use when it gets too tough for you.
| Damage | Weak | Resist | Immune | Location |
|---|---|---|---|---|
| ‣ Physical ‣ Death | Physical | ‣ Poison ‣ Rot ‣ Bleed ‣ Frenzy ‣ Frost ‣ Sleep | Death | Altus Plateau |
Wormface Moveset and Counters
| Attack | Description | Counter |
|---|---|---|
| Face Smash + Blight Clouds | Quickly stomps left foot, then right foot, then smashes its face to the ground leaving Blight Clouds on the spot. | ‣ Dodge inwards, between its legs, then attack. ‣ Run towards its back, then attack |
| Face Sweep + Blight Clouds | Kneels down and sweeps its face while releasing Blight Clouds in front of it, then raises its head, shakes it body, and stands. | Run towards its back, attack multiple times. |
| Blight Spit | Spits Death Blight towards you. | Dodge every spit, away from the clouds, and watch out for the Death Blight buildup. |
| Blight Puke | Lowers head while coughing out Blight Clouds then kneels and pukes a large amount of Death Blight towards you. | ‣ Runs towards it, dodge inwards between the legs, then attack. ‣ Run towards its back, attack. Stick to its back, then attack while it pukes. |
| Blight Fountain + Blight Spit | Shakes its head, puts hands on its face, then releases a large amount of Blight Clouds, engulfing its entire body. Followed by a Blight Spit. | Run away, but watch out for the Blight Spit. |
| Charge and Grab | Charges towards you with arms wide open, with an intention to grab and bite you. | ‣ Dodge inwards, between its legs, then attack. ‣ Run away until it makes another move. |
| Stomp | Stomps its right foot when you get too close. | Dodge as soon as it stomps its foot. |
Cheese Strategy
- Altus Plateau: Poison Mist method
- Prepare Poison Mist Incantation Spell
- Prepare Flask of Cerulean Tears, it’s 18FP per use
- Get rid of the Guardians in the area
- Call Torrent to run away when Wormface is provoked
- When Wormface stays still, crouch and sneak behind it
- Cast Poison Mist until Wormface gets poisoned
- Recast Poison Mist when it stops draining HP
- Keep doing it until you win (about 10 minutes)
- Altus Plateau: Rot Pot or Rotten Breath method with Torrent
- Prepare Rotten Breath Incantation Spell or craft Rot Pots
- Position yourself behind Wormface
- Cast Rotten Breath or throw one to two Rot Pots until it’s inflicted
- Call Torrent and ride away until Wormface’s health bar disappears
- Repeat steps four and six until you win
How to Defeat Ulcerated Tree Spirit

The Ulcerated Tree Spirit is a giant worm with small limbs that’s not only aggressive and fast but also tough to fight. What makes it powerful is the Holy Breath, Holy Swipes, and Holy Explosions under its belt. But the Crystal Tears it can give you are super worth the challenge.
Knowing enough about it gives you a great advantage wherever you are, may it be in close-quarters or open field areas. if you don’t have the time or you’re feeling down already, there are cheese strategies below that you can use against it.
| Damage | Weak | Resistant | Immune | Location |
|---|---|---|---|---|
| ‣ Physical ‣ Holy | ‣ Frostbite ‣ Fire Damage | ‣ Poison ‣ Rot ‣ Bleed | ‣ Death ‣ Sleep | Mt. Gelmir |
Ulcerated Tree Spirit Moveset and Counters
| Attack | Description | Counter |
|---|---|---|
| Hand Sweep | ‣ Sweeps left hand towards the right. ‣ Phase 2: Sweeps left hand towards the right while releasing holy clouds. | Dodge inwards, then attack. |
| Head Slam | Slams it's head and long neck to the ground. | Dodge sideways, then attack. |
| Charge and Bite | Slithers away, roars then charges at you for a bite attack. | Position yourself in front of it, then get ready to dodge inwards when near its bite, then attack its body. |
| Tail Sweep | Pulls it tail towards its chest, then sweeps it to the back. | Dodge when it the tail is about to reach you, then attack. |
| Hand Stomp | Stomps left hand quickly to the ground. | Keep dodging, but stay close to its body, get ready to attack. |
| Holy Breath | Slightly raises it head, stiffens its body, then release Holy Breath to its front. | Run towards its chest, then attack multiple times. |
| Holy Explosion | Phase 2: Charges its whole body with Holy light, then releases Holy Explosion. | Run away as far as you can, wait for its next move. |
Cheese Strategy
- Mt. Gelmir: Poison Mist method
- Prepare Poison Mist Incantation Spell
- Prepare Flask of Cerulean Tears, it’s 18FP per use
- Call Torrent and provoke the Ulcerated Tree Spirit
- Go back until it rests back at the burnt Minor Erdtree
- Crouch and sneak behind its tail, then cast Poison Mist
- Recast Poison Mist when it stops draining HP
- Repeat until you win
- Mt. Gelmir: Using Pots and Campfires in the area
- Craft Fire and Oil or Frost Pots
- Use Opaline Bubbletear and Crimson Burst Crystal Tear
- Call Torrent, drink Mixed Wondrous Physick
- Throw Oil Pot at Ulcerated Tree Spirit (if using Fire Pots)
- Lure it to step on campfires
- Run away until it goes back to the burnt Minor Erdtree
- Throw Fire Pot or Frost Pot to provoke it again
- Run away until its health bar disappears, craft more Pots
- Repeat steps four through eight until you win