GFs: None
Draw Points: Blind, Blizzara, Full-Life
Enemies: G-Soldier, G-Soldier Elite, SAM08G, Thrustaevis, Belhelmel, Geezard
Bosses: Base Leader & Soldiers, Iron Clad
Table Of Contents
Infiltrating The Base
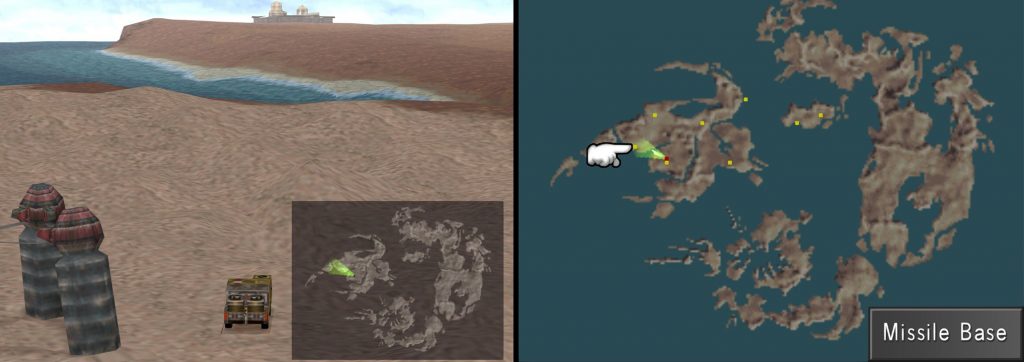
In order to find the Missile Base, simply turn the Galbadian Vehicle slightly to the left. The Missile Base is visible from the D-District Prison—just over the water.
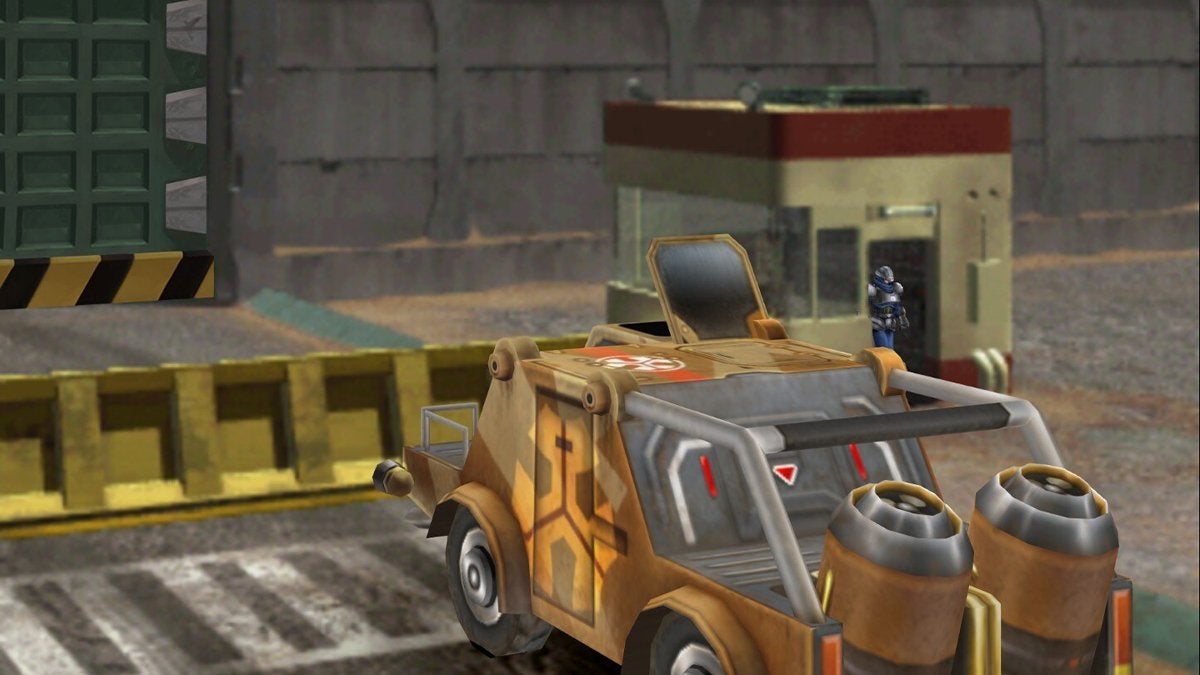
You can also pull up the World Map by pressing Select. Press it twice to bring up the 2D Map, or three times to bring up the Full-Screen Map. Make your way around the small inlet of water, over the train tracks, and turn left. Drive directly into the base, using the vehicle as cover.
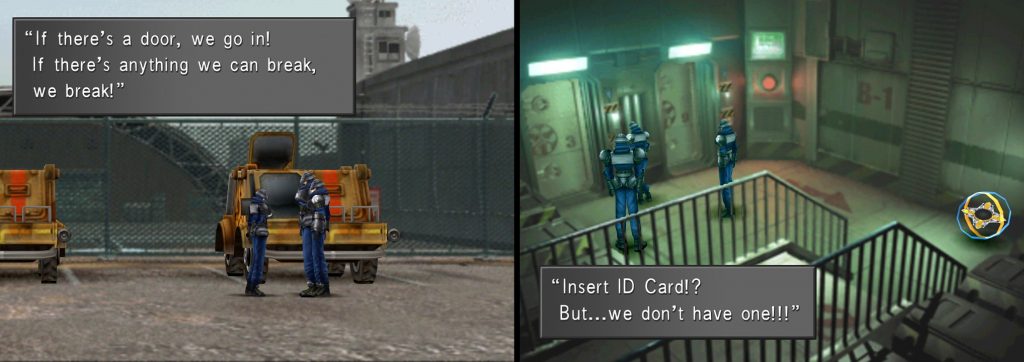
After a pep talk from Selphie, head to the left and enter the only door. Once inside the base, you’ll see a Save Point and two entrances. Both doors are locked, putting a wrench in Selphie’s plan right away. Interact with the panel between the doors and one of your party members will come to the rescue with an ID Card.
From this point, there are a few ways to complete this mission. In order to not have the mission result in a Game Over, you’ll need to both set the control panel’s error ratio to maximum and exit the building and defeat the boss before the self-destruct timer goes off.
If you’re after the best SeeD Rank, you’ll want to remain undiscovered until the end of the mission.
Covert Ops
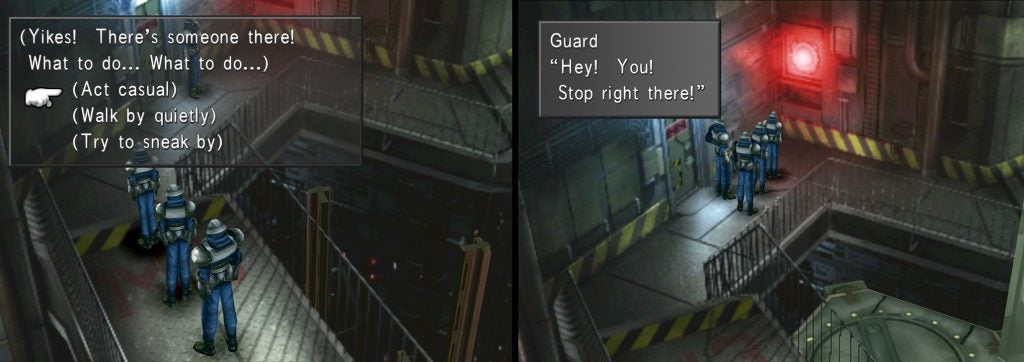
As soon as you enter the base, Selphie will spot a Guard at his post in front of the Circuit Room. She will hold up the party with a choice of how to proceed. No matter what you do, the Guard will stop you.
If you act casually or try to sneak past him, the Soldier will chastise you. If you walk by quietly, he will comment on how well you were raised. Thankfully, you can make any choice without blowing your cover.
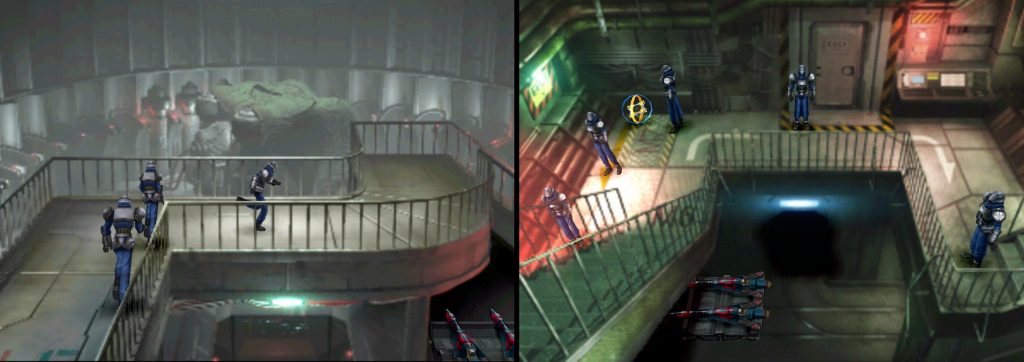
Head to the right over the catwalk and down the stairs. In the background covered with a sheet, the upcoming boss BGH251F2 is visible behind the catwalk. At the bottom of the stairs, you’ll find a room with a Save Point, the Control Panel, and Two Guards.
At this point, you can’t enter either area behind them. The Control Panel will also be locked and you won’t be able to use it yet. If you interact with it, the Guard closer to the Save Point will yell at you, but it won’t break your cover.
Head into the narrow corridor on the left to find the next area you can access. It may be hard to tell, but you can enter this area with the bright red light between the railing and the wall.
Missile Base Messengers
In the Maintenance Bay area, you’ll find a Draw Point containing Blind on the left, and on the right, two Maintenance Soldiers. If you speak to them they’ll ask you for a favor.

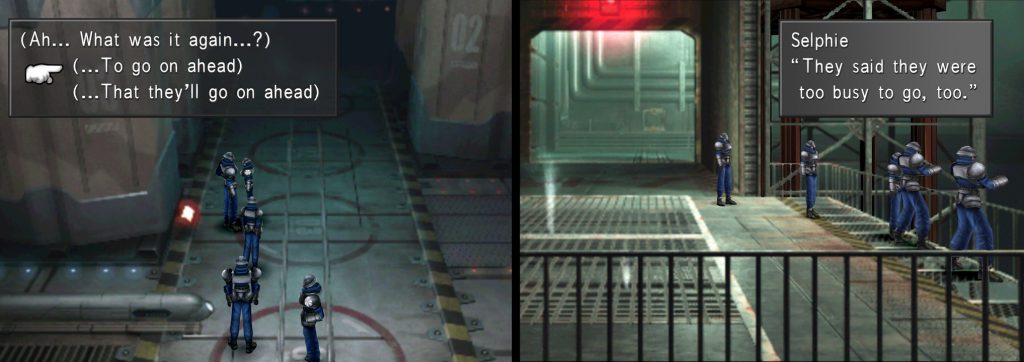
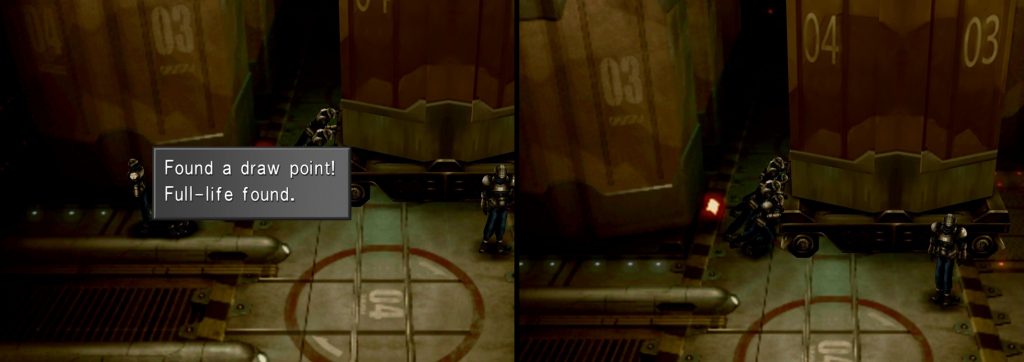
Return to the last room with the two Guards and speak with the Guard closer to the Save Point. Once you tell him what you’re here for, he’ll let you into the Missile Bay behind him. In this room, you’ll find a hidden Full-Life Draw Point on the left side near the Missile. If you haven’t learned Move-Find yet and can’t see it, you’ll still be able to interact with the Draw Point by clicking around in the area.
Talk to the Soldier on the left towards the back of the room in order for Selphie to deliver the message. You’ll want to choose the correct message “(…To go on ahead)” or you’ll have points deducted from the overall SeeD Rank you can obtain in this mission. The Soldier will give you a message in return, so head back to the Maintenance Bay and the two Maintenance Soldiers. Let them know there’s no one to cover them, and you’ll get the okay to enter the Circuit Room.
The Circuit Room
Head back to the Guard by the Circuit Room (the one who commented on your walking style earlier) and he’ll leave his post. Inside the room, there is a Draw Point containing Blizzara. Interact with the Controls near the red lever on the left side of the room. Selphie will have a choice of how to go about messing things up in here.
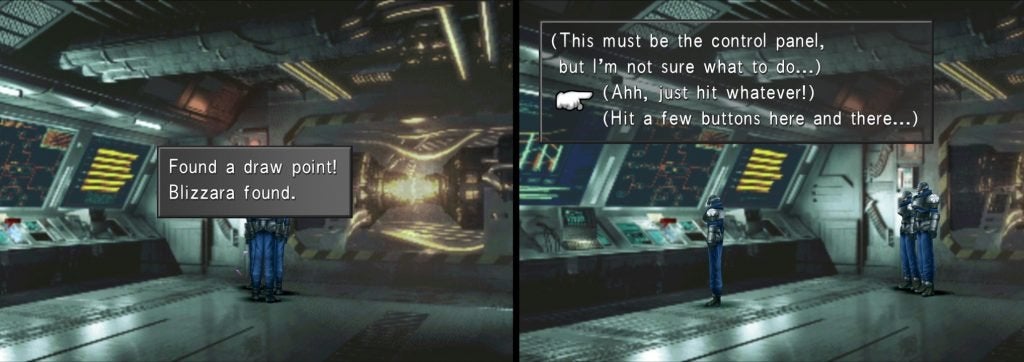
Choose “(Aah, just hit whatever.)” and Selphie will start pressing buttons at random. The first time she’ll have no luck, but the game will prompt you to try one more time. This time, either option will shut down the power. If you choose “(Just press whatever!)” you’ll shut the power down quicker. Choosing “(Bang on it hard!)” will require you to mash the X button in order to cut the power.
Don’t Blow Your Cover
From this point on you’ll have a few opportunities to keep your disguise up or reveal yourself.
The Maintenance Team will respond to the emergency as soon as you exit the Circuit Room. If you choose to fight now, you’ll start a battle with two G-Soldiers and lose your disguise after the battle. You’ll also get a demerit to the overall SeeD Rank you can gain in this mission.
Afterward, the Missile Base will have random encounters with G-Soldiers and monsters like Geezards, Thrustaevis, and Belhelmel. Skip ahead to the section called The Self Destruct Button in order to complete the mission.
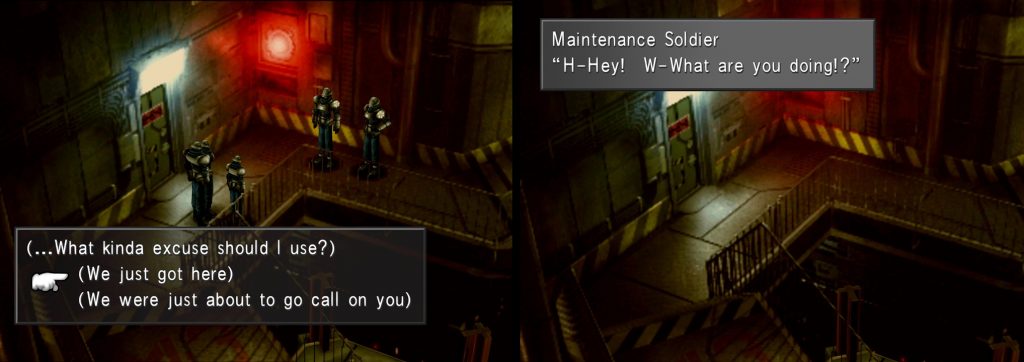
If you choose to talk your way out of it, any combination of choices works. Choosing “(We were just about to go call on you)” is the fastest option, and once the Maintenance Team buys the lie, Selphie’s team will follow them into the Circuit Room and make quick work of them.
If you choose “(We just got here)” the Maintenance Soldier will know you’re lying. However, choosing either “(Must be your imagination)” or “(It’s a mess in there!)” will be enough to convince him.
Play It Cool
Head back to the room with the Save Point. The Two Guards who were here previously are now nowhere to be seen. Head down the stairs and towards the Control Panel. The door to the Missile Bay will open and a Soldier will look at you suspiciously. You’ll have several choices in this section but it should be clear whether they lead to keeping your disguises or not.
To keep your disguise, choose Play it Cool. The Soldier will ask you to come in and help out in the Missile Bay. If you choose to blow your cover, deciding to fight here is the easiest fight option as it is only one G-Soldier. If you choose to run away, you’ll run into the Maintenance Bay and lose your disguises. A battle will begin with one G-Soldier and a SAM08G.
Either way, if you don’t help out in the Missile Bay, you’ll get a demerit to the overall SeeD Rank you can gain in this mission. Afterward, the Missile Base will have random encounters with G-Soldiers and a few monsters like Geezards, Thrustaevis, and Belhelmel. Skip ahead to the section called The Self Destruct Button in order to complete the mission.
Loading The Missiles
If you choose to help out, the Soldier will let you into the Missile Bay. You’ll need to position Selphie between the two Soldiers, the other two party members will join her. Mash the Square Button to help the Soldiers move the Missiles into place. Once you’ve finished, they’ll give you the go-ahead to access the Control Panel. This is your last chance to access the hidden Full-Life Draw Point that is in this room, so make sure to find it before you leave.
The Control Panel
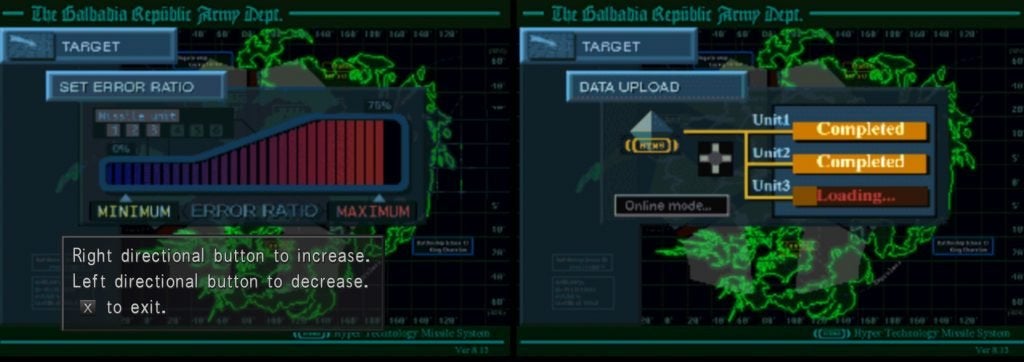
Select ‘Target’ in order to access the first menu. Select the second option ‘Set Error Ratio’ to start the sabotage. Move the Error Ratio all the way to the right and exit. Select the next option in this menu titled ‘Data Upload’ and send the data in order to complete this part of the mission.
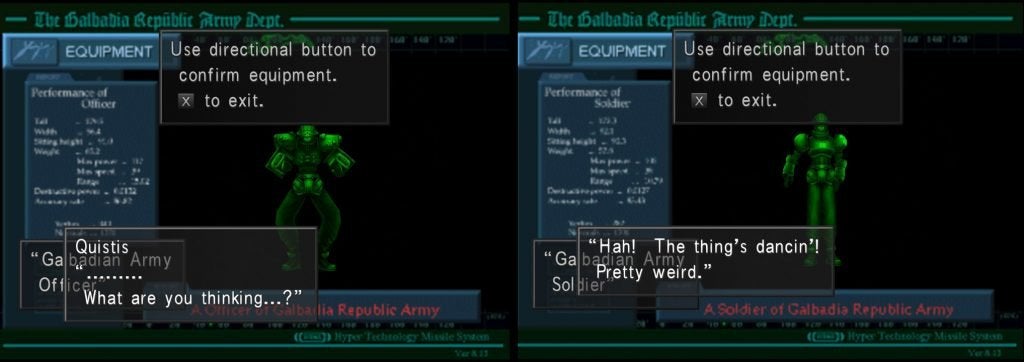
Before you exit the Control Panel, there’s an Easter Egg you can discover. Return to the main menu and Select ‘Equipment’. Hold both the Square and Triangle buttons and press Up and Down on the d-pad to find hidden animations of Galbadian Soldiers dancing.
The Self-Destruct Button
Now that there’s no one guarding the Launch Room, enter the door on the right. If you’ve kept your cover until this point, you’ve succeeded in keeping your G-Soldier disguises for the full mission. Inside the Launch Room, you’ll find the Base Leader and two Soldiers. They aren’t a particularly tough fight and should go down fast. The Base Leader can cast Confuse on the party, which you can also Draw from him and his men.
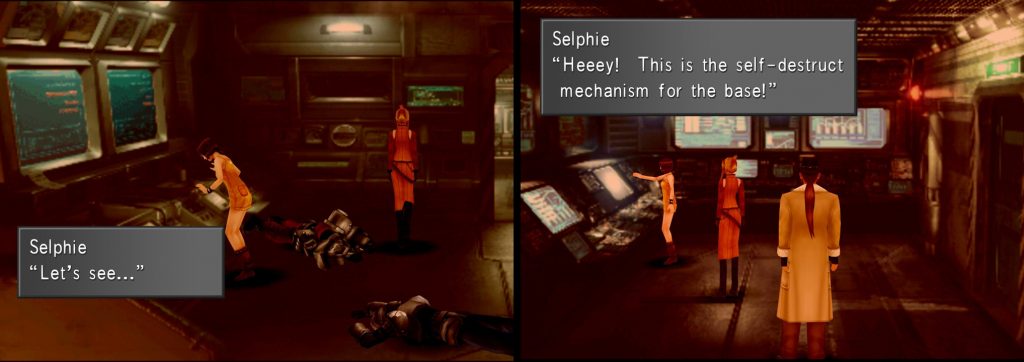
After you’ve defeated them, you’ve got the Launch Room to explore. The double Control Panel on the left is the Launch Mechanism. Interact with it and Selphie will stop the Launch. Then it’s time for the final part of Selphie’s plan: blow the place to smithereens!
Examine the other two consoles in this room. There is one to the right of the doorway and another to the left of it. Once Selphie has determined they’re not what she’s looking for, you can head into the next room.
Before you go any further, be sure to fully equip the party for an upcoming Boss battle. Junction Thunder or Water to your Elemental Attack and equip the Magic and Draw commands.
Interact with the Control Panel further from the camera on the left to find the Self-Destruct Mechanism. Decide how long you will have to get out of the base and fight the boss.
Choosing 10 minutes will ensure you gain the best SeeD Rank from this mission. Select 20 minutes or less and the door on the right side of the room will take you back to the beginning of the base. If you choose anything over 30 minutes, the door will remain locked.
When selecting a time limit (unless you helped with the missiles), you’ll still need to get access to the Control Panel to set the Error Ratio to Maximum.
Doubling Back
If you’ve already been to the Control Panel, you can skip this section and proceed outside to the Parking Lot.
Depending on the time you selected for the base to Self-Destruct, exit through the door on the left or run back through the base. Once you make it to the first room with the Save Point and the ID Card reader, Selphie will stop the group and send them back to the Control Panel. If you come through the door in the room with the Self-Destruct Mechanism, it will lock behind you, so you’ll need to run back through the base the long way.
When you get to the room with the Control Panel, you’ll see a wounded Galbadian Soldier on the floor. Speak to him and he’ll ask Selphie why she’s risking her life to stop the Missiles. No matter what answer you give, he’ll give you his ID Card and the password to get into the Control Panel: ‘EDEA’.
Enter the password one letter at a time, then select ‘Target’ in order to access the first menu. Select the second option in the main menu to access the ‘Set Error Ratio’ panel. Move the Error Ratio all the way to the right (maximum) and exit. Select the next option in this menu titled ‘Data Upload’ and send the data in order to complete this part of the mission. Head back to the beginning of the base and outside to the Parking Lot.
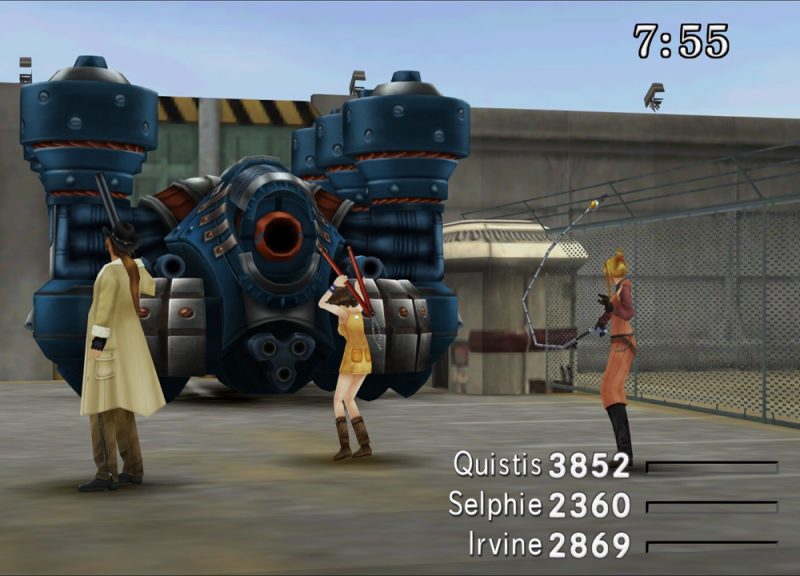

Boss: BGH251F2 (Iron Clad)
Level Range: 9-22
HP Range: 6000-8400
Draw: Shell, Protect, Stop
Drops: Weapons Monthly June
Mug: Nothing
Scan: Named Iron Clad for its defense capability. The main cannon is more powerful than X-ATM092’s Ray-Bomb.
AP: 20
Start the battle by casting Blind on the Iron Clad as most of its attacks are physical shots from the main gun. Every fourth turn, it will charge up a unique attack called Beam Cannon. The cannon will hit even with Blind and does about 1000 damage, so draw Protect from the tank to cast on the party.
The tank is weak to Thunder, Water, and Earth magic and is immune to Bio. The bigger danger in this battle is the timer; consider using Limit Breaks and Magic instead of summoning GFs as the summon animations can be long. As the tank takes damage, the turrets will explode.
Once it has lost four of its turrets, it will no longer charge Beam Cannon and will fire it instantly. Be sure to stack on the heavy damage in this section of the fight. After a few turns, the crew will lose control of the tank. In order to get the AP from this battle, you’ll need to reduce BGH251F2 to 0 HP before that happens.
Once the tank is no longer in the battle, the crew will come out to face you themselves. Defeat the G-Soldier Elite and two G-Soldiers quickly as the timer is still counting down to Self-Destruct. When you’ve defeated them, you’ll get Weapons Monthly June.
Once you’ve defeated BGH251F2, look around the Parking Lot for a way out. After discovering you’re locked in, the Missile Base will Self-Destruct.