Triple Triad is a card game in Final Fantasy VIII that serves as its central minigame.
Table Of Contents
The Basics of Triple Triad
How to Play Triple Triad
Press the Square Button when talking to NPCs to initiate a game. Not every NPC plays Triple Triad, but you will find players all over the world of FFVIII, even in the most unlikely places.
The aim of Triple Triad is to strategically place your cards in order to keep them under your control (the cards will be displayed in your color, Blue) while also using them to flip cards belonging to your opponent (which will be displayed in Red). Both players have a hand of 5 cards and take turns placing them on a three-by-three grid until every space is filled. The player who has the first move is randomly decided. Each player starts with a score of 5 points. Flipping a card will earn you a point and lose your opponent a point. Conversely, having a card flipped by your opponent will lose you a point and gain your opponent a point.
Flipping Cards
Each card has four numbers displayed in the top left corner. The numbers rank from 1-A (A being the highest) and correspond to each of the 4 cardinal edges of the card. Cards are flipped by placing a card with a higher opposing number against it on the grid. For example:
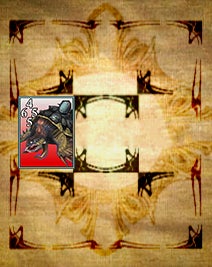
On this first card, Adamantoise, the 4 corresponds to the top edge, the 6 to the left side of the card, the 5 to the right side, and the other 5 to the bottom edge of the card. It’s been placed on the center left of the grid.

By placing this second card, Behemoth, which has a 7 corresponding to the left edge in the center of the grid next to the Adamantoise card, it will be flipped into your control as 7>5 and both cards will now be colored Blue to indicate they are both under your control.
However, because the Behemoth card has a 3 that corresponds to the top of the card, it’s advised to be careful about its placement, or your card may get flipped, leaving you unable to flip it back due to the higher numbers on the right and bottom edges. Try not to place the sides of your cards with lower numbers next to any empty spaces on the grid. Instead, place them against the sides or corners of the grid or against other cards, to prevent losing them to your opponent.
If you play the card on the top left instead of in the center, you will still flip the card as the lower edge of the Behemoth card is a higher number than the top edge of the Adamantoise card (5>4), but instead of leaving the weaker side of the card open to your opponent, you close off the lowest numbered sides of both cards (4, and 3) making your odds much better that neither card can return to your opponent’s control next turn.
Balance playing defensively with flipping your opponent’s cards and you’ll be a Triple Triad Master in no time.
How to Win
To win, you must end the game with more cards under your control/a higher score than your opponent. If you win, you get the chance to take one or more cards from your opponent. If you lose, your opponent can instead take one or more of your cards. It is possible to come to a “Draw” with each player ending the game with a score of 5. and neither lose nor gain cards.
Triple Triad Rules
In addition to the basic game of Triple Triad, each region of the game will have its own additional Rules to gameplay that can be spread and mixed, as well as Trade Rules that change how the rewards for winning a game work. These regional rules can change the game drastically.
Game Rules
- Open – Allows you to see your opponent’s hand during the game, easily the most useful rule.
- Same – If a card matches the numbers on two or more cards it is placed against, both cards will be flipped. Combo is in effect if the Same rule is in play. See an in-depth explanation of Same and Combo below.
- Same Wall – Same, but the edges of the grid now come into play, and their value is “A.” Combo is in effect if the Same Wall rule is in play. See an in-depth explanation of Same Wall and Combo below.
- Plus – If the adjacent numbers on a placed card can be added up to the same sum on two or more cards, both cards will be flipped. Combo is in effect if the Plus rule is in play. See an in-depth explanation of Plus and Combo below.
- Elemental – Randomly assigns Element icons to the spaces on the grid. Some but not all Triple Triad cards have an Element symbol on the top right side of the card. If you play a card with an Element on a space in the grid with a matching Element icon, the card gets +1 added to all four sides. When you place a card that does not match the Element in that grid space, the card gets -1 to all four sides. When a card would be flipped via other rules like Same and Plus, the +1 or -1 from Elemental is ignored and Same and Plus take precedence.
- Random – Your hand is chosen at Random from all the cards in your inventory.
- Sudden Death – When you and an opponent come to a “Draw” by both having a score of 5, another game is started directly after, and you and your opponent are dealt the cards you controlled at the end of the last game. This can result in you and your opponent playing with most of each other’s cards during subsequent games. There is no limit to how many times in a row Sudden Death can trigger when you “Draw” with an opponent, only winning or losing a game will end the game.
Same
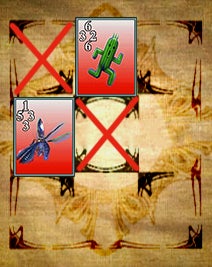
In this example, we have two cards already played. There are two places we can play a card in order to trigger the Same rule, each marked with an X.
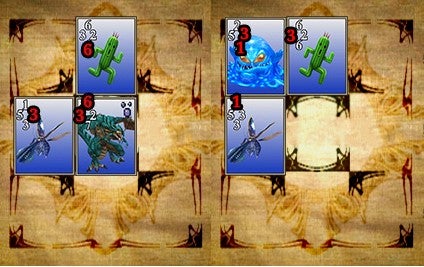
A card with a 3 on the right side and a 1 on the bottom would flip both of these cards if placed in the space on the top left, matching the 3’s on the right and left sides of the cards in the top row, and matching the 1’s on the top and bottom sides of the cards in the left column. Likewise, a card with a 6 on both the top and left sides would flip them both if placed in the center, matching the 6’s on top and bottom of the cards in the center column, and the 3’s on the left and right sides of the cards in the center row.
Same Wall
Same Wall works just like Same, but with the edges of the grid having the value “A.” With Same Wall, you can flip cards by using the edges as one of the matching sides. In this example, the Selphie card can flip the Carbuncle card by using the top edge of the board to match the “A” value on the top of the Selphie card.
Plus
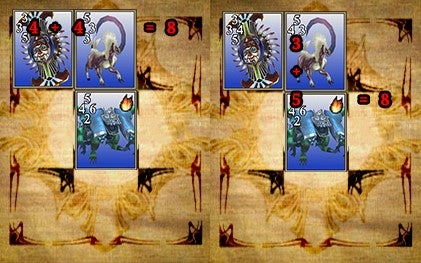
By playing a card with a 4 on the left side and a 3 on the bottom, you can flip both of these cards with Plus. 4+4 = 8, and 5+3 = 8.
Combo
When Same, Same Wall, and Plus are in play, Combo is in effect. When you flip a card by matching the numbers with Same or Same Wall, or by matching sums with Plus (or when your opponent flips a card with these methods) any card that was flipped by it in previous turns also flips. Combo being in play can make turns very volatile, flipping 3 or more cards in a single turn can ensure a win, and losing cards you’ve flipped to a Combo can be impossible to come back from without also flipping a card with Same, Same Wall, or Plus yourself.
Trade Rules
- One – When you win the game, you win one card of your choice.
- Direct – When you win the game, you win all cards that are in your control at the end of the game.
- Diff – When you win the game, you can a number of cards corresponding to how many points you beat your opponent by. If you win with a score of 6 to 4, you win 2 cards. If you win with a score of 7 to 3, you win 4 cards, and if you win with a score of 8 to 2, you win all 5 of your opponent’s cards.
- All – When you win the game, you win all 5 of your opponent’s cards.
Regional Rulesets
| Balamb: Open |
| Dollet: Elemental, Random |
| Galbadia/Timber :Same |
| Centra: Same, Plus, Random |
| Fisherman’s Horizon: Elemental, Sudden Death |
| Trabia/Shumi Village: Random, Plus |
| Esthar: Elemental (Hidden Rule: Same Wall) |
| Lunar Labs: Open, Elemental, Same, Same Wall, Plus, Random, Sudden Death |
The “Area” Section
In the Card tab of the main menu, you can see a list of all the cards you have as well as any cards you have had previously and lost.
The AREA Section can tell you what creatures will drop the card, and in the case of Face cards you have lost, it will show you the location of the NPC player who currently has it. To the left you can see where Ifrit’s card ends up after losing it to General Caraway (a requirement for him to play the Rinoa card) – this is a hint that he has played and lost our precious card to Martine.
Refined Face cards will read “Used Up” while cards in your inventory will read “Squall.”
The CC Group Quest
To do any card playing or rules manipulation on Disc 4, you’ll want to complete the CC Group quest before the end of Disc 3. You can begin the quest as early as the start of the game, but you can’t complete it until after the Garden is mobile.
| Player | Prerequisites | Location/Description | Card Levels | Face Cards |
| Jack | Win 15 games of Triple Triad in the halls of Balamb Garden Note: Players in the Library, Cafeteria, Classroom, etc. do not count. | Dark-haired young man in school uniform who appears in the main hall by the Garden Map Terminal. | 3, 4, 6 | None |
| Magician Joker | Defeat Jack Note: Joker is optional to the completion of the quest. He will upgrade your battle meter if you defeat him. | A student in camouflage and a headband in Balamb Garden’s Training Center, on the small wooden dock over the water. | 1, 2, 3, 6, 7 | Leviathan |
| Knight Club | Defeat Jack | A dark haired young man in school uniform walking from right to left around the 1F circle between the Parking Lot and the Quad. | 3, 5, 6 | None |
| Princess
Diamond (Diamond Duo) |
Defeat Jack and Club | By the Garden Terminal Map, Diamond is a pair of female students in school uniform who will walk up to the Map. | 3, 4, 5, 7 | None |
| Prince Spade | Defeat Jack, Club, and Diamond Note: Spade cannot be challenged until after going to B1F in Balamb Garden | Where you got your first deck of cards by the 2F elevator, you’ll find a student in a brown shirt and khaki pants, standing with a friend. | 1, 2, 3, 6, 7 | None |
| Queen Heart | Defeat Jack, Club, Diamond, and Spade Note: Heart cannot be challenged until after leaving FH. | Can be found on the Garden’s Bridge once the Garden is Mobile. | 3, 5, 6, 7 | Carbuncle |
| Master
King |
Defeat all CC Group Members Note: This does not include Joker, King will challenge you whether you have defeated Joker or not. | Finding King has a few steps:
|
1, 2, 3, 4, 5, 6, 7 | Gilgamesh |
The Rarest Triple Triad Card
There’s only one way to get this little cutie’s card, and that’s to do the PuPu Quest!
| ⭐Heads Up! You’ll want Enc-None equipped for this. You’ll need 5 Elixirs and to have the Item command on someone in your party. It’s only possible to complete this quest when you have the Ragnarok. |
- First look for our friend on Mandy Beach, east of Timber.
- Next, the UFO can be located near the base of the mountains around Winhill.
- Next stop, Kashkabald Desert! In southern Esthar near Cactuar Island, he can be sighted in the western part of the desert.
- Last of the abduction sightings, Heath Peninsula is in eastern Trabia. The UFO can be found on a small, round, gray island east of the peninsula.
- After the fourth sighting, the player must fly the Ragnarok to Grandidi Forest in northern Esthar and land on the mountains above the Chocobo Sanctuary, and they will enter a battle with the UFO.
- After the battle, the player can visit where Balamb Garden used to be to find PuPu, who will ask the party for five Elixirs. This is the only way to acquire the PuPu card. Fighting PuPu instead of giving it Elixirs will result in forfeiting your only chance to get this card.
The Queen of Cards Quest
The Queen of Cards Quest will result in her father creating 5 rare cards: Kiros, Irvine, Chubby Chocobo, Doomtrain, and Phoenix. In order to get you will have to lose a card to her first. Every time you lose a specific rare card to the Queen she will move to some other town. The object of the Quest is to lose the correct card to her and then have her move to Dollet. When she moves to Dollet you can speak with her and you will be presented with the option to ask her about her father, at which point the card will be created and circulated to an NPC in the world. The card that you lose to her can be won back from her son in Dollet.
| Lost Card | Created Card | NPC Location |
| MiniMog | Kiros | Man in black – Deling City Shopping Arcade |
| Sacred | Irvine | Flo – Fisherman’s Horizon |
| Chicobo | Chubby Chocobo | Male student on bench by Library – Balamb Garden |
| Alexander | Doomtrain | Timber Pub Owner – Aphorora Pub |
| Doomtrain | Phoenix | Esthar’s Presidential Aide – Presidential Residence Waiting Room |
| Current Location | Moving Odds |
| Balamb | Galbadia (62.5%) and Dollet (37.5%) |
| Dollet | Galbadia (62.5%) and Balamb (37.5%) |
| Galbadia | FH (62.5%), Balamb (12.5%), Dollet (12.5%) and Centra (12.5%) |
| Centra | Dollet (37.5%), Galbadia (37.5%) and FH (25%) |
| FH | Esthar (62.5%), Winhill (25%) and Dollet (12.5%) |
| Trabia | Dollet (50%), Balamb (25%) and Lunar (25%) |
| Esthar | Lunar (50%), Trabia (25%), Dollet (12.5%) and FH (12.5%) |
| Lunar | Any location (~14.25%) (no hint is given to where she is going) |
⭐You can also use the Queen to manipulate the Trade Rules (see below). When the Queen is in a region, Trade Rules stop degenerating, which means they won’t change back to the “One” rule at random.
Changing the Trade Rules
Manipulating Trade Rules is a lot easier than manipulating Card Rules. There are three ways Trade Rules change. If you’re not interested in the details of how it works and you just want to know how to change the rules, skip ahead to the next section.
How It Works
- If you play a game with an NPC or play a game with the Queen herself in the region the Queen is currently in (On Disc 4, this will be whichever region she was associated with at the end of Disc 3), there is a 35.16% chance that everyone in her region adopts her personal Trade Rule if it differs from the Trade Rule of the region (offer to play her and quit in order to determine her current Trade Rule).
- When you play a game in any region there is a chance that the dominant region’s Trade Rule will be adopted by some other region at random. Dominance is determined by the number of games played in an area. Playing games in the region that is the dominant region increases its dominance by 1 (max 10), while playing in other regions decreases it by 1. All other regions outside the dominant region stay at a dominance of 0. If the dominant region’s dominance reaches 0 (by playing 10 games in other regions), the region in which you last played Triple Triad becomes dominant, with a dominance of 1.
- Trade Rule adoption begins at 9.76% for a region with a dominance of 1, and increases by 9.76% for each dominance point the region has. At max dominance (10), it’s nearly guaranteed some other region will adopt the dominant region’s Trade Rule.
- Setting up to spread a Trade Rule around the world can be done by playing 10+ games in any given region in order to first make that region dominant. By continuing to play in that region, the Trade Rule there will inevitably spread to other regions.
- Each game you play in any region (regardless of dominance or the Queen’s location) there is a chance of causing a random region’s Trade Rule (other than the one the Queen is currently in) to revert to “One”. The probability starts at zero and increases with each game, then reverts to zero and increases again. This can affect only one region per game played. If that region’s Trade Rule is already “One”, nothing happens.
How To Do It
Unless you’re trying to fill out your lower-level card collection very quickly, you will do fine if “One” is the only Trade Rule in play, as most players will not have more than one Face card unless you have lost a card to them. “Diff” can be as helpful as “All” in grabbing as many cards as possible from a game if you’ve got a good deck. Ultimately it’s up to your play style what you want to have as your Trade Rule. (As a note, if you are trying to fill out your lower-level card collection, it’s easiest to manipulate the rules in Balamb and fill out your lower-level card collection by playing Card Master King [see CC Group above ] before Disc 4.)
| ⭐Heads Up!! Save often in case the Queen’s personal Trade Rule changes or in case you lose a Face Card to her, causing her to move to a different region when you do not want her to move. |
- Play cards with the Queen of Cards in Balamb until she is using the Trade Rule you want. (You do not need to actually play any games. (see Play & Quit below)
- Play cards with the Queen of Cards until Balamb NPCs are using the Trade Rule as well. By the time this happens, the dominance of Balamb’s region should have a fairly good chance of spreading the trade rule to regions at random. If her Personal Trade rule changes before it spreads, reset!
- Play cards with anyone in the Balamb Region (except for the Student at the Docks) to continue to spread the Trade Rule to other regions.
- Save before you check other regions’ Rulesets by playing NPCs in those regions. If the Trade Rule has not spread everywhere you want it, reset and continue playing games in Balamb until it has spread everywhere you would like it to spread.
Changing Card Rules
How it Works
The card rules in any given place can be changed by having a specific set of rules and advancing the card rule RNG to the right spot by either 1) pressing square and then saying no to card games a specific number of times, 2) interacting with an in-game object such as a draw point or a stack of magazines a specific number of times, or 3) a combination of the two. Specific details can be found in the sections below. If you already understand the basics of manipulating the card rules and just need to view the table, skip ahead to the next section!
How to Clear Balamb’s Ruleset
By the Balamb town docks a young man in a tank top can be found crouched down by the water. If he doesn’t appear, exit Balamb entirely (out to the world map) and reenter. This guy doesn’t play by any rules…literally. He plays with a unique Ruleset of no rules, his Ruleset can’t be modified, and he will clear your personal “carried” ruleset as well as clear Balamb of all Rules (including “Open”) if you play him. This can be useful if you spread a rule to Balamb accidentally.
Challenge and Refuse
When you challenge a player to cards, they will give you a text prompt that asks you if you want to initiate the card game. If you are not sure you have the right Ruleset, you are trying not to change any rules, or you would like to be carrying the Ruleset your opponent has (see Carrying and Mixing Rules) you can select “no” before seeing your opponent’s Trade Rule and Ruleset. But perhaps most importantly, challenging and refusing a card game does have an effect on the Card Rule RNG that we will be using quite a bit in this guide. By choosing no, you progress the card rules RNG by one.
Play and Quit
When you say yes and accept the challenge text prompt above and initiate a card game, you’ll be shown a screen with your opponent’s Trade Rule and Ruleset. Playing the game is not necessary — select quit and the effects of playing the game re: rules manipulation will still take place. ⭐THIS ALSO WORKS FOR MANIPULATING TRADE RULES!
Carrying and Mixing Rules
When you play a game of Triple Triad, you are carrying a Ruleset. You begin the game in Balamb with the Ruleset “Open”. When you play a game in a different region, the Ruleset you were formerly carrying gets overwritten by the current Ruleset of that region. As you travel around playing cards, you are carrying the Ruleset of the region you played in last. For example, if you play a game in Balamb with the Ruleset “Open” and then travel to Dollet, you will be carrying the Ruleset from Balamb, and players in Dollet will ask if you want to “mix” rules.
In the text prompt, your opponent will tell you which region’s rules you are carrying, and this will be your indicator that rules are about to “mix” if you proceed to the screen showing your opponent’s rules. If you’re unsure you have the right rules, are trying to carry the Ruleset your opponent has, or simply don’t want to spread or abolish any rules on your way through the game, continue to say “no” until the text prompt changes. All players will eventually stop offering to “mix” rules and their text prompt will change from saying something like “You know rules from a different region. Let’s play a game with Balamb and Dollet’s Rules!” to something simpler like “A Card Game? Sure!” If two regions have the same Ruleset, you won’t be asked to mix even if you are technically carrying the Ruleset of a different region.
Spreading Rules
For the most part, you only want to spread the “Open” Rule. As that is normally the only rule most players want to spread, it is detailed in the section below.
If for some reason you would like to spread a different rule, the procedure is as follows:
- Visit a region (we’ll call it Region A) carrying a Ruleset that includes the rule or rules you would like to spread but does not include ”Open”, (or spread “Open” to the second region, Region B, before preceding)
- Challenge, accept and quit a game with an NPC in the region in which you would like the rule to spread (Region B) until the rule is adopted by that region. Note: If the NPC stops offering to mix rules before the rule spreads (this is incredibly unlikely) you will now be carrying the Ruleset of your opponent.
- To fix this, return to Region A, challenge and refuse an NPC there until they stop mixing rules (in order to carry their Ruleset without chancing spreading any rules), return to Region B and continue.
Abolishing the Card Rules
To manipulate a region’s rules, you must be carrying one or more rules that the region doesn’t have in order to initiate the “mix” process. Please make sure you understand the basics before proceeding!
How It Works
When you mix rules, the game does a Spread/Abolish check in order to determine rule changes. In each check, “Open” has a 25% chance of being chosen, while every other rule has a 12.5% chance of being chosen. If the check returns a rule that can spread, it will spread. If not, the process is repeated twice. If the third check still returns nothing, the game will then check if the selected rule (that is, the third one picked from the list) is currently in the NPC’s region’s Ruleset. If it is, it has a 50% chance of being abolished. Therefore, “Open” Spreading is the most common result by far. By manipulating where in the Card Rule RNG you are, which Ruleset you’re carrying (and in some cases which Rules you are not carrying) we can force the game to Abolish a rule of our choosing.
Just as in any other FFVIII manipulation, there are several things that can manipulate and affect the RNG.
- Whether or not the Queen of Cards is in the Region.
- Challenging and accepting or challenging and refusing a game of Triple Triad
- Interacting with a Draw Point. (it’s not necessary to Draw from it) stack of magazines, or other select objects.
- Environmental effects (fountains, television screens, moving NPCs, vehicles and even some lighting effects)
- Using the 3x Speed or Hi-Speed functions. You may use these to get to a location (before a reset), but do not use them while moving between the Save Point and NPC you wish to challenge, or the Draw Point/Magazine Stack/etc and the NPC.
The Lunar Loophole
If a region has all possible Triple Triad rules, playing (or Playing & Quitting) roughly 1-5 games there will cause one rule to be abolished. The usual case of this is in Lunar (having all rules by default), but this is also possible if you spread every rule to a region. It is possible to manipulate the RNG on the Lunar Space Station until you abolish the “Random” Rule, but with a little extra elbow grease, you can face Ellone with a much nicer Ruleset than that, see the section on abolishing Lunar rules below.
Dollet Pub Magazines
⭐Since Soft-resets are not an option in the Remastered version, if you’re playing the Remastered version you’ll want to skip ahead to the next section.
Once you’ve faced the Dollet Pub Owner and beaten him inside the Pub (the man close to the camera on the 2f) he’ll allow you through the door on the 2f of the Dollet Pub and across a small bridge into his private room. Not only can you then get a chance to win a Face card from him (Siren) but you then have the perfect set up to pre-manipulate the Card Rule RNG. There is a hidden Move-Find Save Point outside the door to the bridge which makes a convenient save for this set up. By loading up this save and interacting with the stack of magazines in this room, you can soft-reset and complete some of these manipulations that require more advances of the RNG than can be achieved by challenging & refusing card players before they stop offering to mix rules. The RNG of a game file carries over into completely separate game files with a soft reset in the PlayStation and 2013 Steam versions, and as such you can even use the Dollet Magazines to advance the RNG, soft reset, and open a save file on the Ragnarok on Disc 4. Even Time Compression can’t stop you from getting those perfect rules! If the magazine stack gives you an item like a Card, a Potion, or a Phoenix Down, those interactions still count.
PSX & Steam Manipulation
| ⭐Head’s Up! “Open” needs to be unable to spread before you can actually manipulate other rules, due to the fact that it has a much higher chance of being selected compared to any other rule change. You can spread “Open” to a region before beginning to change the rules in that region, or you can be mindful of Rulesets that have “Open” in them and try to avoid using those region’s Rulesets when changing the rules.
☙All of these methods require a hard-reset before doing anything else!!!!! Since Soft-resets are not an option in the Remastered version, if you’re playing the Remastered version you’ll want to skip ahead to this section. Warning: do not use the Hi-Speed Boost option while performing RNG-based rule manipulation! |
| Rule Change | Procedure
(QoC NOT in region) |
Procedure
(QoC in region) |
| Spread Open |
|
|
| Abolish Random | X Don’t carry Open or Same Wall.
|
X Don’t carry Open or Same Wall.
|
| Abolish Plus | X Don’t carry Same or Same Wall.
|
X Don’t carry Same or Same Wall.
|
| Abolish Same | X Don’t carry Open or Sudden Death.
|
X Don’t carry Open or Sudden Death.
|
| Abolish Sudden Death | X Don’t carry Open or Elemental.
|
X Don’t carry Open or Elemental.
|
| Abolish Elemental |
|
X Don’t carry Plus.
|
| Abolish Same Wall | X Don’t carry Open or Elemental.
|
X Don’t carry Open or Elemental.
|
FFVIII Remastered
| ⭐Head’s Up! “Open” needs to be unable to spread before you can actually manipulate other rules, due to the fact that it has a much higher chance of being selected compared to any other rule change. You can spread “Open” to a region before beginning to change the rules in that region, or you can be mindful of Rulesets that have “Open” in them and try to avoid using those region’s Rulesets when changing the rules. Because the Remastered Version does not allow for Soft Resets, it’s important to use the closest player to both a Save Point and to a Draw Point, Magazine Stack, or other object that can be used to manipulate the RNG. Check the chart to see who to play. Warning: do not use the 3x Speed Boost option while performing RNG-based rule manipulation! |
| Rule Change | Procedure
(QoC NOT in region) |
Procedure
(QoC in region) |
| Spread Open |
|
|
| Abolish Random | X Don’t carry Open or Same Wall.
|
X Don’t carry Open or Same Wall.
|
| Abolish Plus | X Don’t carry Same or Same Wall.
|
X Don’t carry Same or Same Wall.
|
| Abolish Same | X Don’t carry Open or Sudden Death.
|
X Don’t carry Open or Sudden Death.
|
| Abolish Sudden Death | X Don’t carry Open or Elemental.
|
X Don’t carry Open or Elemental.
|
| Abolish Elemental |
|
X Don’t carry Plus.
|
| Abolish Same Wall | X Don’t carry Open or Elemental.
|
X Don’t carry Open or Elemental.
|
Most Convenient places to change the rules (by Disc)
Disc 1
| Region | Save Point | Manipulation Point | Player |
| Balamb | N/A | N/A | Balamb Student at Docks |
| Dollet | Dollet Pub 2f (Equip Move-Find) | Magazine Stacks in Dollet Pub Room 2f | Dollet Pub Owner |
| Galbadia/Timber | Timber Hotel | Rest in the Hotel (interacting with Gatey counts the same as a Draw Point) | Lady by model train (Timber Hotel) |
| Trabia/Shumi Village | Galbadia Garden Main Hall | Galbadia Garden Locker Room | Trabia Exchange Student |
Discs 2 & 3
| Region | Save Point | Manipulation Point | Player |
| Balamb | N/A | N/A | Balamb Student at Docks |
| Dollet | Dollet Pub 2f (Equip Move-Find) | Magazine Stacks in Dollet Pub Room 2f | Dollet Pub Owner |
| Galbadia/Timber | Timber Hotel | Talking to Gatey can be used as you would a Draw Point | Lady by model train (Timber Hotel) |
| Centra | World Map | Curaga Draw Point, Edea’s House bedroom | Edea |
| Trabia/Shumi Village | Shumi Inn | Blizzaga Draw Point in front of the Elder’s house. | Shumi at table outside of Inn |
| FH | Rail Bridge | Regen Draw Point on Rail Bridge or Ultima Draw Point in Mayor’s House. | Mayor Dobe |
| Esthar | World Map | Life Draw Point, Sorceress Memorial exterior | Guard (Main Entrance) |
| Lunar | World Map | Life Draw Point, Sorceress Memorial exterior | Guard (Lunar Gate) |
Disc 4
| Changing the rules on Disc 4 works much the same as in the rest of the game, it just requires some prerequisites. More details on that below! |
Changing the Rules on the Lunar Space Station
So you’re about to go up into Space but you’re worried Sis isn’t gonna play fair? Let’s make sure the card rules are on our side before the Launch without even playing a single game! This should work the same for all versions of the game including the Remastered version as there are no soft resets needed.
⭐Heads Up!
|
After you’ve dropped off sleeping beauty with Odine there’s a ton of running around to do!!
|
Want to try your hand at getting as many of the Face cards as you can before Disc 4? Some you’ll get naturally through the story, but others are harder to get! Here’s a complete list of locations to help!
| Lvl 8 Cards | Location | Lvl 9 Cards | Location | Lvl 10 Cards | Location |
Chubby Chocobo |
Student on bench, Balamb Garden [QoC Quest] | Carbuncle | Queen Heart [CC Group] | Ward | Odine |
| Angelo | Watts | Diablos | Defeat Diablos | Kiros | Man in black in Deling City Shopping Arcade [QoC Quest] |
| Gilgamesh | King [CC Group] OR Defeat Seifer (Disc 3) after having acquired the Odin summon. |
Leviathan | Played by Joker [CC Group] | Laguna | Ellone (Lunar Base only) |
| MiniMog | Young Boy Balamb Garden’s main hallway | Odin | Defeat Odin | Selphie | Selphie’s friend (Trabia Garden) |
| Chicobo | Complete all Chocobo Forest puzzles & visit Sanctuary | Pandemona | Balamb Hotel Owner (Disc 2-3) | Quistis | Any Trepie Groupie (Balamb Garden Cafeteria & Classroom) |
| Quezacotl | Mayor Dobe (FH) | Cerberus | Defeat Cerberus | Irvine | Flo [QoC Quest] |
| Shiva | Give Zone Girl Next Door for free (White SeeD Ship, Disc 3) | Alexander | Piet (Lunar Base/Crash Site) | Zell | Ma Dincht |
| Ifrit | Defeat Ifrit | Phoenix | Esthar’s Presidential Aide [QoC Quest] | Rinoa | General Caraway (must lose Ifrit Card to him first) |
| Siren | Dollet Pub Owner (private room only) | Bahamut | Defeat Bahamut | Edea | Edea |
| Sacred | Defeat Minotaur | Doomtrain | Timber Pub Owner [QoC Quest] | Seifer | Cid |
| Minotaur | Complete the Tomb of the Unknown King | Eden | Defeat Ultima Weapon | Squall | Played by Laguna (Ragnarok, Disc 3, right before Lunatic Pandora) |
Trade Rules on Disc 4
Before you move forward to Disc 4, Trade rules on the Ragnarok can be influenced by the Queen of Cards’ last location and Trade rule. When advancing to Disc 4, you lock in what the “Queen’s Region” and “Queen’s Trade Rule” are, and the player who uses that ruleset will use her trade rule.
If at the end of Disc 3, the Queen is in Balamb with the “All” trade rule, then on Disc 4, Balamb is the “Queen’s Region” and All is the “Queen’s Trade Rule”. By moving the Queen to a region of your choice with the trade rule of your choice before advancing the game past Disc 3, you can give yourself an unchangeable Trade Rule in the Ragnarok. By playing games with that player, you make their region the dominant region, and can spread that rule out to the other CC Group members. If the Queen’s location at the point of no return is Deling City, the trade rule for all CC members will be “One”, as no CC member uses Galbadia’s ruleset. This is the only method for modifying trade rules on Disc 4.
Getting to the Ragnarok on Disc 4
Start by heading through the top portal on the chain. You’ll emerge on the other side on a small beach attached to the giant Grandidi Forest, north of Esthar. You’ll want to equip enc-none before you travel up through the forest.
Zoom way out and head north until you find the Chocobo Sanctuary, a bubble-shaped forest protruding from the rest of the forest. (There are different Chocobo forests you can use to get to the Ragnarok on Disc 4, but unless you’ve done the puzzle there, you’ll need to pay Chocoboy or catch a Chocobo).
Even if you’ve never set foot in a Chocobo Forest, the Chocobo Sanctuary will have a free Chocobo waiting for you, no puzzle needed!
Ride your new friend all the way down the East coast of Esthar and around to the south of Centra. Along the southern edge of the Centra continent, you’ll find a beach along a mountain ridge. Look closely to find the narrow pass between the mountains and make your way to the flashing red dot on your full-screen map. There’s a portal nearby— head through it before boarding the ship if you’d like to make a fourth portal along Ultimecia‘s chain.
Once inside the ship, as long as you completed the CC Group Quest, Xu & the CC Members will greet you, ready to play cards until the end of time itself! Thankfully it’s not like we’ve got to save the universe or anything important like that, so we’ve got plenty of time to build our card collection up!
Changing the rules on the ship on Disc 4 relies entirely on one draw point, found in the room under the stairs with the Save Point. If you like, equip Move-Find to make the draw point easier to locate.
Each player has a regional Ruleset as shown in the table below. Using the charts above, even if you have never changed the rules throughout your entire play-through, there should be no trouble running between players and manipulating the rules.
The CC Group Members will ask for you to “wait a moment” while they pick their cards. This “shuffle” checks all Face cards that you do not currently have in your inventory and deals one of them to the CC Group member you are playing (they are not guaranteed to play it, but it is very likely). If a card has been shuffled to a player and you don’t win it. they will tend to play the card they have revealed to you despite the “shuffle” dialogue coming up. If you play a different member, that card can be “shuffled” to them, but playing the same CC Group member over and over will not “unshuffle” the card and deal them a new Face card.
For example, with seven Face cards to choose from, each player tends to have a card shuffled to them with no repeats (except for with Right Diamond occasionally playing Left Diamond’s revealed card, see below) and with subsequent losses, the cards stayed with those players. The same was true when playing others, so long as there were “unshuffled” cards. Once there were fewer Face cards than players, playing a different CC Group member resulted in that member being forced to “take” an already shuffled card for lack of cards that had not already been shuffled in.
Cards only available through Left Diamond✧:
|
✧These cards are also winnable by playing the Queen of Cards who is located at the Lunar Escape Pod during Time Compression on Disc 4, although in addition to her terrible rules, she only has one copy of each card, In contrast, the CC Group members will play multiple copies of Face Cards you have won previously and refined, so long as the cards are not in your inventory. Additionally, if one of these five cards is shuffled to Left Diamond but not won from her, Right Diamond will be able to (and is very likely to) play the card after.
Cards available through all CC members including Left Diamond:
|
|
CC Group Members on the Ragnarok
| Member | Card Levels | Region | Base Rules | Location |
| Jack | 3, 4, 6 | Balamb | Open | Storage |
| Joker | 1, 2, 3, 6, 7 | Centra | Same, Plus, Random | Elevator Room |
| Club | 3, 5, 6 | Dollet | Elemental, Random | Aisle (upper level) |
| Diamond✧ | 3, 4, 5, 7 | Trabia | Random, Plus | Hangar |
| Spade | 1, 2, 3, 6, 7 | Esthar | Elemental (Hidden Rule: Same Wall) | Aisle (lower level) |
| Heart | 3, 5, 6, 7 | FH | Elemental, Sudden Death | Entrance |
| King | 1, 2, 3, 4, 5, 6, 7 | Lunar | Open, Elemental, Same, Same Wall, Plus, Random, Sudden Death | Air Room (Quistis must be in your party) |
✧Left Diamond (that is, the Diamond girl on the left with short hair) is an exception to the normal rules. She can play any Face Card so long as it’s not in your inventory (with the exception of the PuPu card) even those only the Queen can normally play. She ignores the shuffle process entirely (even though she still pauses like all the other players do, as if she is shuffling), playing the first Face Card missing from your list. She is not guaranteed to play a Face Card, but the probability is extremely high. If you Refine the last Face Card won from her, she will play that card again next, making her ideal for farming multiples of specific cards. In all other respects (Region, Common Cards, etc.), the Diamond Duo are the same. Right Diamond (the girl on the right with the ponytail) is the same as any other CC Group member in terms of mechanics.
The AREA indicator in the Card menu shows some weird locations when on the Ragnarok (I blame Time Compression) but if you couldn’t win a card last time you played and have since forgotten who has it, you might be able to figure that out (and save yourself some time) by checking.
| AREA “location” | What it Means |
| Used Up | Refined & Unshuffled |
| B-Garden- Hall | Jack or the Diamond Duo |
| B-Garden- 2f Hallway | Spade |
| B-Garden- Headmaster’s Office | Joker or Queen |
| B-Garden- Dormitory Single | King |
| Queen | Queen of Cards |