Talismans are must-have accessories in Elden Ring. They have a wide selection of long-lasting buffs, which is enough to help you in any challenge. Learn about which ones might be most suitable for your playstyle.
Table Of Contents
What Is a Talisman?
A Talisman is a utility accessory that gives you either a buff or debuff on the following: Main Attributes, Offense Stats, Defense Stats, and Equipment Stats. Even better, they do not have a time limit, and you can trade them with other Tarnished.
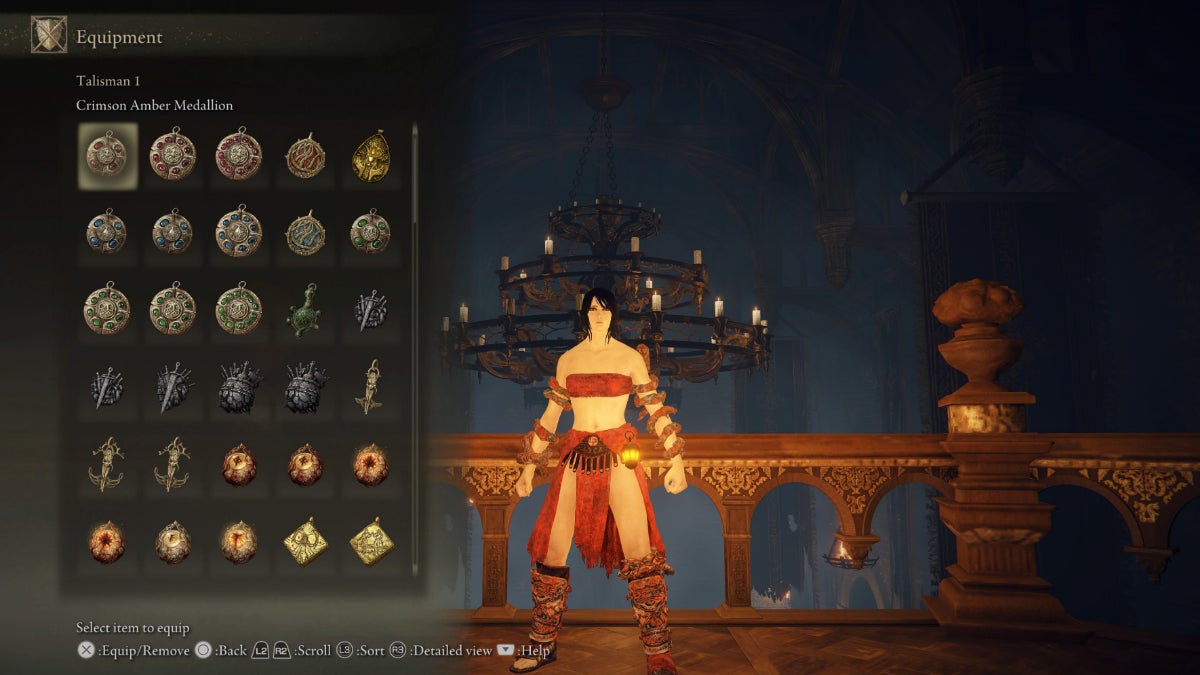
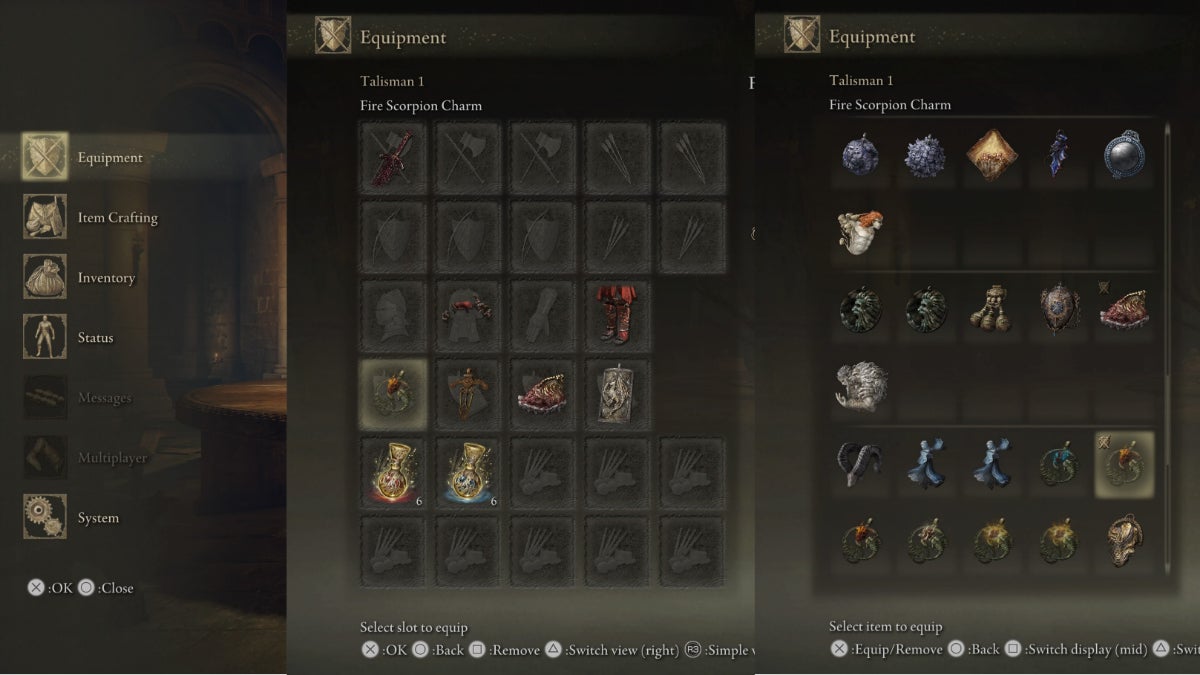
How to Use a Talisman
Currently, there are 117 Talismans in Elden Ring. Only a combination of up to four Talismans can be used at a time. To use a Talisman, follow these steps:
- Open your Inventory
- Select ‘Equipment’
- Go to the fourth row, where the Talisman Slots are
- Select a Talisman Slot
- Select one Talisman to use
How to Get More Talisman Pouches
In the beginning, you will only have one Talisman Slot. You will need to get a Talisman Pouch to add another slot. There are three more Talisman Pouches to find in the Lands Between.
| Talisman | Boss / Source | Location |
|---|---|---|
| First | Margit, the Fell Omen | Castleward Tunnel, Stomhill in Limgrave. |
| Alternative: Morgott, the Omen King | Elden Throne at Leyndell, Royal Capital. | |
| Second | Finger Reader Enia (after getting two Great Runes) | Two Fingers' Room, Roundtable Hold. |
| Twin Maiden Husks (If missed from Enia) | West Hallway, Roundtable Hold. | |
| Third | Godfrey, First Elden Lord | Erdtree Sanctuary at Leyndell, Royal Capital. |
Achievement: Legendary Talismans
You must find eight Legendary Talismans scattered in the Lands Between to get the Legendary Talismans achievement. The following list is sorted by game progression and level range for each region.
| Stage | Level | Talisman | Region |
|---|---|---|---|
| Early Game | 30+ | Liurnia of the Lakes | |
| 45+ | Caelid | ||
| Mid Game | 65+ | Altus Plateau | |
| 65+ | Nokstella | ||
| Late Game | 110+ | Crumbling Farum Azula | |
| 120+ | Leyndell, Ashen Capital | ||
| 125+ | Elphael's Brace of the Haligtree | ||
| 125+ | Elphael's Brace of the Haligtree |
Every Talisman in Limgrave
There are 14 Talismans in Limgrave.
Note that all the following Talismans throughout this article will be listed in order from easiest to most difficult to obtain in each region.
| Talisman | Map Location | |
|---|---|---|
| 1 | 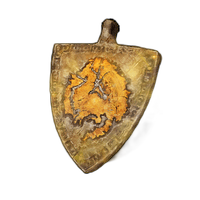 Haligdrake Talisman Haligdrake Talisman | Stranded Graveyard. |
| 2 |  Arrow's Reach Arrow's Reach | Left tower of Stormgate. |
| 3 |  Axe Talisman Axe Talisman | Mistwood Ruins. |
| 4 |  Warrior Jar Shard Warrior Jar Shard | Near Saintbridge. |
| 5 |  Lance Talisman Lance Talisman | Northeast of Deathtouched Catacombs. |
| 6 | 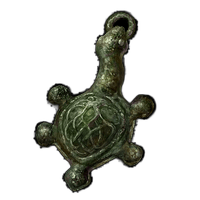 Green Turtle Talisman Green Turtle Talisman | Summonwater Village. |
| 7 | 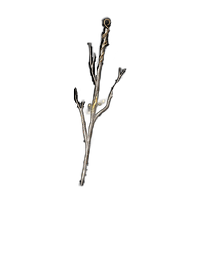 Sacrificial Twig Sacrificial Twig | Murkwater Cave. |
| 8 | 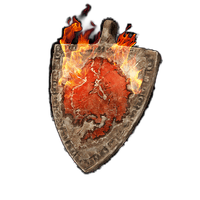 Flamedrake Talisman Flamedrake Talisman | Groveside Cave. |
| 9 |  Roar Medallion Roar Medallion | Limgrave Tunnel. |
| 10 |  Blue Dancer Charm Blue Dancer Charm | Highroad Cave. |
| 11 |  Hammer Talisman Hammer Talisman | NPC invader in Limgrave Coliseum. |
| 12 |  Assassin's Crimson Dagger Assassin's Crimson Dagger | Deathtouched Catacombs. |
| 13 |  Blue-Feather Branchsword Blue-Feather Branchsword | Deathrite Bird, southeast of Warmaster's Shack. |
| 14 |  Erdtree's Favor Erdtree's Favor | Fringefolk Hero's Grave. |
Haligdrake Talisman

| Effect | Variation |
|---|---|
| +13% Holy Damage Negation (+4% only in PVP) | ‣ Haligdrake Talisman +1 ‣ Haligdrake Talisman +2 |
Seaside Ruins Grace — Head to the cliff near a stone with two Land Octopuses. Summon Torrent and jump down on a nearby Spirit Spring. Beware of the Lesser Alabaster Lord camping under a ruin. Make your way to the back entrance of the Cave of Knowledge. Go into the cave to find the Haligdrake Talisman on an overhanging corpse.
Arrow’s Reach Talisman
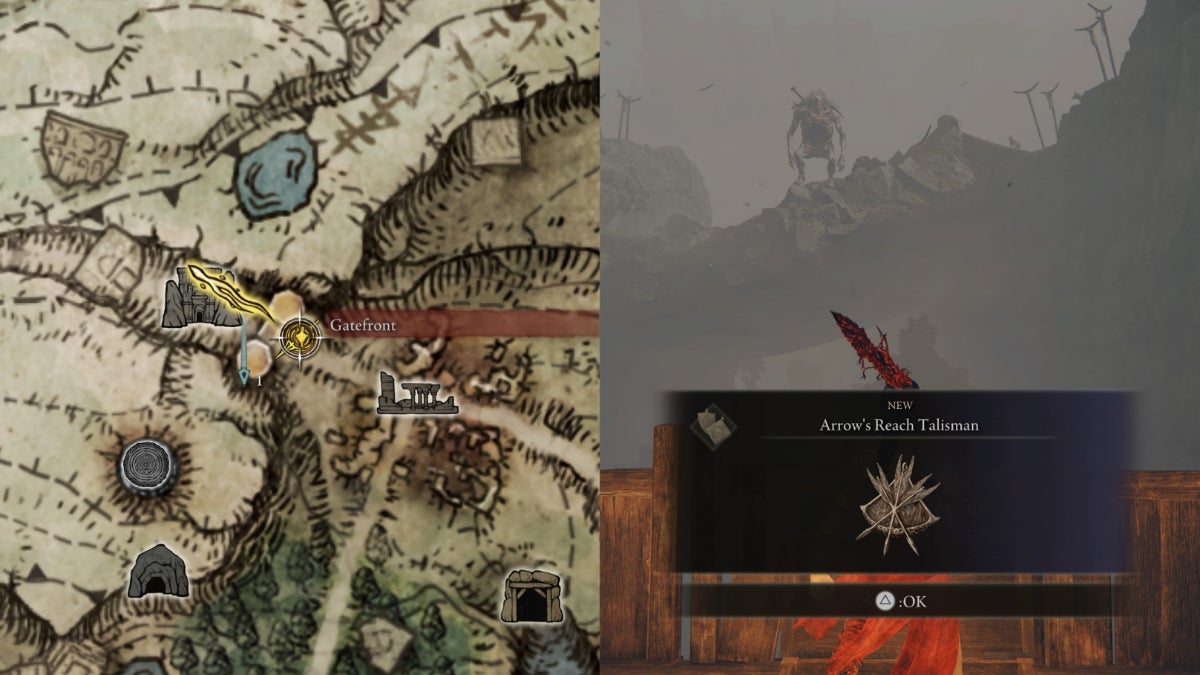
| Effect | Note |
|---|---|
| An estimated +30% range increase on bows, spells, and projectiles | Affected Items: ‣ All Bow variants ‣ Rock Sling ‣ Bestial Sling ‣ Ambush Shard ‣ Great Oracular Bubble ‣ Throwables ‣ Ash of War: Spectral Lance |
Gatefront Grace — Go through the Stormgate past the enemies. Upon spotting an Erdtree Branch, head for the Stormgate’s left watchtower near the cliff. Beware of the Kaiden Sellsword and Godrick Soldiers within. You’ll find the Arrow’s Reach Talisman in the chest.
Axe Talisman
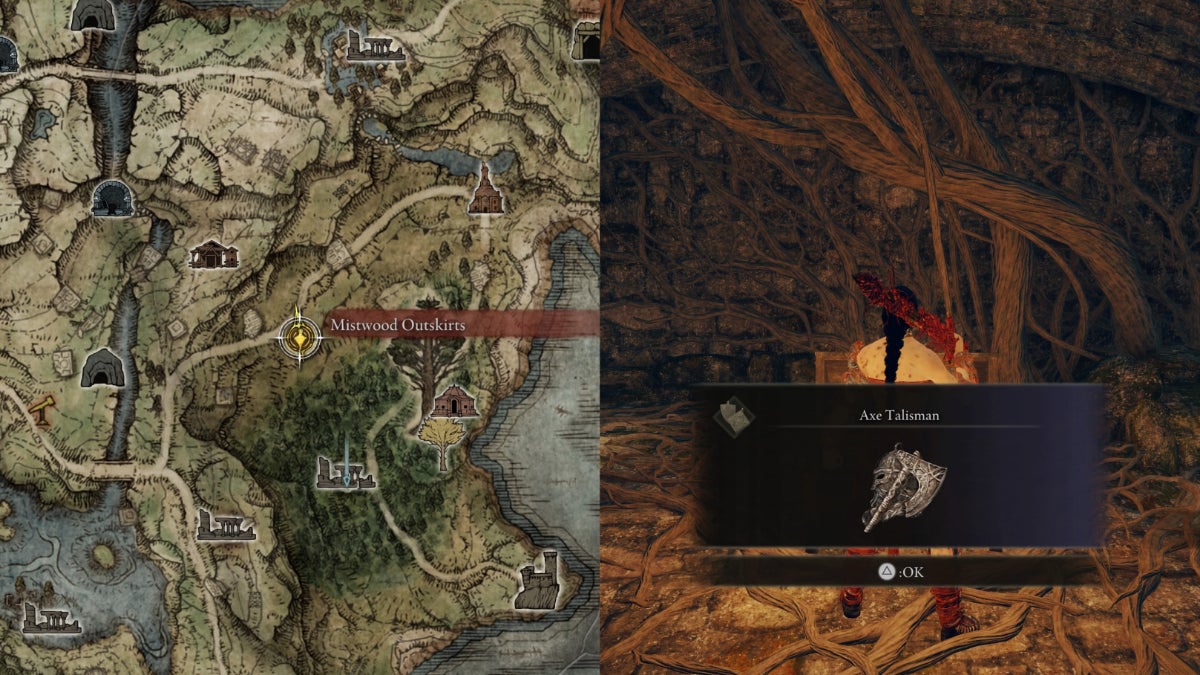
| Effect | Charge Attack |
|---|---|
| +10% Charge Attack Damage | A Charge Attack is when you do a Strong Attack with your weapon. These are the following buttons to hold longer: ‣ PS4/5 - R2 ‣ Xbox - RT ‣ PC - Shift + Left Mouse Button |
Mistwood Outskirts Grace — Make your way to the Mistwood Ruins. You’ll find a Lesser Runebear sleeping by the stairs. Go down to the cellar to find the Axe Talisman in the chest.
Warrior Jar Shard

| Effect | Variation |
|---|---|
| +10% Weapon Skills DPS | Shard of Alexander |
Warmaster’s Shack Grace — Go past a Godrick Soldier Camp. Seek a pathway before the Saintbridge. Hear out Iron Fist Alexander’s cry for help. When he’s unstuck, you’ll have the opportunity to kill him for the Warrior Jar Shard. But beware, he’s a tank.
Tip: Follow his questline to get a better variation of the Talisman.
Lance Talisman
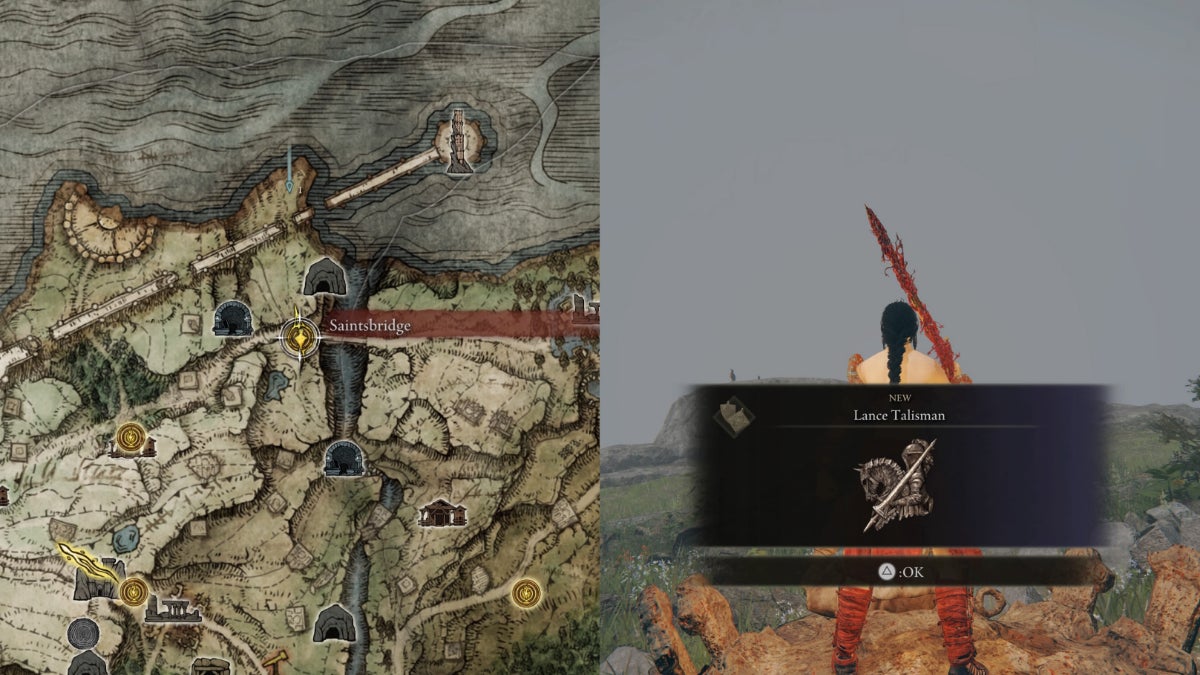
| Effect | Note |
|---|---|
| +10% Attack Damage on horseback | Ineffective on the following: ‣ Spells ‣ Bows |
Saintbridge Grace — Make your way back to the Godrick Soldier Camp. Seek an ascending pathway towards the hill. Go towards the northwestern tip of the hill, beyond the Limgrave Tower Bridge pillars. Beware of the Guardian Golem nearby. The Lance Talisman is on a corpse behind a bush.
Green Turtle Talisman
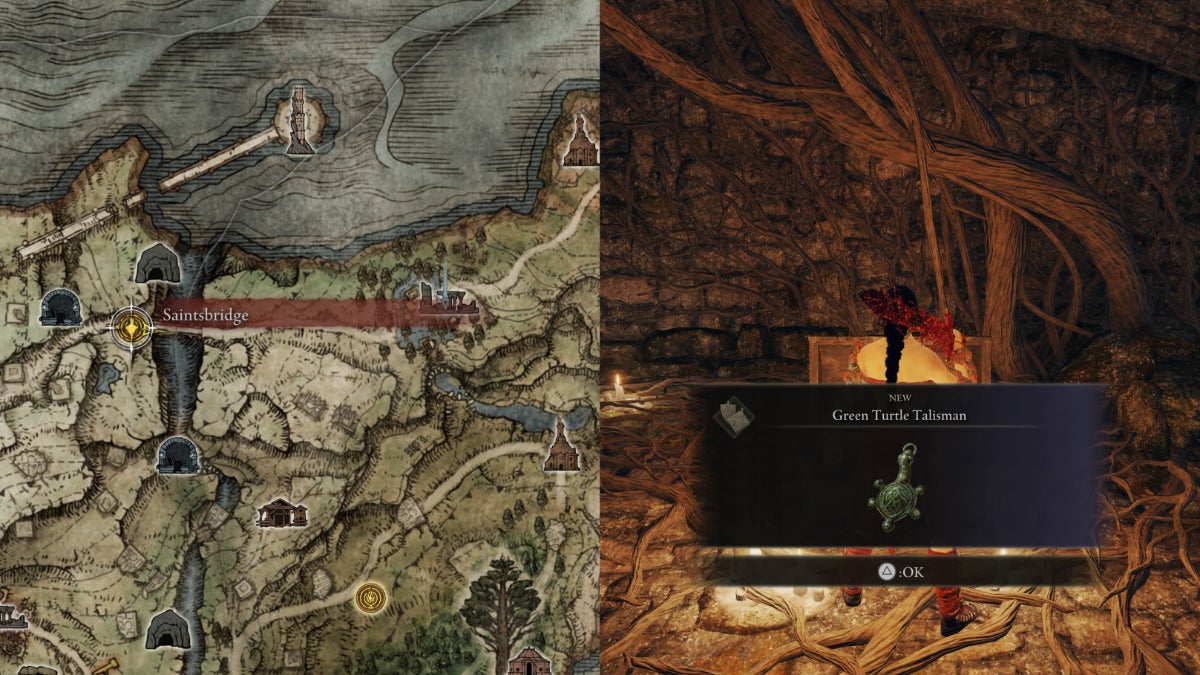
| Effect | Note |
|---|---|
| +17.7% Stamina Recovery Speed | Stack with the following: ‣ Green Turtle Shell ‣ Picked Turtle Neck |
Saintbridge Grace — Cross the bridge towards the Summonwater Village. Go to the eastern part of the ruins where you’ll find Turtles surrounding an Imp-Sealed cellar. Use a Stonesword key to unlock it. You’ll find the Green Turtle Talisman in the chest.
Tip: Pick up the Stonesword Key from the Stormhill Shack.
Sacrificial Twig
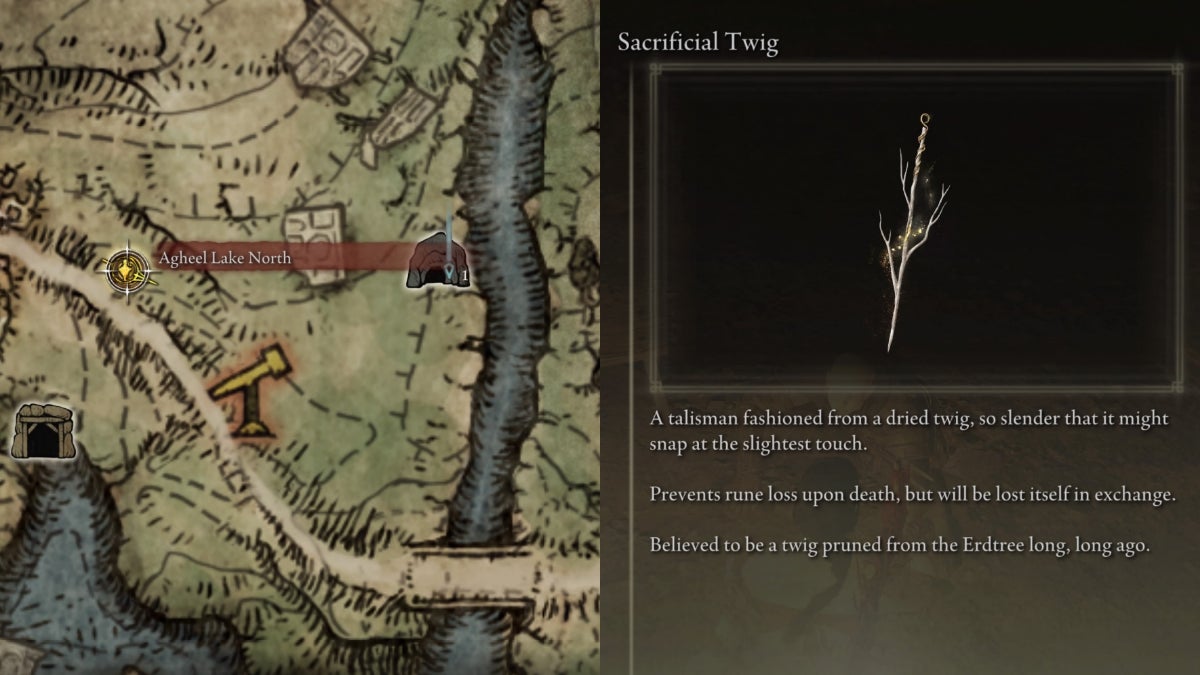
| Effect | Note |
|---|---|
| ‣ Prevents rune loss upon death ‣ Can only be used once | Alternative Source: Isolated Merchant in the Weeping Peninsula |
Agheel Lake North Grace — Go down to Agheel Lake, and seek the bridge where you’ll find Skeletal Militiamen Stick to the left until you notice a cave entrance. Make your way into a cavern with a campfire. Open the chest and grab the armor set to provoke Patches.
Get his health bar down to 50%. Stop fighting when he surrenders. Exhaust his lines, then rest at the Murkwater Cave grace site. Talk to him again to buy the Sacrificial Twig.
Tip: You’ll get invaded by Bloody Finger Nerijus. Try to stay alive until Yura comes to your rescue.
Flamedrake Talisman
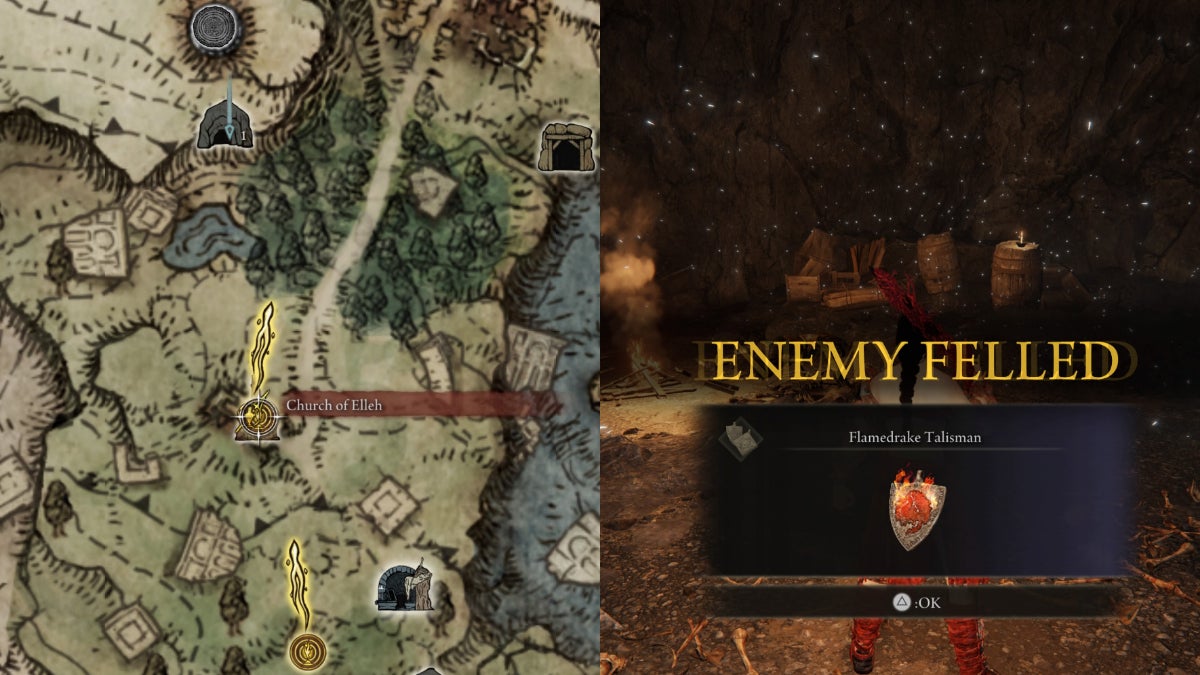
| Effect | Variation |
|---|---|
| +13% Flame Damage Negation (+4% only in PVP) | ‣ Flamedrake Talisman +1 ‣ Flamedrake Talisman +2 |
Church of Elleh Grace — Follow the path towards the middle of the forest. On the left side, a Godrick Soldier is kneeling near a campfire. Go northwest from here to find Godrick Soldier investigating near the Groveside Cave entrance. Find the Beastman of Farum Azula in the cave. Defeat him to get the Flamedrake Talisman.
Roar Medallion

| Effect | Note |
|---|---|
| +15% Roar and Breath Attack Damage | Stacks with the following: ‣ Spiked Crystal Tear ‣ Axe Talisman |
Agheel Lake North Grace — Go down to Agheel Lake. Turn right, and make your way to the Limgrave Tunnel. When taking the first lift down in the tunnel, seek a pathway with a campfire and a Stake of Marika. You’ll need to take another lift down to find the Stonedigger Troll. Defeat him to get the Roar Medallion.
Blue Dancer Charm
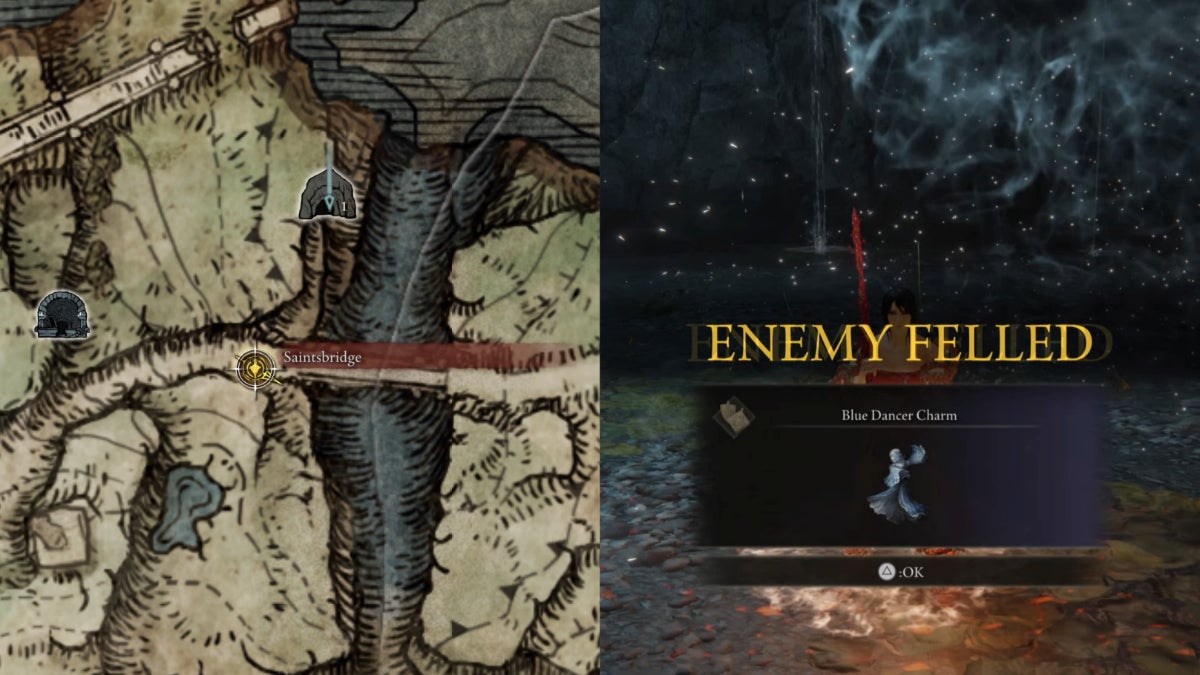
| Effect | Note |
|---|---|
| Increases Physical Damage Bonus with Light Equipment Load, with the following soft caps: 8, 16, and 20 | Affected items: ‣ Light Weapons ‣ Low-level Weapons ‣ Bow Damage |
Saintbridge Grace — Summon Torrent and jump on a nearby Spirit Spring on the right side of the bridge. Beyond the third Giant, Land Octopus is the Highroad Cave entrance. When in a cavern with two waterfalls, go behind the right waterfall. Defeat the Guardian Golem to get the Blue Dancer Charm.
Hammer Talisman
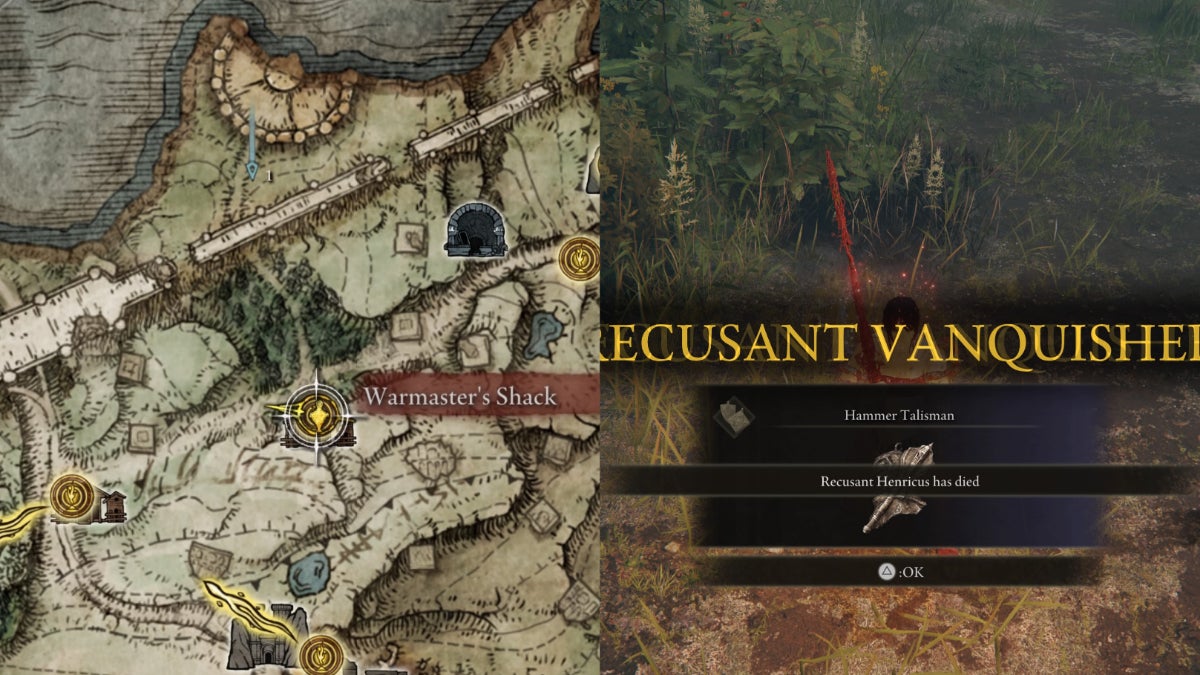
| Effect | Note |
|---|---|
| +20% Stamina Damage against blocking enemies | Only works against enemies blocking your attacks with their shield |
Warmaster’s Shack Grace — Go straight to the Limgrave Coliseum. When you get closer to the coliseum doors, Recusant Henricus will invade you. Defeat him to get the Hammer Talisman.
Assassin’s Crimson Dagger
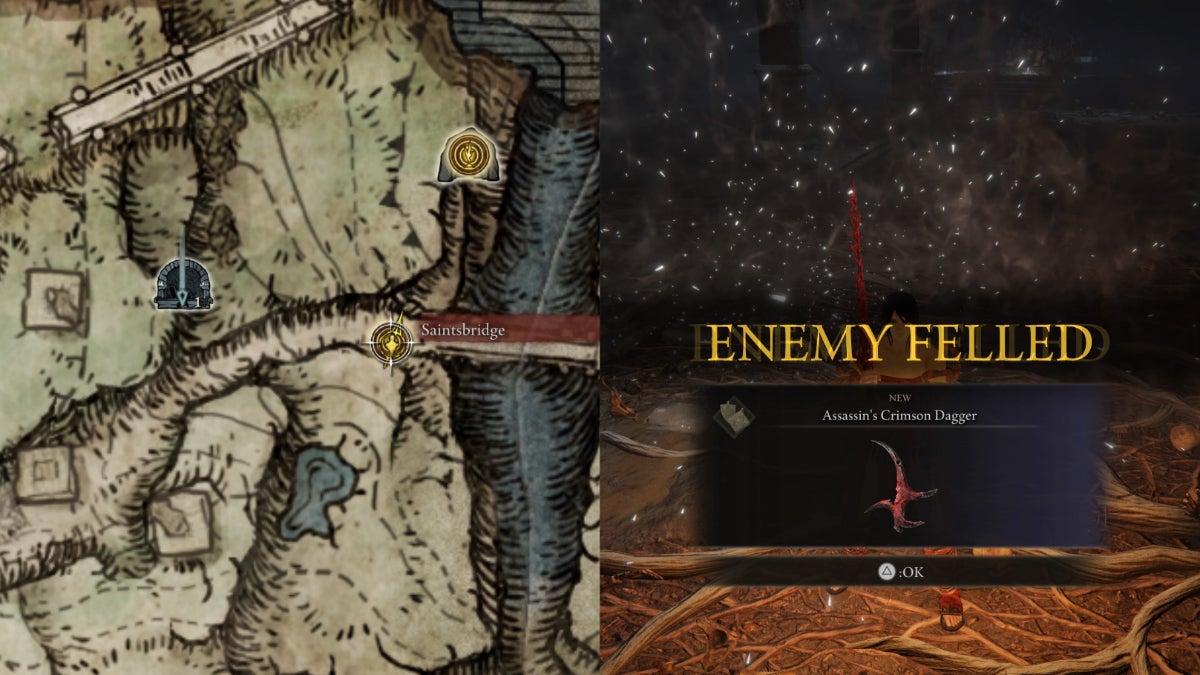
| Effect | Note |
|---|---|
| Critical Attack restores HP (10% of Total HP + 85 HP) | Great in the following situations: ‣ Using Poise-Breaking Weapons ‣ Parrying enemies |
Saintbridge Grace — Turn back towards the Godrick Soldier Camp. Jump up on the stones to your left to find the Deathtouched Catacombs entrance. Find the lever to unlock the chamber of the Black Knife Assassin. Defeat her to get the Assassin’s Crimson Dagger.
Blue-Feathered Branchsword
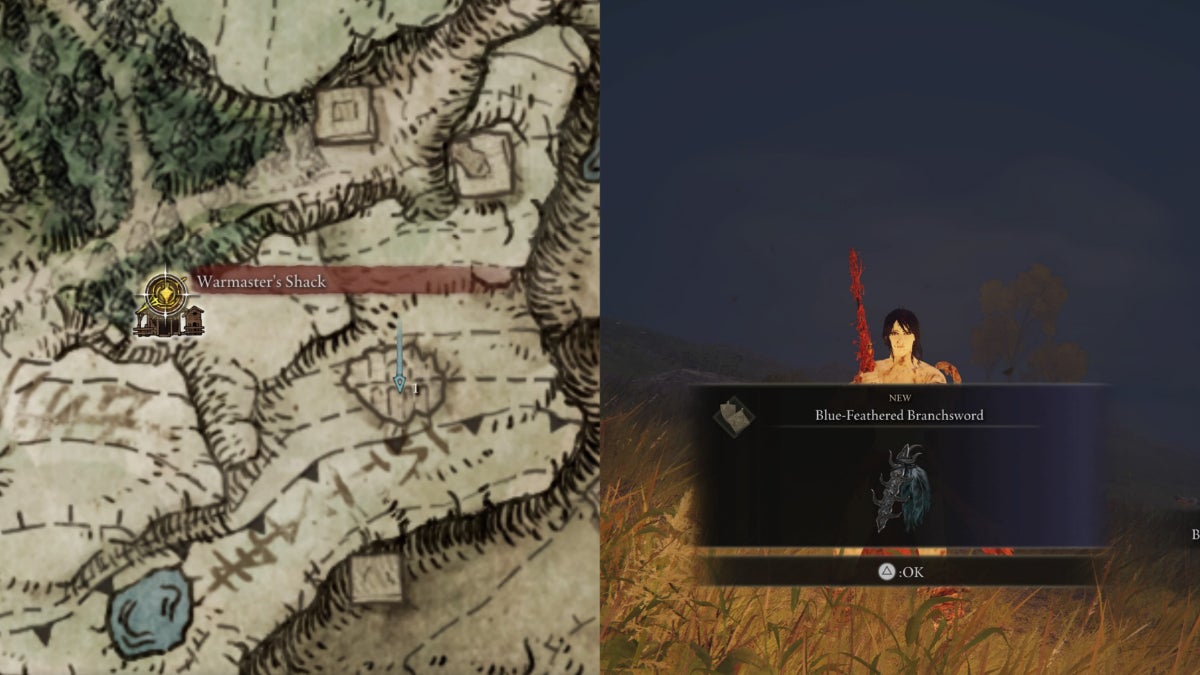
| Effect | Note |
|---|---|
| +50% Damage Negation when HP is below 20% | Stacks with the following: ‣ Red-Feathered Branchsword ‣ Twinbird Kite Shield |
Warmaster’s Shack Grace — Pass the time until Nightfall. Go to the coliseum ruin southeast of the shack, where the Stonedigger Trolls are. The Deathbird will jump down towards you. Kill it to get the Blue-Feathered Branchsword.
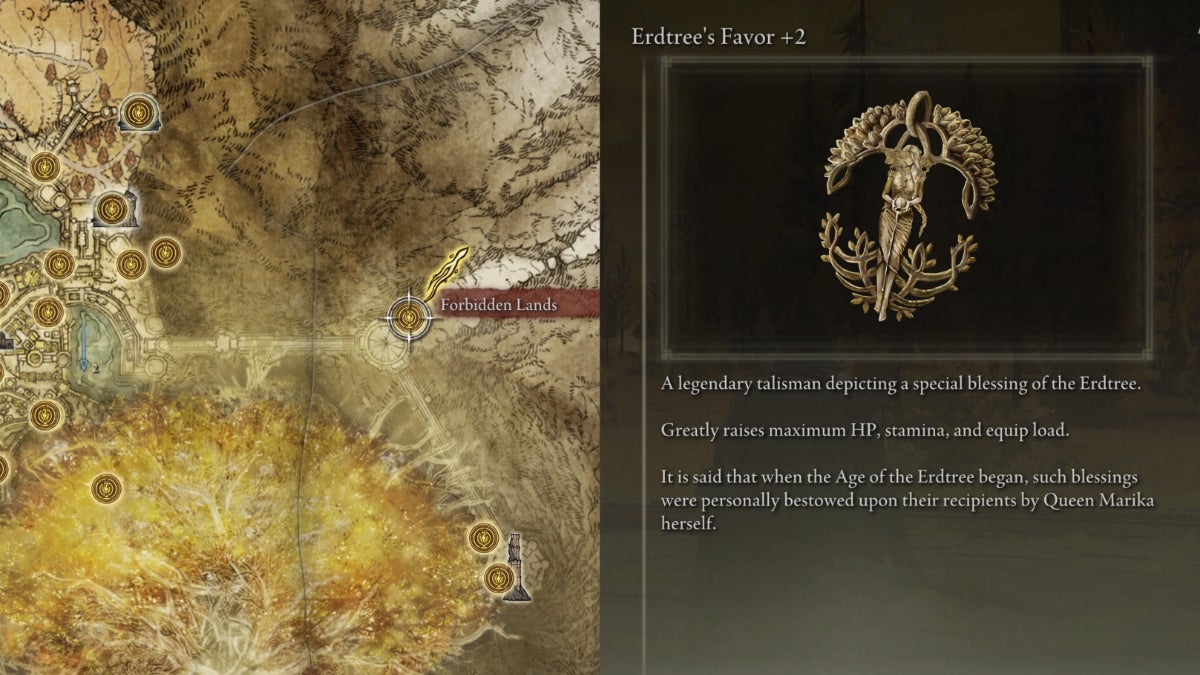
Erdtree’s Favor
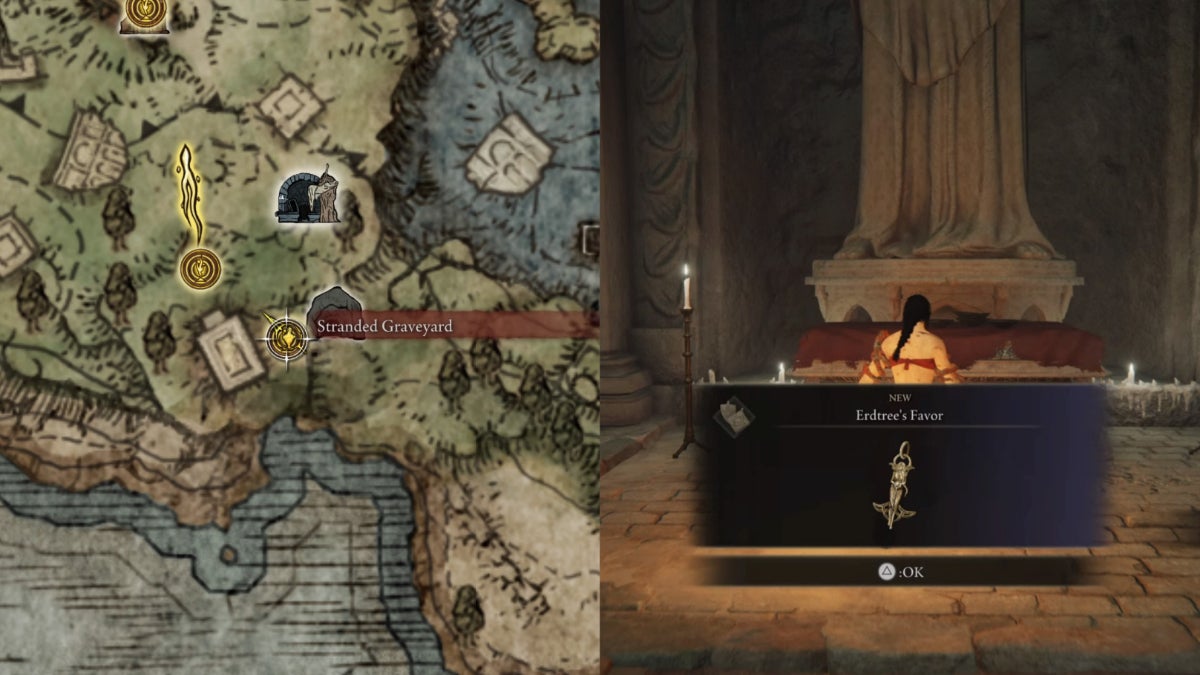
| Effect | Variation |
|---|---|
| +3% HP, +6.75% Stamina, and +5% Equip Load | ‣ Erdtree's Favor +1 ‣ Erdtree's Favor +2 |
Stranded Graveyard Grace — Use two Stonesword Keys to unlock the Imp-Sealed Fringefolk Hero’s Grave. Beware of the Chariot patrolling the corridors. Make your way to the second slope, and there’s a corpse on the narrow bridge. Jump down by the edge.
Beware of the Fanged Imps. Go down the stairs, but avoid the pillar’s fire breath. Behind the pillar is a doorway towards a hall where you can find the Erdtree’s Favor at the base of the statue. Beware of the Revenants.
Tips:
- To get two Stonesword Keys: Buy from Patches or the Isolated Merchant in the Weeping Peninsula
- Defeat Margit, the Fell Omen at Stormhill to get access to the Roundtable Hold for more Stonesword Keys.
Every Talisman in Weeping Peninsula
There are six Talismans in the Weeping Peninsula.
| Talisman | Map Location | |
|---|---|---|
| 1 |  Crimson Amber Medallion Crimson Amber Medallion | Nomadic Merchant |
| 2 | Sacrificial Twig | Isolated Merchant |
| 3 | 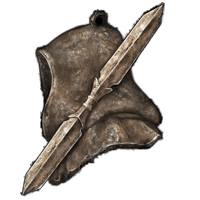 Twinblade Talisman Twinblade Talisman | Castle Morne |
| 4 | 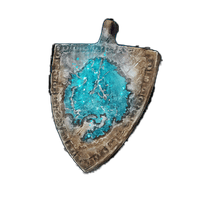 Spelldrake Talisman Spelldrake Talisman | Earthbore Cave |
| 5 | 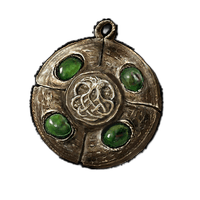 Viridian Amber Medallion Viridian Amber Medallion | Tombsward Cave |
| 6 |  Radagon's Scarseal Radagon's Scarseal | Weeping Evergaol |
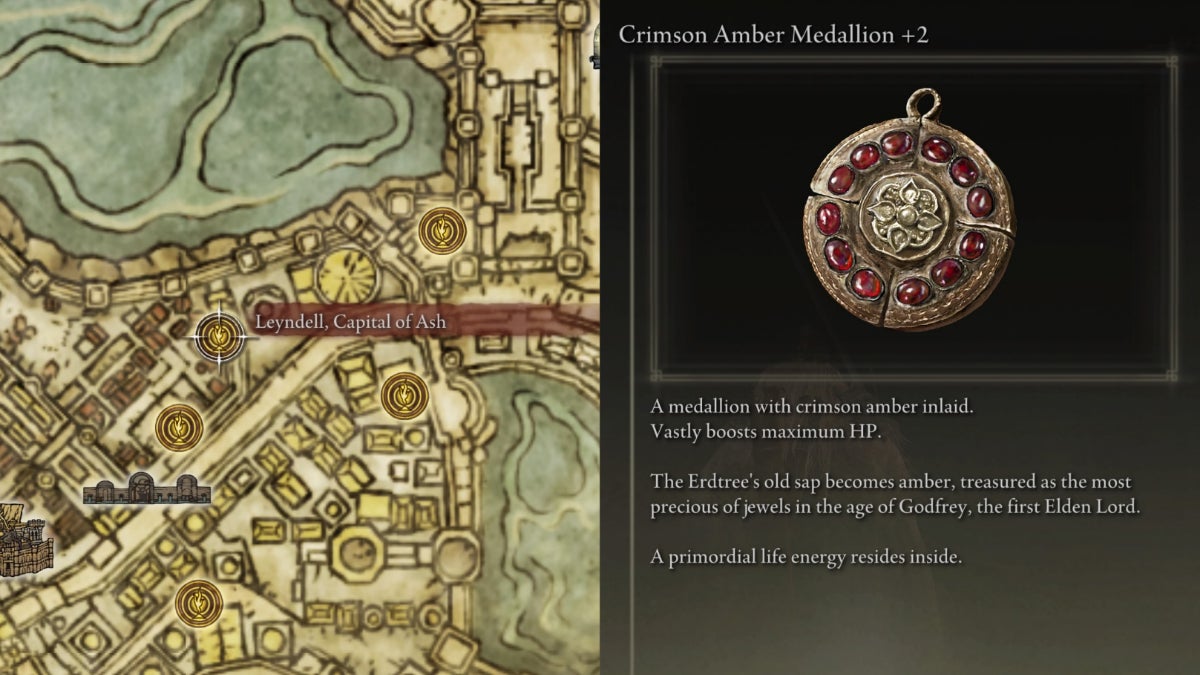
Crimson Amber Medallion

| Effect | Variation |
|---|---|
| +6% of Max HP | ‣ Crimson Amber Medallion +1 ‣ Crimson Amber Medallion +2 |
Bridge of Sacrifice Grace — Follow the pathway towards Castle Morne. Upon getting closer to the outer wall, seek the Nomadic Merchant on the left side. Purchase the Crimson Amber Medallion from him for 1,500 Runes.
Sacrificial Twig
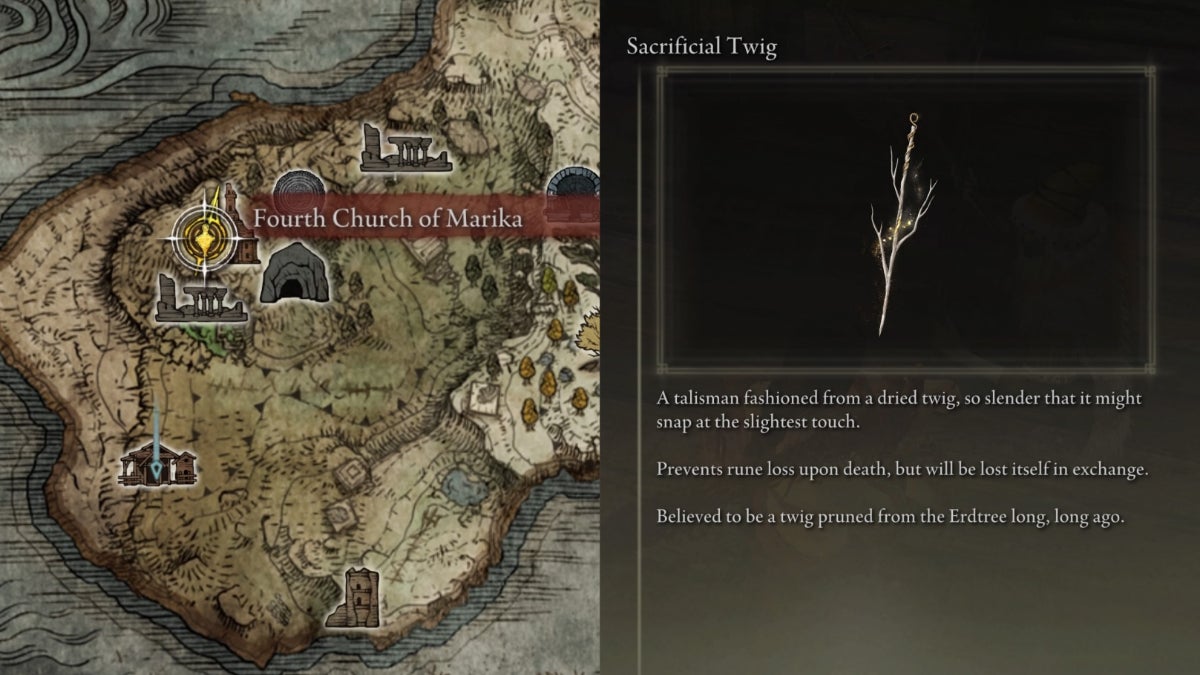
| Effect | Note |
|---|---|
| ‣ Prevents rune loss upon death ‣ Can only be used once | Alternative source: Patches |
Fourth Church of Marika Grace — Go down from the cliff towards the seashore. Seek the Isolated Merchant inside a lone shack for the Sacrificial Twig.
Twinblade Talisman
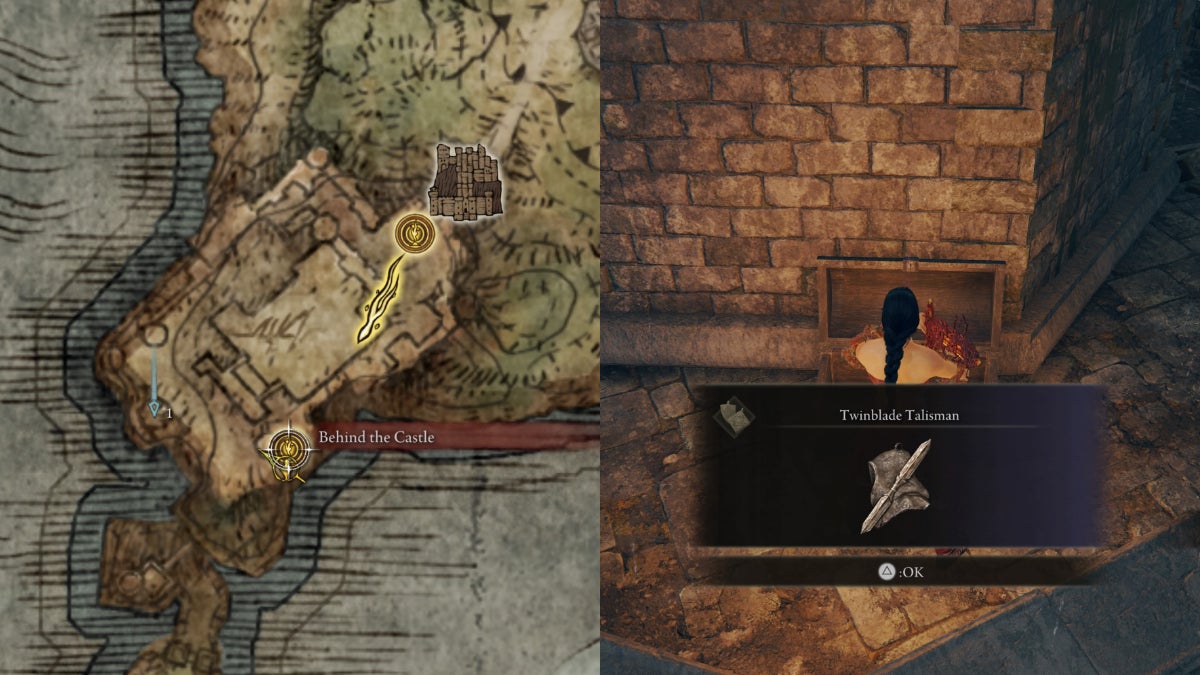
| Effect | Note |
|---|---|
| +20% Final Hit Damage in an Attack Chain | ‣ Great with Daggers and Colossal Weapons ‣ Stacks with Winged Sword Insignia |
Behind the Castle Grace — Jump down to the rampart. Seek a tower on the right, beyond the bridge. Beware of the Misbegotten guarding the ladder. Climb up, and turn right to find the Twinblade Talisman in the chest.
Spelldrake Talisman
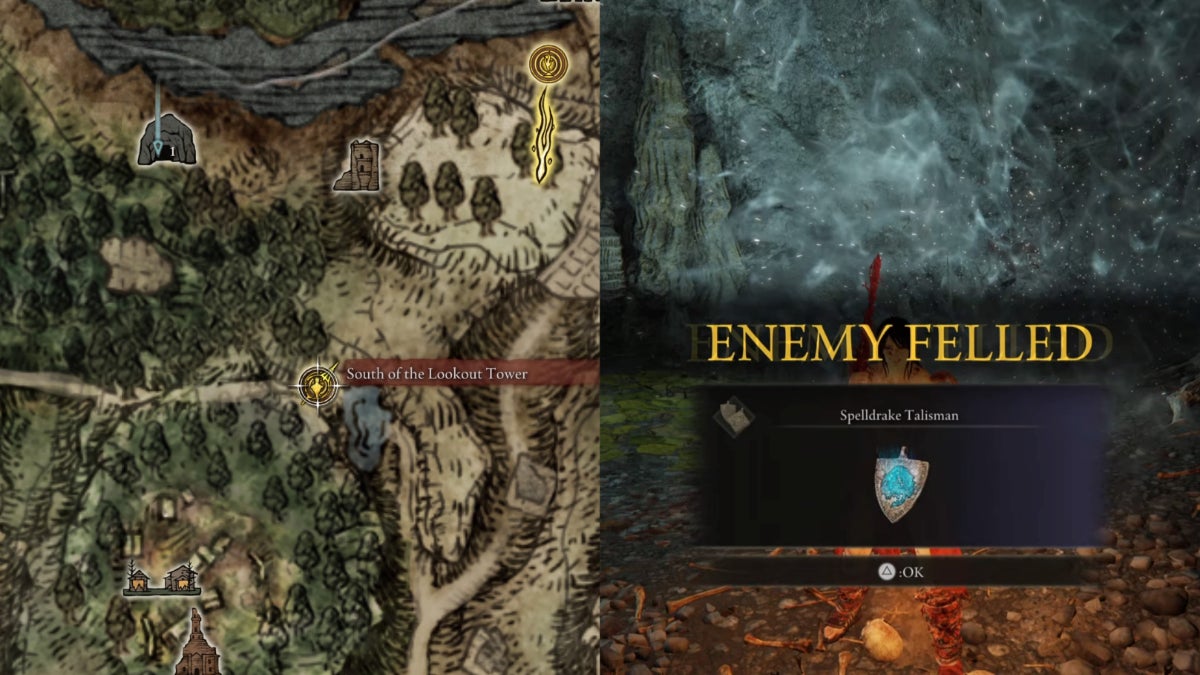
| Effect | Variation |
|---|---|
| +13% Magic Resistance (+4% only in PVP) | ‣ Spelldrake Talisman +1 ‣ Spelldrake Talisman +2 |
South of the Lookout Tower Grace — Go north, jump down from the cliff. Get closer to the river to find a pathway leading to the Earthbore Cave. When in the Earthbore Cave, go towards the chest. You’ll fall to a cavern with Giant Rats. From there, find the cavern where a Runebear is resting. Defeat it to get the Spelldrake Talisman.
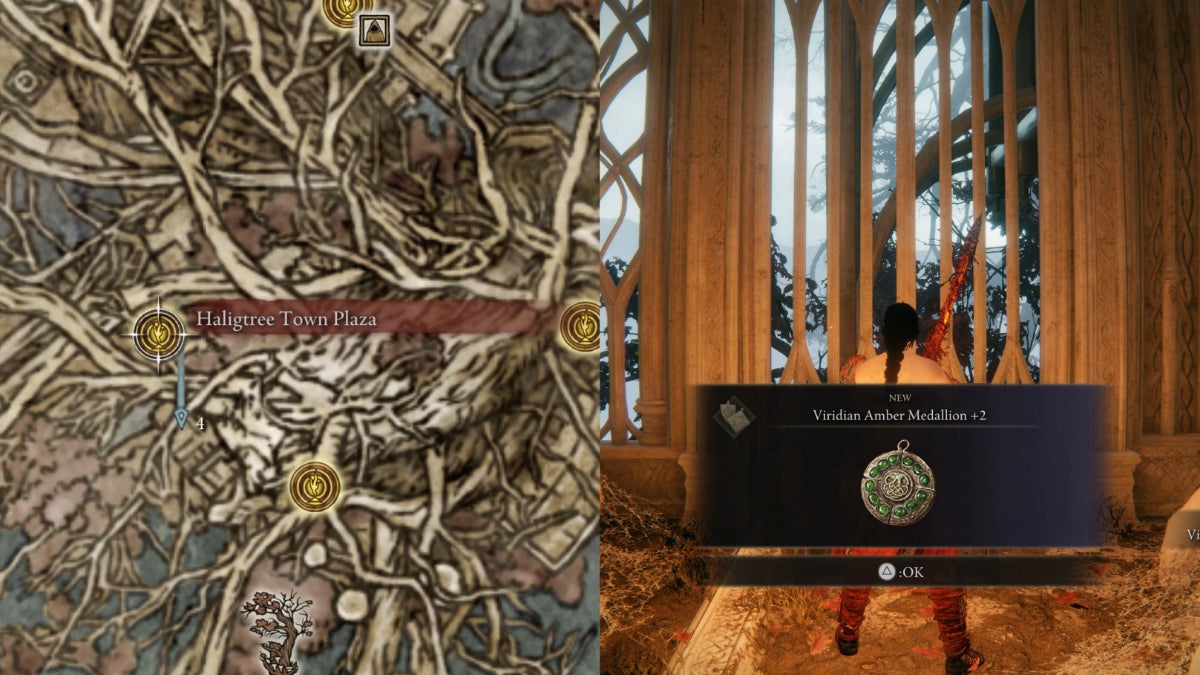
Viridian Amber Medallion
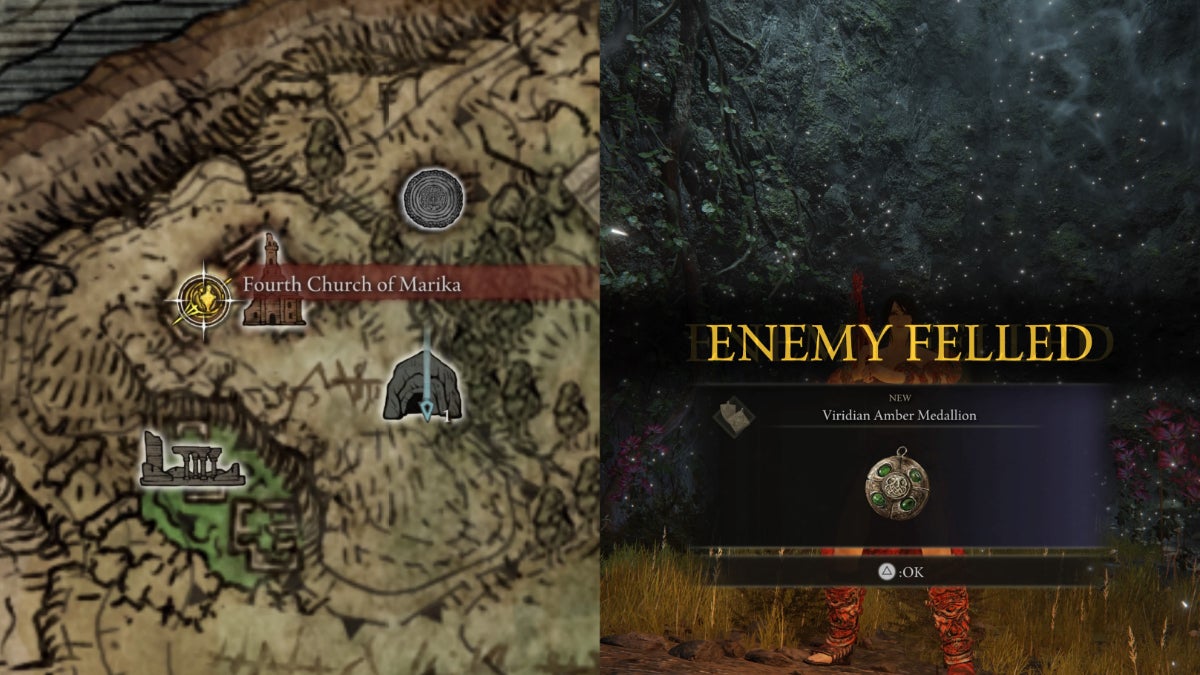
| Effect | Variation |
|---|---|
| +11% of Max Stamina | ‣ Viridian Amber Medallion +1 ‣ Viridian Amber Medallion +2 |
Fourth Church of Marika Grace — Go to the eastern side of the church. Find a ledge, a little south of the Weeping Evergaol to find the Tombsward Cave entrance. Make your way to Miranda the Blighted Blossom. She’ll be in a very small cavern along with Miranda Sprouts. Defeat her to get the Viridian Amber Medallion.
Tip: Prepare Neutralizing Boluses (for Poison Cure).
Radagon’s Scarseal
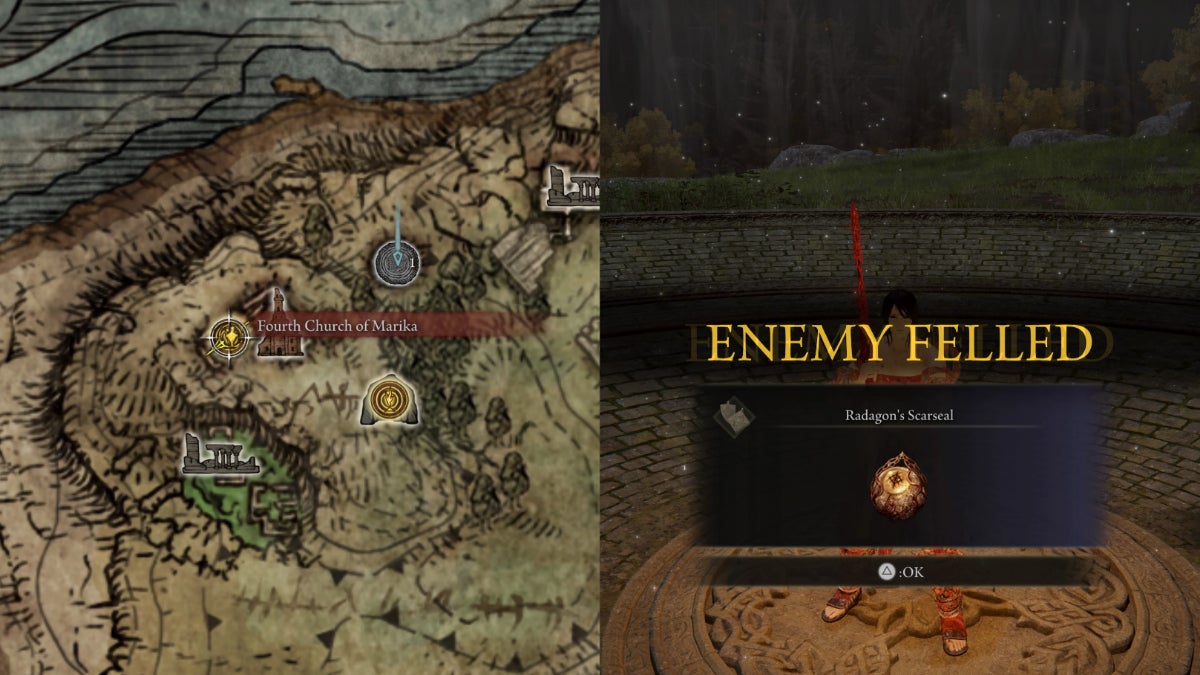
| Effect | Variation |
|---|---|
| ‣ +3 Vigor, Endurance, Strength and Dexterity ‣ -10% Damage Negation | Radagon's Soreseal |
Fourth Church of Marika Grace — Go down to the eastern side of the church. Unlock the Imp-Sealed Weeping Evergaol using one Stonesword key. Touch the now-glowing seal. Kill the Ancient Hero of Zamor to get Radagon’s Scarseal.
Tip: You can purchase a cheaper Stonesword Key from the Isolated Merchant in the Weeping Peninsula.
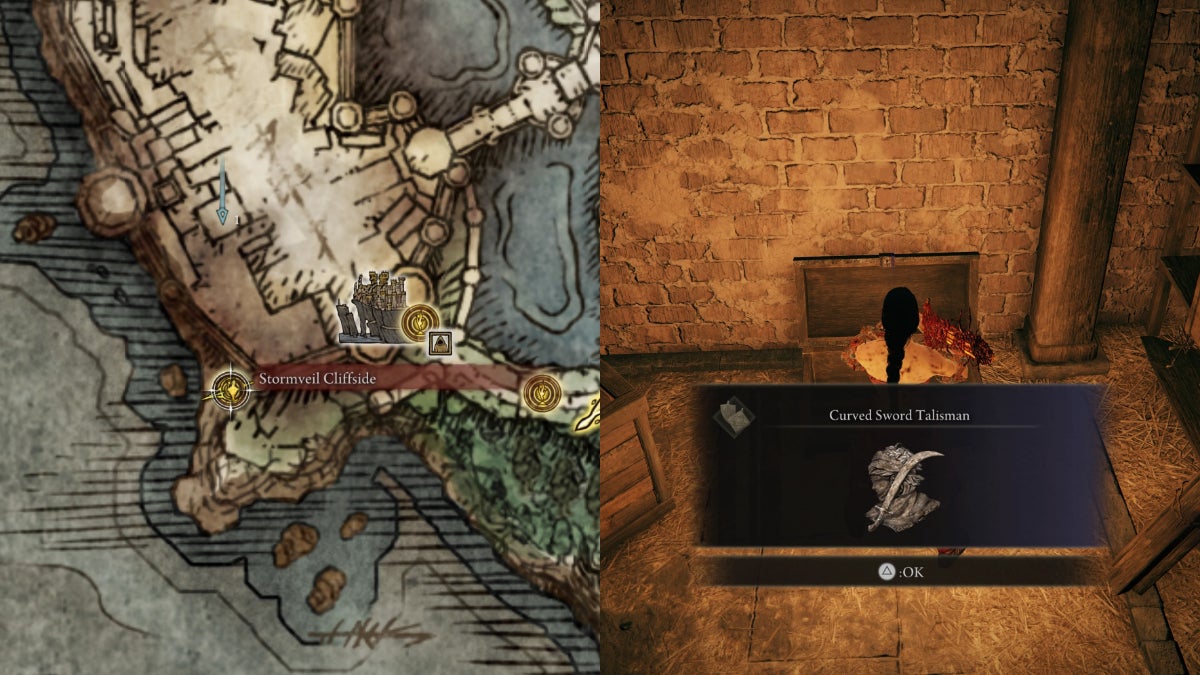
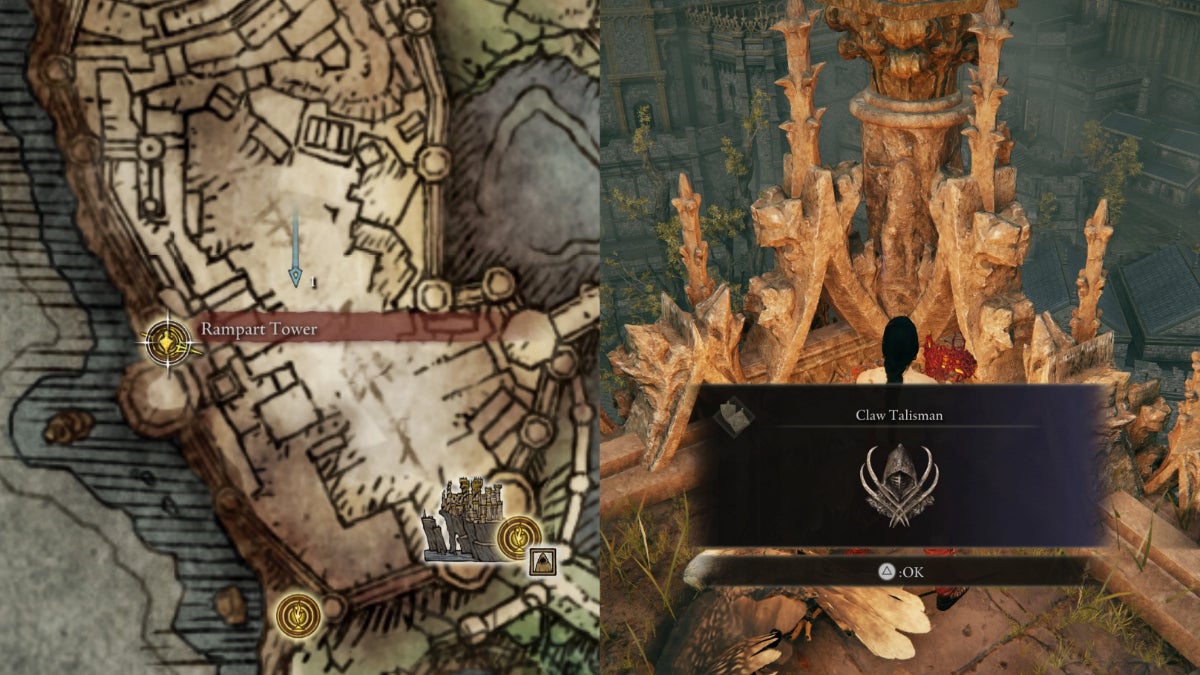
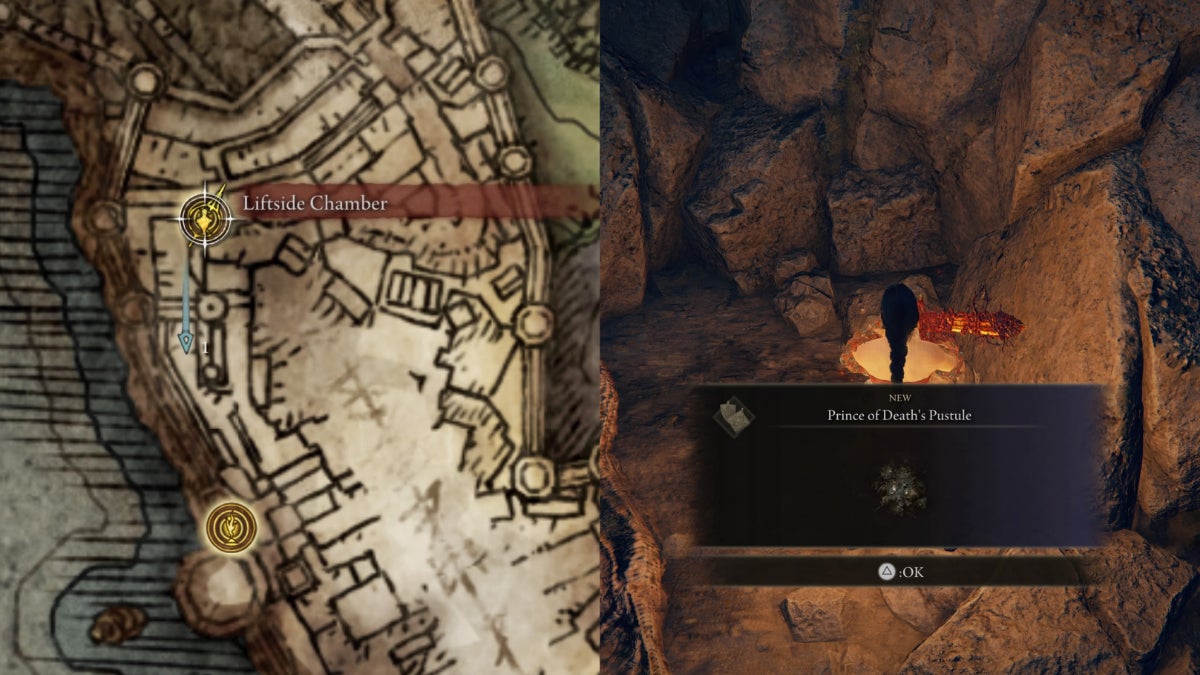
Every Talisman in Stormveil Castle
There are four Talismans in the Stormveil Castle.
| Talisman | Map Location | |
|---|---|---|
| 1 |  Curved Sword Talisman Curved Sword Talisman | Wine Cellar |
| 2 |  Claw Talisman Claw Talisman | Watchtower overlooking the courtyard |
| 3 |  Boltdrake Talisman Boltdrake Talisman | Limgrave Tower Bridge |
| 4 |  Prince of Death's Pustule Prince of Death's Pustule | Pit of Stomveil Castle |
Curved Sword Talisman
| Effect | Note |
|---|---|
| +20% Guard Counter Damage | ‣ Great with Straight Swords + Shield build ‣ Stacks well with Spear Talisman |
Stormveil Cliffside Grace — Make your way to the third floor of the wine cellar. Beware of the Commoners throwing Fire Pots at the wooden vessels. When inside the room, you’ll get locked out with a Banished Knight. You don’t have to defeat him. The Curved Sword Talisman is in the chest at the left corner of the room.
Claw Talisman
| Effect | Note |
|---|---|
| +15% Jump Attack Damage | ‣ Stacks with Raptor's Black Feathers ‣ Doesn't work with Bow and Spell jump attacks |
Rampart Tower Grace — Get out of the room, and make your way to the rooftops. Jump up on the pile of sacks, and seek the wooden panels on the left. Make your way down to the roof below. Jump up on the broken pillar and onto the ledge. Carefully walk alongside towards the watchtower. Climb up the long ladder on the middle tower. The Claw Talisman is on the corpse leaning in a corner.
Tip: Kill the Godrick Soldier Archers to smoothly reach the top.
Prince of Death’s Pustule
| Effect | Variation |
|---|---|
| +90 Vitality (Death Blight Resistance) | Prince of Death's Cyst |
Liftside Chamber Grace — Go out towards the courtyard. Take a sharp turn to the right. Go to the corpse and jump down below. Make your way down where the Giant Rats are. Keep running straight beyond the ruins to reach the pit.
When you get down to the pit, an Ulcerated Tree Spirit will emerge from the ground. You don’t have to defeat it. Run towards the other side where you can spot Godwyn’s death-blighted face. Pick the Prince of Death’s Pustule off a corpse on the right side of the area.
Tip: You’ll get a Golden Seed if you defeat the Ulcerated Tree Spirit.
Boltdrake Talisman
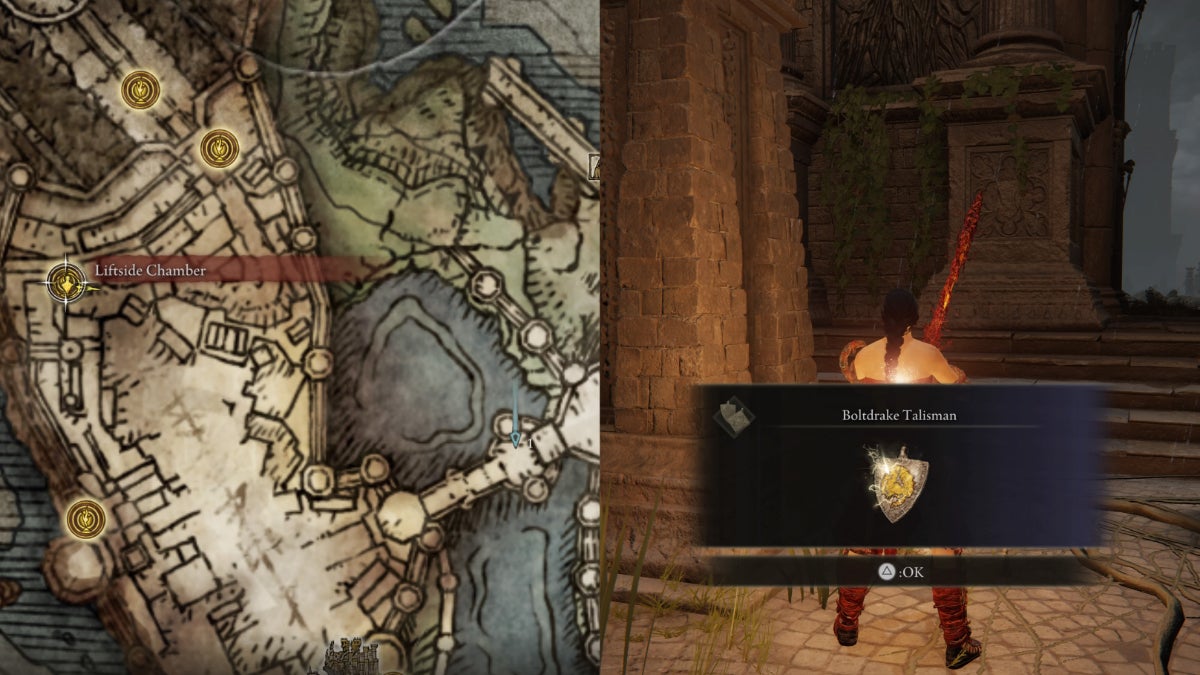
| Effect | Variation |
|---|---|
| +13% Lightning Resistance (+4% only in PVP) | ‣ Boltdrake Talisman +1 ‣ Boltdrake Talisman +2 |
Liftside Chamber Grace — Seek the descending pathway towards the Stormveil Main Gate from the heavily guarded courtyard. Beware of the explosive arrows from the Godrick Soldier archers. There’s an entrance at your left beyond the archway. Beware of the Lion Guardians. Go through the hall with kneeling Knights towards the Limgrave Tower Bridge. Just above the stairs is the Boltdrake Talisman on a corpse leaning on a fire column.
Every Talisman in Roundtable Hold
There are four Talismans in the Roundtable Hold.
| Talisman | Map Location | |
|---|---|---|
| 1 |  Furled Finger's Trick-Mirror Furled Finger's Trick-Mirror | Twin Maiden Husks |
| 2 |  Host's Trick-Mirror Host's Trick-Mirror | Twin Maiden Husks |
| 3 |  Arsenal Charm Arsenal Charm | Nepheli Loux |
| 4 |  Ancestral Spirit's Horn Ancestral Spirit's Horn | Remembrance of the Regal Ancestor, Finger Reader Enia |
Furled Finger’s Trick-Mirror
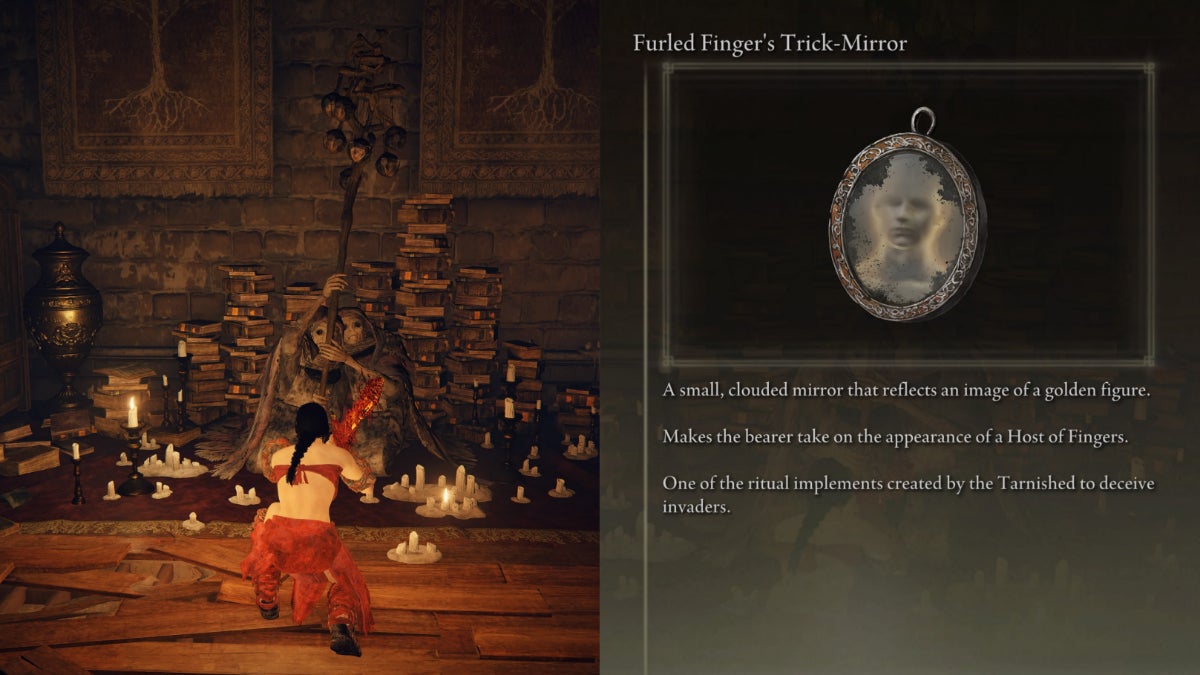
| Effect | Cost |
|---|---|
| Appear as the Host of Fingers | 5,000 Runes |
Table of Grace — Go to the left hallway, where Ensha of the Royal Remains is leaning on a wall. Go down the stairs towards the next area to find the Twin Maiden Husks on the right side of the area. Open their shop to get the Furled Finger’s Trick-Mirror.
Tip: Equip the Furled Finger’s Trick-Mirror when in another player’s world to keep the Host safe from the invaders.
Host’s Trick-Mirror
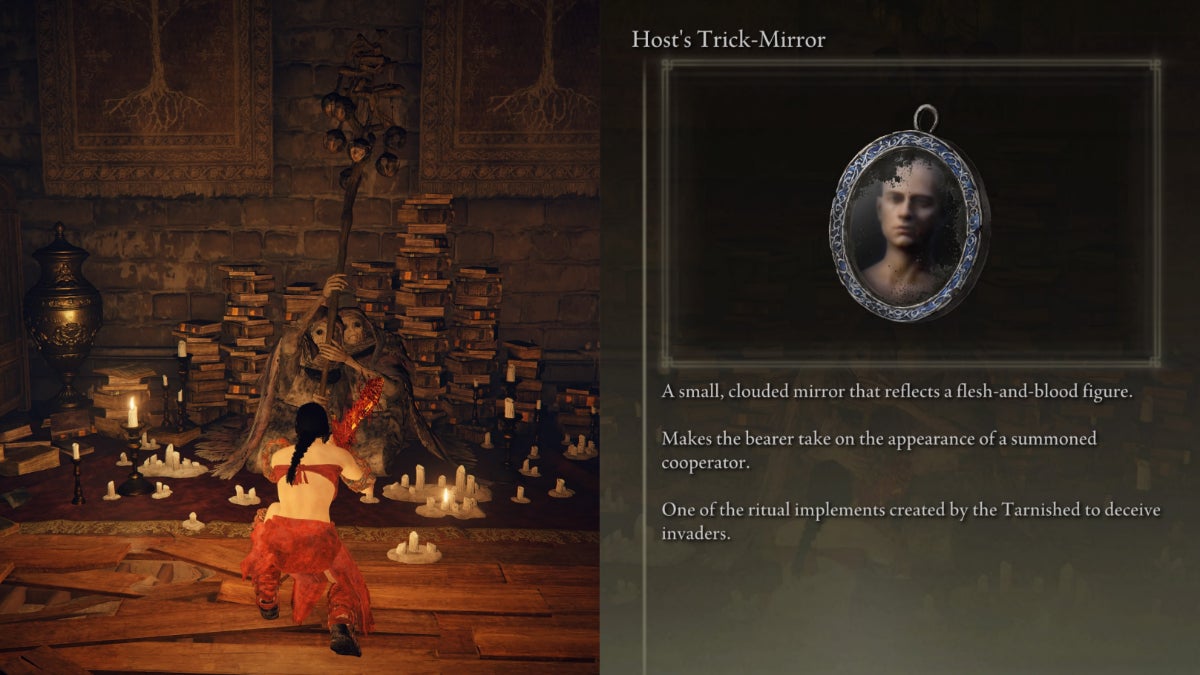
| Effect | Cost |
|---|---|
| Appears as a Furled Finger | 5,000 Runes |
Twin Maiden Husks — Tip: Equip the Furled Finger’s Trick-Mirror during co-op to hide from the invaders.
Arsenal Charm
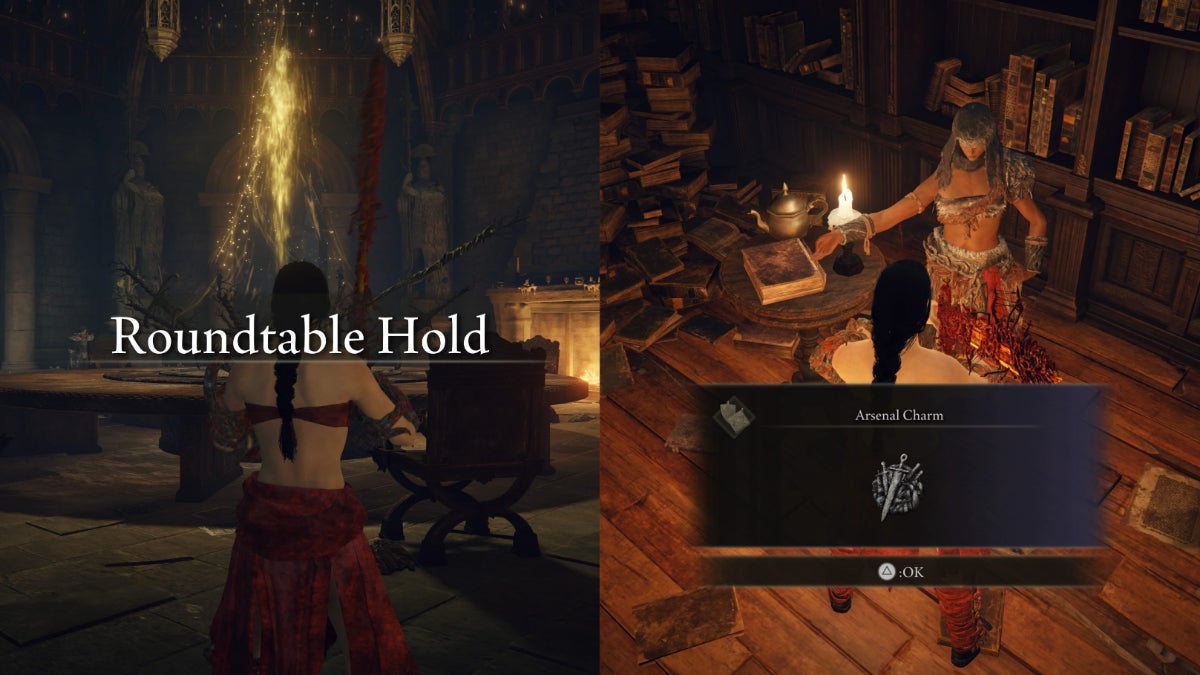
| Effect | Variation |
|---|---|
| +15% of Max Equip Load | ‣ Arsenal Charm +1 ‣ Great-Jar's Arsenal |
Liftside Chamber Grace — Go up the stairs guarded by two Bladed Talon Eagle and a Godrick Soldier Archer. Go into the room on the right to find Nepheli Loux. Exhaust her lines before defeating Godrick the Grafted.
Roundtable Hold — Go to the left hallway to find Nepheli Loux by the stairs. Exhaust her lines to get the Arsenal Charm.
Ancestral Spirit’s Horn
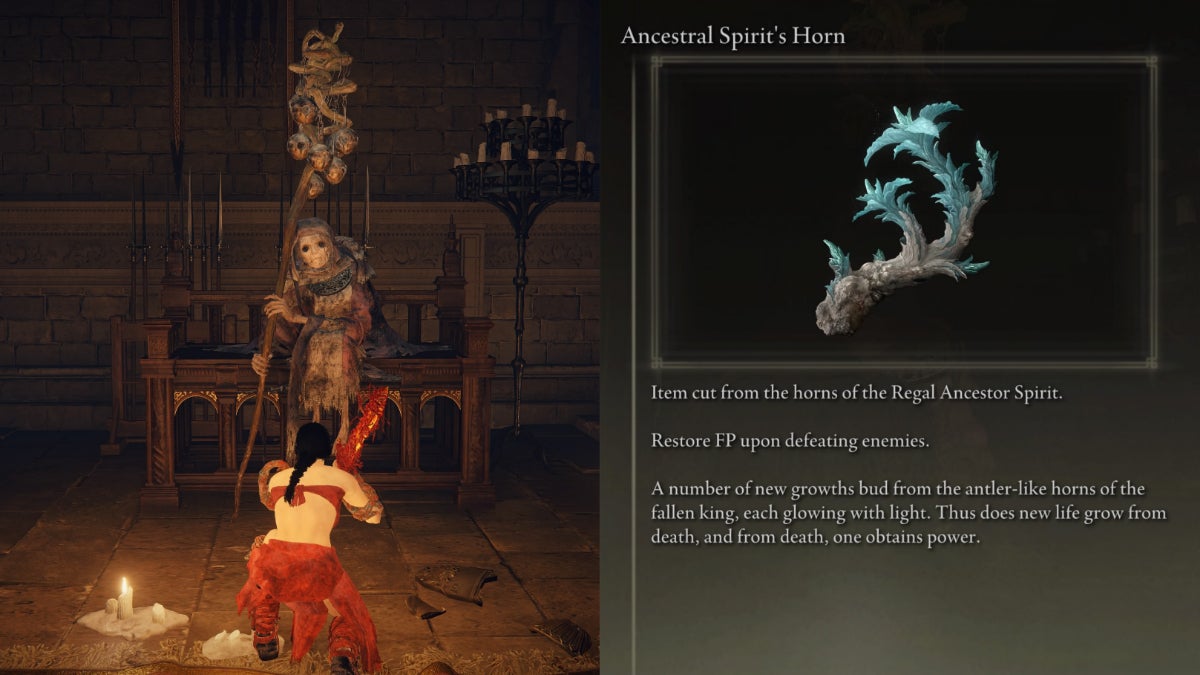
| Effect | Note |
|---|---|
| +3 FP upon defeating enemies | Look at the bloodstains upon defeating enemies within range |
Defeat the Regal Ancestor Spirit in Nokron, Eternal City to get the Remembrance of the Regal Ancestor. Then, go Finger Reader Enia at the Roundhold Table. The Ancestral Spirit’s Horn will be made available.
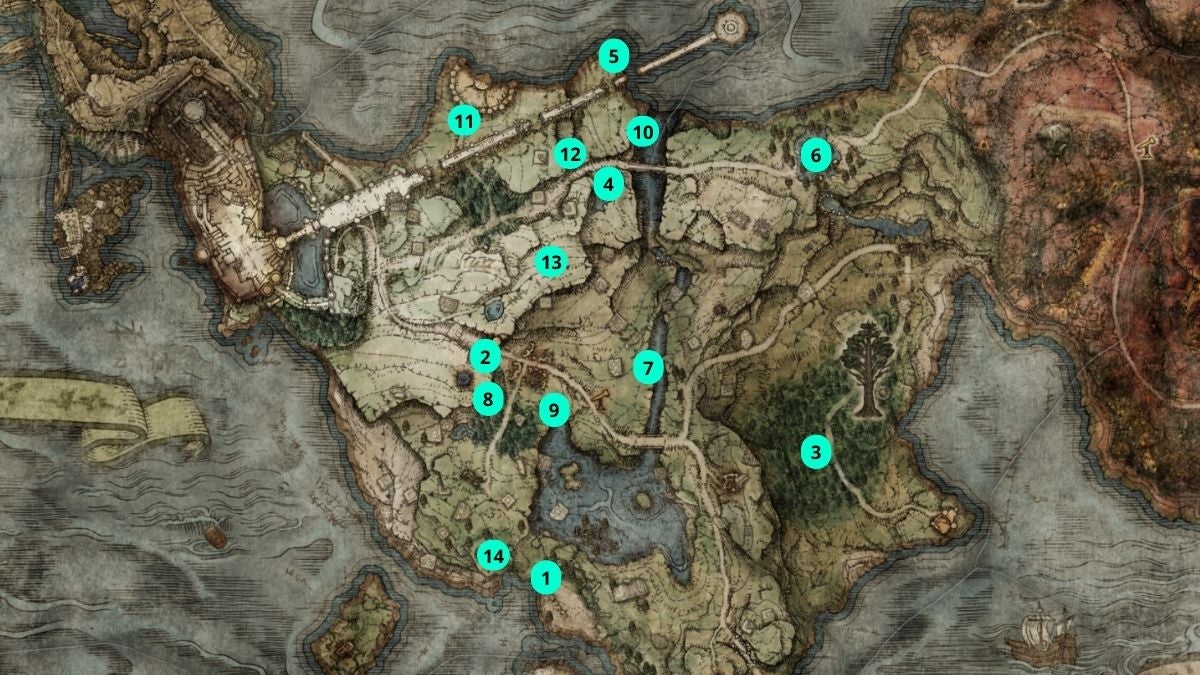
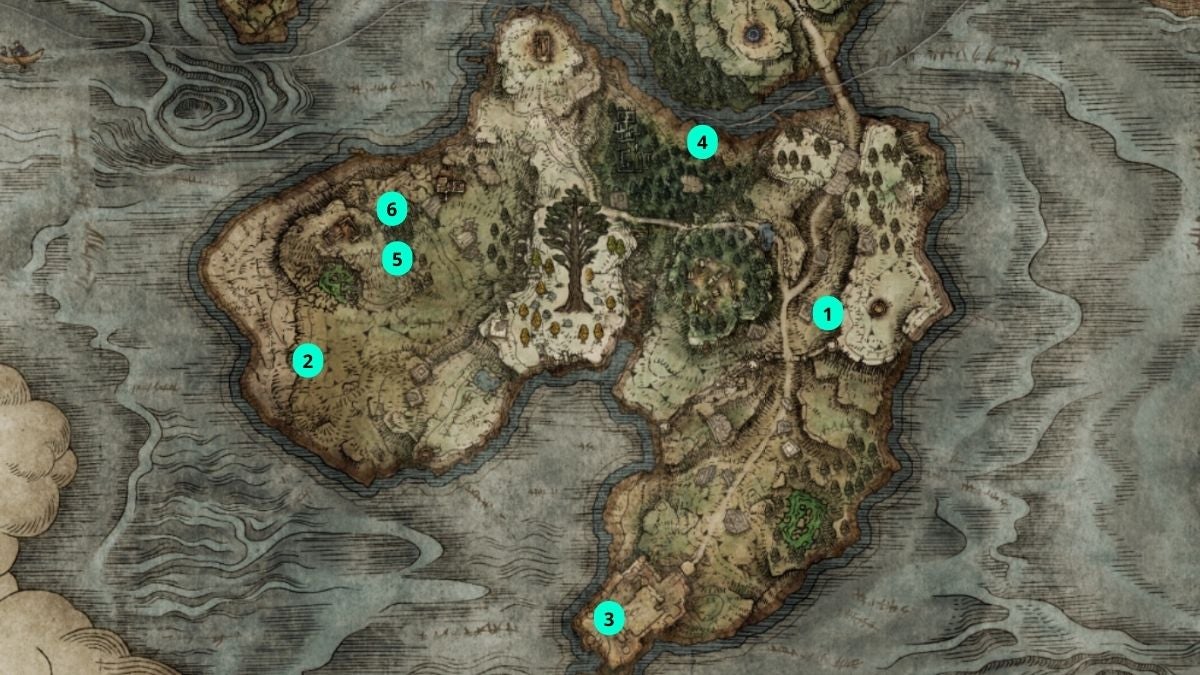
Every Talisman in Liurnia of the Lakes
There are 17 Talismans in Liurnia of the Lakes.
| Talisman | Map Location | |
|---|---|---|
| 1 |  Two Fingers Heirloom Two Fingers Heirloom | Purified Ruins |
| 2 |  Winged Sword Insignia Winged Sword Insignia | Stillwater Cave |
| 3 |  Spear Talisman Spear Talisman | Lakeside Crystal Cave |
| 4 |  Cerulean Amber Medallion Cerulean Amber Medallion | Lakeside Crystal Cave |
| 5 |  Cerulean Seed Talisman Cerulean Seed Talisman | Uninverted Carian Study Hall |
| 6 |  Red-Feathered Branchsword Red-Feathered Branchsword | East of Scenic Isle |
| 7 |  Crucible Knot Talisman Crucible Knot Talisman | Village of the Albinaurics |
| 8 |  Pearldrake Talisman Pearldrake Talisman | First Waygate, Four Belfries |
| 9 |  Mottled Necklace Mottled Necklace | Second Waygate, Four Belfries |
| 10 |  Shabriri’s Woe Shabriri’s Woe | Frenzied Flame Village |
| 11 |  Stalwart Horn Charm Stalwart Horn Charm | Southwest of Mausoleum Compound |
| 12 |  Carian Filigreed Crest Carian Filigreed Crest | Smithing Master Iji at Kingrealm Ruins |
| 13 |  Assassin’s Cerulean Dagger Assassin’s Cerulean Dagger | Black Knife Catacombs |
| 14 |  Stargazer Heirloom Stargazer Heirloom | Divine Tower of Liurnia |
| 15 |  Magic Scorpion Charm Magic Scorpion Charm | Preceptor Seluvis in his rise |
| 16 | 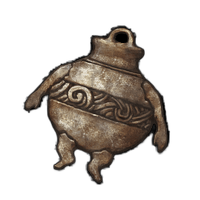 Companion Jar Companion Jar | Jar Bairn, Jarbug |
| 17 | 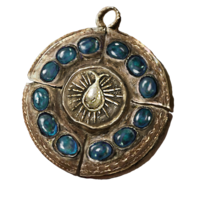 Cerulean Amber Medallion +2 Cerulean Amber Medallion +2 | Lunar Estate Ruins, Moonlight Altar |
Two Fingers Heirloom
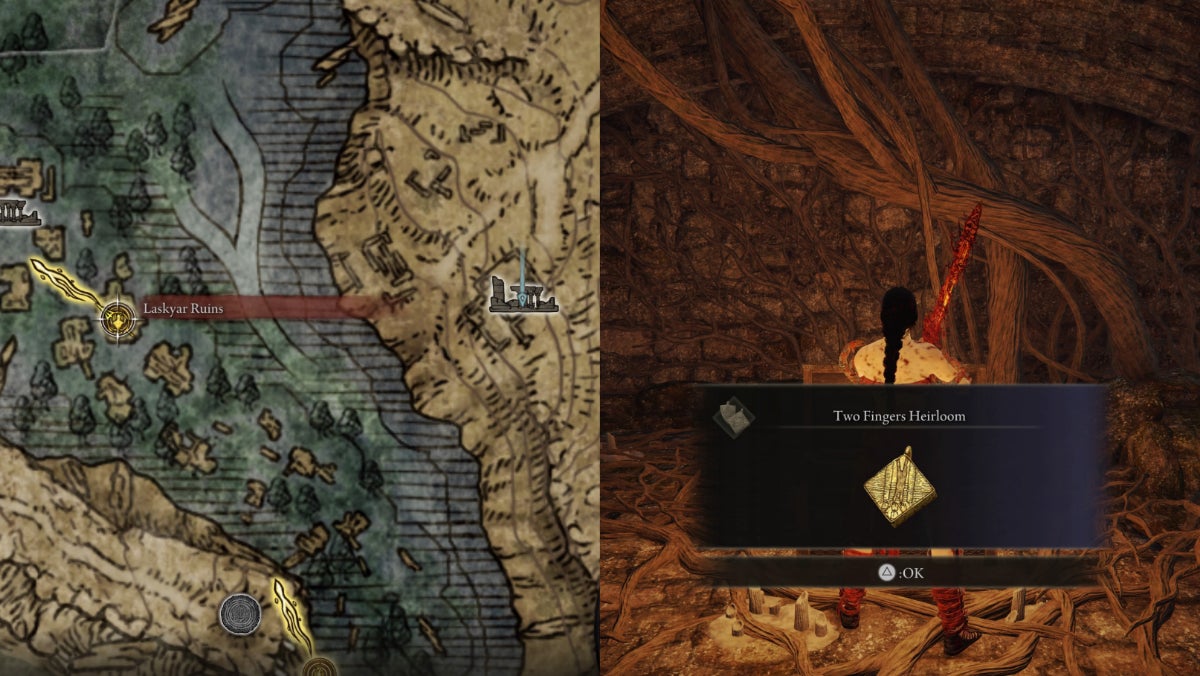
| Effect | Note |
|---|---|
| +5 Faith | Useful when you need additional points to Faith to cast Incantation Spells |
Laskyar Ruins Grace — Go east of the Laskyar Ruins towards the Purified Ruins. Seek a ghost, which tells you where to find the hidden cellar. Beware of the Raya Lucaria Soldiers, Commoners, and Strays guarding the area. Hit the wooden panels hiding the cellar. The Two Finger Heirloom is in the chest.
Winged Sword Insignia
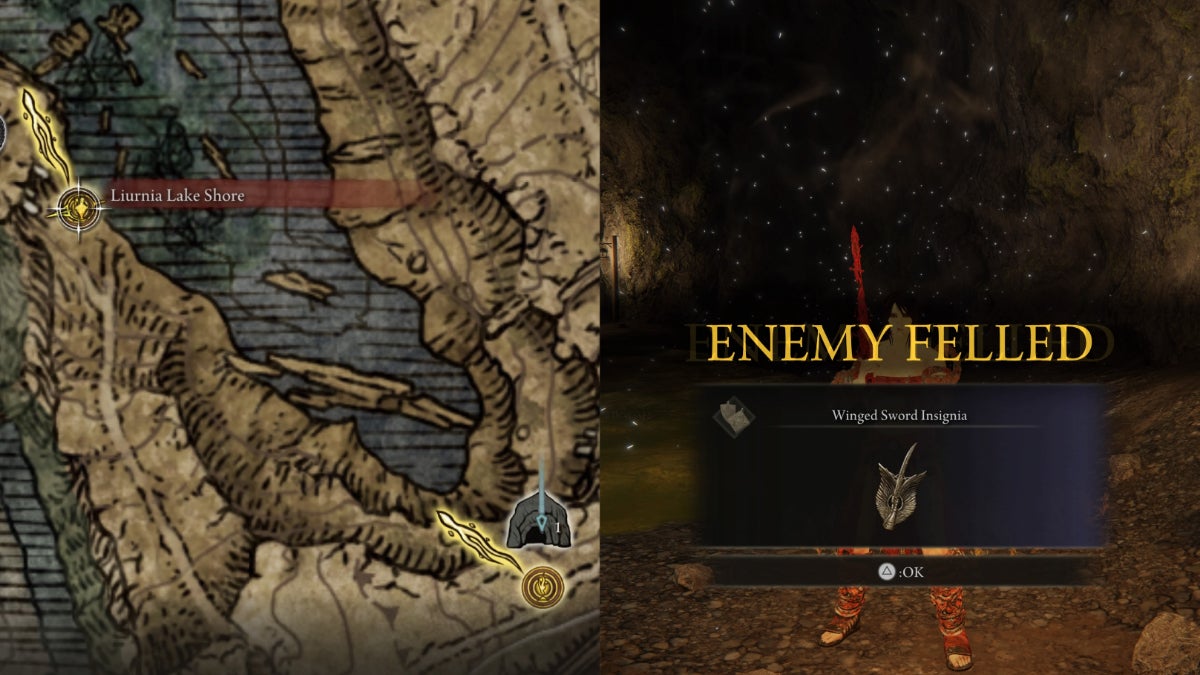
| Effect | Variation |
|---|---|
| ‣ Successively raises DPS, specifically 3%, 5%, and 10%, activates after 3 hits | Rotten Winged Sword Insignia |
Liurnia Lake Shore Grace — Go to the south corner of Liurnia of the Lakes. Keep your eyes on your left side. Seek the Spirit Jellyfish floating behind a large rock. The Stillwater cave entrance is nearby.
Beware of the Poison Swamps and Poison-type shamans in the cave. Make your way down towards the cavern of a Cleanrot Knight. Beware of her Scarlet Rot attack. Defeat her to get the Winged Sword Insignia.
Tips:
- Prepare Neutralizing Boluses.
- Position yourself away from the poison waters of the Stillwater Cave.
Spear Talisman
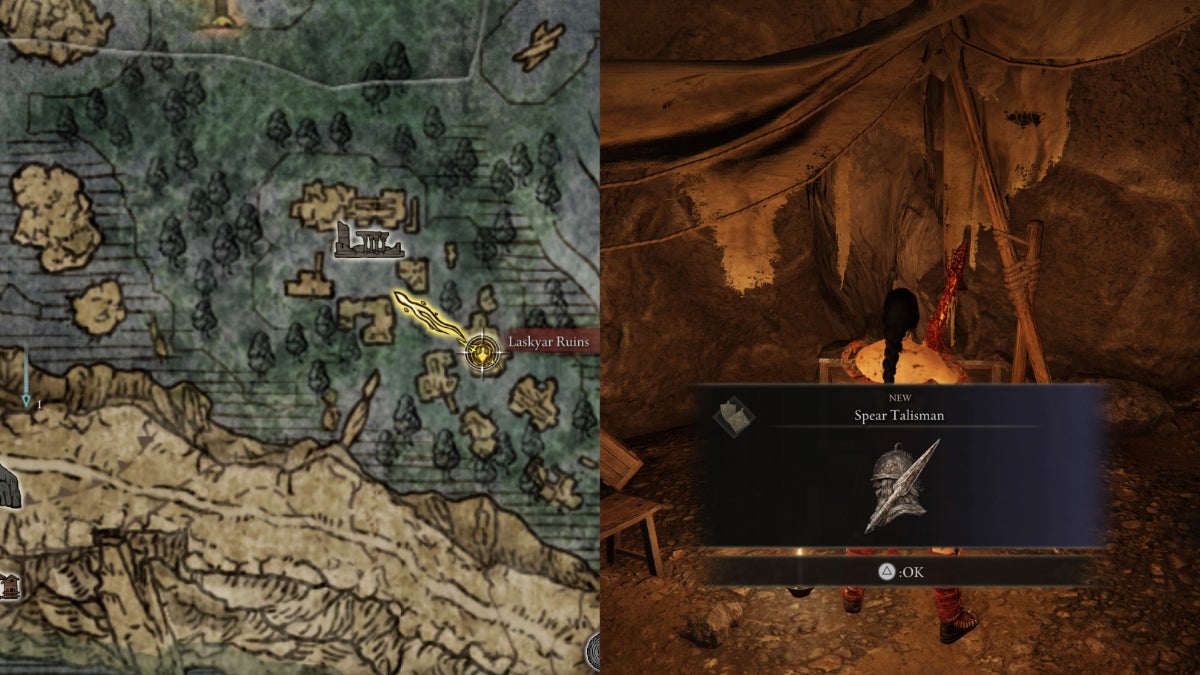
| Effect | Note |
|---|---|
| +15% Thrust Counterattack Damage | ‣ Great with Spears, Thrusting Swords, Bows and Crossbows ‣ Works on any Thrusting Attacks |
Laskyar Ruins Grace — Run towards the western side of Liurnia. Hug the walls until you can spot Yellow Trees and Crystal. Keep going until you you notice the Lakeside Crystal Cave entrance.
Do not jump down. Find the cavern with a Demi-human Chief camping. All you need to do is find a pathway right across the Lakeside Crystal Cave site of grace. The Spear Talisman is in the chest.
Cerulean Amber Medallion
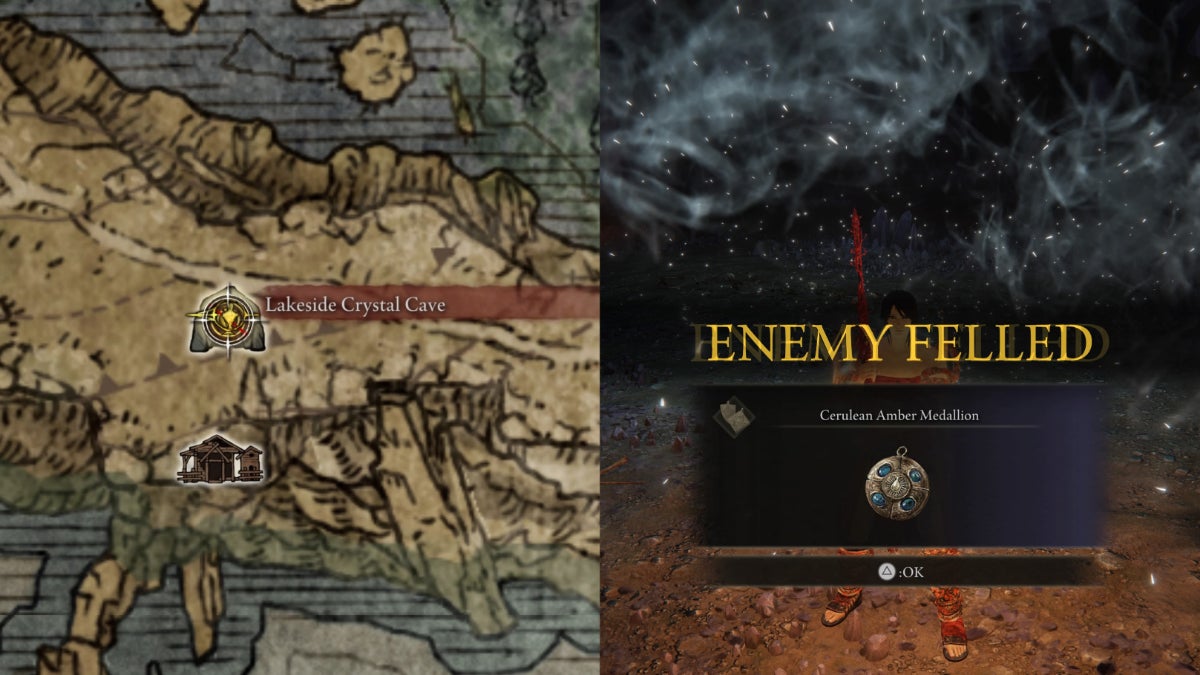
| Effect | Variation |
|---|---|
| +7% of Max FP | ‣ Cerulean Amber Medallion +1 ‣ Cerulean Amber Medallion +2 |
Lakeside Crystal Cave — Carefully make your way down to a side entrance with a campfire. Beware of the Crystal Snails dwelling in the cavern. Get out of there by jumping down, where you can spot three more corpses on the ground. Turn right towards a huge cavern. Defeat the Bloodhound Knight to get the Cerulean Amber Medallion.
Tip: If you have the first half of the Haligtree Secret Medallion, talk with Latenna at the Slumbering Wolf Shack. You can only reach it after defeating the Bloodhound Knight.
Cerulean Seed Talisman
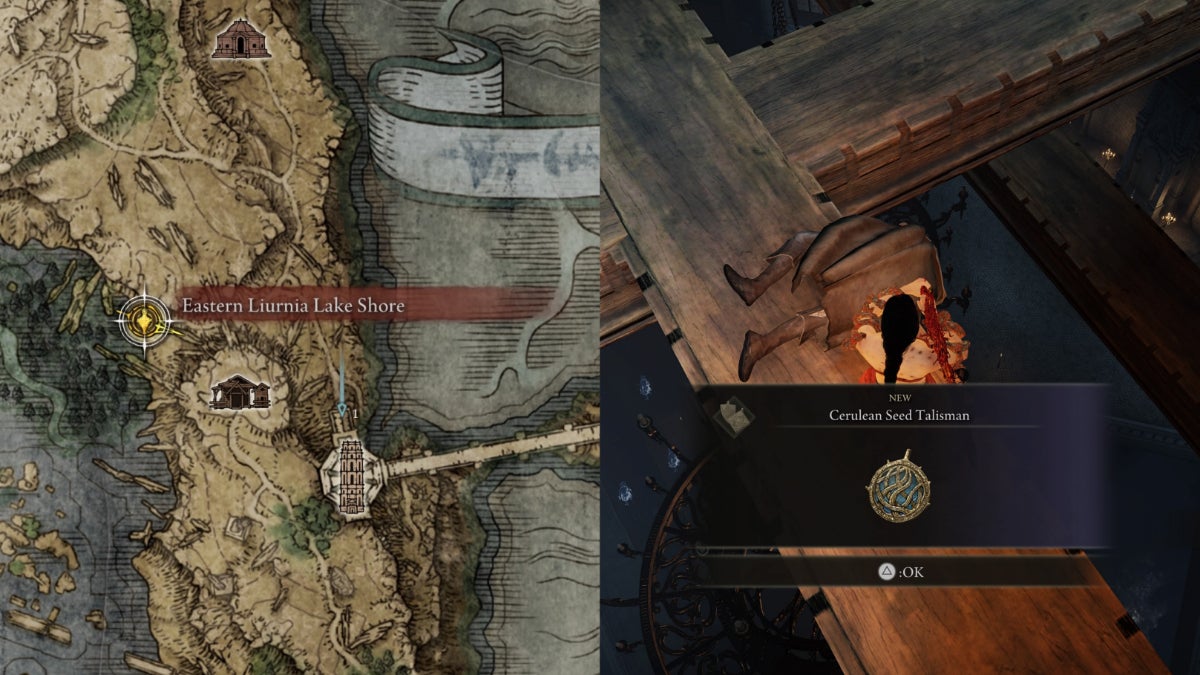
| Effect | Note |
|---|---|
| +20% FP restoration from Flask of Cerulean Tears | You don't have to defeat Preceptor Miriam to get it |
Eastern Liurnia Lake Shore Grace — Go to the Carian Study Hall. Make sure it’s not inverted yet. Make your way to the ramparts of the building. It’s guarded by Preceptor Miriam and her spirit allies. You don’t have to defeat her.
On the third floor, you’ll need to climb two ladders to reach the upper rampart patrolled by Giant Rats. The Cerulean Seed Talisman is on an overhanging corpse.
Tip: If you choose to defeat Preceptor Miriam, you’ll get the Magic Downpour sorcery spell. You can cheese her by using Poison Darts.
Red-Feathered Branchsword

| Effect | Note |
|---|---|
| +20% DPS when HP is below 20% | Stacks with the following: ‣ Blue-Feathered Branchsword ‣ Twinbird Kite Shield |
Scenic Isle Grace — Pass the time until Nightfall. Seek the coliseum ruin northeast of the isle. Notice the glowing Ruin and Sanctuary Fragments on it. The Deathbird will jump down towards you. Defeat it to get the Red-Feathered Branchsword.
Crucible Knot Talisman
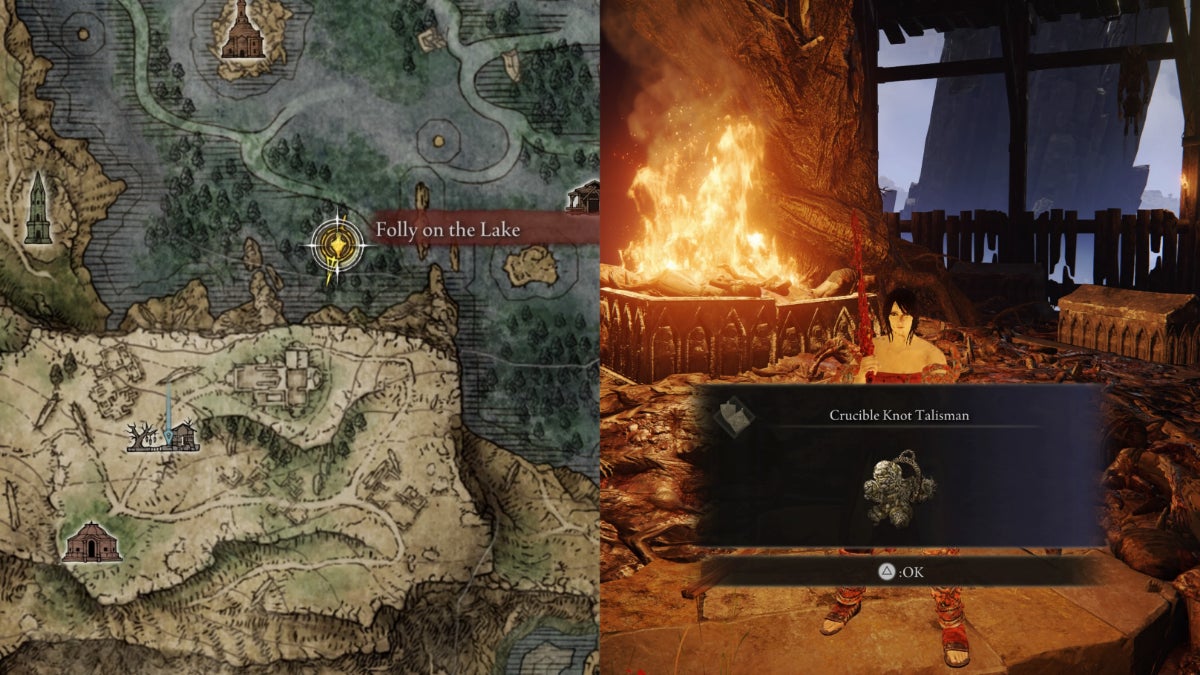
| Effect | Note |
|---|---|
| Reduces Bonus Stagger and Poise Damage from a headshot | ‣ Stacks with Pumpkin Helm ‣ Effective against Ash of War: Rain of Arrows |
Folly on the Lake Grace — Go into the caverns of the cliff and stick to your left. Notice the hanged corpses and an upward slope. Follow the path until you see a ghost near a well and the Village of Albinaurics Grace.
Seek the bridge at the upper part of the village. There’s a large campfire on the other side guarded by strays and the Omenkiller. Defeat the Omenkiller to get the Crucible Knot Talisman.
Tips:
- Kill the Strays before fighting the Omenkiller by jumping down to the huts of the battle area.
- Seek a glowing pot in the upper area before the bridge, where the Omenkiller is. Hit it and talk to get the first half of the Haligtree Secret Medallion.
Pearldrake Talisman
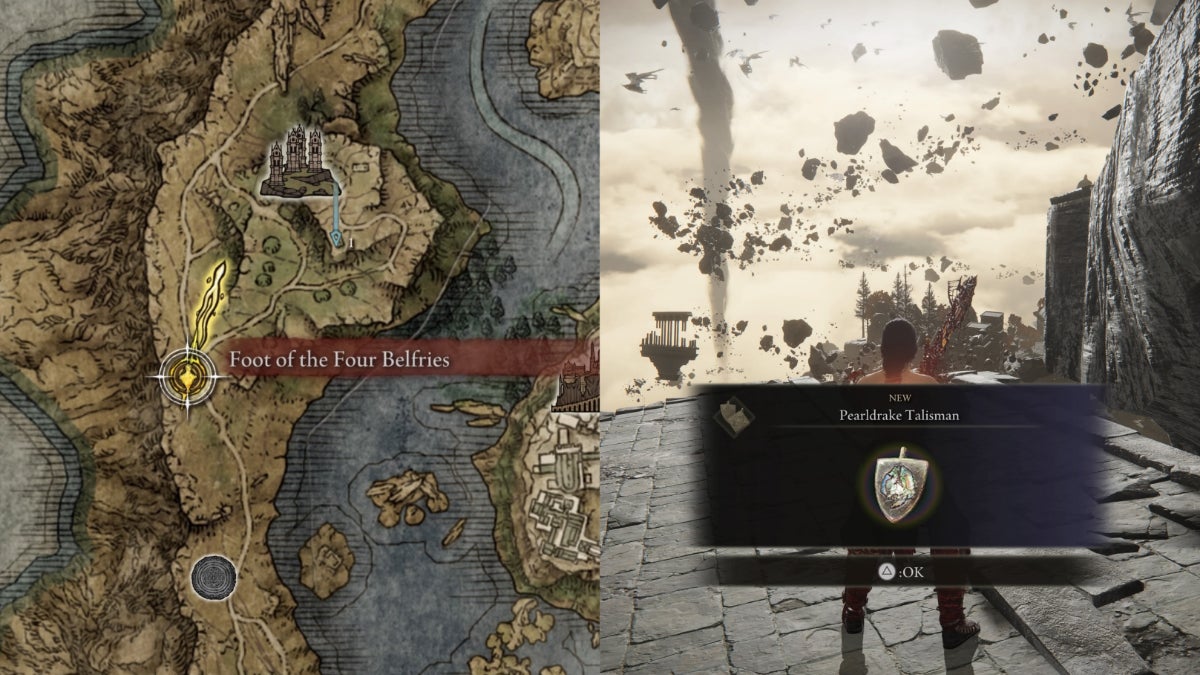
| Effect | Variation |
|---|---|
| +5% Elemental Damage Negation (2% only in PVP) | ‣ Pearldrake Talisman +1 ‣ Pearldrake Talisman +2 |
The Foot of the Four Belfries Grace — Make your way to the Four Belfies. There’s an Imbued Sword Key in a chest and a site of grace at the very top of the cliff. Now go back down to the First Belfry. There’s a note that says “Crumbling Lands.”
Use the Imbued Sword Key to open the waygate. Examine it to reach a far section of the Crumbling Farum Azula. Drop down the floating debris. There are two Beastman of Farum Azula stuck below. You don’t have to defeat them.
Jump down to them and run towards the right side. Jump down again. The Pearldrake Talisman is on a corpse at the edge of the debris.
Mottled Necklace
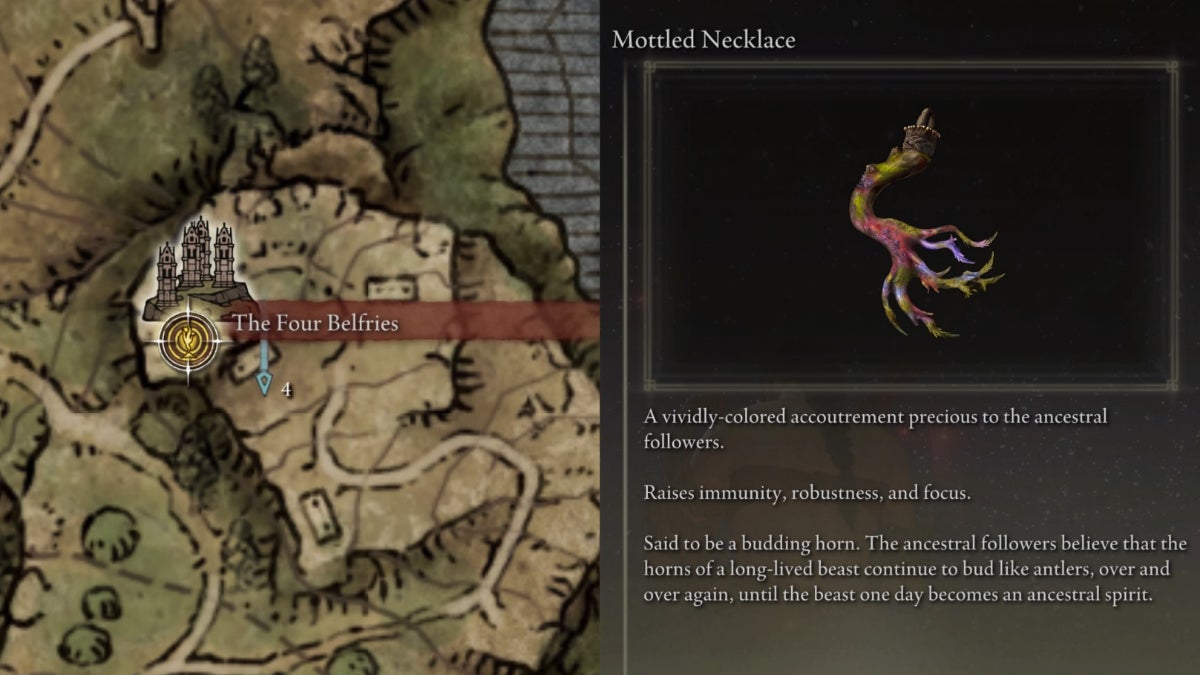
| Effect | Variation |
|---|---|
| +40 Immunity (Poison and Rot Resistance), Robustness (Bleed and Frostbite Resistance) and Focus (Sleep and Madness Resistance | Mottled Necklace +1 |
The Four Belfries Grace — Get an Imbued Key to unlock the second Waygate with a note that says “Night Sky Unceasing.” Find your way to the left, and jump from the pillars down to the ground. The Mottled Necklace is on a corpse at the edge of a ruined bridge, straight ahead.
Shabriri’s Woe
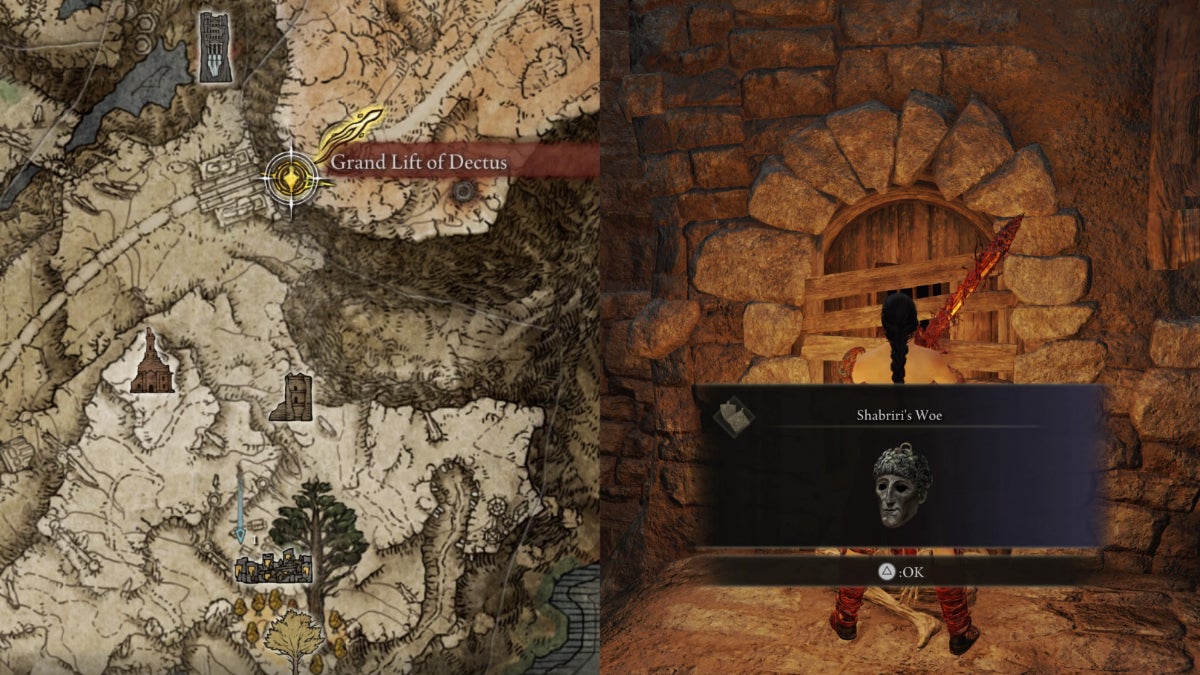
| Effect | Note |
|---|---|
| Attract enemies' aggression | ‣ Equip it while summoning Mimic Tear, to direct enemies' aggression to it ‣ Only works during Co-op |
Grand Lift of Dectus Grace — Get out and go east from here. Make your way to the top past the Flame of Frenzy tower. The Frenzied Flame Village is just behind the wall ruin. Seek the Frenzied Raya Lucaria Soldiers by a bonfire at the edge of the village. The Shabriri’s Woe is on the corpse leaning to a wooden door.
Stalwart Horn Charm
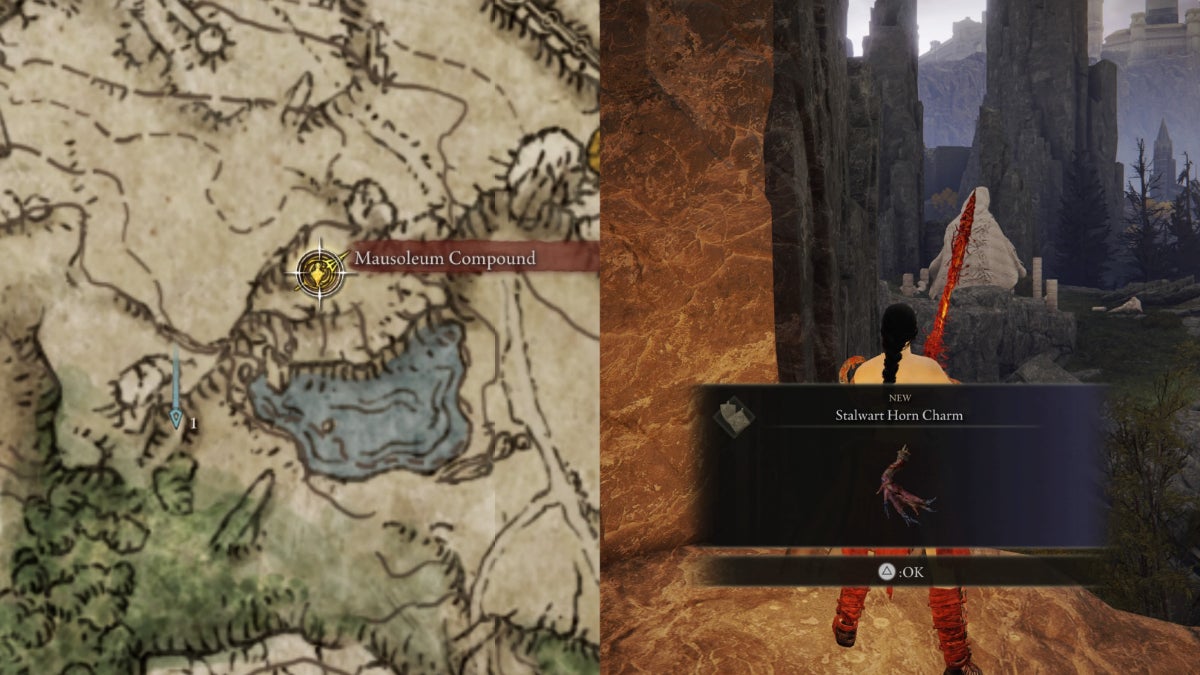
| Effect | Variation |
|---|---|
| +90 Robustness (Bleed and Frostbite Resistance) | Stalwart Horn Charm +1 |
Mausoleum Compound Grace — Notice the large stone across the big statue near the site of grace. Make your way there through the upper western pathway. Go towards the edge, and there’s a hole you can get through. Turn left to see the Stalwart Horn Charm on a corpse.
Carian Filigreed Crest
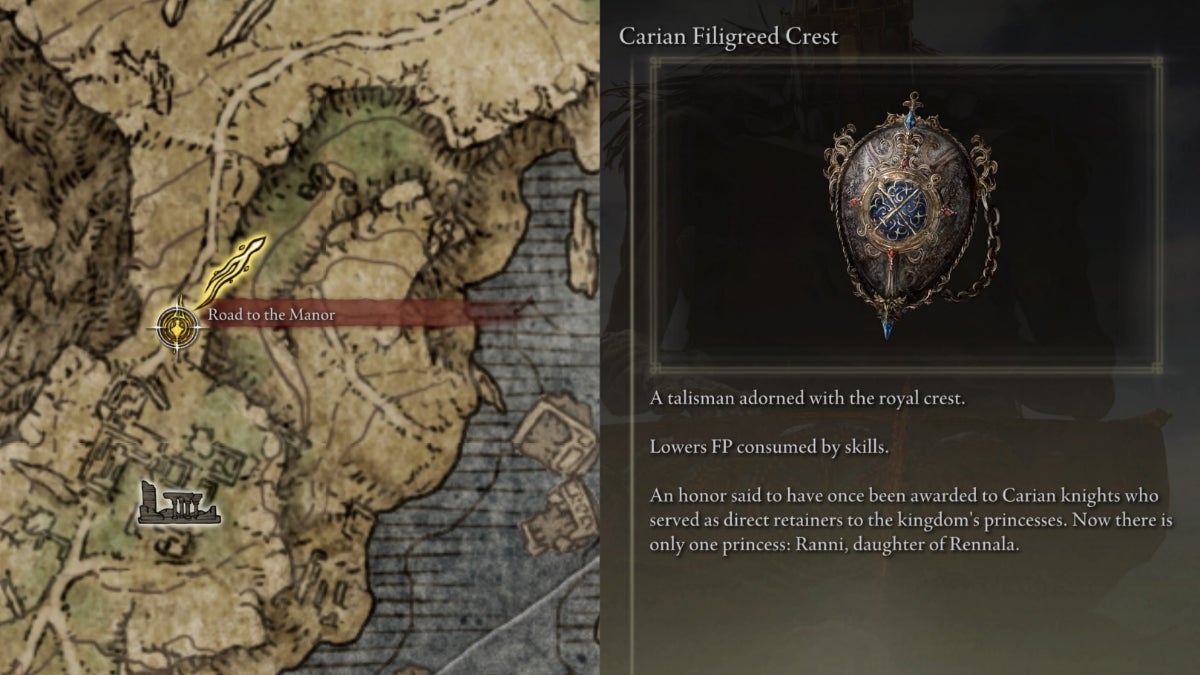
| Effect | Note |
|---|---|
| -25% FP cost of Skills | Defeat Bloodhound Knight Darriwil in Forlon Hound Evergaol, East Limgrave and tell War Counself Iji that Blaidd sent you |
Mistwood Ruins — Do the Finger Snap Gesture to get Blaidd, the Half-Wolf’s attention. Talk to him until he mentions Dariwill. Fast travel to Agheel Lake South Grace. Enter the Forlorn Hound Evergoal and summon Blaidd. Defeat Dariwill together. After the fight, talk to Blaidd outside the evergaol until he says to tell Smithing Master Iji that he sent you.
Road to the Manor Grace — Talk to Smithing Master Iji until you can say that Blaidd sent you. The Carian Filigreed Crest will be made available to purchase.
Tip: You can get the Finger Snap Gesture from merchant Kale at the Church of Elleh in Limgrave.
Assassin’s Cerulean Dagger

| Effect | Note |
|---|---|
| Critical Attack restores 15 FP | Great in the following situations: ‣ Using Poise-Breaking Weapons ‣ Parrying enemies |
Ruined Labyrinth Grace — Head towards the cliff and go far north. Beware of the Lesser Runebears along the way. A Headless Knight is guarding the Black Knife Catacomb entrance. You don’t have to defeat her.
Beware of the Lightning Floor Traps in the catacomb. Upon reaching a room full of moving huge guillotines, jump on one to reach an upper pathway. Turn right and hit the illusory wall to reveal the chamber of the Black Knife Assassin. Defeat her to get the Assassin’s Cerulean Dagger.
Stargazer Heirloom
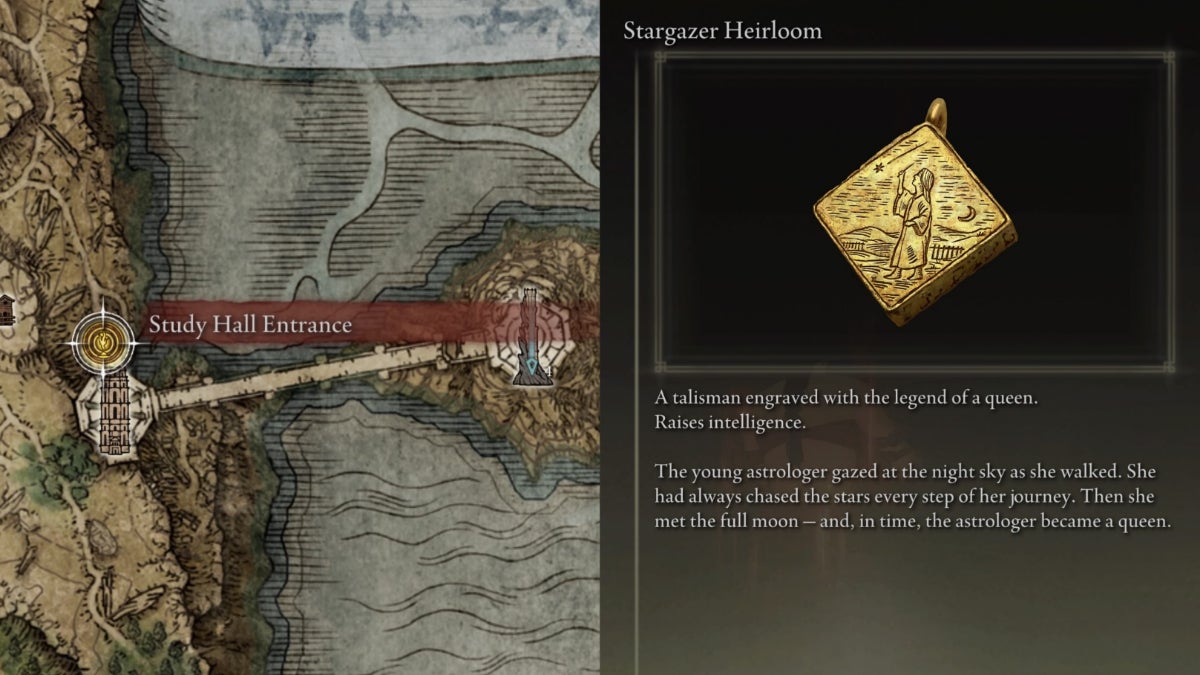
| Effect | Note |
|---|---|
| +5 Intelligence | Requires the Carian Inverted Statue from Ranni the Witch |
Carian Study Hall Grace — Get the Carian Inverted Statue from Ranni the Witch by following her questline. Make your way to the Divine Tower of Liurnia through the now-inverted Carian Study Hall. The Stargazer Heirloom is on the corpse at the top of the tower.
Magic Scorpion Charm
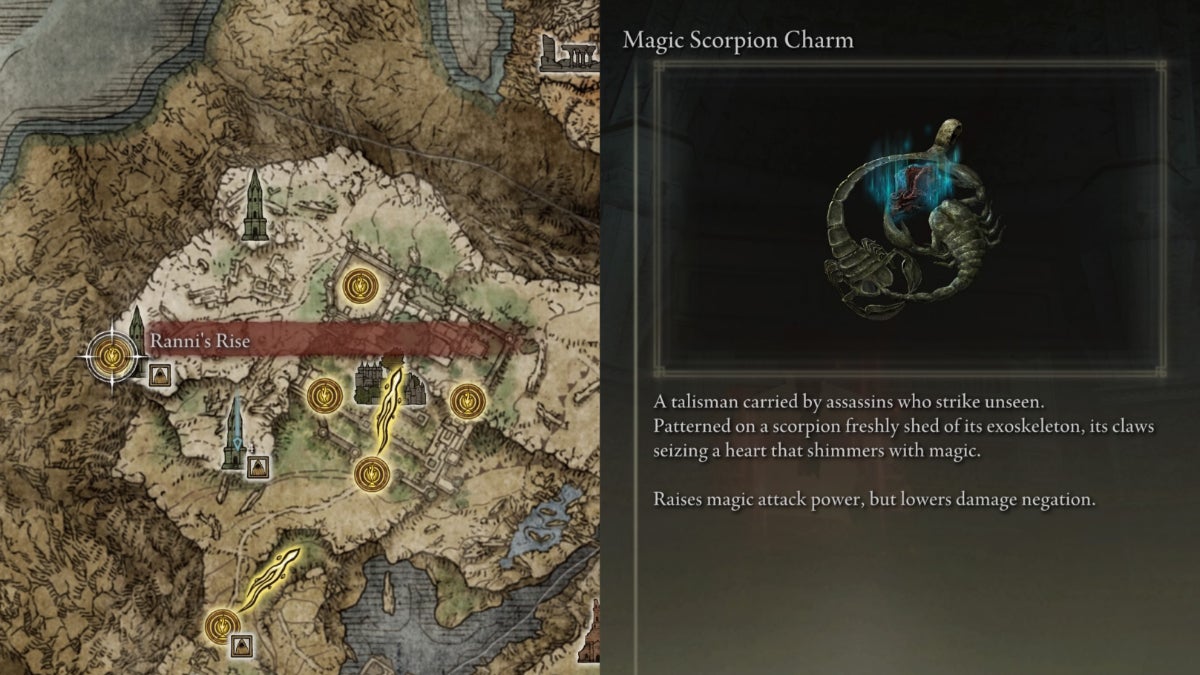
| Effect | Note |
|---|---|
| ‣ +12% Magic Damage (8% only in PVP) ‣ -10% Physical Defense (-15% in PVP) | Requires you to give the Amber Starlight to Preceptor Seluvis |
Seluvis’s Rise — Find Preceptor Seluvis’ hidden chamber, behind an Illusory Wall in a ruins within the Three Sisters Subregion. Buy three Spirit Ash Puppets from him until he tells you about his secret plan. Get the Amber Starlight in the Altus Plateau and give it to him. By then, he’ll give you the Magic Scorpion Charm.
Tip: Get the Magic Scorpion Charm before giving Ranni the Witch the Fingerslayer Blade from Nokron, Eternal City. Otherwise, you’ll get locked out from the Talisman.
Companion Jar
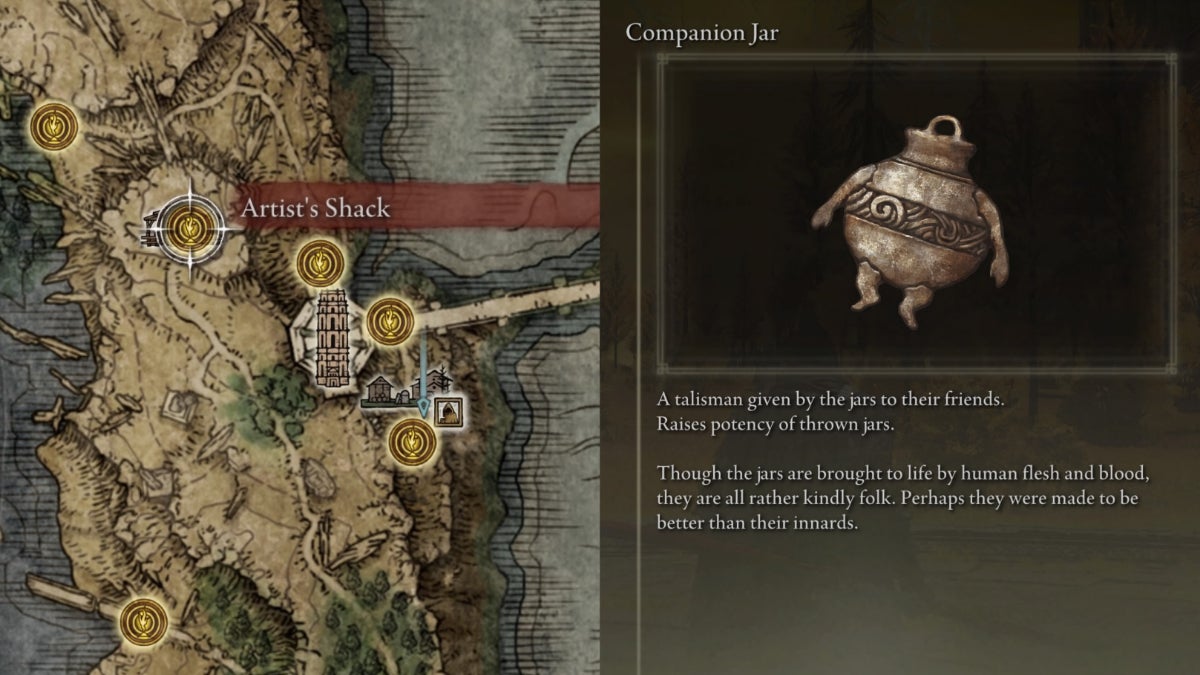
| Effect | Note |
|---|---|
| +20% Throwing Pots Damage | Requires you to finish Iron Fist Alexander's questline |
Jarbug — Find Jar Bairn and give him Alexander’s Innards. You’ll get the Companion Jar in return.
Cerulean Amber Medallion +2
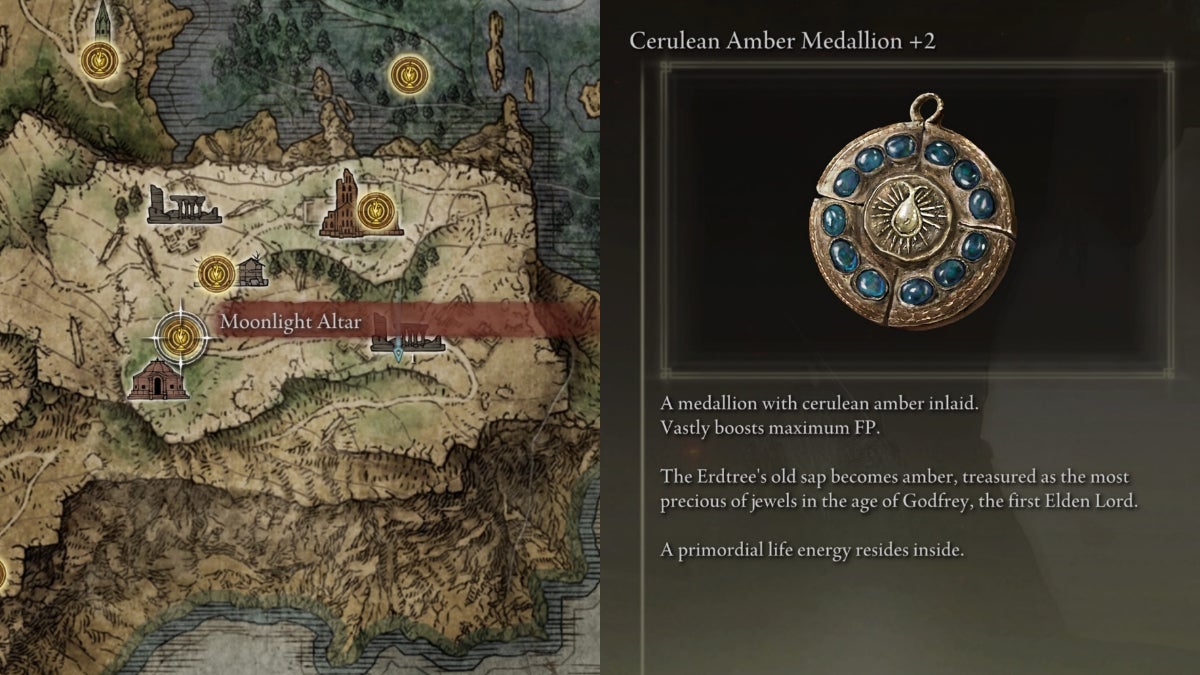
| Effect | Variation |
|---|---|
| +11% of Max FP | ‣ Cerulean Amber Medallion ‣ Cerulean Amber Medallion +1 |
Moonlight Altar — Make your way to the cellar of Lunar Estate Ruins, on the eastern side of the region. The Cerulean Amber Medallion +2 is in the chest.
Every Talisman in Raya Lucaria Academy
There are three Talismans in the Raya Lucaria Academy.
| Talisman | Map Location | |
|---|---|---|
| 1 |  Longtail Cat talisman Longtail Cat talisman | Pit of Raya Lucaria Academy |
| 2 |  Graven-School Talisman Graven-School Talisman | In a room behind an Illusory Wall |
| 3 | Inner Balcony of the Debate Parlor |
Longtail Cat Talisman
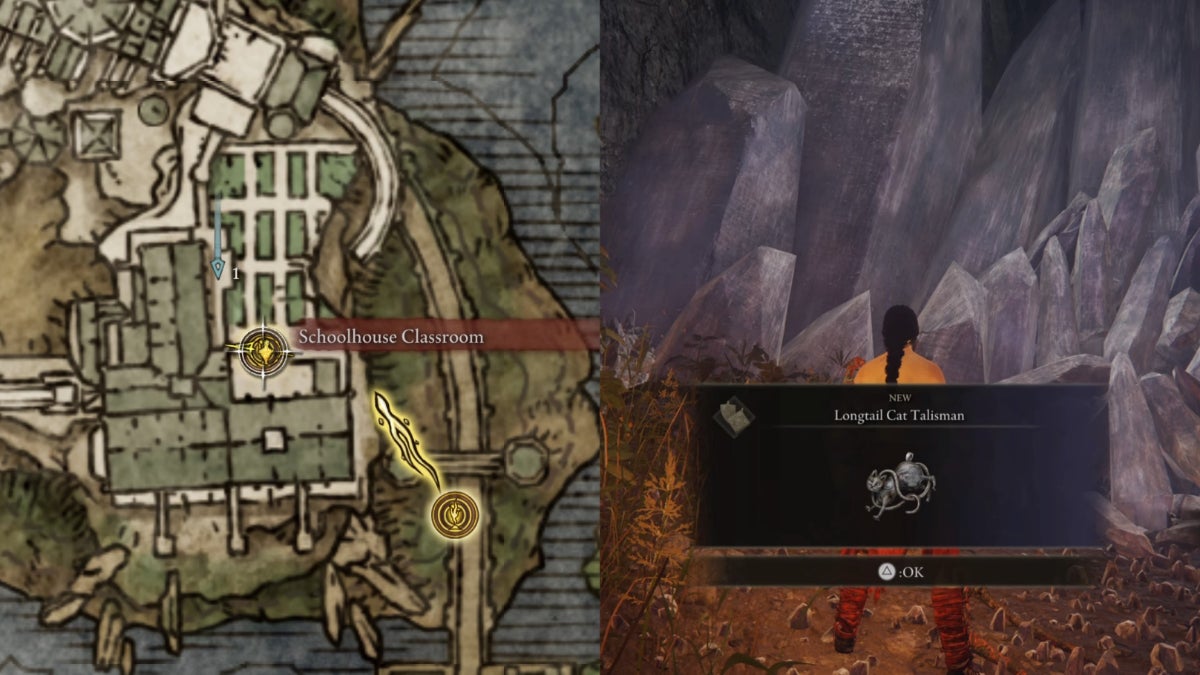
| Effect | Note |
|---|---|
| Negates Fall Damage for non-lethal falls (16m to 19.9m) | Does not prevent death from lethal fall, which is around 20m |
Schoolhouse Classroom Grace — Go out to the backyard towards the waterwheel. Jump down to an ascending platform and run towards the descending one. Wait for 35 seconds to reach the pit of Raya Lucaria Academy. Notice crystals behind the lone Abductor Virgin. The Longtail Cat Talisman is on a corpse below it.
Tip: If you get grabbed and killed inside the Abductor Virgin, you’ll be teleported to an area in the Volcano Manor.
Graven-School Talisman
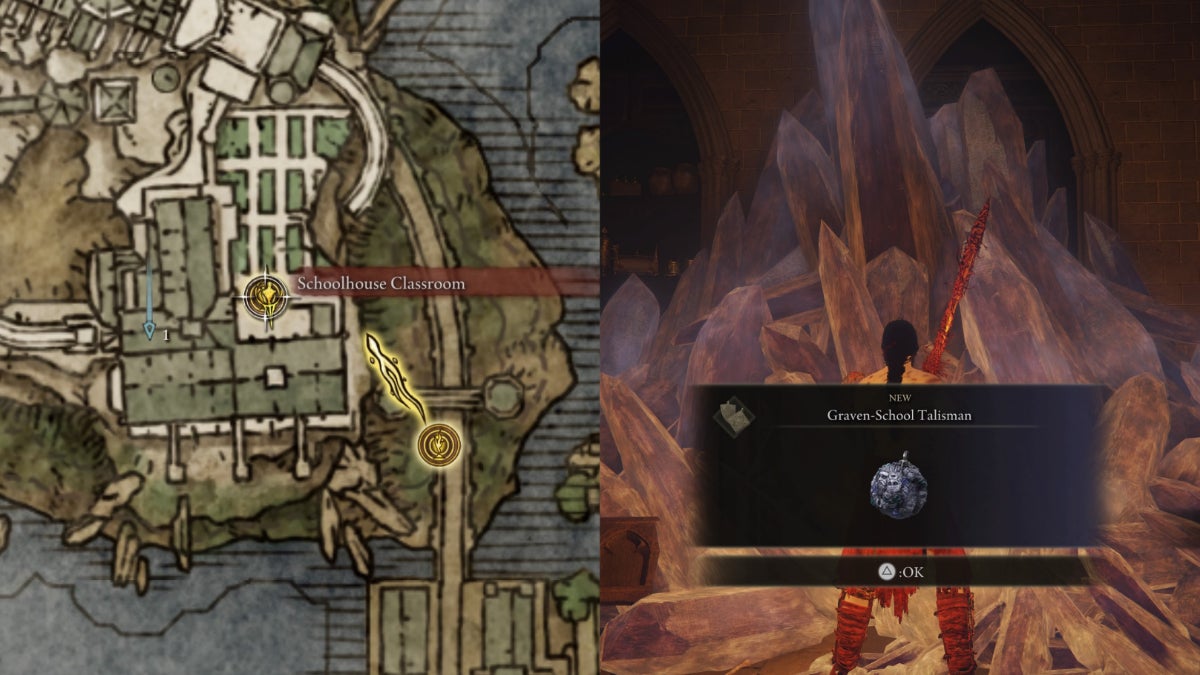
| Effect | Variation |
|---|---|
| +4% Sorceries' Damage | Graven-Mass Talisman (Stackable) |
Schoolhouse Classroom Grace — Go to the hallway and take the right stairs. Roll into an empty bookshelf to reveal a secret path. Climb the ladder and seek a broken rampart to jump down to. Find your way down to a room with Living Jars. The Graven-School Talisman is on the crystals.
Radagon Icon
| Effect | Note |
|---|---|
| Speeds up casting for Sorceries and Incantations (+30 Dexterity only for cast speed) | ‣ Does not speed up Scarlet Aeonia and Dragon Communion Incantations ‣ Depends on your current Dexterity, full effect is visible around 40 Dex |
Debate Parlor Grace — After defeating the Red Wolf of Radagon, get out of the parlor and take a sharp turn to the right. Jump off the balcony and climb up the ladder. Jump into a broken window. Make your way to the other side of the inner balcony. The Radagon Icon is in the chest.
Every Talisman in Caelid
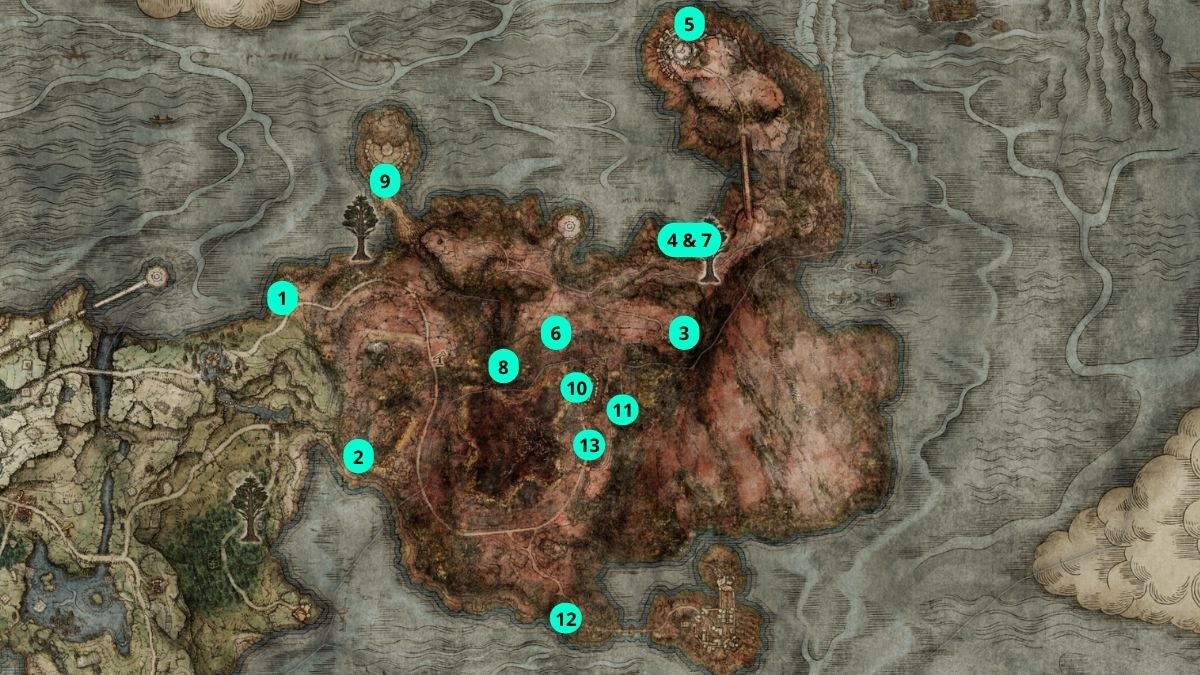
There are 13 Talismans in Caelid.
| Talisman | Map Location | |
|---|---|---|
| 1 |  Sacred Scorpion Charm Sacred Scorpion Charm | Invader Anastasia, Smoldering Church |
| 2 |  Starscourge Heirloom Starscourge Heirloom | Fort Gael |
| 3 |  Radagon's Soreseal Radagon's Soreseal | Fort Faroth |
| 4 |  Bull-Goat's Talisman Bull-Goat's Talisman | Dragonbarrow Cave |
| 5 |  Dragoncrest Shield Talisman Dragoncrest Shield Talisman | Lower Bestial Sanctum |
| 6 |  Faithful's Canvas Talisman Faithful's Canvas Talisman | Sellia Crystal Tunnel |
| 7 |  Flamedrake Talisman +2 Flamedrake Talisman +2 | Dragonbarrow Cave |
| 8 |  Gold Scarab Gold Scarab | Abandoned Cave |
| 9 |  Great-Jar’s Arsenal Great-Jar’s Arsenal | The Great-Jar at Caelid Coliseum |
| 10 |  Spelldrake Talisman +1 Spelldrake Talisman +1 | Sellia, Town of Sorcery |
| 11 |  Prosthesis-Wearer Heirloom Prosthesis-Wearer Heirloom | Millicent, Church of Plague |
| 12 |  Arrow’s Sting Talisman Arrow’s Sting Talisman | Impassable Greatbridge Tower |
| 13 |  Flock’s Canvas Talisman Flock’s Canvas Talisman | Crying Gowry at his shack |
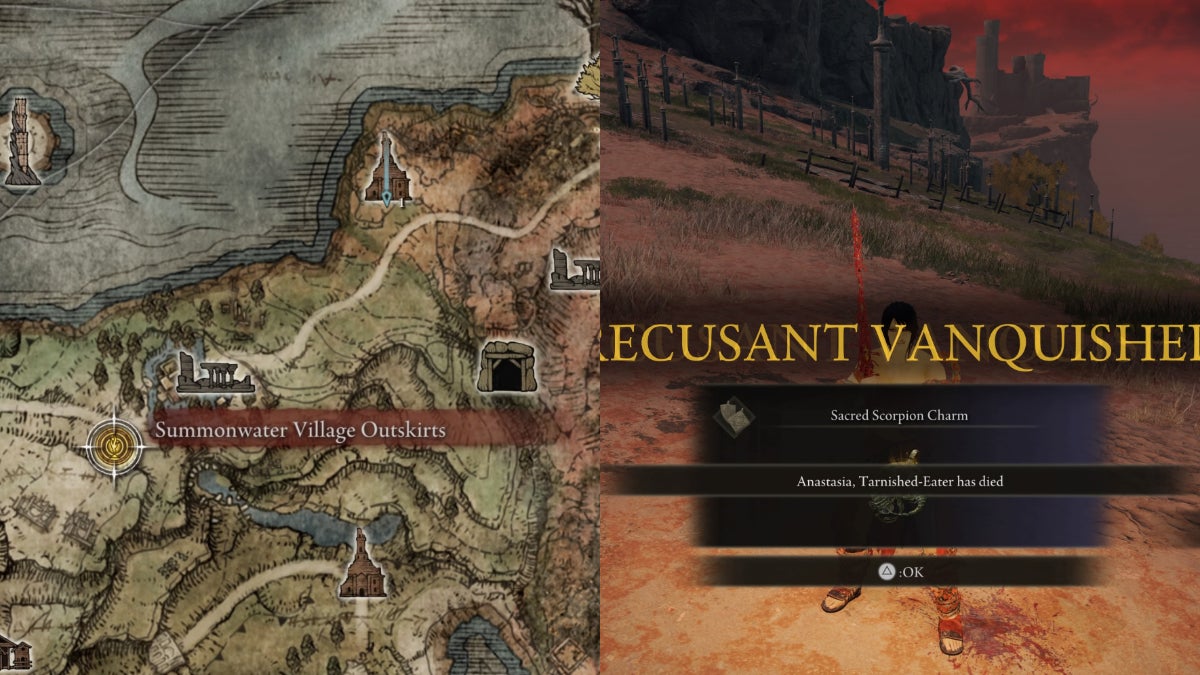
Sacred Scorpion Charm
| Effect | Note |
|---|---|
| ‣ +12% Holy Damage (+8% only in PVP) ‣ -10% Physical Defense (-15% in PVP) | Stacks with the following: ‣ Holy-Shrouding Cracked Tear ‣ Ruptured Crystal Tears ‣ Faithful's Canvas Talisman ‣ Flock's Canvas Talisman ‣ Golden Vow Incantation |
Summonwater Village Outskirts Grace — Follow the pathway to North of Caelid. The Smoldering Church is just along the road. Get closer to the entrance to get invaded by Anastasia, Tarnished Eater. Defeat her to get the Sacred Scorpion Charm.
Starscourge Heirloom

| Effect | Note |
|---|---|
| +5 Strength | Two-handing a weapon will you give more Strength, specifically: 5 Strength * 1.5 = 7.5 Strength |
Smoldering Wall Grace — Go southeast towards Fort Gael. Stick to the edge of the cliff to reach the castle safely. Instead of going through the front gate, which is locked, go to the back of the Fort.
Carefully make your way to the wooden rampart guarded by a Commoner. Climb up the ladder. Notice the Redmane Knight on the other side. Use the wood panel to get to him. Go to the rooftop to find the Starscourge Heirloom in the chest under a canopy.
Radagon’s Soreseal
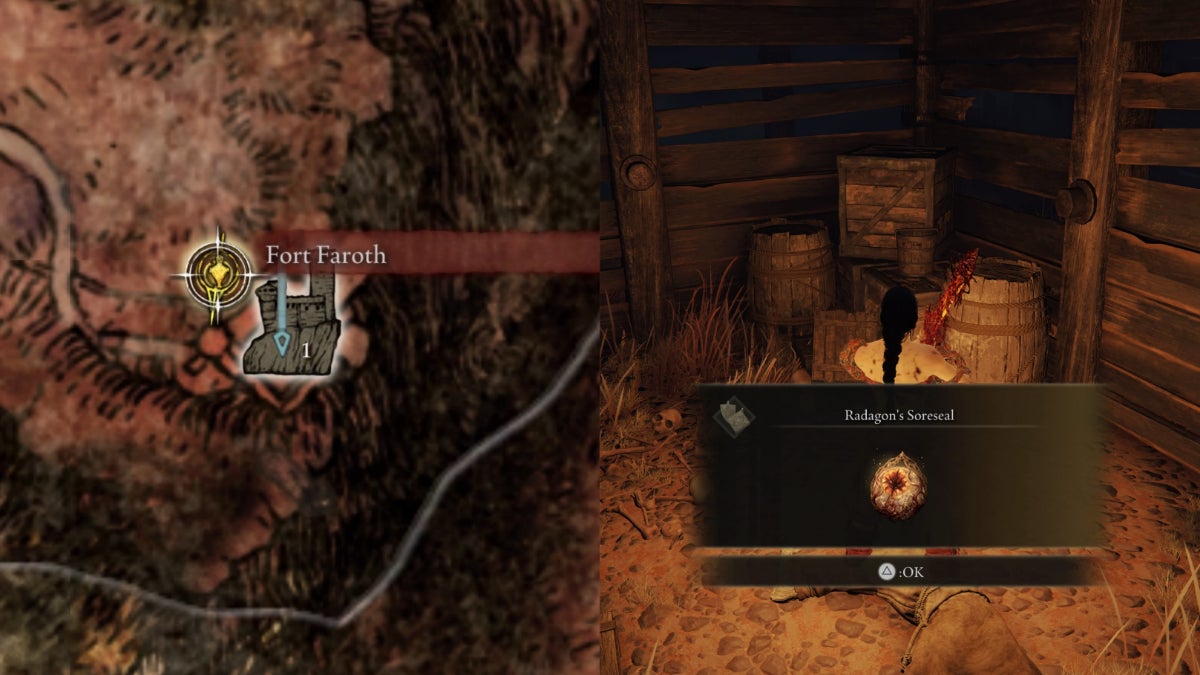
| Effect | Variation |
|---|---|
| ‣ +5 Vigor, Endurance, Strength and Dexterity ‣ -15% Defense | Radagon's Scarseal |
Fort Faroth Grace — Go inside and run towards the ladder. Turn right and jump on the wooden ramparts. Find the opening near the huts of the rooftop.
Jump down, turn right, and quickly jump across the other section where the Giant Rats are. Jump down again, and turn left to find the Radagon’s Soreseal on a corpse near the wooden crates and barrels.
Bull-Goat’s Talisman
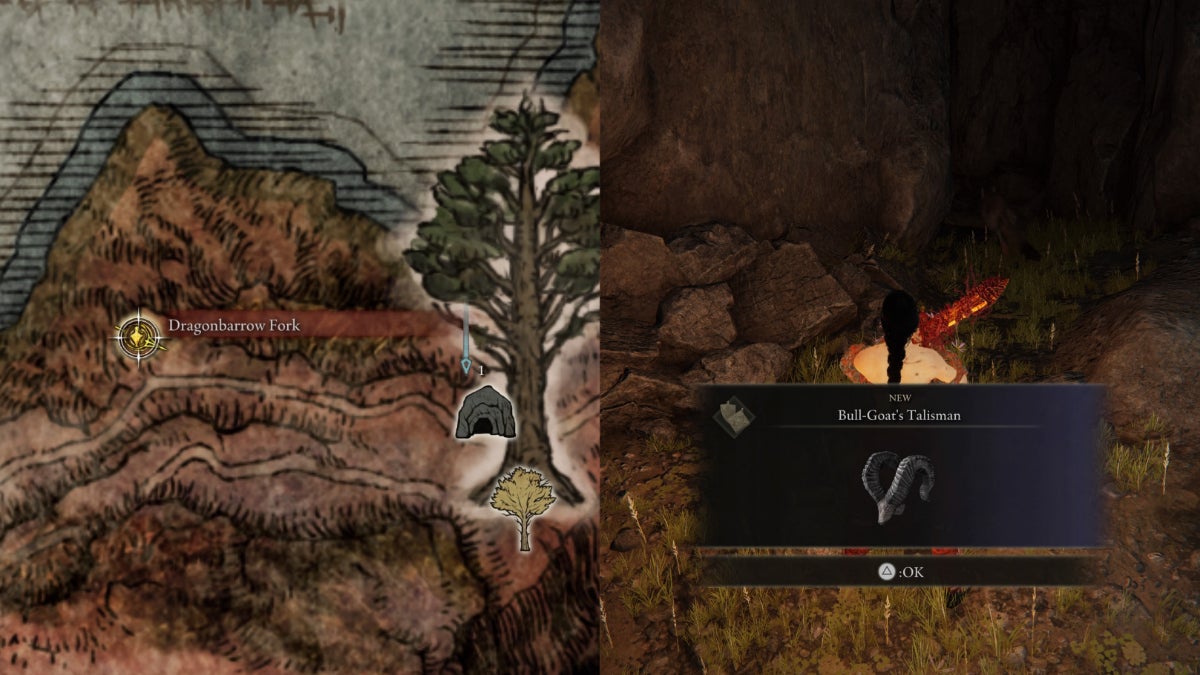
| Effect | Note |
|---|---|
| +33% Poise | ‣ A must for Tank Builds ‣ Makes heavy stagger attacks weak ‣ Goes along with the Bull-Goat Armor Set |
Dragonbarrow Fork Grace — Go to the Dragonbarrow Cave entrance guarded by Lesser Runebears. Inside, you can find a Runebear Den. Quickly rush to where the Runebear is heading, and find a beautiful cavern with Deers and Squirrels. The Bull-Goat’s Talisman on a corpse at a corner.
Dragoncrest Shield Talisman
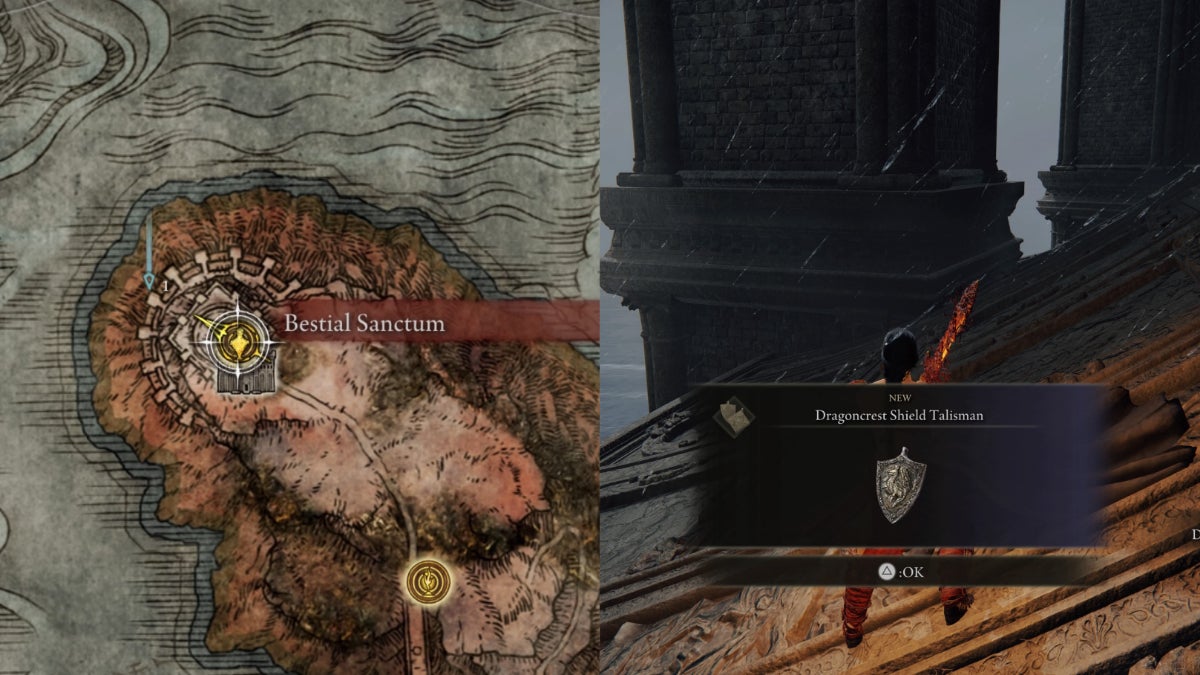
| Effect | Variation |
|---|---|
| +10% Physical Damage Negation (+2% only in PVP) | ‣ Dragoncrest Shield Talisman +1 ‣ Dragoncrest Shield Talisman +2 ‣ Dragoncrest Greatshield Talisman |
Limgrave, Third Church of Marika Grace — Find the hidden waygate northeast of the church, and you’ll be teleported to the Bestial Sanctum in Greyoll’s Dragonbarrow, North of Caelid.
Bestial Sanctum Grace — Get out of the sanctum and turn right. Go to the edge near the two Guillemot. Look for a thick branch you can jump down to.
Find another branch below that you can jump down to. Notice the circular roof and jump on it. Now jump down to the pillar and make your way to the edge facing the ocean. Jump down towards the Giant Bat’s spot.
Carefully walk towards the back side of the pillar. Jump towards the ledge across. Call Torrent to safely reach the second bottom layer. Notice a Ruin Fragment on a ledge. Jump across, and make your way to the pillar. Jump down to the ledge of the wall.
Don’t jump down to the rock, because that will kill you. Instead, call on Torrent and jump on the pillar’s ledge. Position yourself on the inner corner of the pillar. Now, jump again on the rounded ledge with Torrent and skip your way, just above the rocks.
Fall down to it to reach the third bottom layer. From here on, head east. You’ll notice a balcony with an item on it. A little beyond the balcony is a Giant Bat. Behind it is the Dragoncrest Talisman on a corpse.
Faithful’s Canvas Talisman
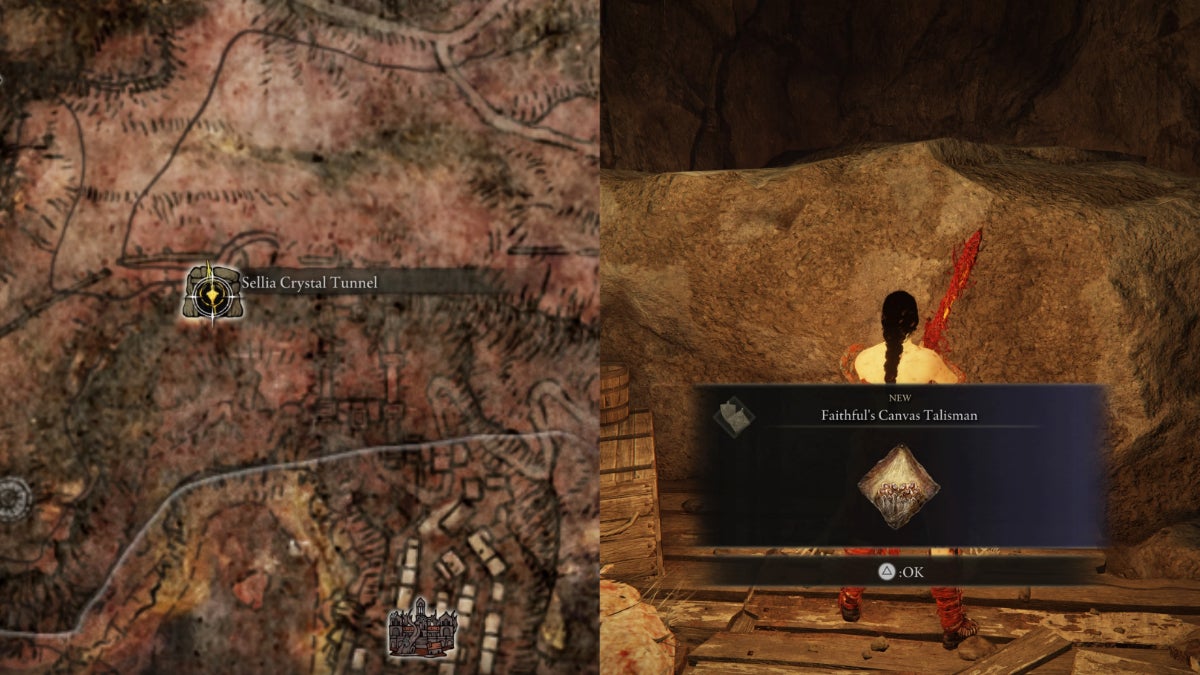
| Effect | Variation |
|---|---|
| +4% Incantations' Damage | Flock's Canvas Talisman (Stackable) |
Sellia Crystal Tunnel — Take the right path. Seek the Lesser Kindred of Rot on the roof of the shed. Jump onto its spot and kill it. Jump onto the wooden tunnel to reach the upper shed area.
Kill the Lesser Kindred of Rot before going into the next cavern. Beware of yet another Lesser Kindred of Rot hiding in the left shed. The Faithful’s Canvas Talisman is on a corpse on a platform in front of the two Lesser Kindred of Rot.
Tip: To quickly reach the Sellia Crystal Tunnel, Use the Transporter Trap within the cellar of the Dragon-Burnt Ruins of Agheel Lake, Limgrave.
Flamedrake Talisman +2
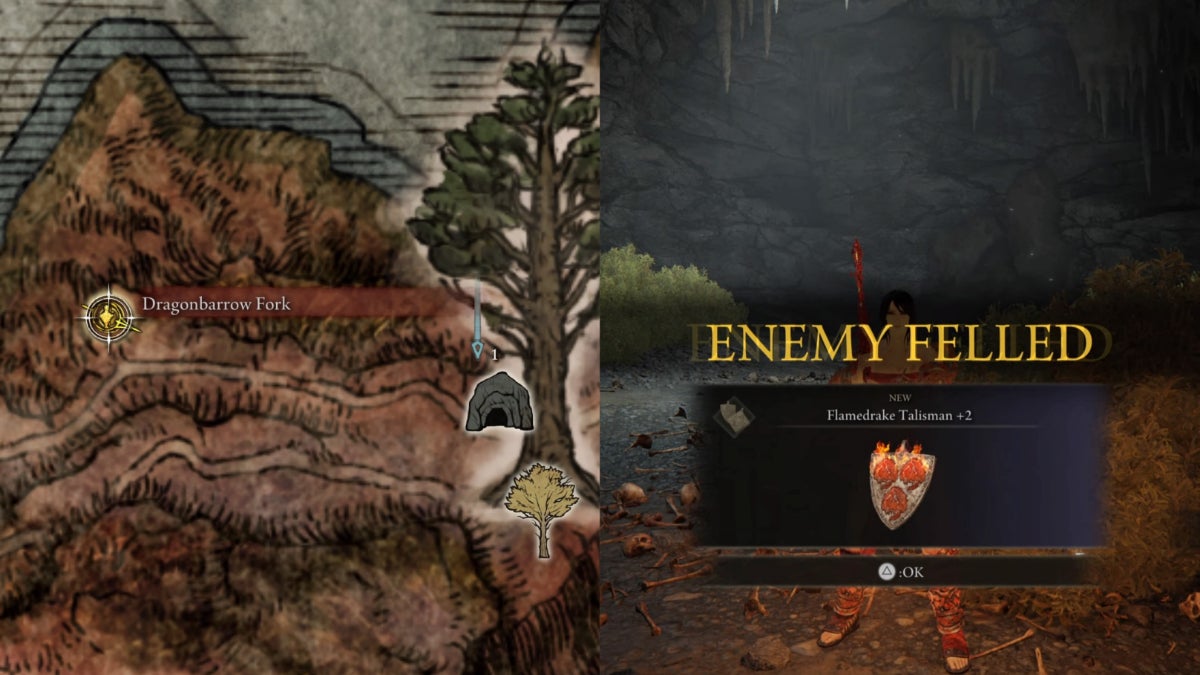
| Effect | Variation |
|---|---|
| +20% Fire Damage Defense (+4% only in PVP) | ‣ Flamedrake Talisman ‣ Flamedrake Talisman +1 |
Dragonbarrow Fork Grace — Make your way to the Dragonbarrow Cave, or fast travel to the Dragonbarrow Cave site of grace if you already have it. Hide behind the bushes and notice a large stone on the right side.
Once the Runebear is out of the den, run towards the tunnel beside the large stone. Beware of the Wolf packs as you may your way down to the pit of the Dragonbarrow Cave. Defeat the two Beastman of Farum Azula to get the Flamedrake Talisman +2.
Gold Scarab
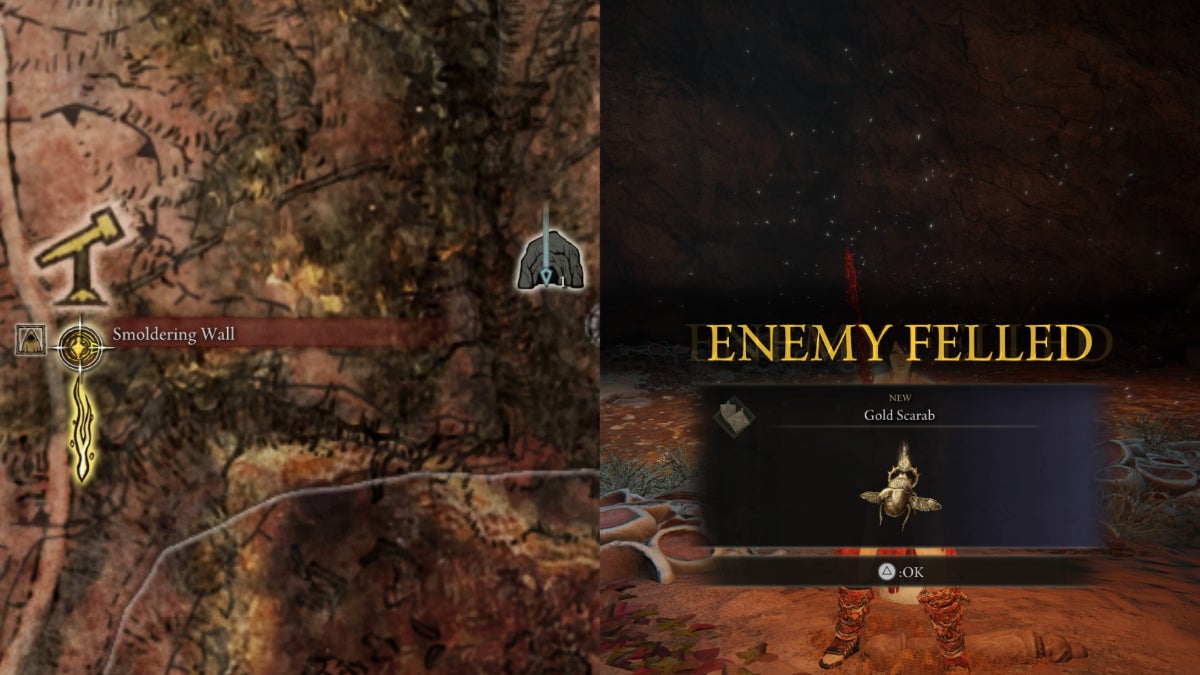
| Effect | Note |
|---|---|
| +20% Runes Gain | Stacks with Gold-Pickled Fowl Foot |
Smoldering Wall Grace — Go east towards the cliff. Beware of the Monstrous Dogs on your way there. Seek a tree with an Abductor Virgin. At the edge of the cliff are branches you can use to reach the Abandoned Cave entrance.
Find your way to a cavern with a Scarlet Miranda Bloom and Miranda Sprouts. Turn right, and climb up towards the upper platform towards the cavern of the two Cleanrot Knights. Defeat them to get the Gold Scarab.
Tips:
- Prepare Neutralizing Boluses (for Poison cure) and Preserving Boluses (for Scarlet Rot cure).
- Use Ash of War: Bloodhound Step to smoothly explore the cave.
Great-Jar’s Arsenal
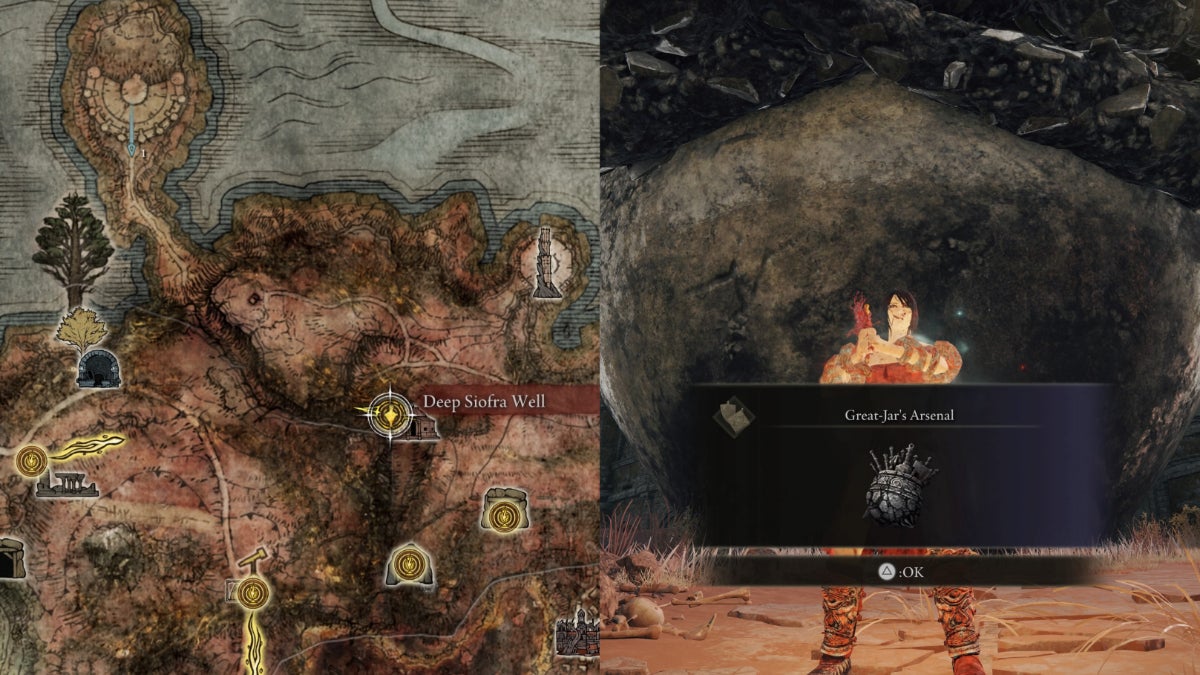
| Effect | Note |
|---|---|
| +19% of Max Equip Load | ‣ Must defeat all 3 Warriors of The Great-Jar ‣ Go offline when doing the challenge makes it more manageable; doing it online means having to fight against overpowered and cheesy Warriors |
Siofra River, Worshipper’s Woods Grace — Head straight for the Deep Sofria Well lift. Unlock it using two Stonesword Keys to reach the Caelid Coliseum.
Deep Siofra Well site of grace: Go straight for the Caelid Coliseum. Beware of the exploding Abnormal Stone Clusters and Guardian Golems. Talk to the Great Jar to spawn the three Red Summon Signs on the ground. After defeating all three of his Warriors, talk with him again to get the Great-Jar’s Arsenal.
Tip: Do the Great Jar’s questline offline to make it easier. Going online means fighting overpowered and cheesy builds of other players.
Spelldrake Talisman +1
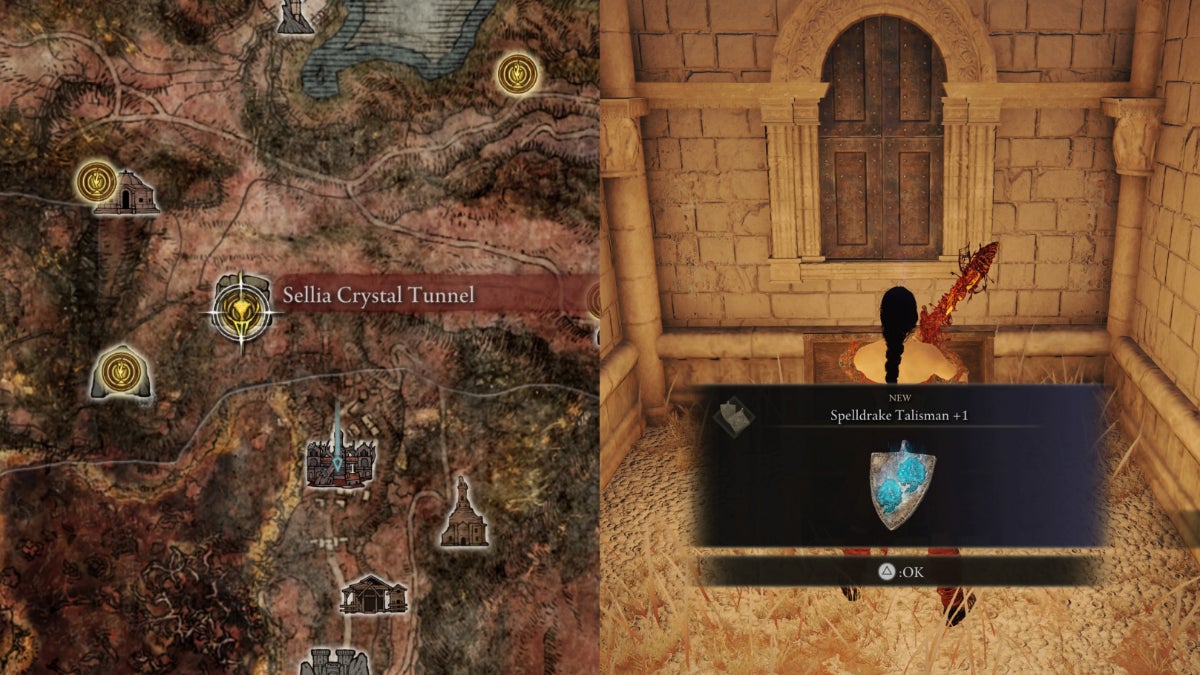
| Effect | Variation |
|---|---|
| +17% Magic Resistance (+5% only in PVP) | ‣ Spelldrake Talisman ‣ Spelldrake Talisman +2 |
Sellia Crystal Tunnel Grace — Go out of the tunnel towards Sellia, Town of Sorcery. Fast travel to Sellia Under-Stair site of grace, if you already have it.
Notice the sealed room under a balcony with an overhanging corpse. All that’s left to do is break the seal. Light up every Ghost-Flamed brazier in all three towers. Go to the unlocked room to get the Spelldrake Talisman +1 from the chest.
Prosthesis-Wearer Heirloom
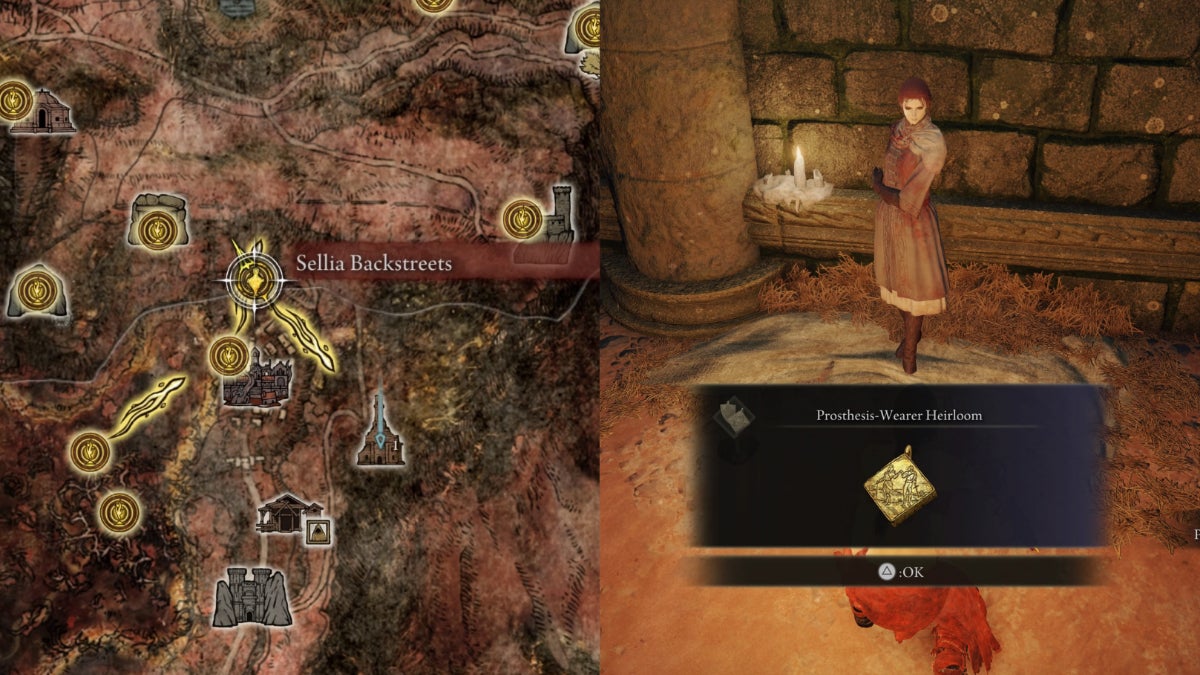
| Effect | Note |
|---|---|
| +5 Dexterity | Stacks with the following: ‣ Millicent's Prosthesis ‣ Winged Sword Insignia or Rotten Winged Sword Insignia |
Inner Aeonia Grace — Defeat Commander O’Neal located nearby to get the broken Unalloyed Gold Needle. Give it to Gowry at his shack, east of the Heart of Aeonia site of grace.
Rest at any site of grace to pass time, and talk to Gowry again to get the now-fixed Unalloyed Gold Needle from him.
Tip: Call Torrent and lure Commander O’Neal around the Scarlet Rot explosions near the Inner Aeonia site of grace to cheese him.
Sellia, Town of Sorcery — Light up all the Ghost-Flamed braziers to unlock the pathway to the Sellia Backstreets. Head towards the doorway near an Erdtree Branch, or fast travel to the Sellia Backstreets site of grace, if you already have it. Go to the Church of Plague.
Church of Plague — Beware of the two Lesser Kindred of Rot guarding the entrance. Give Millicent the Unalloyed Gold Needle. Rest at the site of grace. Talk to her again to get the Prosthesis-Wearer Heirloom.
Arrow’s Sting Talisman
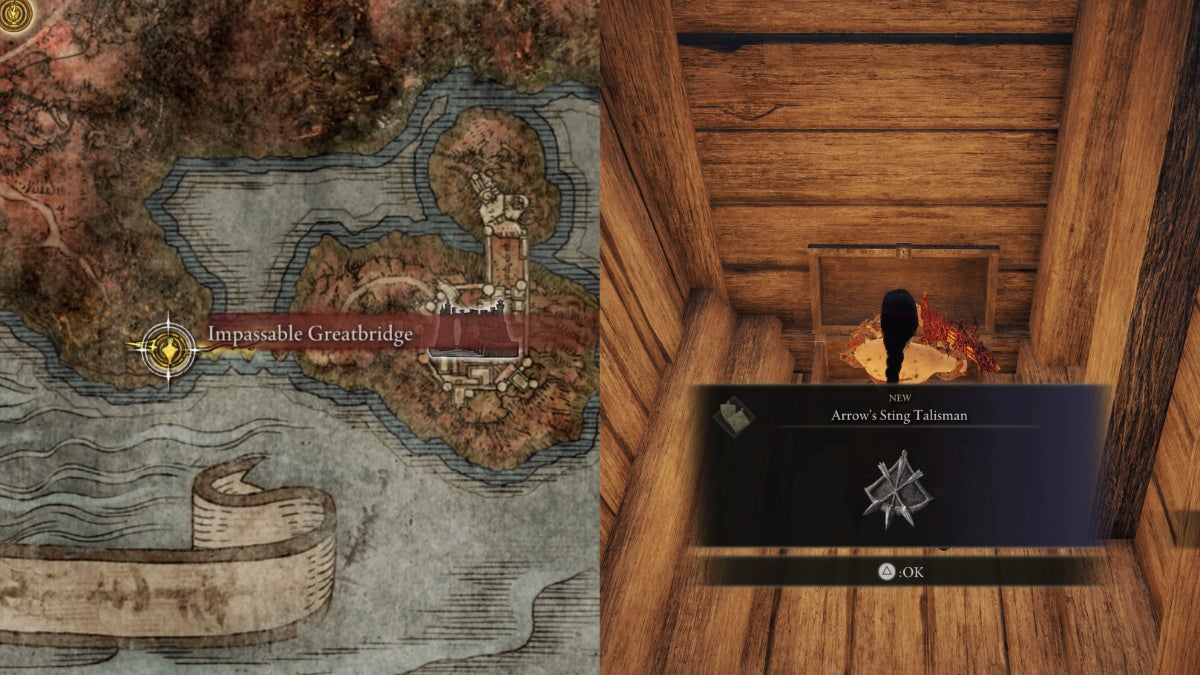
| Effect | Note |
|---|---|
| +10% Arrow and Bolt DPS | Affected Items: ‣ All Bow variants ‣ Throwable Daggers |
Impassable Greatbridge Grace — Climb up to the upper section of the watchtower. Beware of the Redmane Soldiers and Knights. The Arrow’s Sting Talisman is in the chest at the right corner.
Flock’s Canvas Talisman
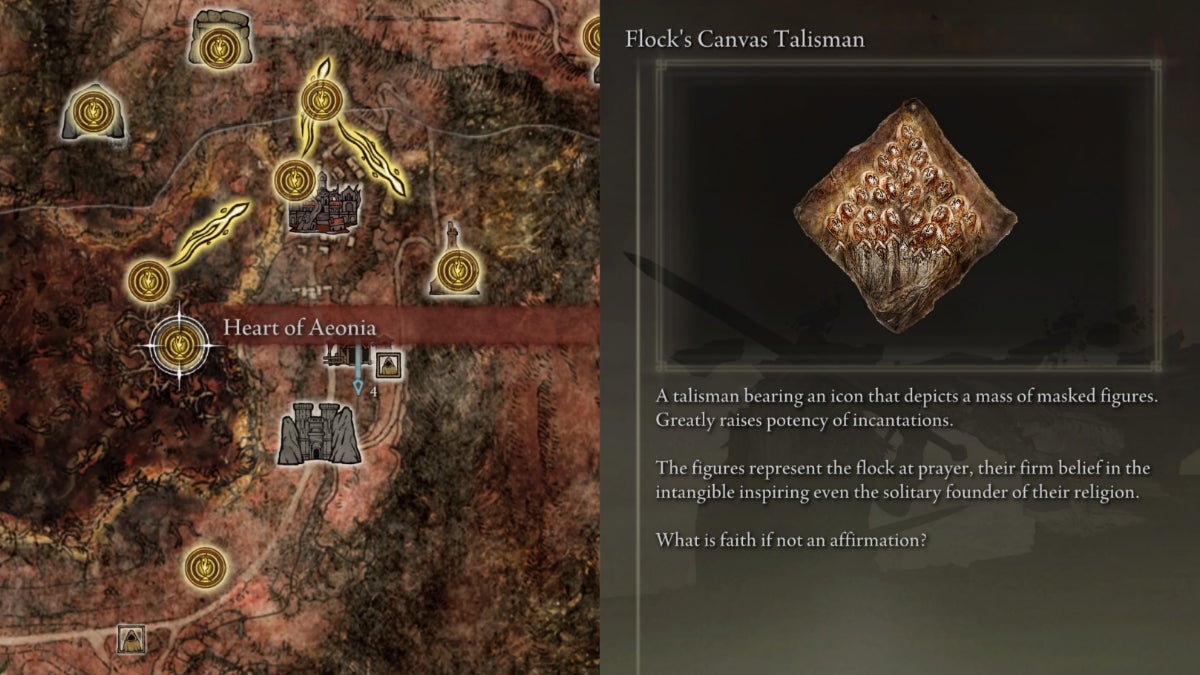
| Effect | Variation |
|---|---|
| +8% Incantations' Potency | Faithful's Canvas Talisman (Stackable) |
Gowry’s Shack — You need to progress Millicent’s questline to the point that you’re given the choice to assist her or kill her. You’re free to choose either option. Afterward, go to Gowry’s Shack in Caelid to find him in a crying state. Kill him to get the Flock’s Canvas Talisman.
Every Talisman in Altus Plateau
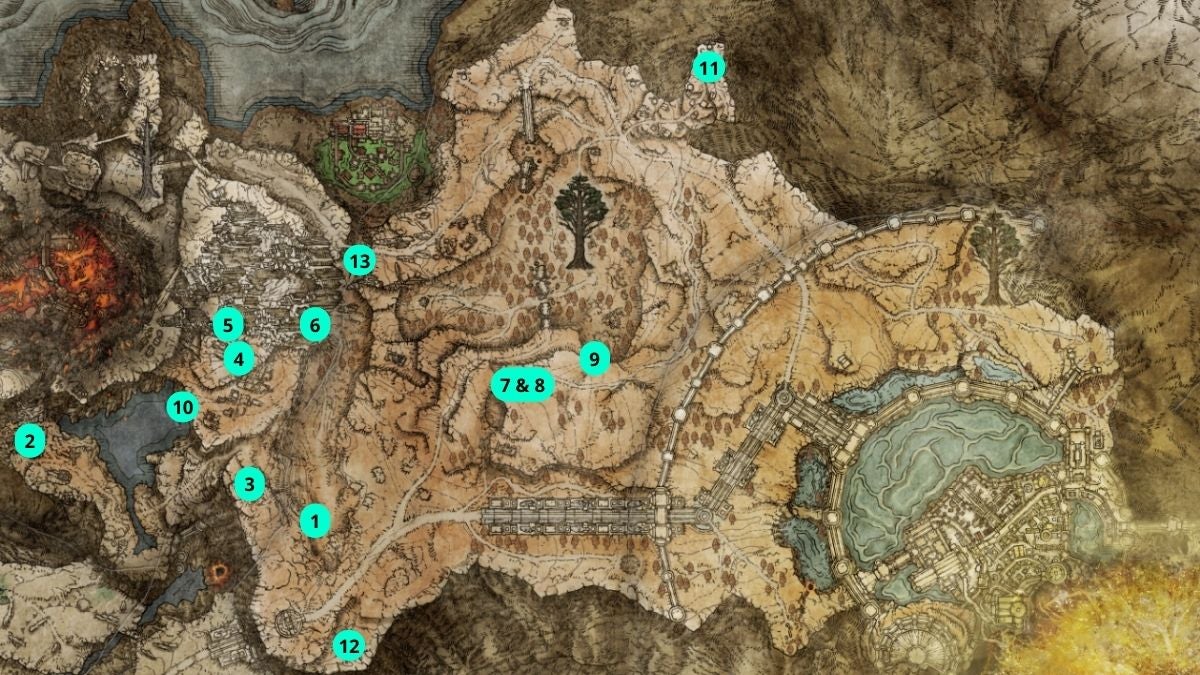
There are 13 Talismans in the Altus Plateau.
| Talisman | Map Location | |
|---|---|---|
| 1 |  Greatshield Talisman Greatshield Talisman | On a Carriage at a Leyndell Soldier Camp |
| 2 | 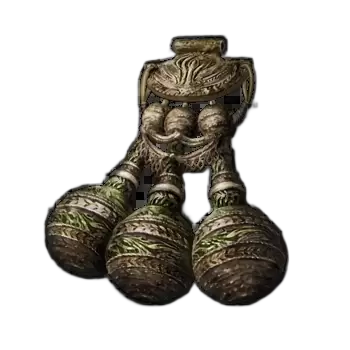 Perfumer’s Talisman Perfumer’s Talisman | Perfumer's Ruins |
| 3 |  Ritual Sword Talisman Ritual Sword Talisman | Lux Ruins |
| 4 | 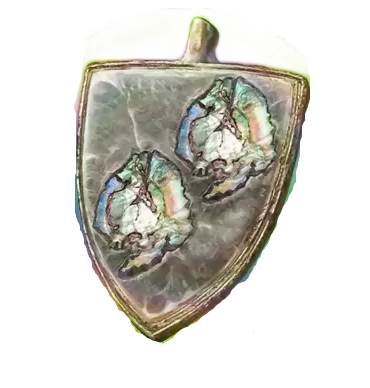 Pearldrake Talisman +1 Pearldrake Talisman +1 | Imp-Sealed cellar in Wyndham Ruins |
| 5 | 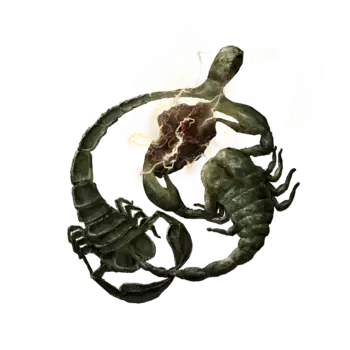 Lightning Scorpion Charm Lightning Scorpion Charm | Imp-Sealed room in Wyndham Catacombs |
| 6 | 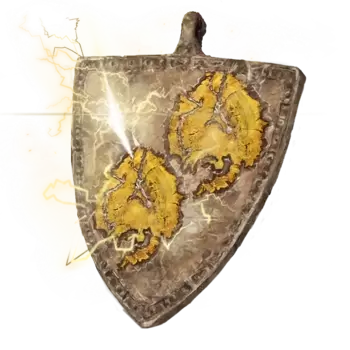 Boltdrake Talisman +1 Boltdrake Talisman +1 | Balcony at Old Altus Tunnel |
| 7 |  Crimson Seed Talisman Crimson Seed Talisman | Imp-Sealed room of Sainted Hero's Grave |
| 8 |  Dragoncrest Shield Talisman +1 Dragoncrest Shield Talisman +1 | Imp-Sealed room of Sainted Hero's Grave |
| 9 |  Arsenal Charm +1 Arsenal Charm +1 | Upper Balcony of Altus Tunnel |
| 10 |  Concealing Veil Concealing Veil | Sage's Cave |
| 11 |  Millicent’s Prosthesis Millicent’s Prosthesis | Millicent at Windmill Heights, Windmill Village |
| 12 | Golden Lineage Evergaol | |
| 13 |  Crepus’s Vial Crepus’s Vial | Rileigh the Idle, Volcano Manor Second Letter |
Greatshield Talisman

| Effect | Note |
|---|---|
| +10% Guard Boost | ‣ Does not reduce damage when blocking ‣ Use with Shield Grease and Scholar's Shield or fully upgraded Great Shields to reach 100% Guard Boost |
Erdtree-Gazing Hill Grace — Go down towards the Leyndell Soldier Camp. Seek the caravan on the right side of the camp. Get behind it to get the Greatshield Talisman from the chest.
Perfumer’s Talisman
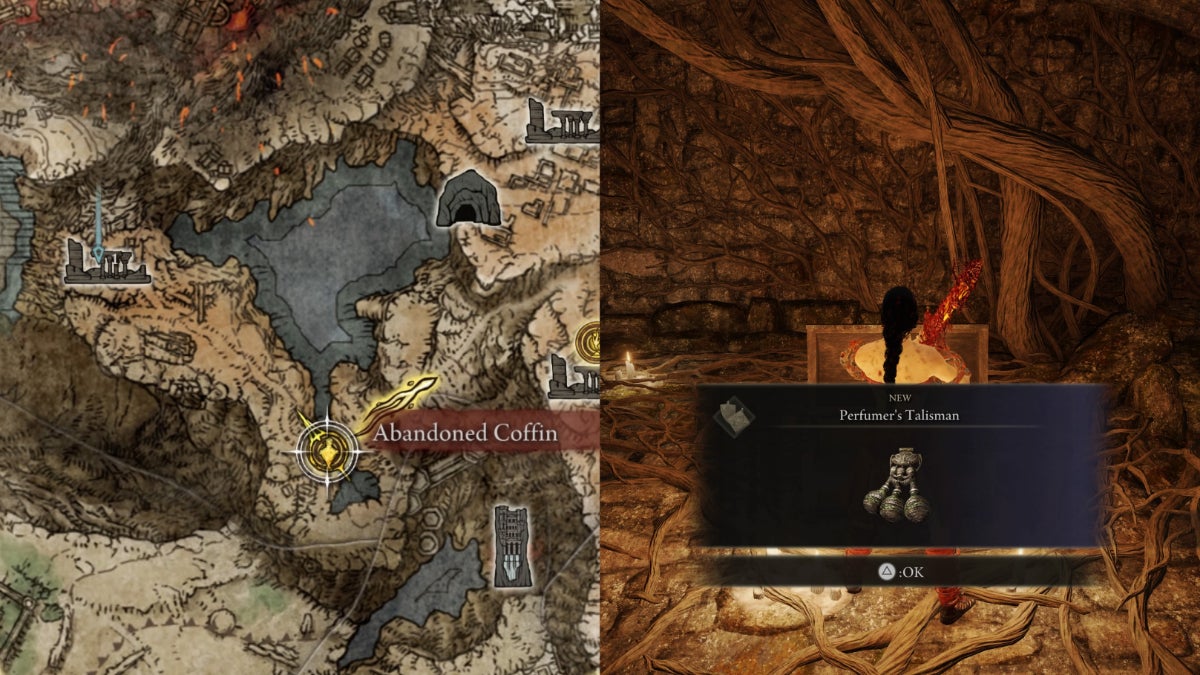
| Effect | Note |
|---|---|
| +17% Perfume Arts' Damage | ‣ Only applicable to offensive Perfume Arts ‣ Does not stack with Arrow's Sting Talisman |
Abandoned Coffin Grace — Go towards Perfumer Ruins, northwest of the Lake. Beware of the Perfumers and Omenkiller dwelling in there. Go to the upper part of the ruins where you can spot a Yellow Miranda Bloom. Hit the wooden panels to reveal the cellar. The Perfumer’s Talisman is in the chest.
Ritual Sword Talisman
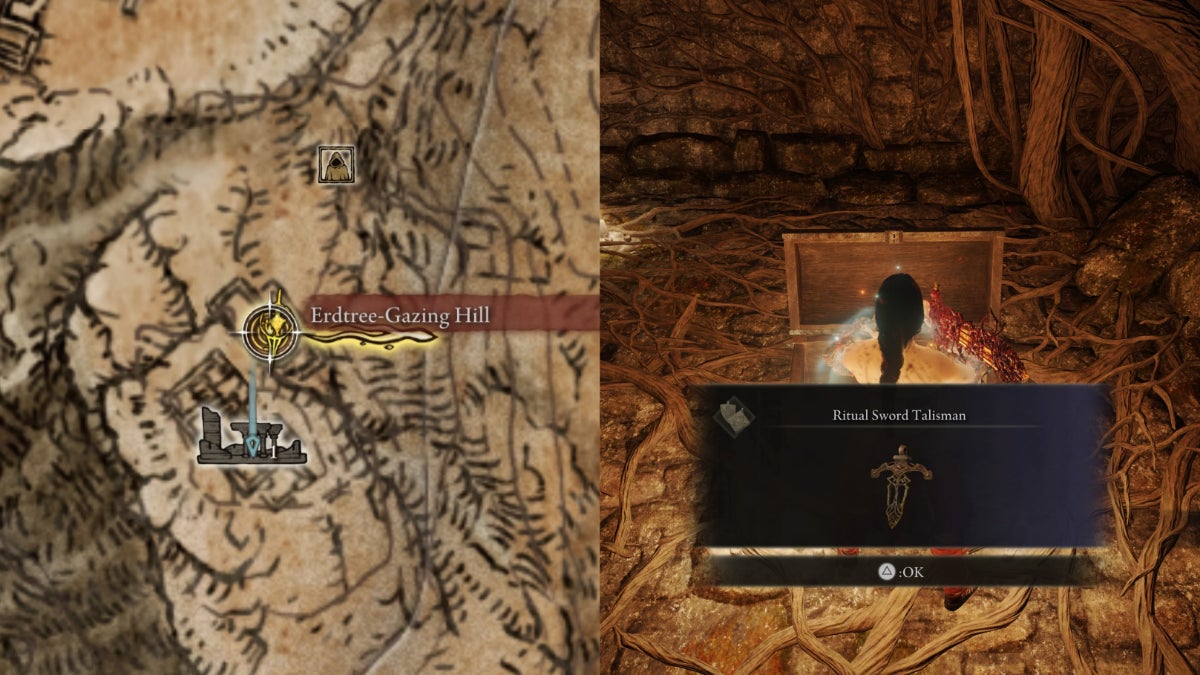
| Effect | Note |
|---|---|
| +10% DPS on Full HP | ‣ Use with Health Regen buffs (spells and crystal tears) ‣ Stacks with Blessed Dew Talisman, Taker's Cameo Talisman, Shield, Graven-Mass Talisman, Flock's Canvas Talisman, Golden Vow Incantation, etc. |
Erdtree-Gazing Hill Grace — Find a ledge hidden by the trees on the right side of the ruins. Call on Torrent and double jump towards the other side. Seek a cellar in the Lux Ruins. Defeat the Demi-Human Queen Gilika to get access to the chamber. The Ritual Sword Talisman is in the chest.
Pearldrake Talisman +1
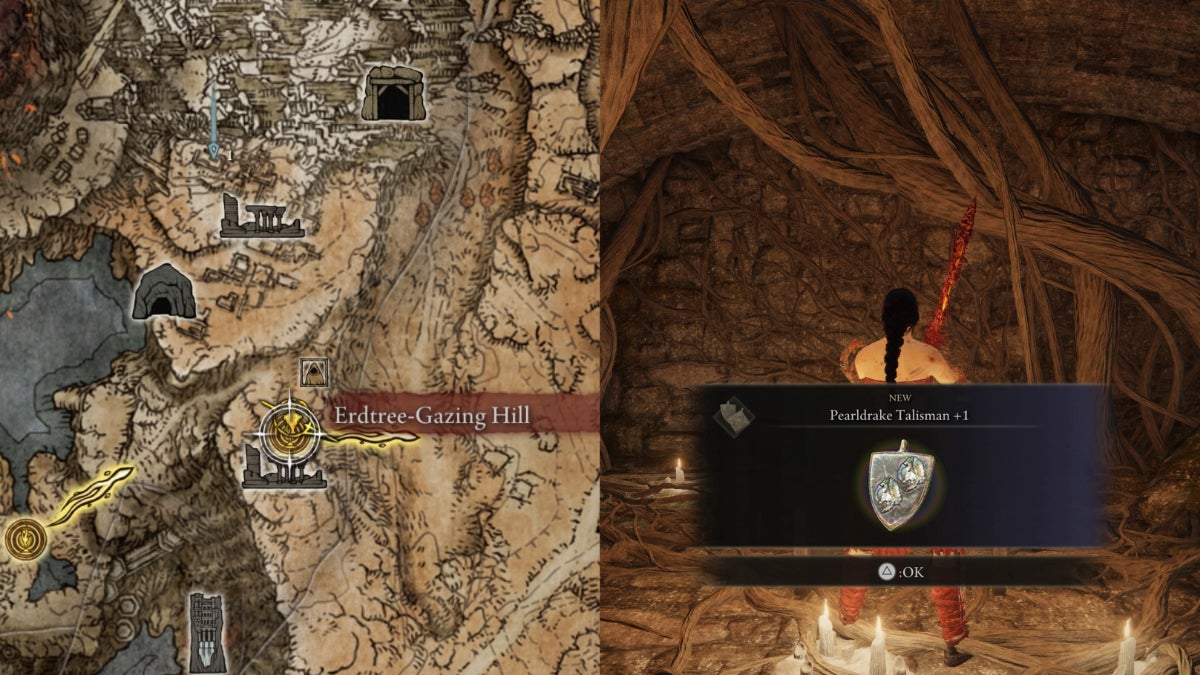
| Effect | Variation |
|---|---|
| +7% Elemental Resistance (3% only in PVP) | ‣ Pearldrake Talisman ‣ Pearldrake Talisman +2 |
Erdtree-Gazing Hill Grace — Go northwest from here where you’ll meet with Tibia Mariner. Reach the upper part of the Wyndham Ruins, There’s an Imp-Sealed Cellar, which requires one Stonesword Key. Beware of the Giant Spirit Skeleton and Skeletal Militiamen guarding the area. The Pearldrake Talisman +1 is in the chest.
Lightning Scorpion Charm
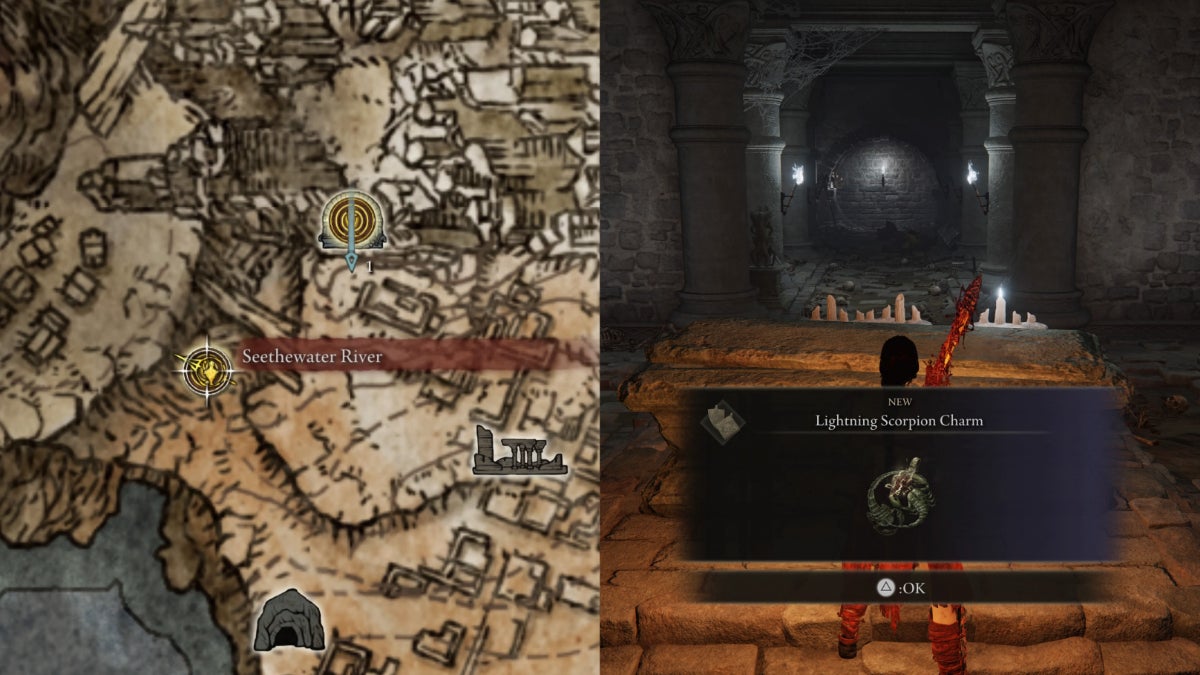
| Effect | Note |
|---|---|
| ‣ +12% Lightning Damage (+8% only in PVP) ‣ -10% Physical Defense (-15% in PVP) | Stacks with the following: ‣ Lightning-Shroud Cracked Tear ‣ Faithful's Canvas Talisman ‣ Flock's Canvas Talisman ‣ Golden Vow Incantation |
Seethewater Cave Grace — Go up the cliff. Run north until you see the Wyndham Catacomb entrance. Find your way towards a Leyndell Knight. Climb the ladder behind him. Beware of the Fanged Imp near the Imp-Sealed room, which requires one Stonesword Key. The Lightning Scorpion Charm is on a corpse behind the gravestone bed.
Boltdrake Talisman +1

| Effect | Variation |
|---|---|
| +17% Lightning Resistance (+5% only in PVP) | ‣ Boltdrake Talisman ‣ Boltdrake Talisman +2 |
Erdtree-Gazing Hill Grace — Go to the Imp-Sealed Old Altus Tunnel, which requires two Stonesword Keys. Beware of the Stone-digger Trolls and Wraith Callers guarding the entrance. Within the tunnel, find a ladder to your right. Beware of the Leyndell Knight and explosive barrels within the area. The Boltdrake Talisman +1 is on a corpse inside a shed guarded by two Strays.
Crimson Seed Talisman
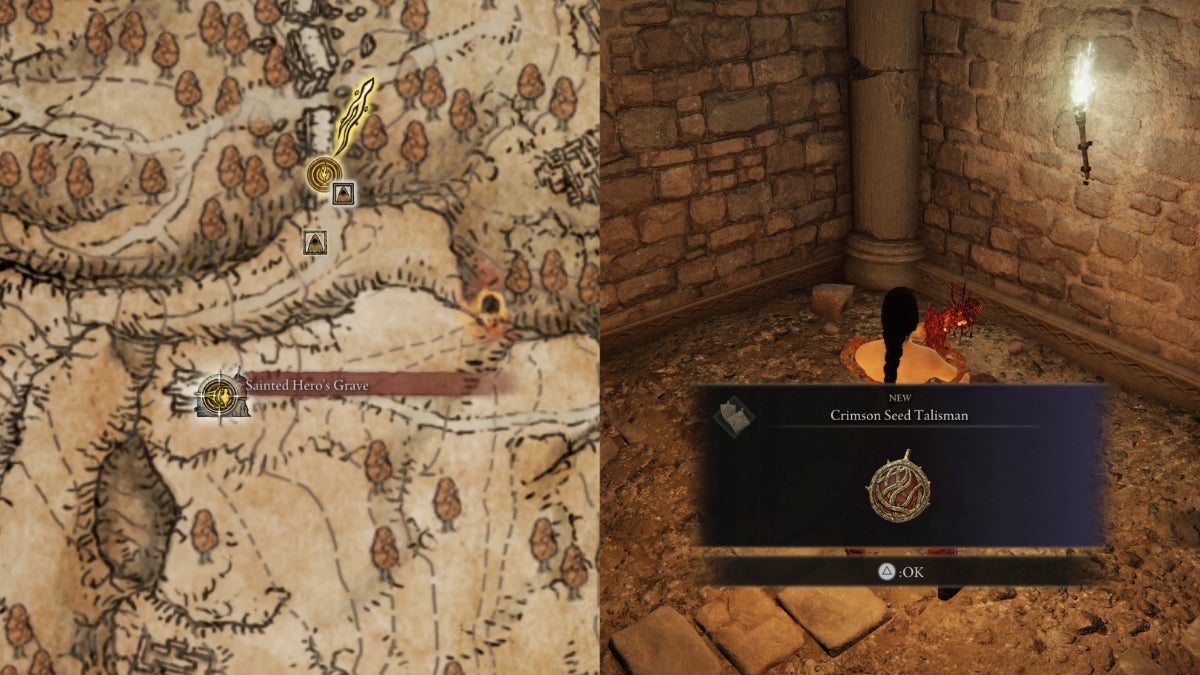
| Effect | Note |
|---|---|
| +20% HP restoration from Flask of Crimson Tears | Great to use when invading or fighting Bosses |
Sainted Hero’s Grave Grace — Beware of the Black Knife Assassin standing by the entrance. You don’t have to defeat her to get in. Seek the Imp-Sealed room, which requires one Stonesword Key. The Crimson Seed Talisman is on a corpse guarded by a Wraith Caller.
Dragoncrest Shield Talisman +1

| Effect | Variation |
|---|---|
| +13% Physical Damage Negation (+3% only in PVP) | ‣ Dragoncrest Shield Talisman ‣ Dragoncrest Shield Talisman +2 ‣ Dragoncrest Greatshield Talisman |
Sainted Hero’s Grave Grace — Go down the hallway, and seek a Fanged Imp standing under a golden light. Turn right until you reach a room with a collapsible floor. Upon reaching an area with moving gigantic guillotines, jump on one to reach an upper area. Find your way to an Imp-Sealed room. Use one Stonesword key to unlock it. Turn right, the Dragoncrest Shield Talisman on corpse guarded by two Putrid Corpses.
Arsenal Charm +1
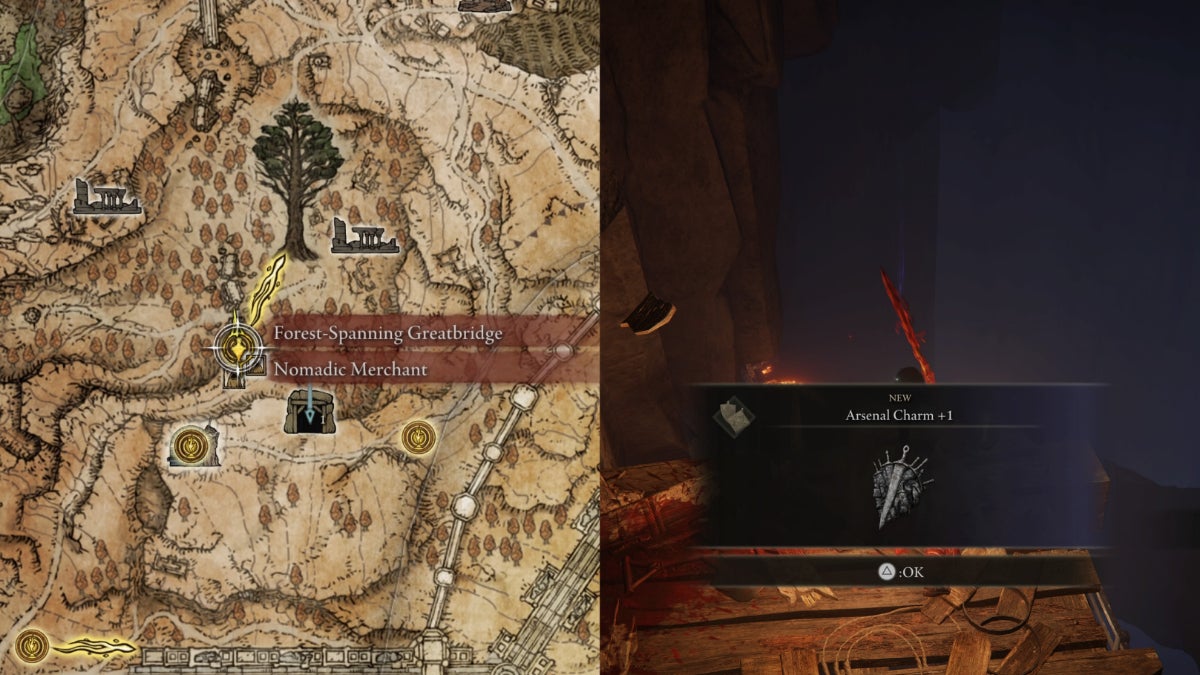
| Effect | Variation |
|---|---|
| +17% of Max Equip Load | ‣ Arsenal Charm ‣ Great-Jar's Arsenal |
Forest-Spanning Greatbridge Grace — Call Torrent and jump down to the descending parts of the ruined greatbridge. Take a sharp turn to the right towards the mountain walls. Climb the upward slope that leads to the Altus Tunnel entrance.
Find your way to a cavern with an Avionette Soldier on a wooden platform. Seek a pathway on the right side leading towards a balcony. Kill the enemies chasing after you. Beware of the Malformed Star and a Spirit-Caller Snail. Go to the left corner and jump down the branch. Climb up towards the upper part of the shed. The Arsenal Charm +1 is on a corpse.
Concealing Veil
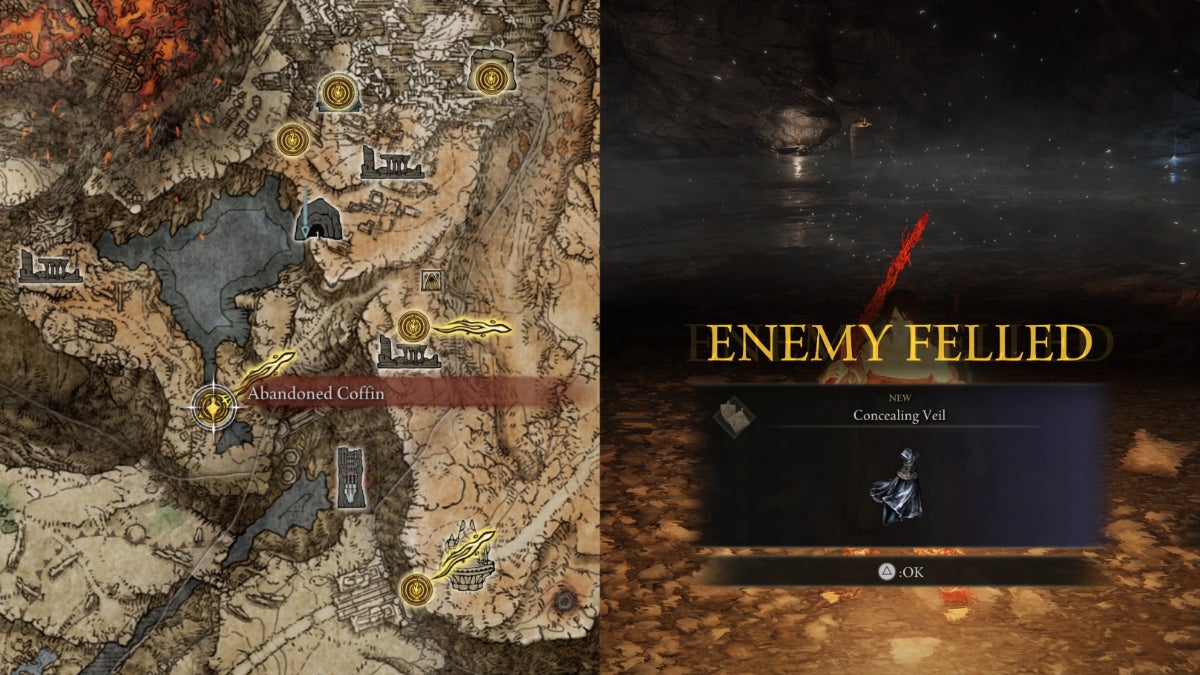
| Effect | Note |
|---|---|
| Makes you invisible when crouching (approximately 4-meter radius) | ‣ Removing the Talisman ‣ Non-crouching moves ‣ Effective in PVP |
Rampartside Path Grace — Go to the Hermit’s Shack on a cliff of the Capital Outskirts. Buy the Sentry Torch for 7,000 Runes.
Abandoned Coffin Grace — Go to the Lake. Stick to the right side until you can spot a small forest hiding the Sage’s Cave entrance. Find your way out to an opening near the waterfalls. Beware of the Skeletal Militiamen chasing you. Jump on the ledge to your left. Make your way behind the waterfall, where the Black Knife Assassin is. Use the Sentry Torch to reveal her presence. Defeat her to get the Concealing Veil.
Millicent’s Prosthesis
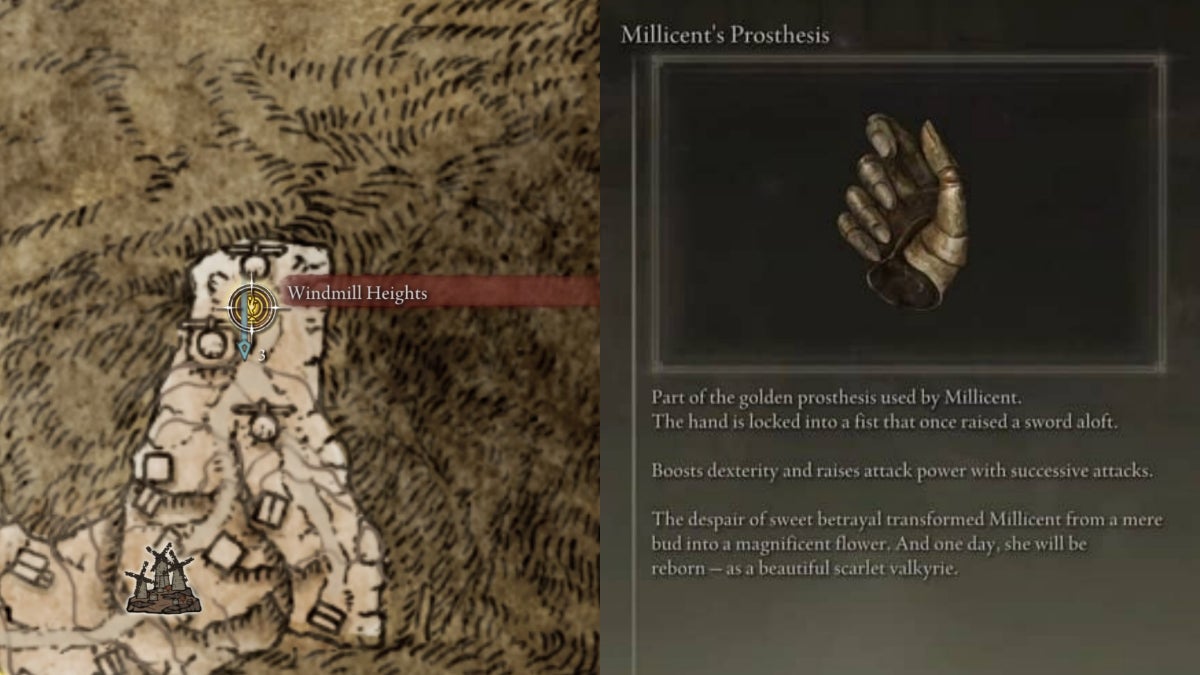
| Effect | Note |
|---|---|
| ‣ +5 Dexterity ‣ Successively raises DPS, specifically: 4%, 6%, and 11%. | ‣ Requires you to kill Godskin Apostle ‣ Locks you out of getting the Rotten Winged Sword Insignia ‣ Stacks with Prosthesis-Wearer Heirloom, Winged Sword Insignia, and Rotten Winged Sword Insignia |
Windmill Heights — You’re required to kill the Godskin Apostle located north of the Windmill Village to unlock the grace site. Afterward, Millicent will appear near the grace. You can choose to kill her to get Millicent’s Prosthesis Talisman. However, you will get locked out of the better variation later on.
Godfrey Icon
| Effect | Note |
|---|---|
| +15% Charged Spells and Skill Damage | ‣ Applicable to Strong Attacks only ‣ Does not affect Bow attack |
Erdtree-Gazing Hill Grace — Call Torrent, go beyond the Leyndell Soldier Camp. Stick to the right until you find a short tunnel leading to the Imp-Sealed Golden Lineage Evergaol. Unlock it with one Stonesword Key. Defeat Godefroy the Grafted to get the Godfrey Icon.
Crepus’s Vial
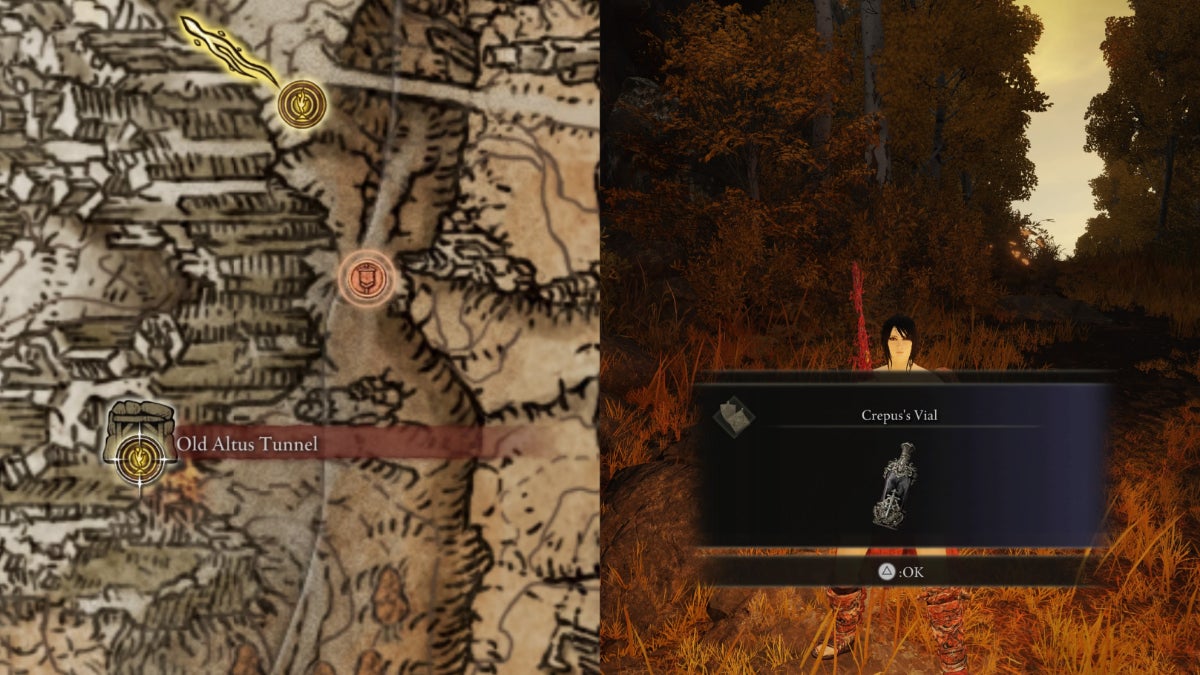
| Effect | Note |
|---|---|
| Make absolutely no sound; no one can hear any of your moves | Very useful when sneaking behind enemies |
Volcano Manor Grace — Talk with Lady Tanith to get the Drawing-Room Key. Open the doors on the left side of the hallway. Pick up the first Volcano Manor Letter and finish it. Talk with Lady Tanith again for the second Volcano Manor Letter, and examine it to make a red mark to appear on the map.
Old Altus Tunnel Grace — Get out of the tunnel and go to the red mark’s location. Seek the Red Summon Sign and invade Rileigh’s world. After defeating him, you’ll return to your world and receive the Crepus’s Vial.
Every Talisman in Mt. Gelmir
There are six Talismans in Mt. Gelmir.
| Talisman | Map Location | |
|---|---|---|
| 1 |  Fire Scorpion Charm Fire Scorpion Charm | Fort Laiedd |
| 2 |  Kindred of Rot’s Exultation Kindred of Rot’s Exultation | Seethewater Cave |
| 3 |  Crimson Amber Medallion +1 Crimson Amber Medallion +1 | Imp-Sealed building in the Volcano Manor Town. |
| 4 |  Daedicar’s Woe Daedicar’s Woe | Rya, Volcano Manor |
| 5 |  Dagger Talisman Dagger Talisman | Imp-Sealed room of Volcano Manor |
| 6 |  Taker’s Cameo Taker’s Cameo | Juno Hoslow, Volcano Manor Third Letter |
Fire Scorpion Charm
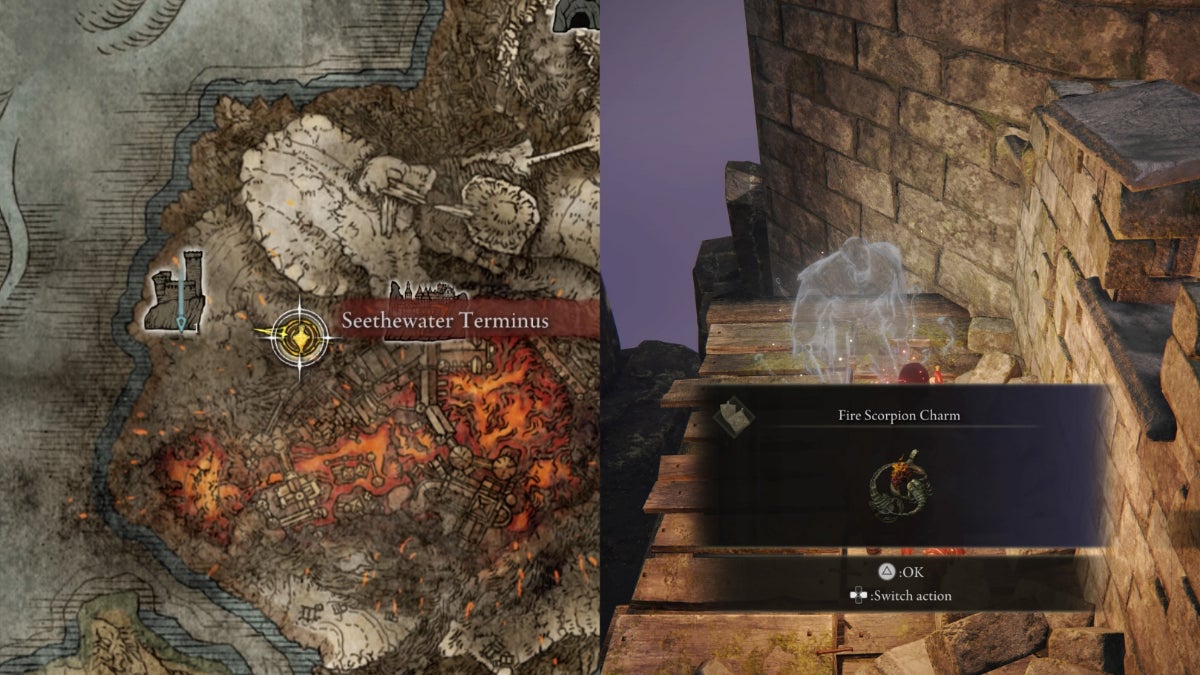
| Effect | Note |
|---|---|
| ‣ +12% Fire Damage (+8% only in PVP) ‣ -10% Physical Defense (-15% in PVP) | Stacks with the following: ‣ Flame-Shrouding Cracked Tear ‣ Faithful's Canvas Talisman ‣ Flock's Canvas Talisman ‣ Golden Vow Incantation |
Seethewater Terminus Grace — Go to the eastern side of Fort Laiedd for the entrance. Beware of the Flame Chariot and Leyndell Soldiers guarding the grounds.
Open the door behind the Flame Monk within the fort. Climb up the stairs and seek a ghost on the wooden ledge on the left side of the rooftop. The Fire Scorpion Charm is on the corpse.
Kindred of Rot’s Exultation
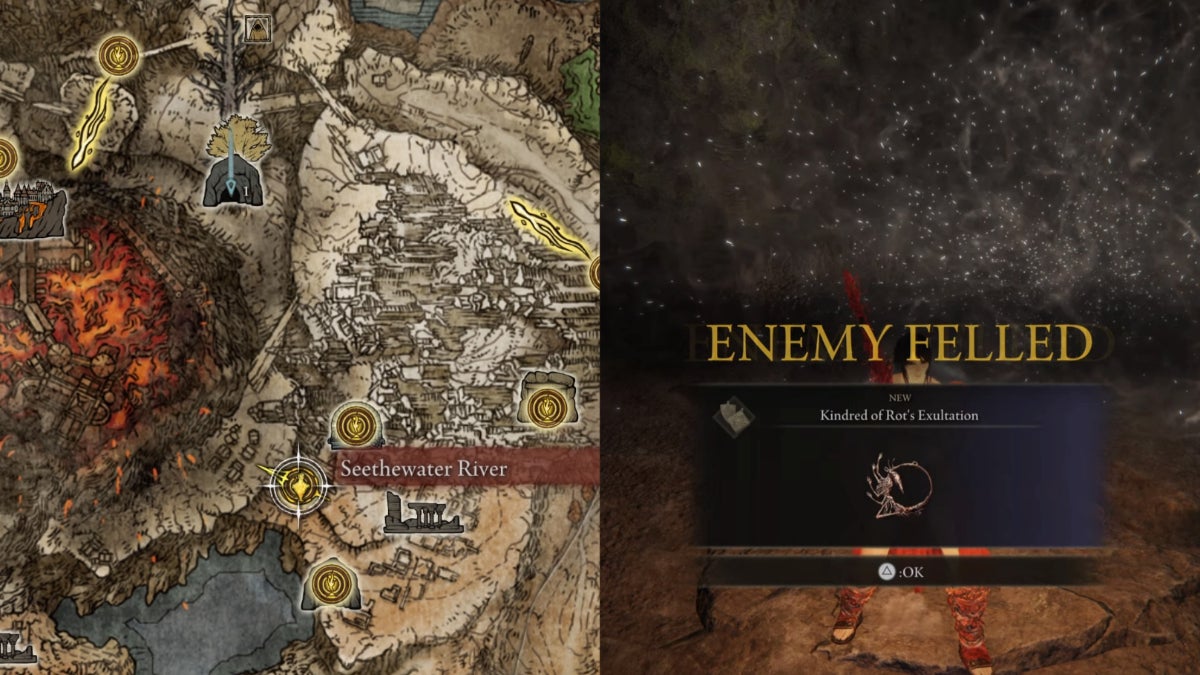
| Effect | Note |
|---|---|
| +20% Poison or Rot DPS for 20 sec | ‣ Must be within close-medium range from enemies ‣ Great to use with Ekzyke's Decay Incantation, Poison or Rot Pots, Poison or Rot-infused Weapons ‣ Stacks with Golden Vow, Winged Sword Insignia, Rotten Winged Sword Insignia |
Seethewater River Grace — Go to the Imp-Sealed Seethewater Cave entrance. Unlock it with two Stonesword Keys. beware of the Commoner and two Basilisks guarding it.
In the Seethewater Cave, find your way to the poisonous falls. Jump down and turn right to find a Stake of Marika and a large stone pit to fall down to.
Upon reaching the bottom, turn right into a cavern where the two Kindreds of Rot are. Defeat them to get the Kindred of Rot’s Exultation.
Tips:
- Prepare Neutralizing Boluses (for Poison Cure).
- Use Spells and Crystal Tears that provide you with a shield and health regeneration.
Crimson Amber Medallion +1
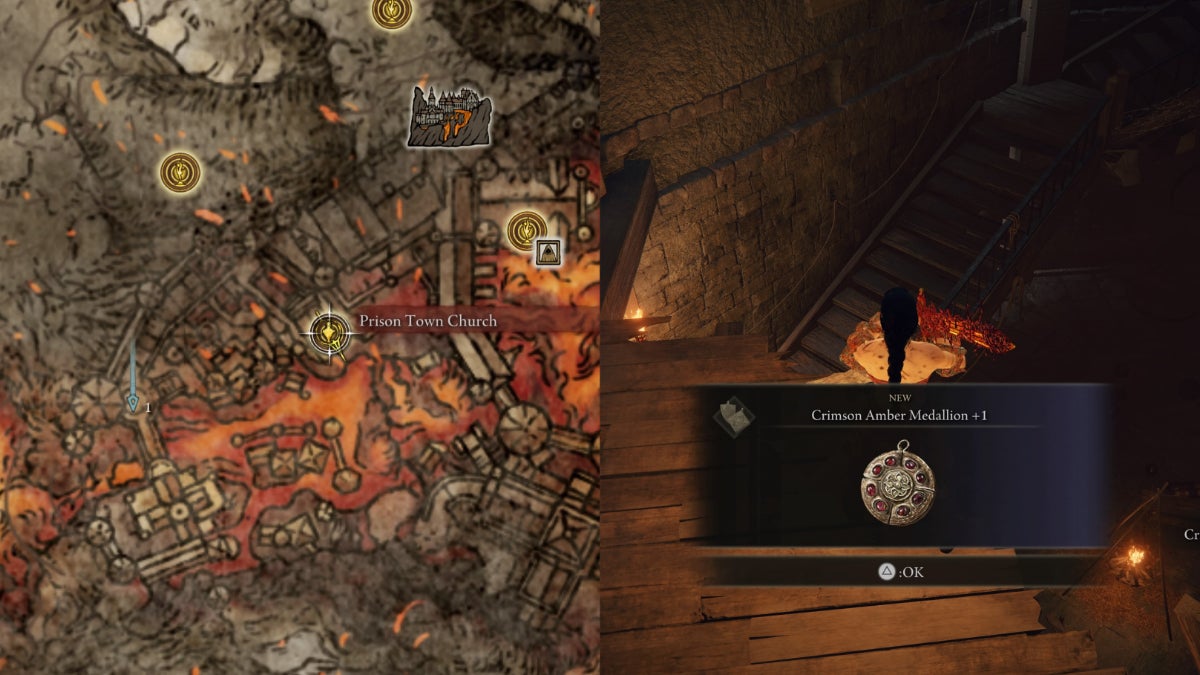
| Effect | Variation |
|---|---|
| +7% of Max HP | ‣ Crimson Amber Medallion ‣ Crimson Amber Medallion +1 |
Prison Town Church Grace — Follow the pathway to the right. Beware of the Rotten Strays and the Abductor Virgin along the way. Make your way down the stairs. You’ll see a building with an Imp-Sealed entrance. Use one Stonesword Key to unlock it. Quickly go up the stairs to avoid the Abductor Virgin, and the Crimson Amber Medallion +1 is on an overhanging corpse of the wooden panels.
Daedicar’s Woe

| Effect | Note |
|---|---|
| Receive double damage from any attack | Great Talisman to have for an Elden Ring Challenge Run |
Volcano Manor Grace — Keep talking to Rya to the point that you will see her true form. Defeat Rykard, Lord of Blasphemy. Go back to Rya in her room and choose to spare her. Make sure to exhaust her lines before resting at the Volcano Manor Grace to reload the area. You’ll find Daedicar’s Woe on the spot, where she used to be.
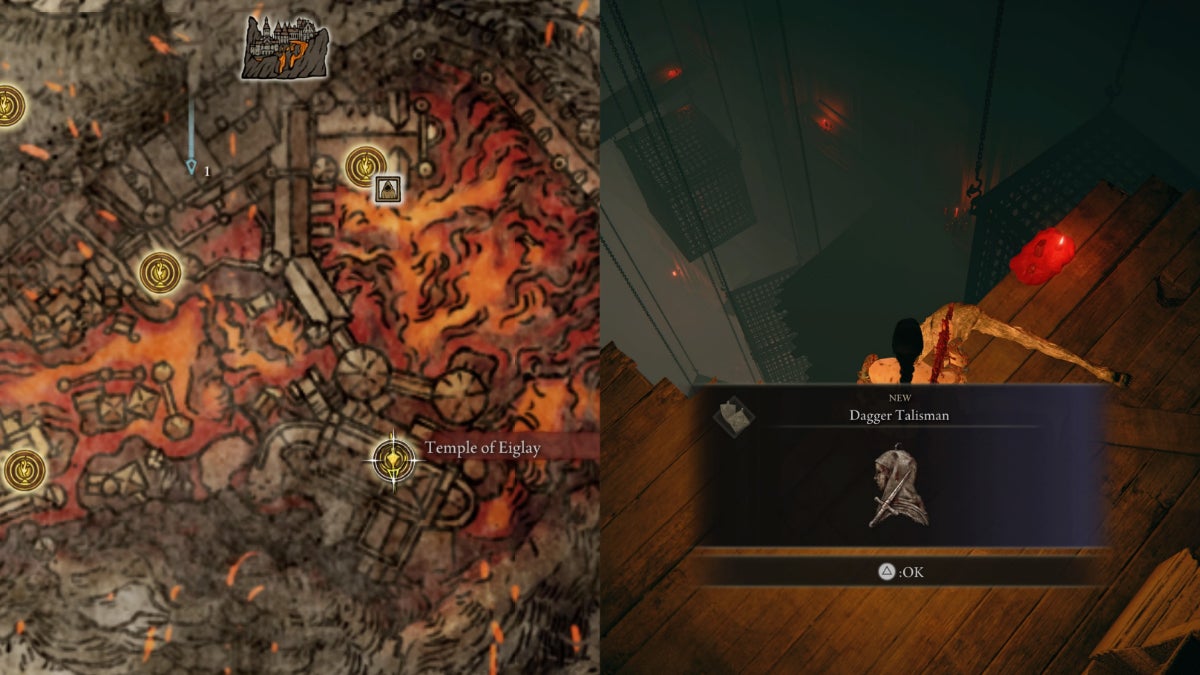
Dagger Talisman
| Effect | Note |
|---|---|
| +17% Critical Damage | ‣ Requires you to kill Godskin Noble in Temple of Eiglay, Volcano Manor ‣ Does not affect headshot damage from all Bow variants |
Temple of Eiglay Grace — Take the pillar lift within the temple. Jump off the balcony, and make your way to the upper plateau where an Abductor Virgin is guarding an open window. Keep going straight until you get into a grand hallway of the Volcano Manor. Take the left stairway that leads to the balcony, there’s a doorway where you can see an Imp-Sealed room. Use two Stonesword Keys to unlock it, and the Dagger Talisman is on the corpse.
Taker’s Cameo
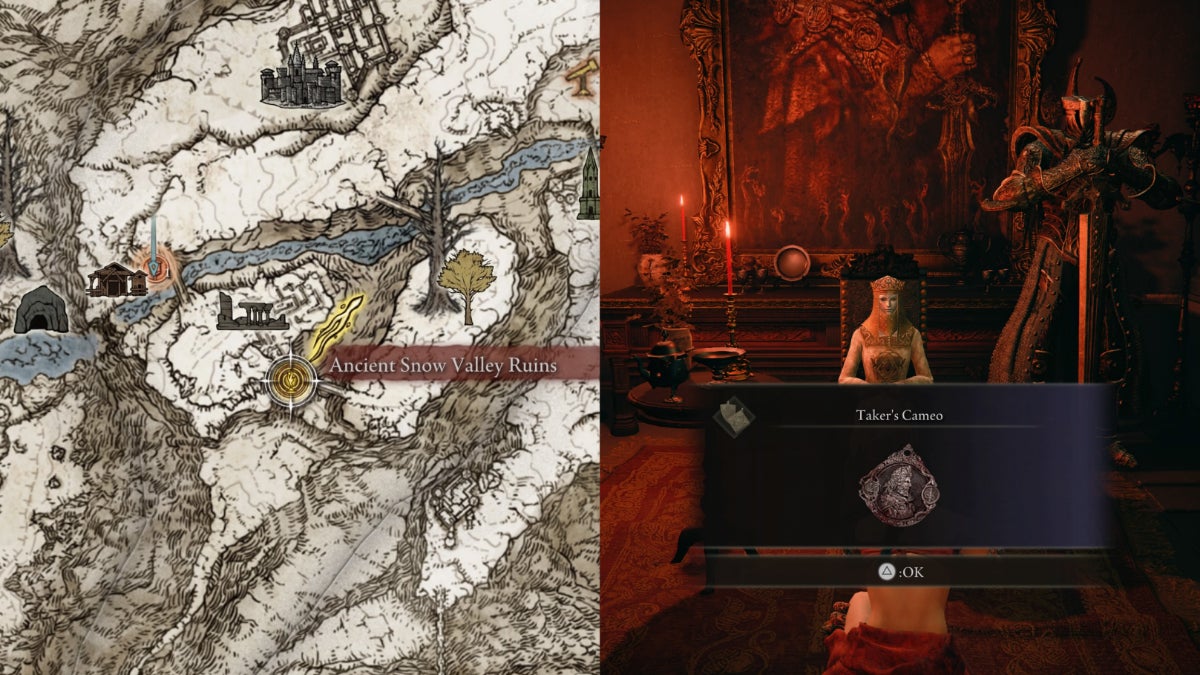
| Effect | Note |
|---|---|
| Restores HP upon defeating enemies (3% of Total HP + 30 HP) | ‣ Great to use with Ritual Sword Talisman ‣ Very useful when Co-Oping to save some Flasks of Crimson Tears |
Volcano Manor Grace — Do the first two Volcano Manor Assassination Tasks to get the final one. You’ll need to defeat Juno Hoslow at the Mountaintops of the Giants. Afterward, talk to Tanith at the Volcano Manor to get the Taker’s Cameo.
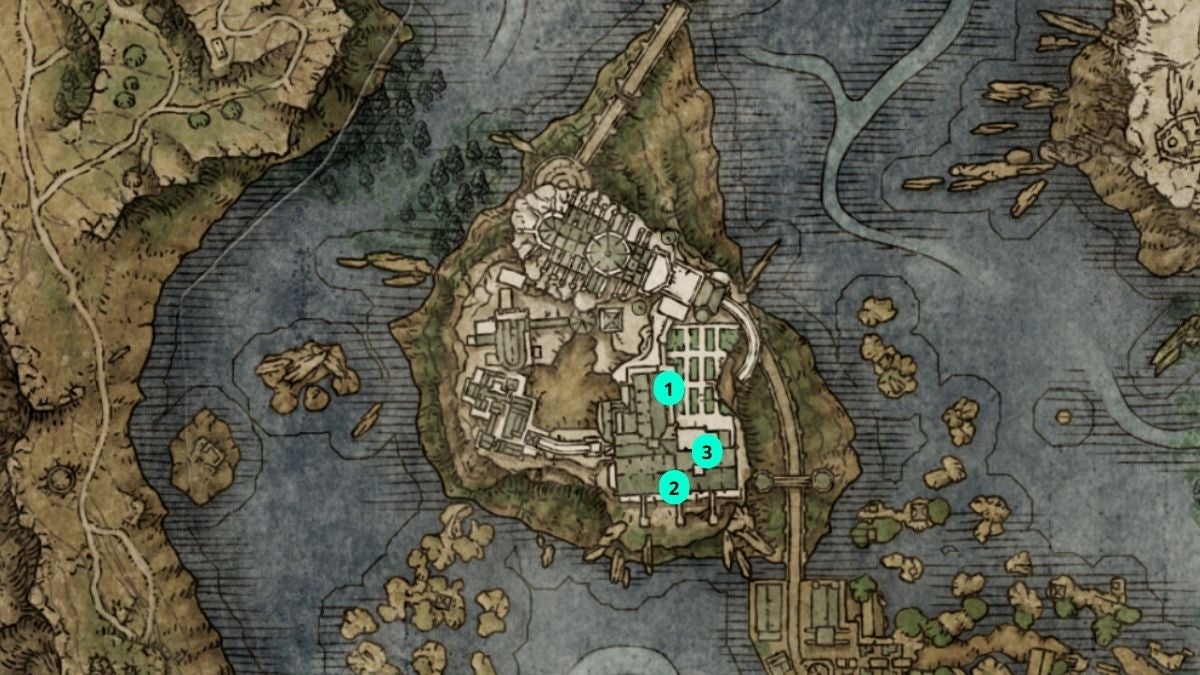
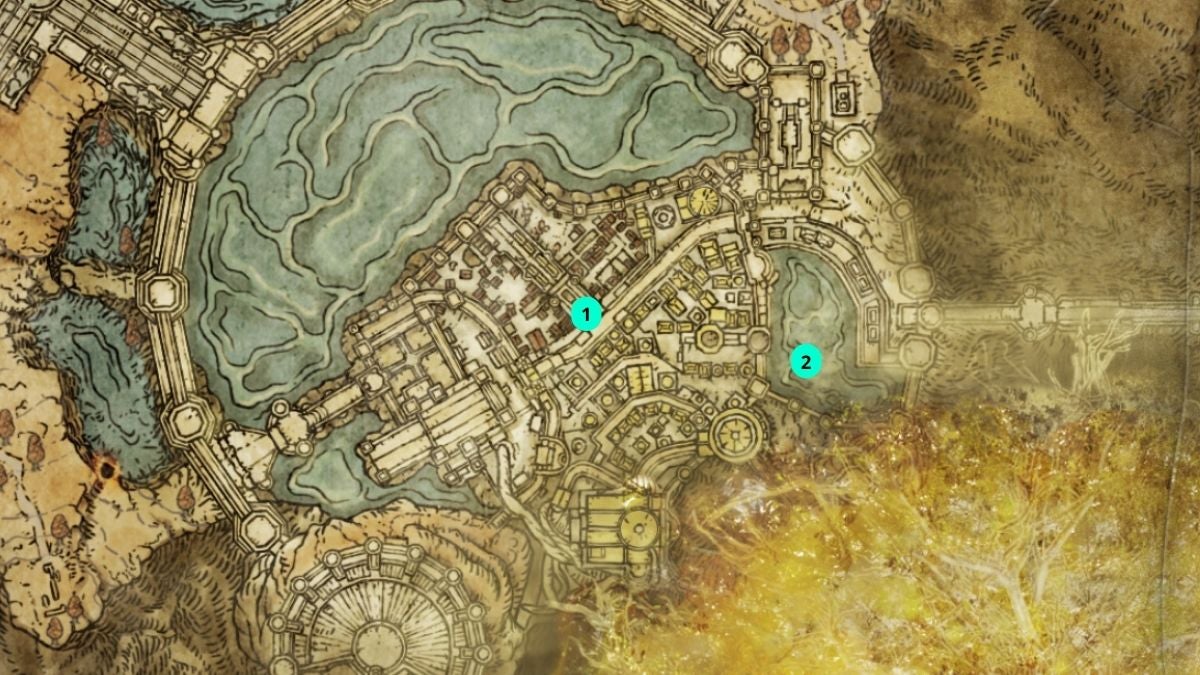
Every Talisman in Leyndell, Royal Capital
There are nine Talismans in Leyndell, Royal Capital.
| Talisman | Map Location | |
|---|---|---|
| 1 |  Blessed Dew Talisman Blessed Dew Talisman | Balcony of Divine Bridge |
| 2 |  Ritual Shield Talisman Ritual Shield Talisman | Leyndell Coliseum |
| 3 |  Viridian Amber Medallion +1 Viridian Amber Medallion +1 | Margit, Outer Wall Battleground |
| 4 |  Crucible Feather Talisman Crucible Feather Talisman | Auriza Hero's Grave |
| 5 |  Haligdrake Talisman +1 Haligdrake Talisman +1 | Leyndell Catacombs |
| 6 |  Crucible Scale Talisman Crucible Scale Talisman | Leyndell Catacombs |
| 7 |  Lord of Blood’s Exultation Lord of Blood’s Exultation | Esgar, Priest of Blood, Leyndell Catacombs |
| 8 |  Erdtree’s Favor +1 Erdtree’s Favor +1 | Cathedral of the Forsaken |
| 9 |  Flamedrake Talisman +1 Flamedrake Talisman +1 | Leyndell Tower Bridge |
Blessed Dew Talisman
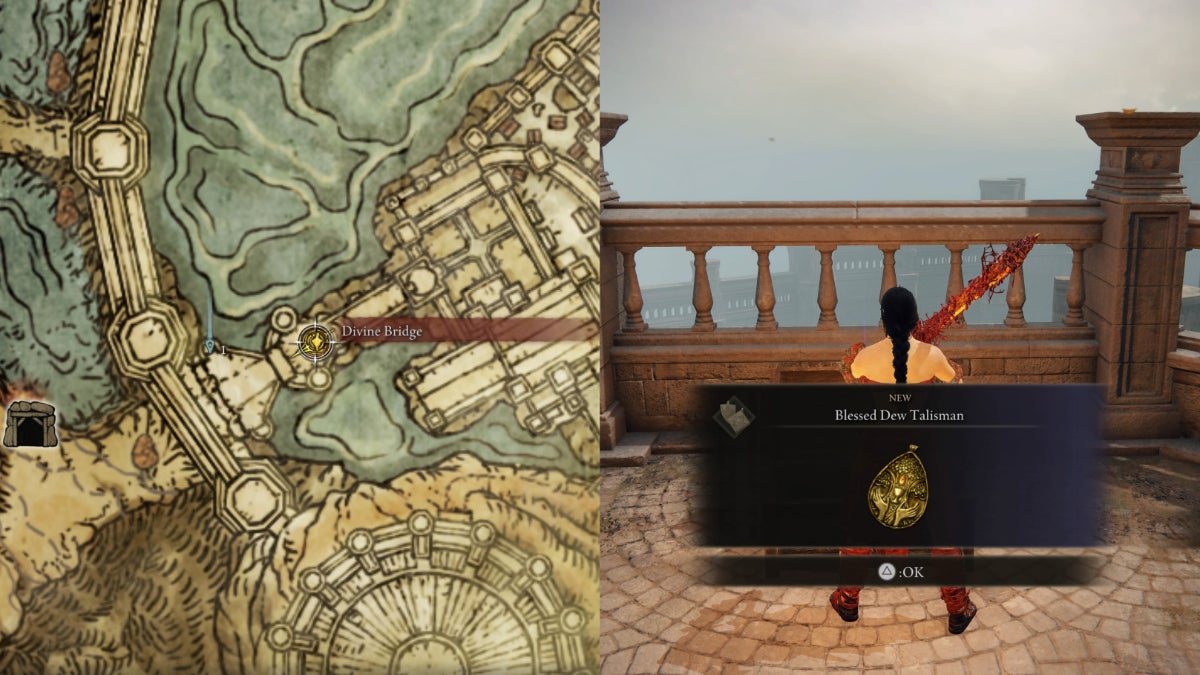
| Effect | Note |
|---|---|
| Gain 2 HP per second | ‣ You get it early game by using a Transporter Trap at the Tower of Return, Weeping Peninsula ‣ Stacks with Taker's Cameo, Blessing's Boon Incantation, and Blessing of the Erdtree Incantation |
Isolated Shack site of grace, Weeping Peninsula: Go southeast from the shack towards the Tower of Return. Beware of the Godrick Soldiers guarding it. Climb all the way to the top and open the chest to get transported to the Divine Bridge in Leyndell, Royal Capital.
Divine Bridge Grace — Go through the pathway where a Guardian Golem is lying on the ground. Seek the chest on the right balcony to get the Blessed Dew Talisman.
Ritual Shield Talisman
| Effect | Note |
|---|---|
| +30% Damage Negation when on Full HP | Cancels the debuffs of Scorpion Charms, Radagons Scarseal and Soreseal, and Marika's Scarseal and Soreseal |
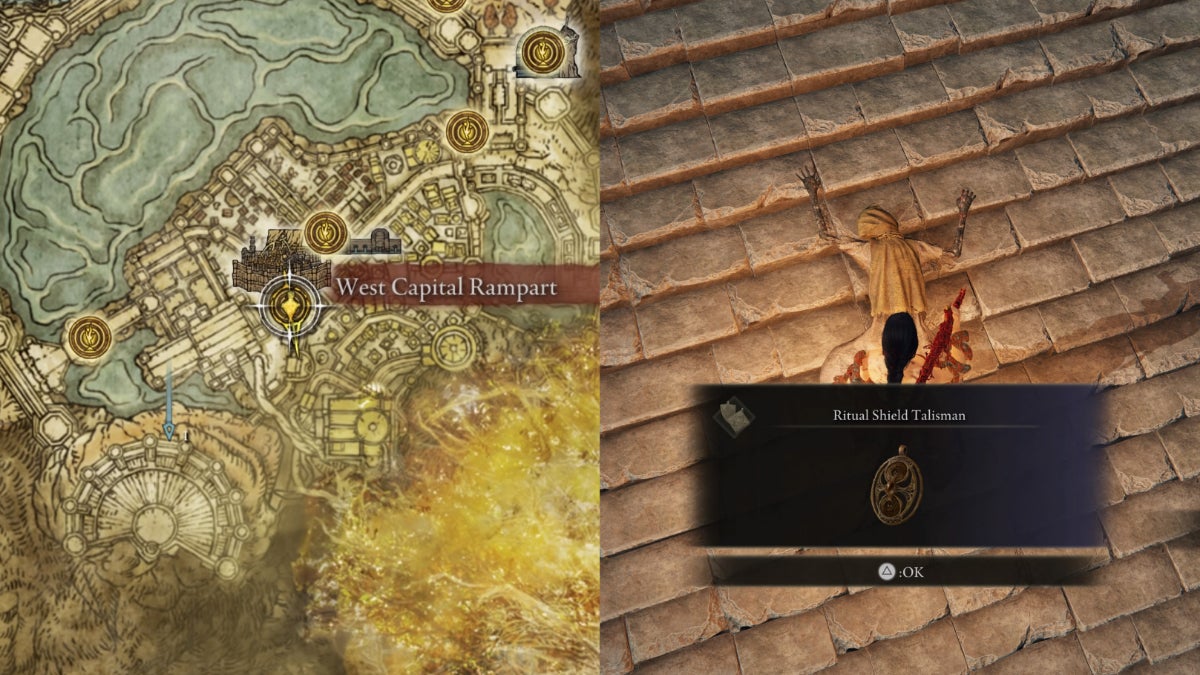
West Capital Rampart Grace — Make your way past the Gargoyle to the Leyndell Coliseum. Beware of the Duelists patrolling the pathways. The Ritual Shield Talisman is on the corpse in front of the main doors.
Crucible Feather Talisman
| Effect | Note |
|---|---|
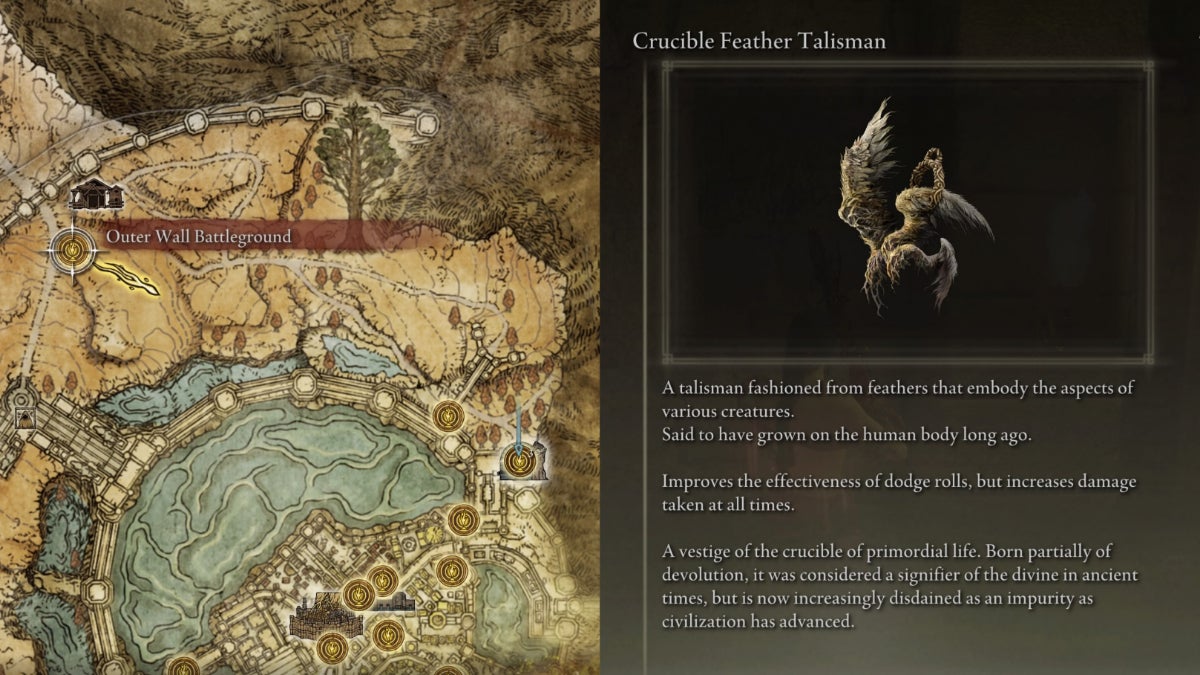
| ‣ Light or Medium Equip Load: +23% or +6 iframes (60 FPS) ‣ Heavy Equip Load: +25% or +5 iframes (60 FPS) ‣ -30% Damage Negation | Does not affect the following: ‣ Windy Crystal Tear ‣ Ash of War: Quickstep ‣ Ash of War: Bloodhound Step |
Outer Wall Battleground Grace — Go towards a cliff on the left side of the battleground. Follow the path downwards. Upon reaching a clear area where the Guardian Golems are, turn to the right down by the river. Travel between two cliffs under the Leyndell Bridge. Seek the Auriza Hero’s Grave entrance at the right side of a Lesser Runebear and a statue.
Auriza Hero’s Grave Grace — Go down to the corridors towards the pillar. Beware of the Chariots patrolling the slopes. Upon reaching the golden light on a narrow bridge, jump down the left side. Beware of the Basilisks in the area. Find your way out of there. Run towards the pillars with yet another narrow bridge on the right side. Position yourself on the corpse and jump down to the wooden panels.
Don’t jump down to the room with a Basilisk below a statue. Instead, make your way down to the stone pillars. Head towards the other entrance with a Skeletal Militiaman and a ladder. Climb up the ladder. Beware of a Chariot patrolling the slope. Wait for the Chariot to go up. Rush down towards an entrance on the left side. Kill the two Skeletal Militiaman. Straight ahead, there’s an Omen guarding the Crucible Feather Talisman below a statue.
Viridian Amber Medallion +1
| Effect | Variation |
|---|---|
| +13% of Max Stamina | ‣ Viridian Amber Medallion ‣ Viridian Amber Medallion +2 |
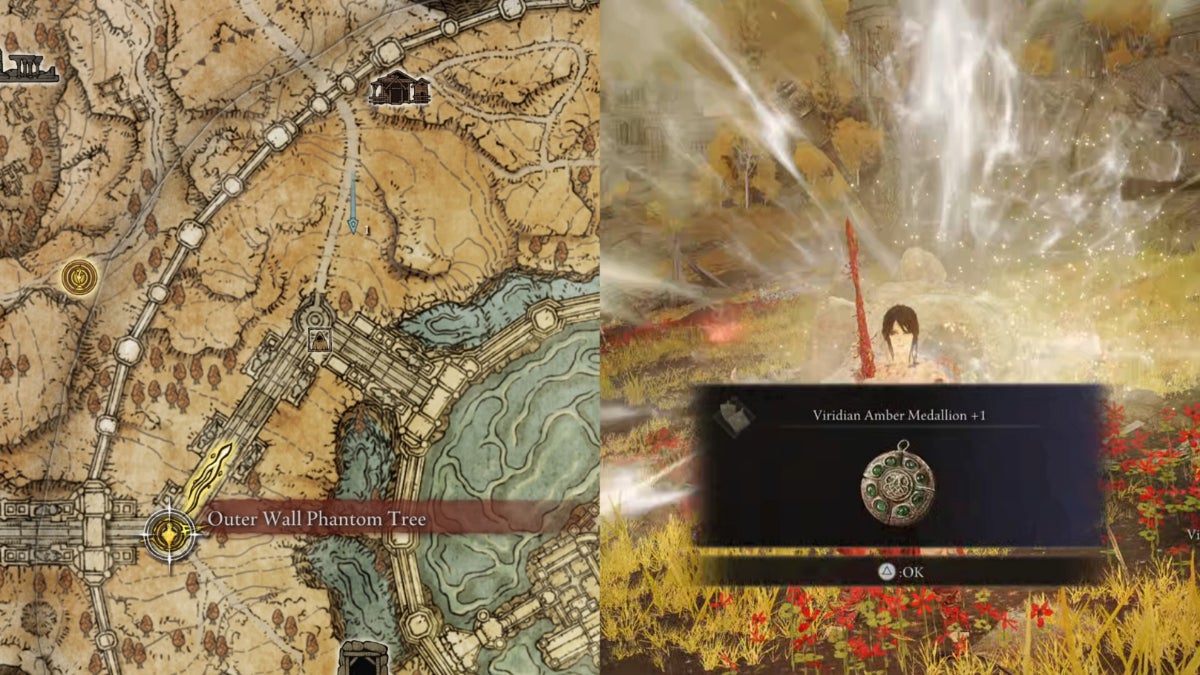
Outer Wall Phantom Tree Grace — Go northeast towards the Outer Wall Battleground. Go beyond the stairs of the Capital Outskirts until you spot a Commoner transforming into Margit. Defeat him to get the Viridian Amber Medallion +1.
Haligdrake Talisman +1
| Effect | Variation |
|---|---|
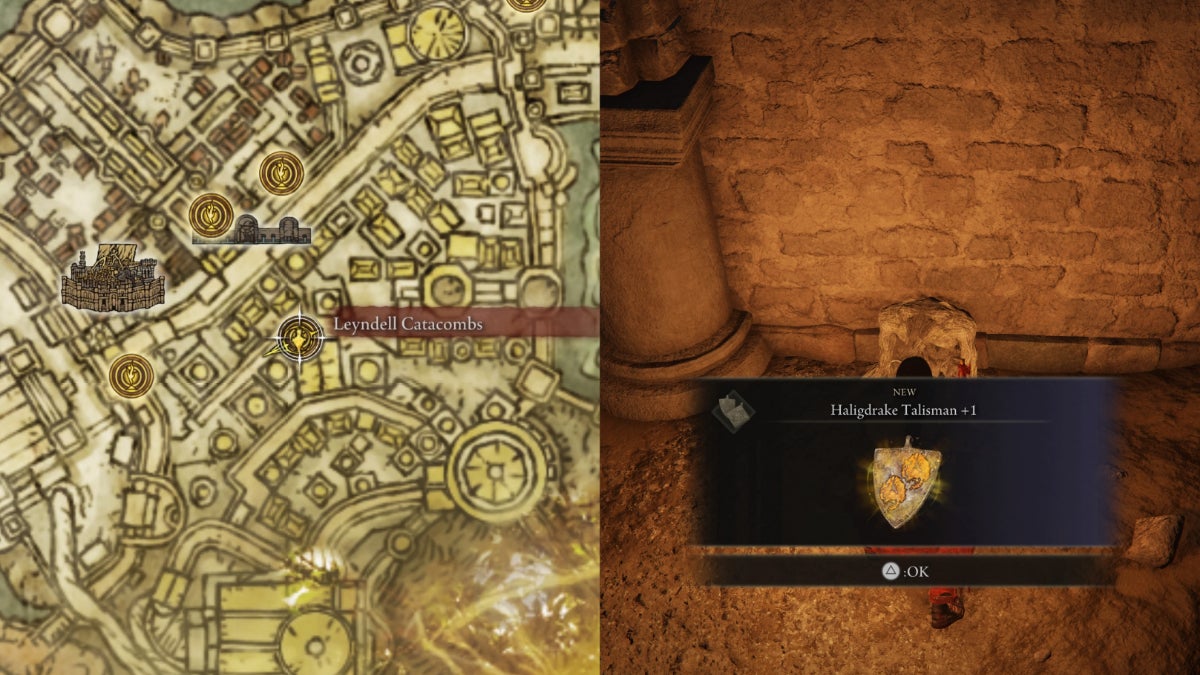
| +17% Holy Damage Negation (+5% only in PVP) | ‣ Haligdrake Talisman ‣ Haligdrake Talisman +2 |
Leyndell Catacombs Grace — Climb up the ascending stairs, and onto the lift. Beware of the Crossbowmen Spirits in the area. Hit the illusory wall beside the stairs. Go to the left corner illusory wall, and hit it. The Haligdrake Talisman +1 is next to the Lesser Spirit-Caller Snail.
Crucible Scale Talisman
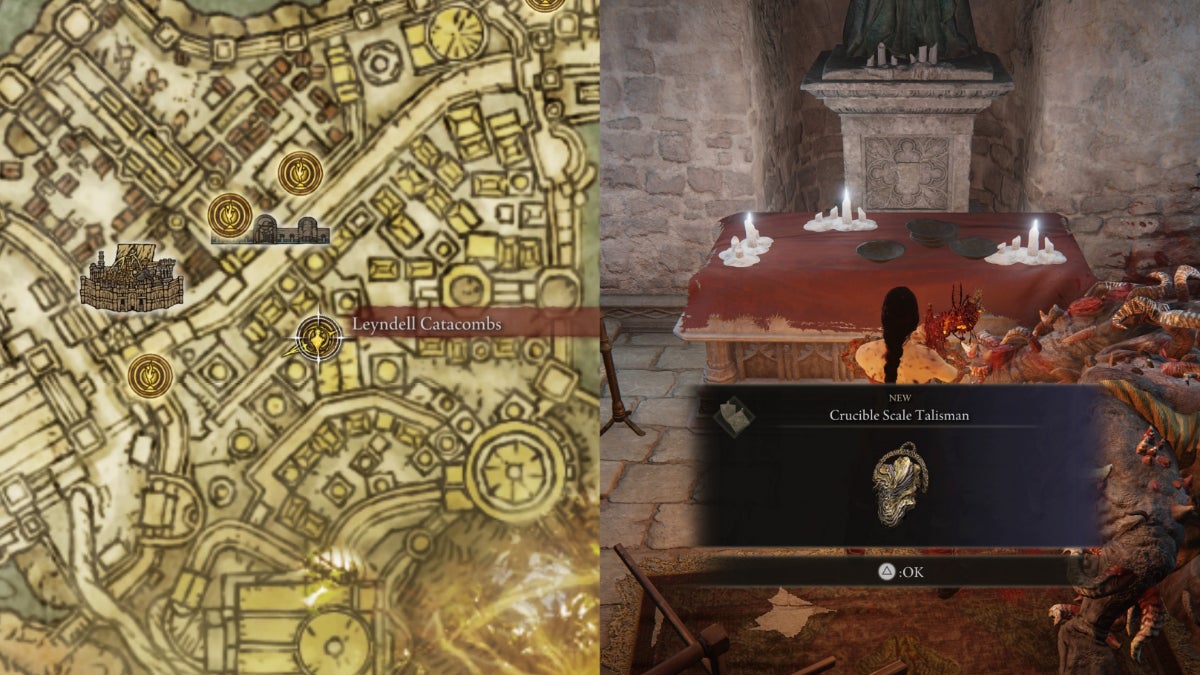
| Effect | Note |
|---|---|
| +30% Critical Damage Negation | Useful against Critical Attacks by other players or Black Knife Assassins |
Leyndell Catacombs Grace — Go down the descending stairs. Take a left turn past the burning Skeletal Militiamen. Hit the fire column for it to go down. Hit it again and jump on top of it to reach the church. The Crucible Scale Talisman is on the altar guarded by an Omen.
Lord of Blood’s Exultation
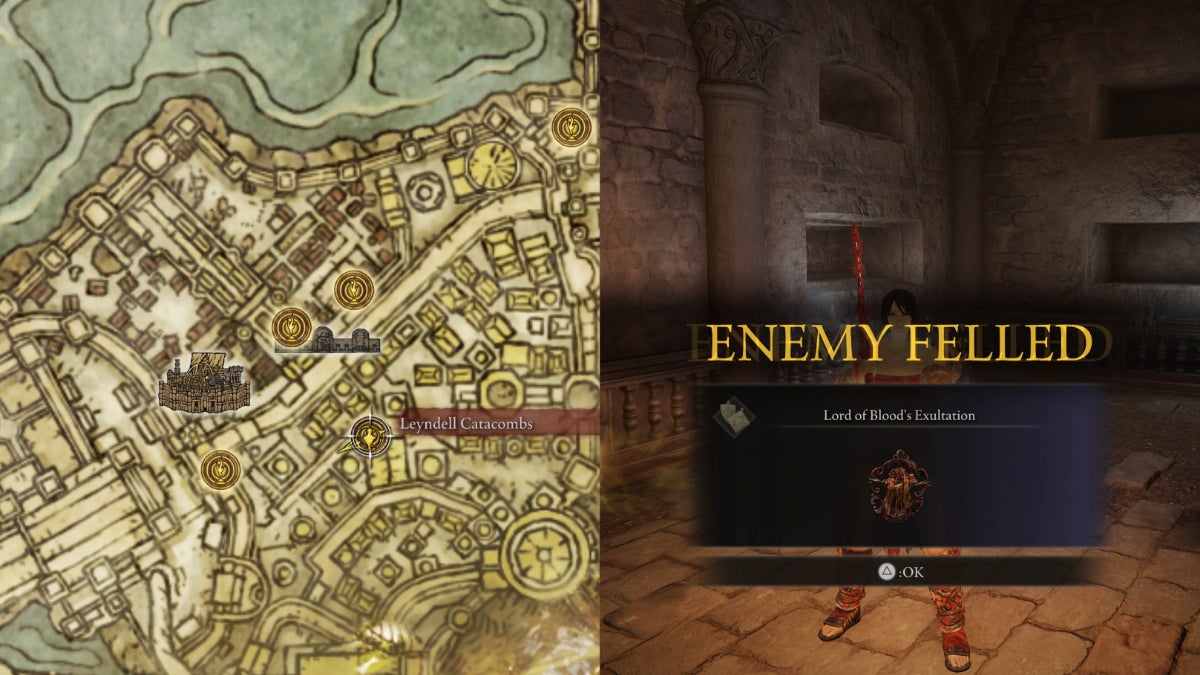
| Effect | Note |
|---|---|
| +20% Bleed DPS for 20 sec, | ‣ Stacks with White Mask Helm ‣ Great to use with Seppuku, Bleed Ash of War, Spells and Weapons |
Leyndell Catacombs Grace — Find the lever of the catacombs to unlock Esgar, Priest of Blood’s chamber. Defeat him to get the Lord of Blood’s Exultation Talisman.
Erdtree’s Favor +1
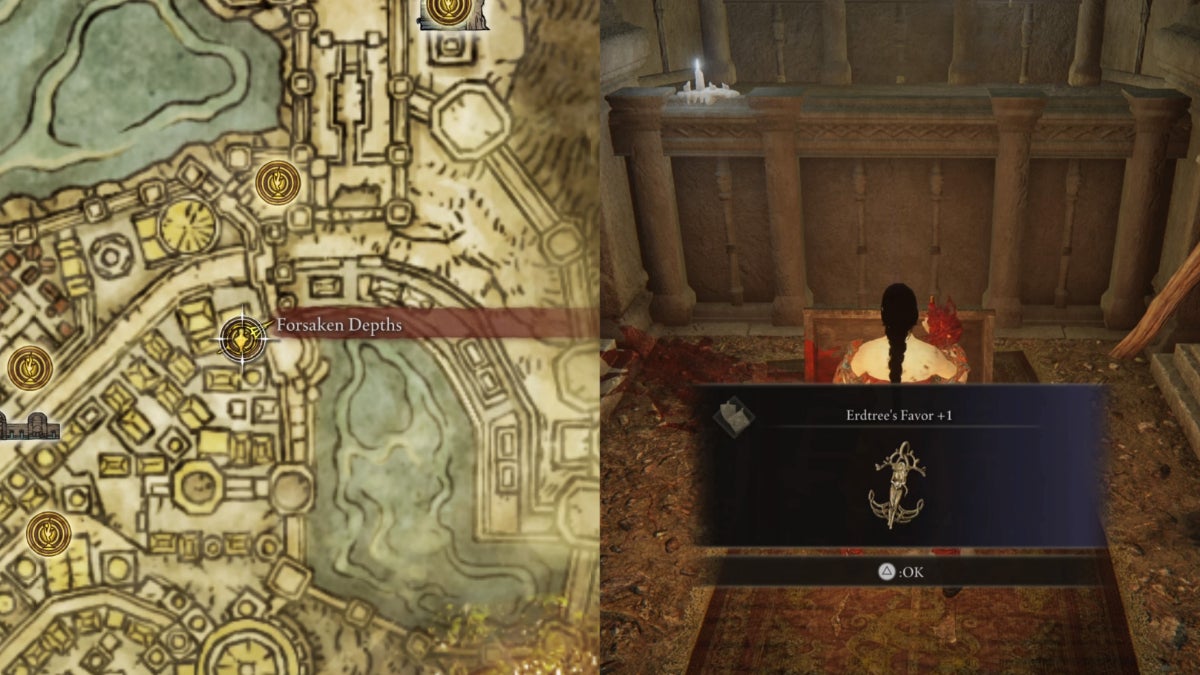
| Effect | Variation |
|---|---|
| +3.5% HP, +8.25% Stamina, and +6.5% Equip Load | ‣ Erdtree's Favor ‣ Erdtree's Favor +2 |
Forsaken Depths Grace — Go inside the Cathedral of the Forsaken. The Erdtree’s Favor +1 is in the chest on the altar. You don’t need to defeat Mohg, the Omen to get it.
Flamedrake Talisman +1
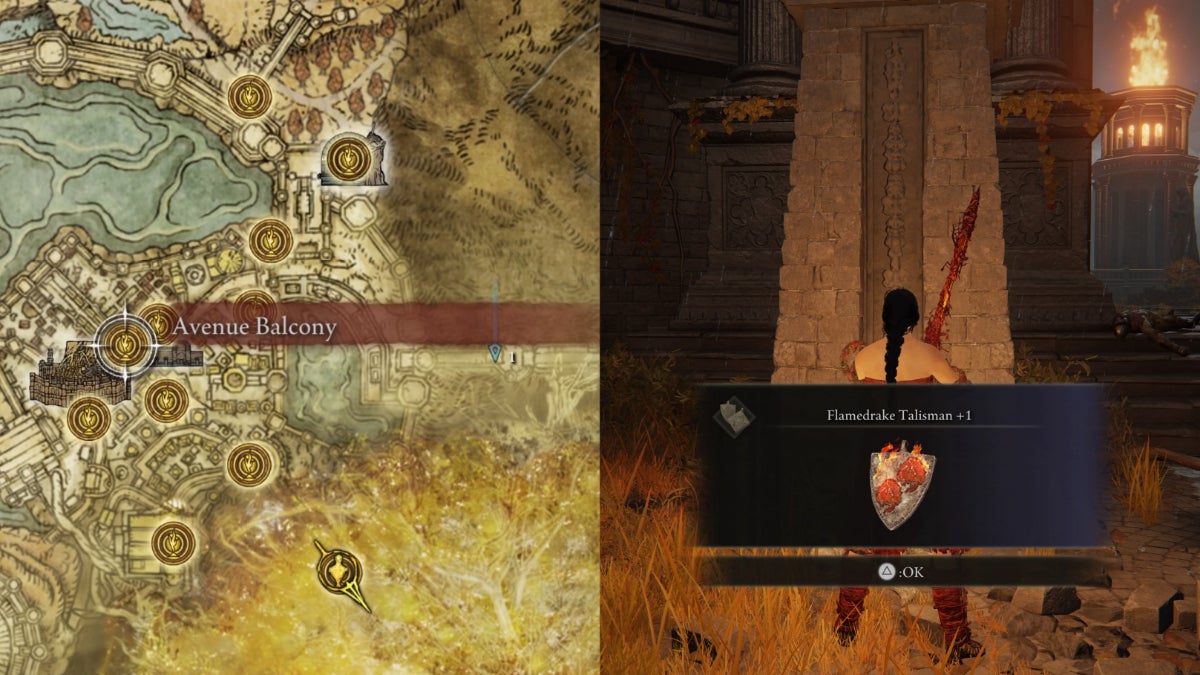
| Effect | Variation |
|---|---|
| +17% Fire Resistance (+5% only in PVP) | ‣ Flamedrake Talisman ‣ Flamedrake Talisman +2 |
Avenue Balcony Grace — You need to defeat Morgott, the Grace-Given at the Elden Throne. Climb up the ascending stairs, and take the left path. Go straight for the giant doors, and open them. Keep going straight until you reach the lift that leads to the Leyndell Tower Bridge. The Flamedrake Talisman +1 is on a corpse leaning against a fire column on the right side.
Every Talisman in Mountaintops of the Giants
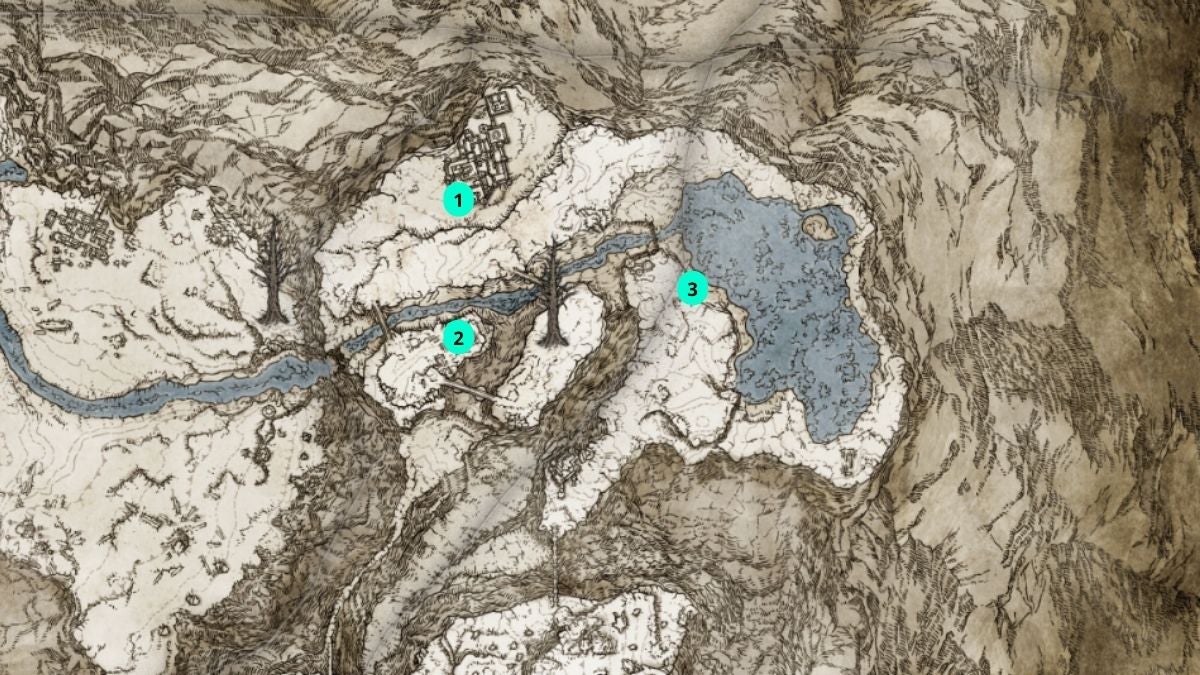
There are three Talismans in the Mountaintops of the Giants.
| Talisman | Map Location | |
|---|---|---|
| 1 |  Cerulean Amber Medallion +1 Cerulean Amber Medallion +1 | Wooden Ledge at Castle Sol |
| 2 |  Primal Glintstone Blade Primal Glintstone Blade | Stargazer's Ruins |
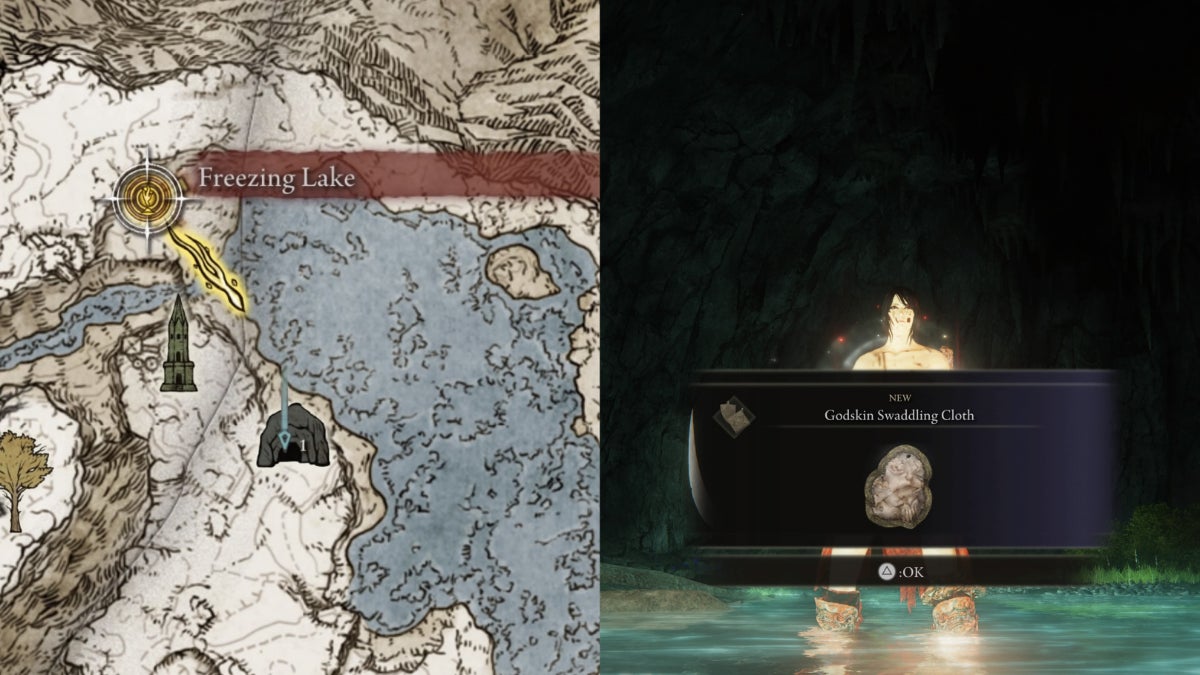
| 3 |  Godskin Swaddling Cloth Godskin Swaddling Cloth | Spiritcaller's Cave |
Cerulean Amber Medallion +1
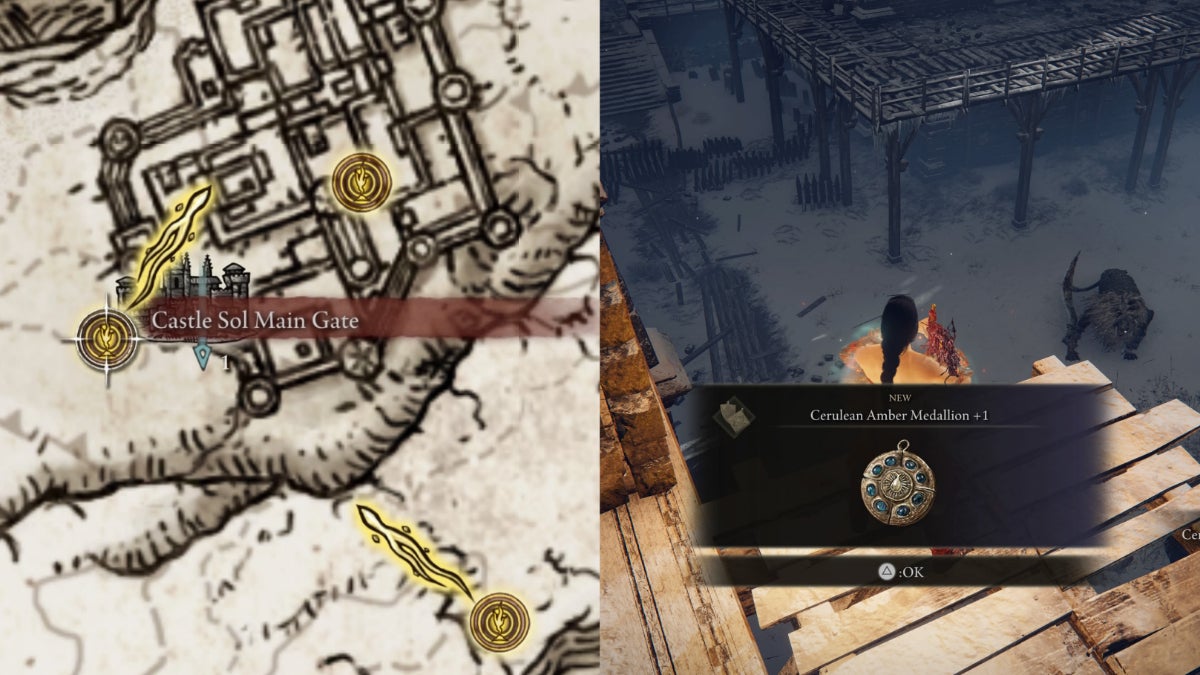
| Effect | Variation |
|---|---|
| +9% of Max FP | ‣ Cerulean Amber Medallion ‣ Cerulean Amber Medallion +2 |
Church of the Eclipse Grace — Make your way to the side doorway of the church. Seek a ladder on a wooden structure in the alleyway. Go right, following the wooden panels of the castle. Keep going straight to the other end of the rampart, and there’s another set of wooden panels on the left. Go down the ladder. Beware of the Banished Knight. The Cerulean Amber Medallion +1 is on an overhanging corpse on the right side of the balcony.
Primal Glintstone Blade
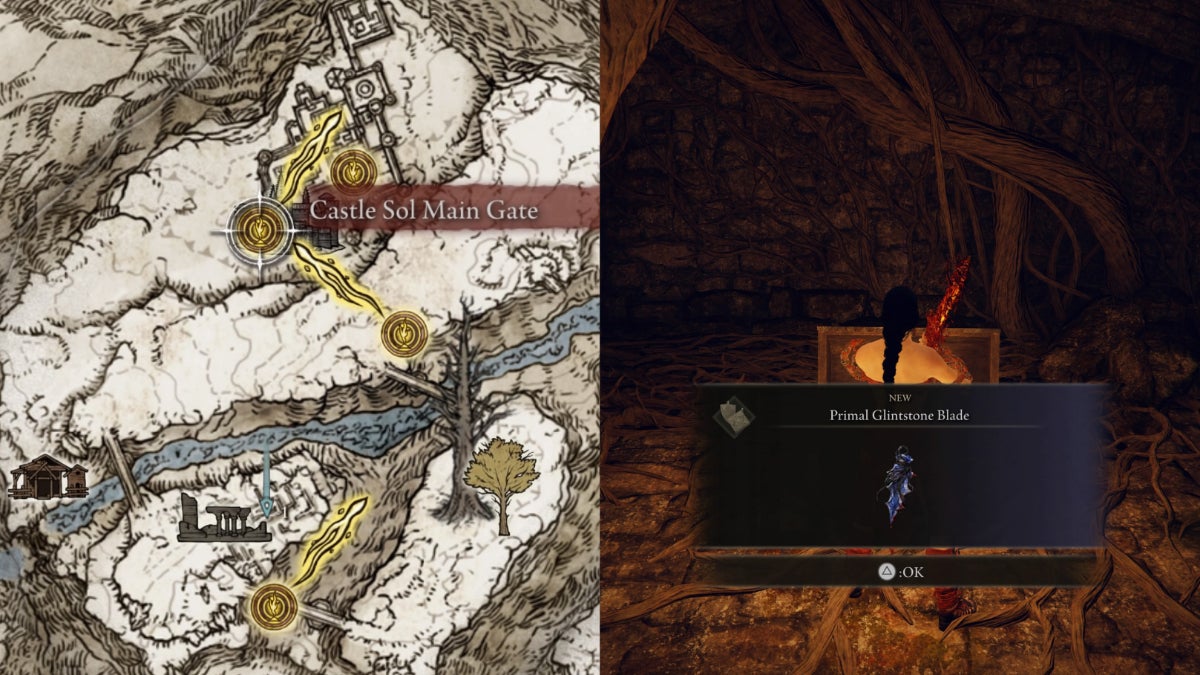
| Effect | Note |
|---|---|
| ‣ -25% FP cost of Spells ‣ -15% of Max HP | ‣ Ineffective on Lusat Staff's +50% FP Consumption (use Cerulean tear Scarab to cancel the debuff) ‣ Very useful during Co-op and Invasions |
Castle Sol Main Gate Grace — Summon Torrent, and ride straight to the edge of the cliff. Jump up on the stones behind the graveyard until you reach the upper layer of the mountain. This is to avoid the Deathrite Bird. Keep straight, and jump up on the stones with bushes growing on them. Watch out for the Giant Skeleton. Now, make your way to the Stargazer’s Ruins. Summon the Spirit Jellyfish Ash to unlock the seal. The Primal Glinstone Blade is in the cellar.
Godskin Swaddling Cloth
| Effect | Note |
|---|---|
| Successive attacks restores HP (3% of Total HP + 30HP) | ‣ Only for Melee-type Weapons, Ashes of War, and Spells like the Carian Slicer ‣ All successful hits on different targets are counted |
Freezing Lake Grace — Make your way to the Spiritcaller’s Cave, just southwest of here. Defeat the Godskin Apostle, Godskin Noble, and lastly, the Spirit-Caller Snail to get the Godskin Swaddling Cloth.
Every Talisman in the Consecrated Snowfield
There are four Talismans in the Consecrated Snowfield.
| Talisman | Map Location | |
|---|---|---|
| 1 |  Silver Scarab Silver Scarab | Behind an illusory wall, Hidden Path to the Haligtree |
| 2 | 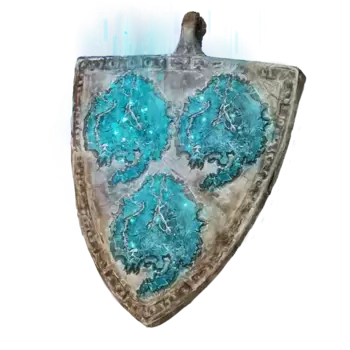 Spelldrake Talisman +2 Spelldrake Talisman +2 | Secret Catacombs, Hidden Path to the Haligtree |
| 3 | 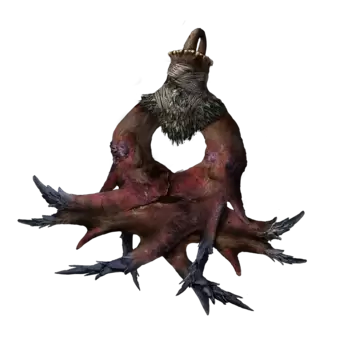 Stalwart Horn Charm +1 Stalwart Horn Charm +1 | Giant forest, southwest Consecrated Snowfield |
| 4 |  Graven-Mass Talisman Graven-Mass Talisman | Albinuaric Rise |
Silver Scarab
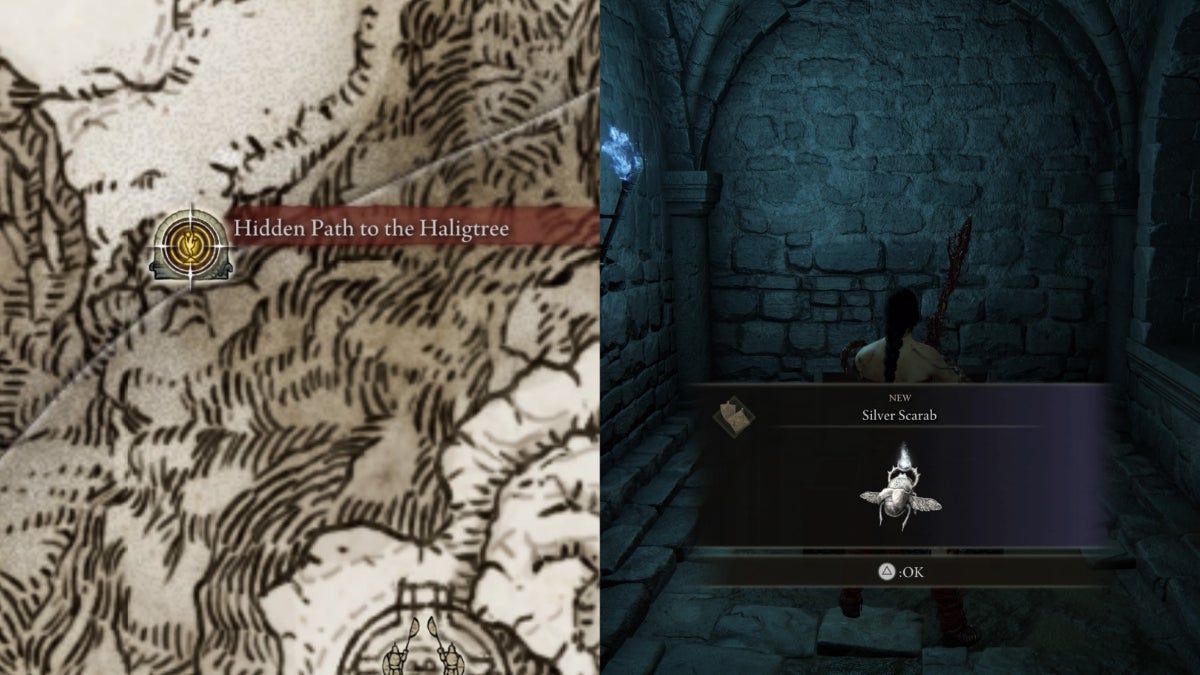
| Effect | Note |
|---|---|
| +75 Discovery | Stacks with Silver-Pickled Fowl Foot |
Hidden Path to the Haligtree Grace — Craft Rainbow Stones on your way to the balcony. Watch out for the Giant Land Octopus and the Vulgar Militiamen. Drop down at the left side of the balcony, and there’s an invisible path to uncover. Make your way to the doorway. Hit the illusory wall on the right side to find the Silver Scarab Talisman.
Spelldrake Talisman +2
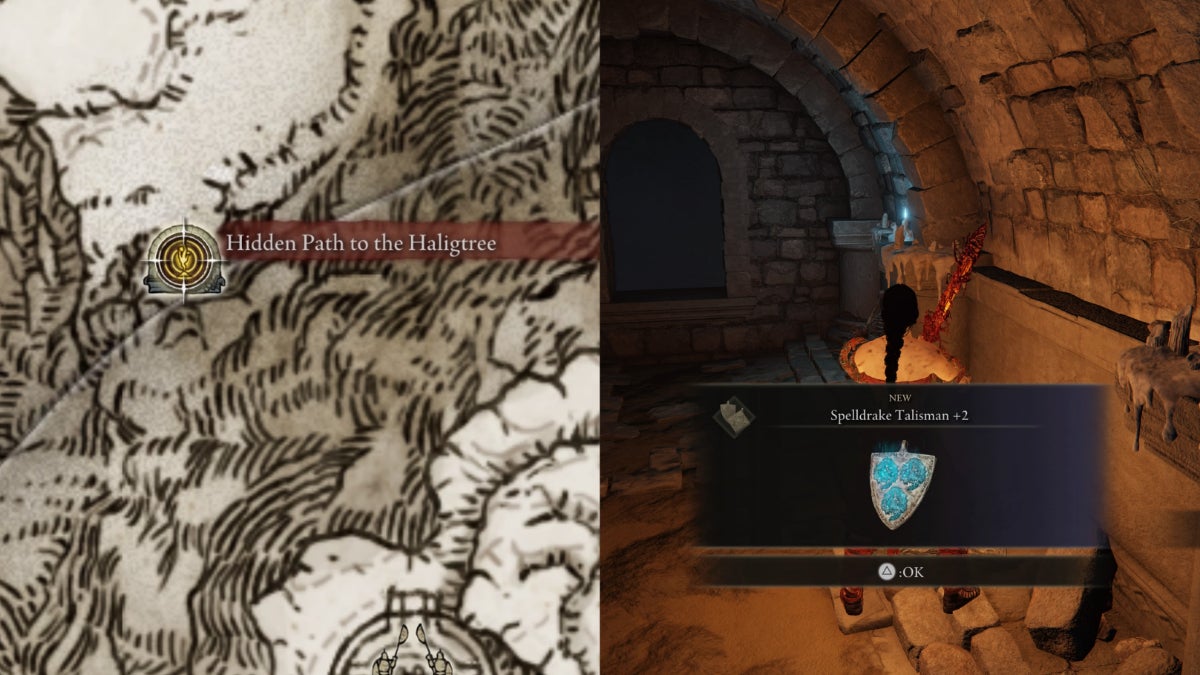
| Effect | Variation |
|---|---|
| +20% Magic Resistance (+6% only in PVP) | ‣ Spelldrake Talisman ‣ Spelldrake Talisman +1 |
Hidden Path to the Haligtree Grace — Make your way to the balcony. Drop down to the left side, facing the eastern wall of the building. Walk to the spot between the doorway and the bridge pillars. Use Rainbow Stones to reveal the path going north. Jump down the ledge, then jump over the window to the Secret Catacombs. Turn left and go straight for the boss chamber doors. There’s a doorway on the right side. Make your to the lift and go up, the Spelldrake Talisman +2 is on the corpse.
Stalwart Horn Charm +1
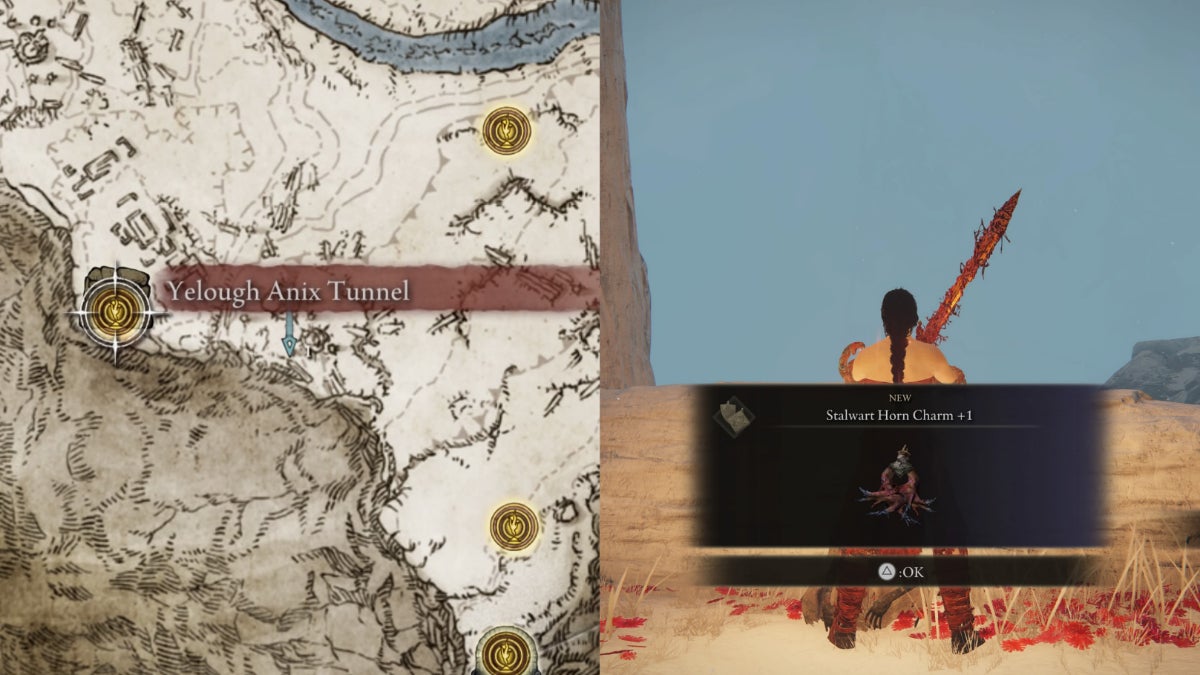
| Effect | Variation |
|---|---|
| +140 Robustness (Bleed and Frostbite Resistance) | Stalwart Horn Charm |
Yelough Anix Tunnel Grace — Summon Torrent, and make your way to the northwest forest. The Stalwart Horn Charm +1 is on a corpse near the cliff. Beware of the Ancestral Follower and the Ancestral Follower Shaman guarding it.
Graven-Mass Talisman
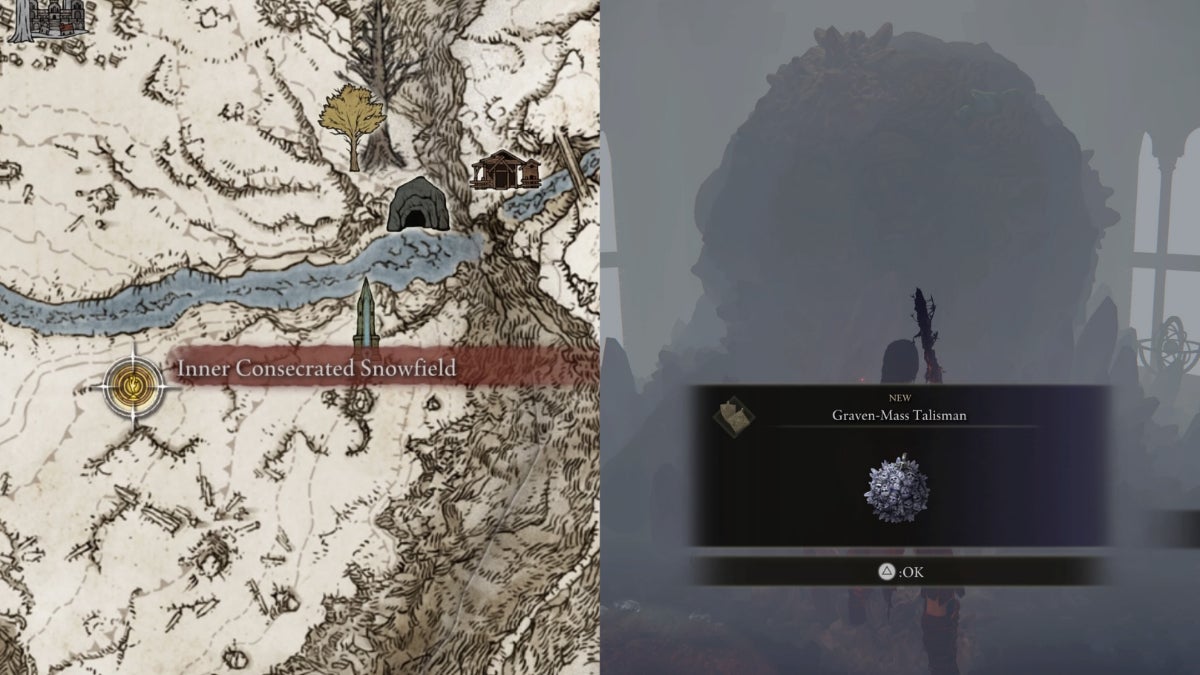
| Effect | Variation |
|---|---|
| +8% Sorceries' Damage | Graven-School Talisman (Stackable) |
Inner Consecrated Snowfield Grace — Summon Torrent, and make your way to the Albinauric Rise. Unlock the puzzle by summoning Fanged Imps to fight off the hostile Fanged Imp within the area. The Graven-Mass Talisman is on the top floor.
Every Talisman in Siofra River
There are five Talismans in the Siofra River.
| Talisman | Location | |
|---|---|---|
| 1 |  Clarifying Horn Charm Clarifying Horn Charm | Stairs of Deep Siofra River Well lift |
| 2 |  Marika's Scarseal Marika's Scarseal | Waterfall near the Dragonkin Soldier |
| 3 |  Mottled Necklace +1 Mottled Necklace +1 | On a pillar of the Hallowhorn Grounds, Nokron, Eternal City |
| 4 |  Clarifying Horn Charm +1 Clarifying Horn Charm +1 | Unknown Ruins, Nokron, Eternal City |
| 5 |  Haligdrake Talisman +2 Haligdrake Talisman +2 | Graveyard, Mohgwyn Palace |
Clarifying Horn Charm
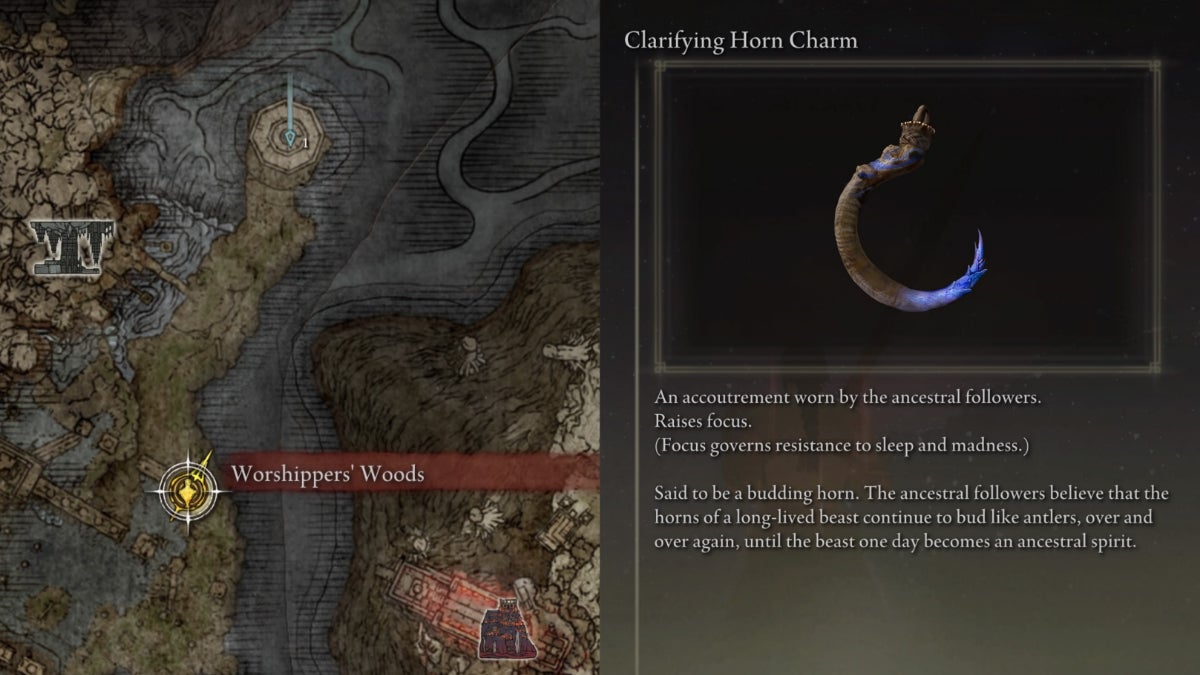
| Effect | Variation |
|---|---|
| +90 Focus (Sleep and Madness Resistance) | Clarifying Horn Charm +1 |
Worshipper’s Woods Grace — Summon Torrent, and make your way north to the Deep Siofra Well. The Clarifying Horn Charm is on a corpse on the stairs.
Marika’s Scarseal
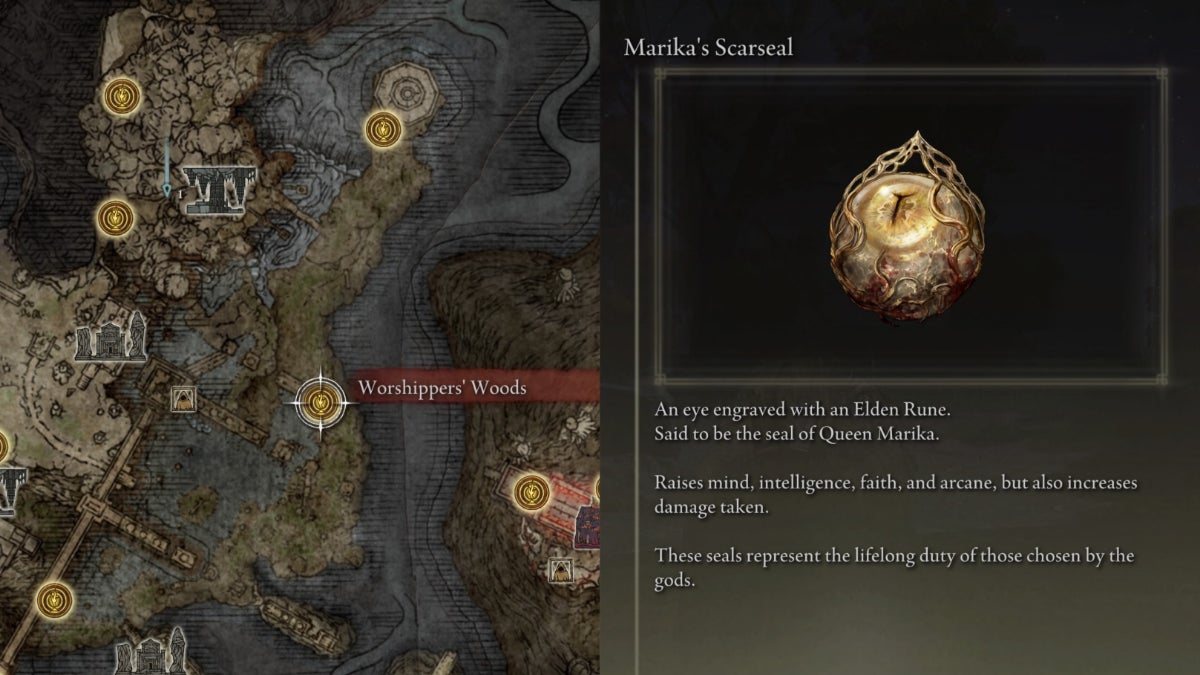
| Effect | Variation |
|---|---|
| ‣ +3 Mind, Intelligence, Faith, and Arcane ‣ -10% Damage Negation | Marika's Soreseal |
Worshipper’s Woods Grace — Make your way to the pillar ruins southeast of the grace site. There’s a Waygate on top, which teleports you to a section of Nokron, Eternal City. Go to the other side, and Marika’s Seal is on a corpse underneath the waterfall. Beware of the Dragonkin Soldier nearby.
Mottled Necklace +1
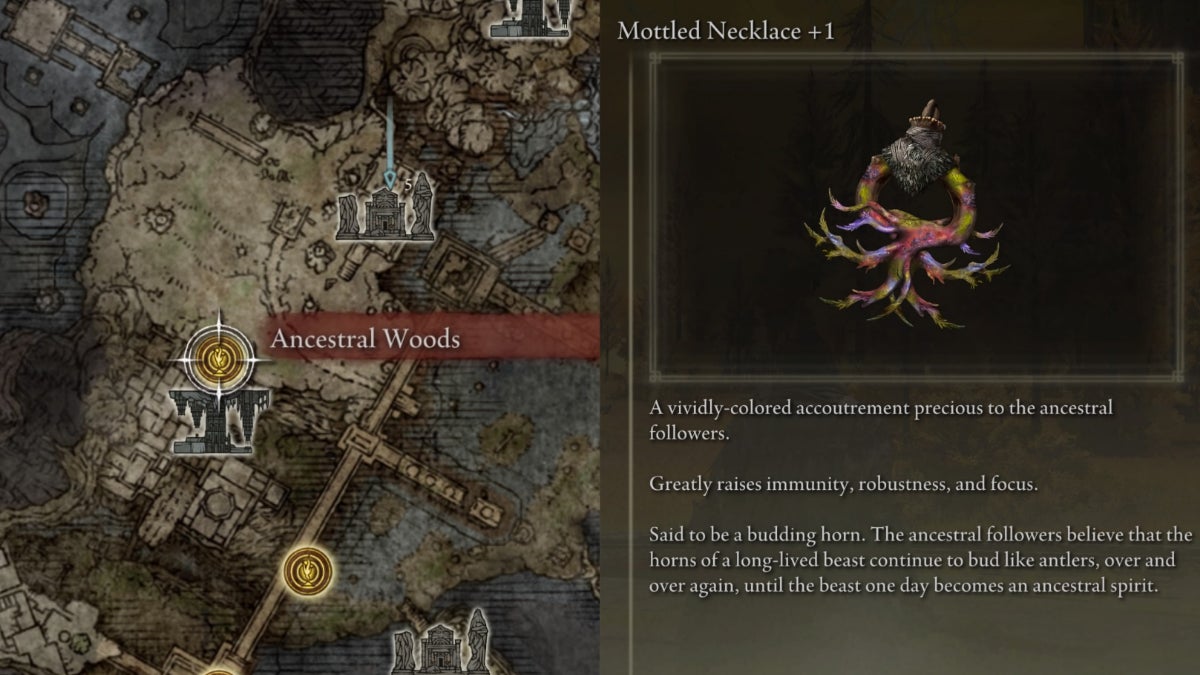
| Effect | Variation |
|---|---|
| +60 Immunity (Poison and Rot Resistance), Robustness (Bleed and Frostbite Resistance) and Focus (Sleep and Madness Resistance | Mottled Necklace |
Ancestral Woods Grace — Go to the hillside west of the Hallowhorn Grounds. Walk on the pillars of the structure, and you can find the Mottled Necklace +1 on a hanging corpse on the northern part.
Clarifying Horn Charm +1
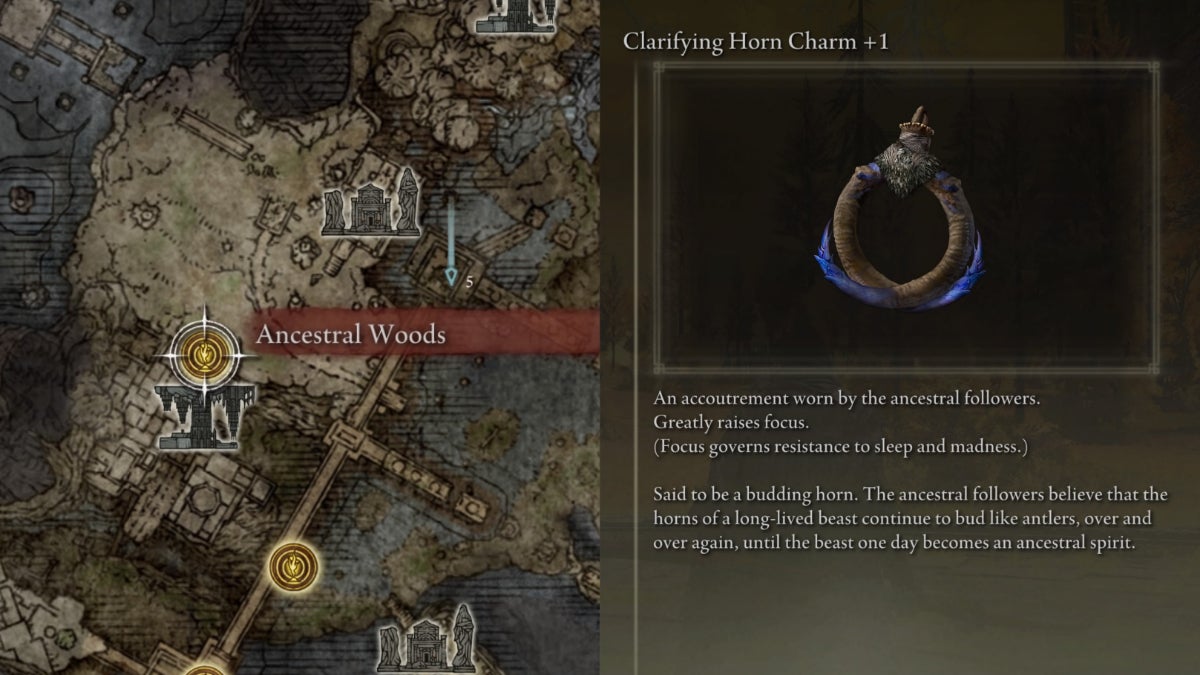
| Effect | Variation |
|---|---|
| +140 Focus (Sleep and Madness Resistance) | Clarifying Horn Charm |
Ancestral Woods Grace — Make your way to the cliff under the bridge. Jump down below to the bridge pillars, then go north to the unknown ruins of the Siofra River. Summon Torrent to get to the ground safely. The Clarifying Horn Charm +1 is on a corpse within the room.
Haligdrake Talisman +2
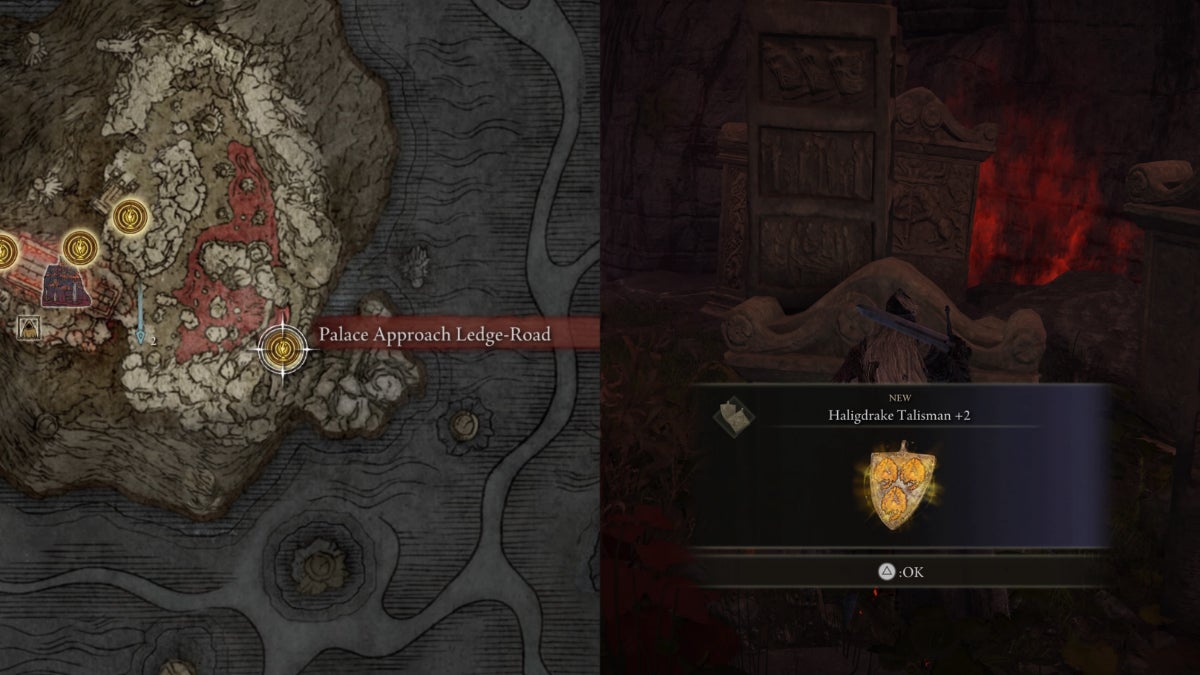
| Effect | Variation |
|---|---|
| +20% Holy Damage Negation (+6% only in PVP) | ‣ Haligdrake Talisman ‣ Haligdrake Talisman +1 |
Palace Approach Ledge-Road Grace — Summon Torrent, and make your way to a graveyard located southwest of the red lake. Beware of the Giant Crows and Shamans in the area. The Haligdrake Talisman is behind a gravestone near the edge of the cliff.
The Talisman in Deeproot Depths
There’s only one Talisman in Deeproot Depths.
Prince of Death’s Cyst
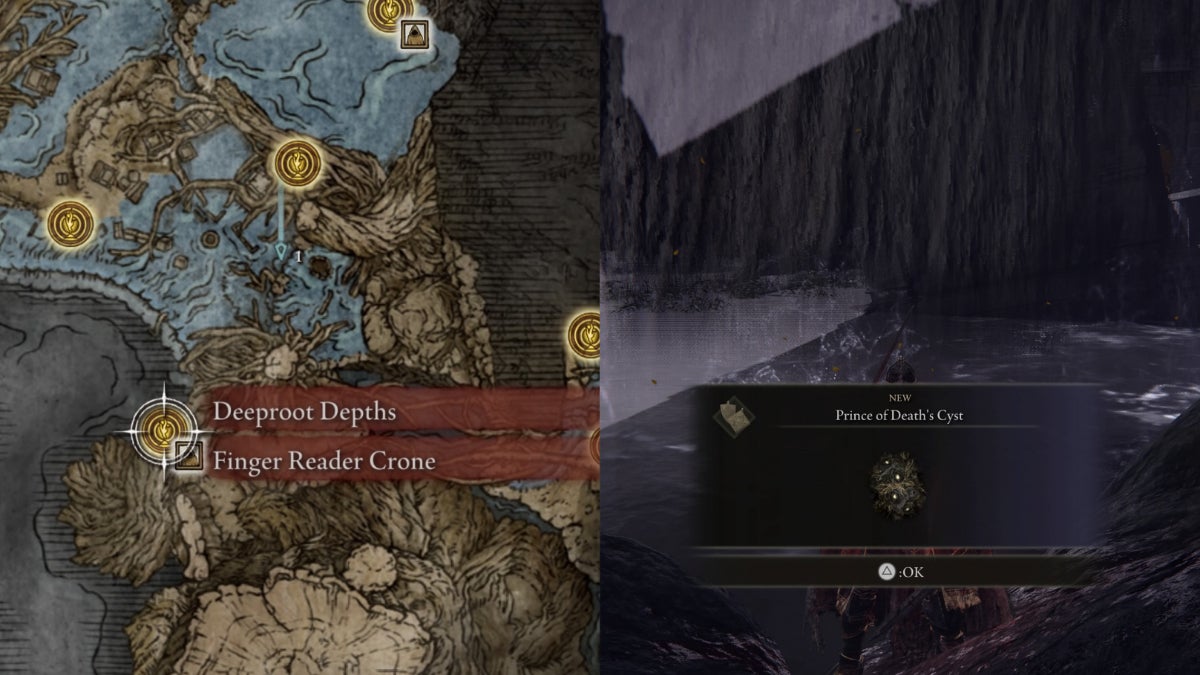
| Effect | Variation |
|---|---|
| +140 Vitality (Death Blight Resistance) | Prince of Death's Pustule |
Deeproot Depths Grace — Go behind the waterfall. It’s located northeast of the grace site, just behind the roots of a giant tree. Defeat the Lesser Runebear in the waterfall cave to get the Prince of Death’s Cyst.
Every Talisman in Ainsel River
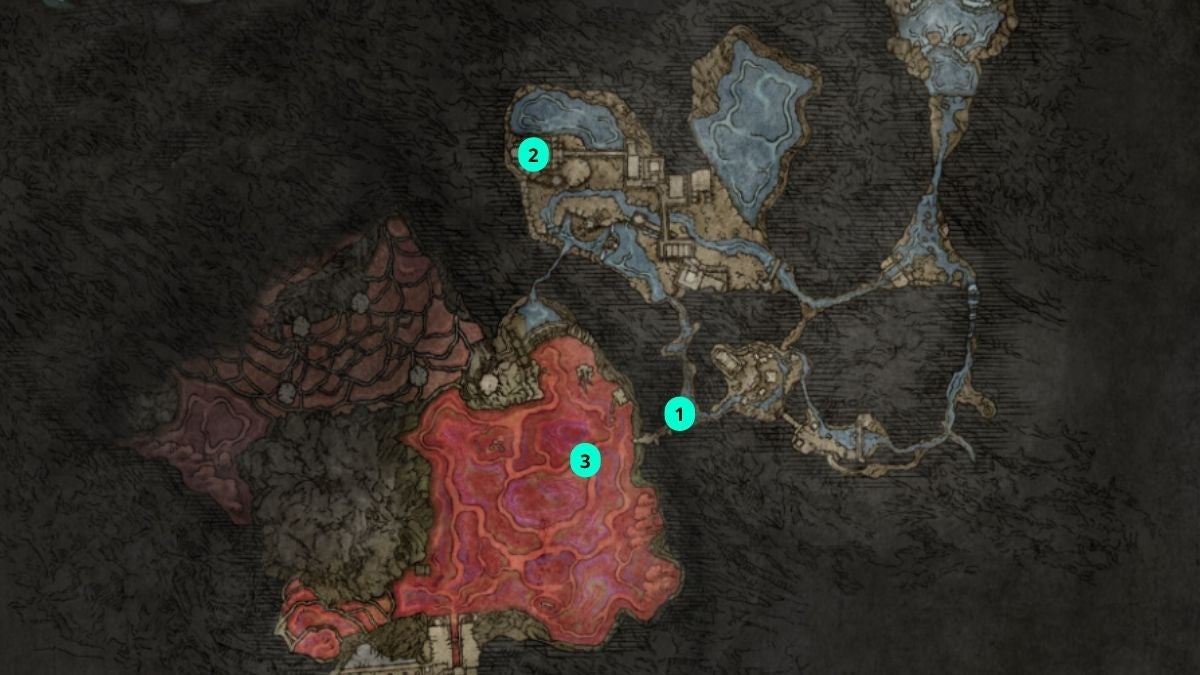
There are three Talismans in the Ainsel River.
| Talisman | Map Location | |
|---|---|---|
| 1 |  Immunizing Horn Charm Immunizing Horn Charm | Ant nest, Ainsel River Downstream |
| 2 |  Moon of Nokstella Moon of Nokstella | Throne room, Nokstella, Eternal City |
| 3 |  Immunizing Horn Charm +1 Immunizing Horn Charm +1 | Ancestral Follower, Lake of Rot |
Immunizing Horn Charm
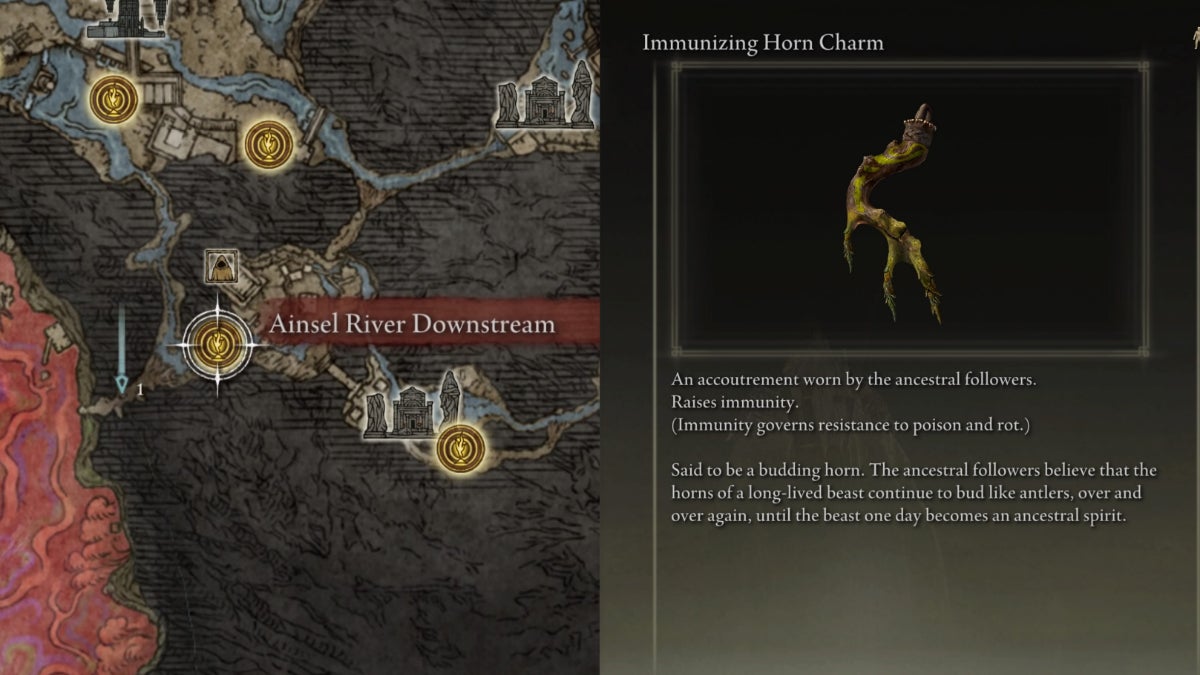
| Effect | Variation |
|---|---|
| +90 Immunity (Poison and Rot Resistance) | Immunizing Horn Charm +1 |
Ainsel River Downstream Grace — Go down to the river, and take the right path that leads to an ant nest. The Immunizing Horn Charm is on the left side of the entrance. Beware of the Giant Ants nearby.
Moon of Nokstella
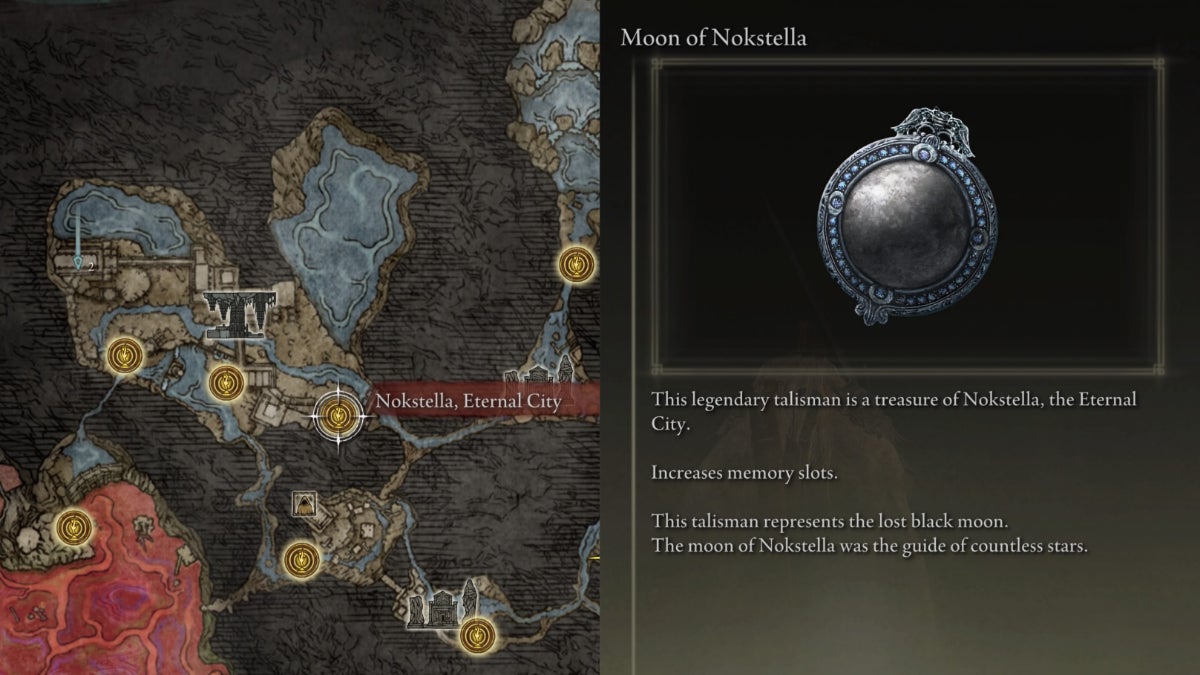
| Effect | Note |
|---|---|
| +2 Memory Slots | Useful during Co-op and when you prefer using a wider range of Spells |
Nokstella, Eternal City Grace — Take the stairs up, and make your way to the Throne Room. It’s a large building located northwest of Nokstella. The Moon of Nokstella is in the chest under a giant throne. Beware of the Mimic Tears and the Nox Swordstress guarding the room.
Immunizing Horn Charm +1
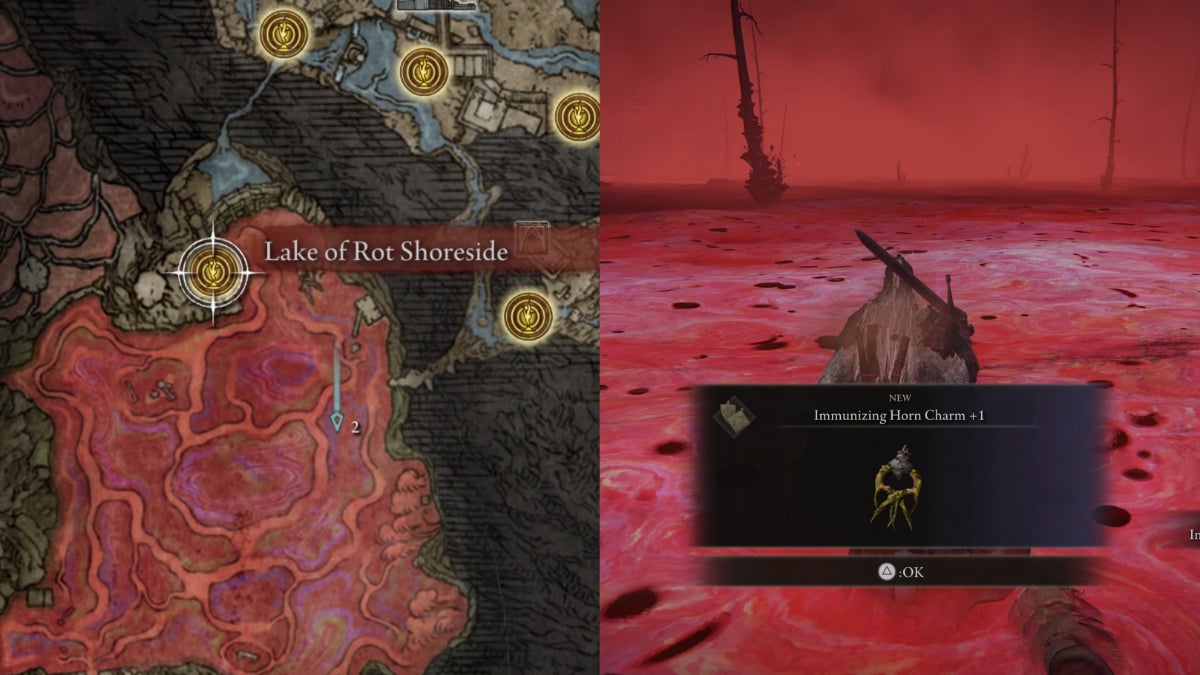
| Effect | Variation |
|---|---|
| +140 Immunity (Poison and Rot Resistance) | Immunizing Horn Charm |
Lake of Rot Shoreside Grace — Carefully make your way central east of the lake, just before the Dragonkin Soldier. There’s an Ancestral Follower that you need to defeat to get the Immunizing Horn Charm +1.
Every Talisman in Crumbling Farum Azula
There are four Talismans in the Crumbling Farum Azula.
| Talisman | Map Location | |
|---|---|---|
| 1 |  Shard of Alexander Shard of Alexander | Iron Fist Alexander |
| 2 |  Dragoncrest Shield Talisman +2 Dragoncrest Shield Talisman +2 | Bridge ruins towards the Dragon Temple |
| 3 |  Old Lord's Talisman Old Lord's Talisman | East of Dragon Temple Rooftop |
| 4 | 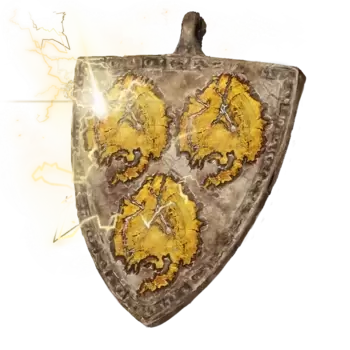 Boltdrake Talisman +2 Boltdrake Talisman +2 | In a tower, northeast of the Great Bridge |
Shard of Alexander
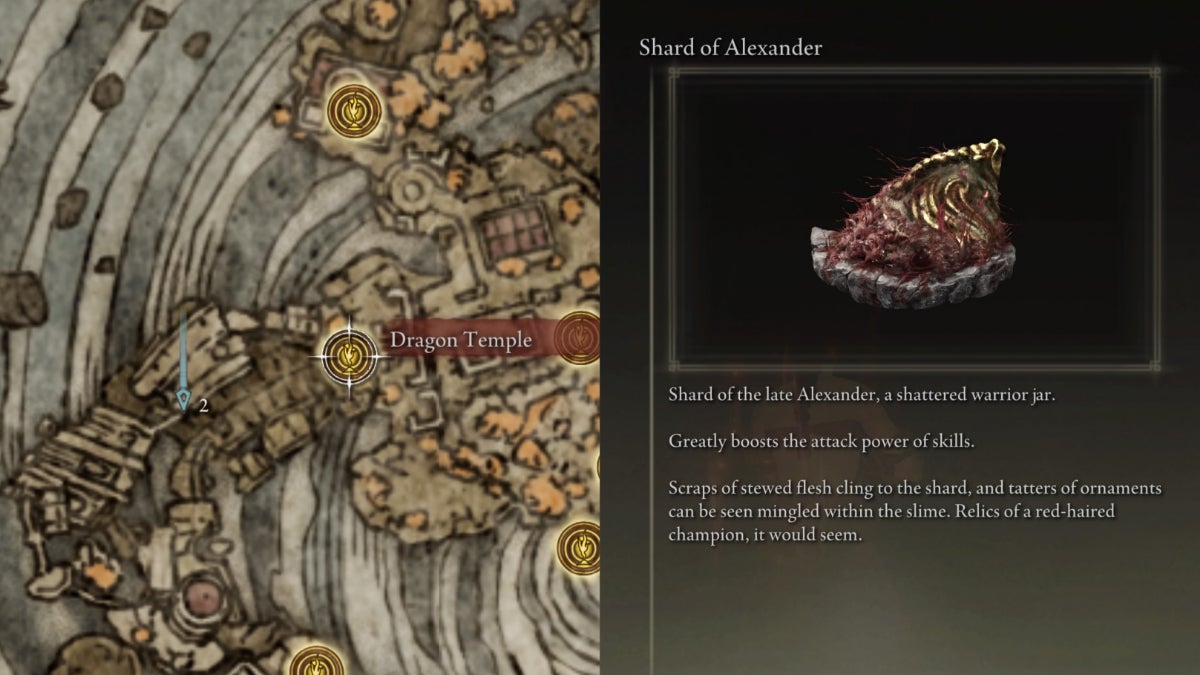
| Effect | Variation |
|---|---|
| +15% Weapon Skills DPS | Warrior Jar Shard |
Dragon Temple Lift Grace — Go out to the courtyard. Make your way up to the southwestern ruins, west of the pillars to find Iron Fist Alexander. Defeat him to get the Shard of Alexander Talisman.
Dragoncrest Shield Talisman +2
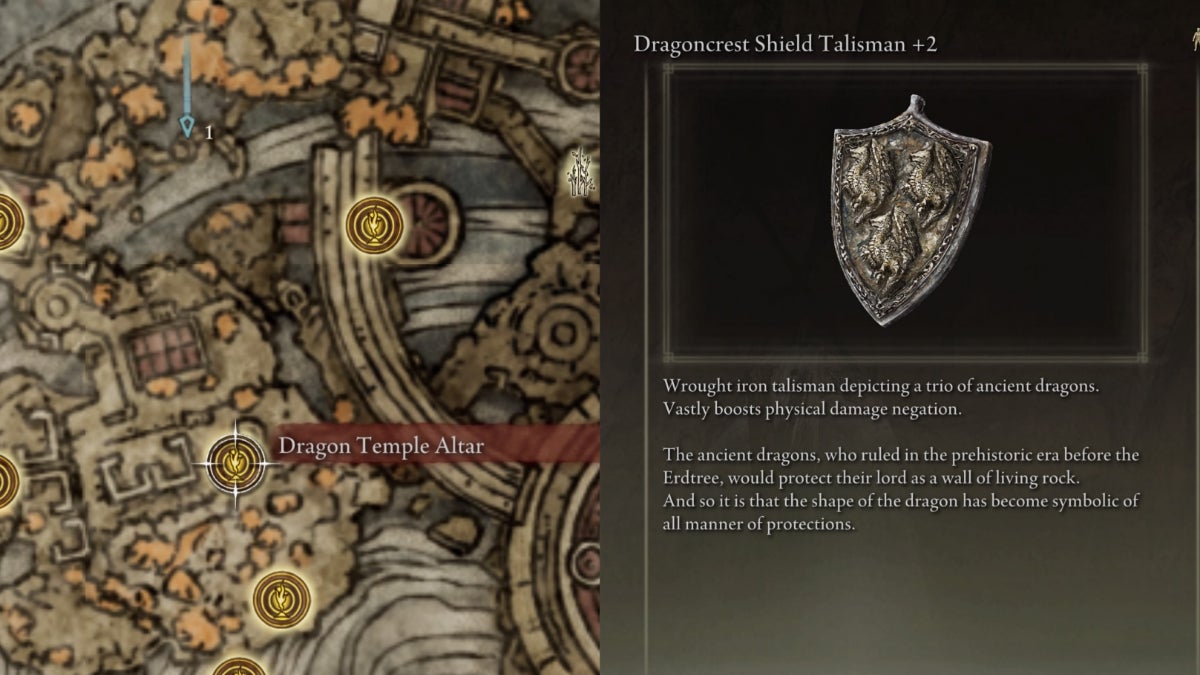
| Effect | Variation |
|---|---|
| +17% Physical Damage Negation (+4% only in PVP) | ‣ Dragoncrest Shield Talisman ‣ Dragoncrest Shield Talisman +1 ‣ Dragoncrest Greatshield Talisman |
Dragon Temple Altar — You’re required to defeat the Godskin Duo to access the northern area of the Crumbling Farum Azula. From the grace site, go down to the left doorway. Upon crossing the broken bridge towards the Dragon Temple Rooftop, get the Dragon Shield Talisman on a corpse on the left side.
Old Lord’s Talisman
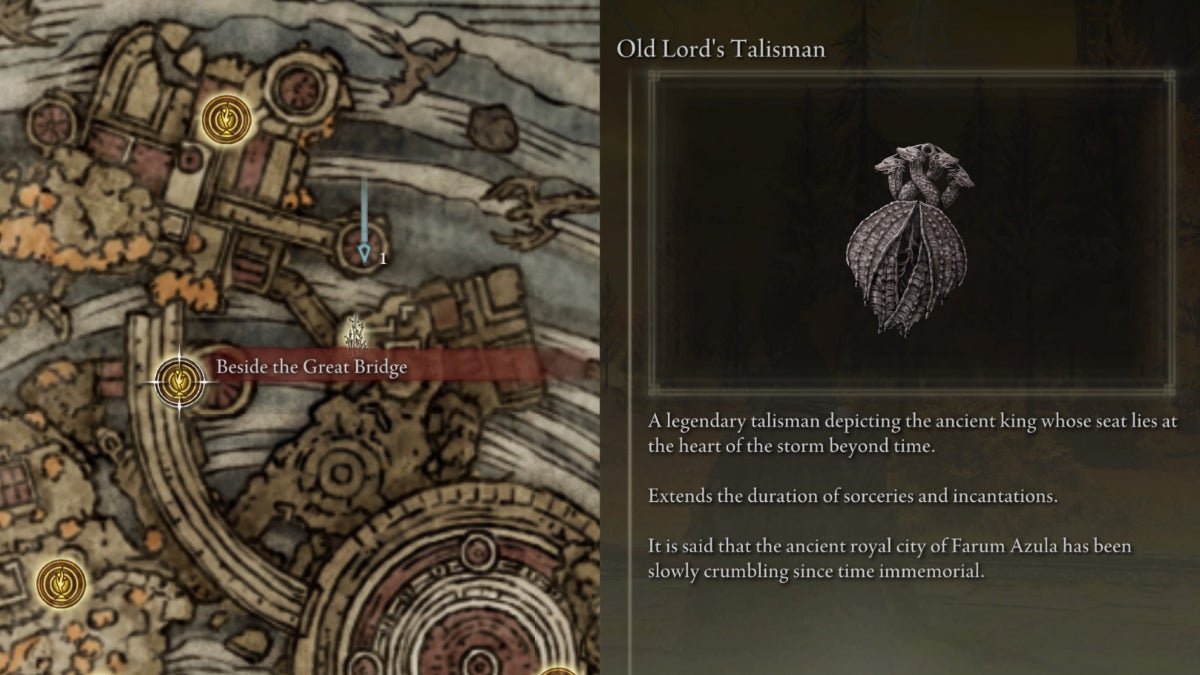
| Effect | Note |
|---|---|
| +30% Spell Duration | ‣ Affects Sorceries and Incantations ‣ Does not affect Ashes of War and Spirit Ashes |
Beside the Great Bridge Grace — Climb up towards the bridge, take a sharp left turn. Go straight to a section of the Dragon Temple Rooftop. Go down the stairs, then out to the balcony. Climb down the ladder on the right side, and then go straight for the tower. Beware of the Beastmen of Farum surrounding the chest. Open it to get the Old Lord’s Talisman.
Boltdrake Talisman +2
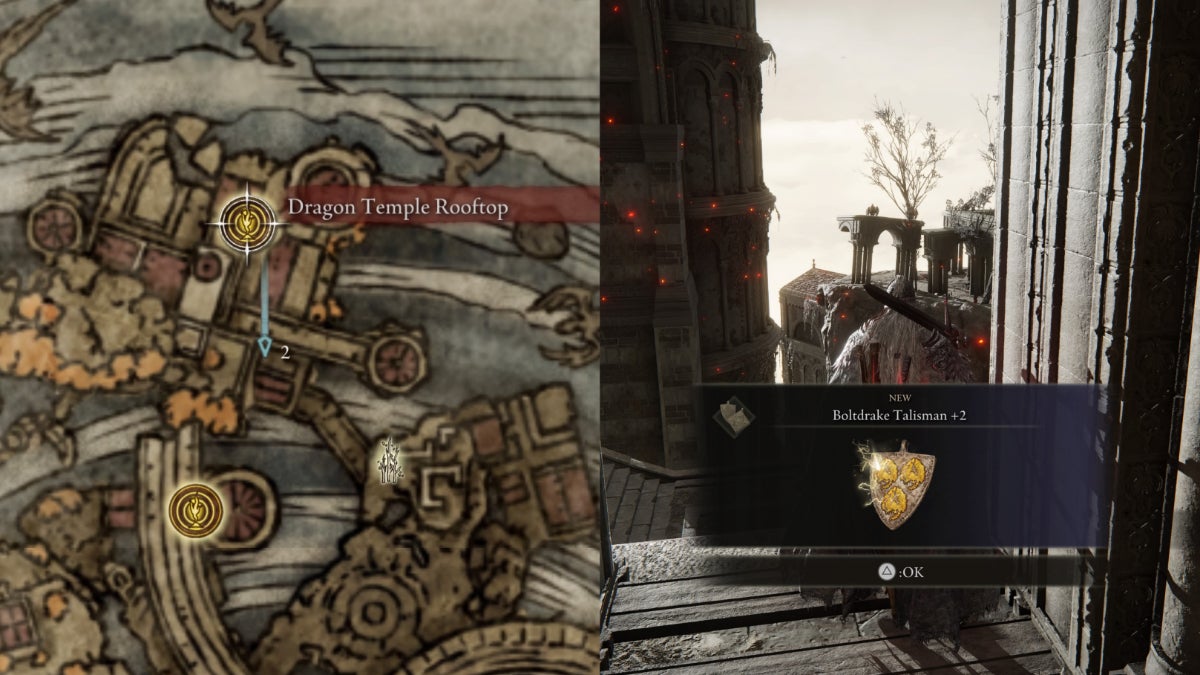
| Effect | Variation |
|---|---|
| +20% Lightning Resistance (+6% only in PVP) | ‣ Boltdrake Talisman ‣ Boltdrake Talisman +1 |
Dragon Temple Rooftop Grace — Go straight to where a Greater Farum Azula Dragon strikes red lightning on the ground. On the left side, jump down from the cliff to the debris that leads to another building. Make your way to the ground. Beware of the Banished Knight and Warkhawk as you climb up the ladder. Go straight for the lift that leads to another hallway filled with Beastmen of the Farum Azula. Climb the ladder, then seek the Boltdrake Talisman on an overhanging corpse out of a window.
Every Talisman in Leyndell, Ashen Capital
There are two Talismans in Leyndell, Ashen Capital.
| Talisman | Map Location | |
|---|---|---|
| 1 |  Crimson Amber Medallion +2 Crimson Amber Medallion +2 | In an opened manhole in the middle of ruins |
| 2 |  Erdtree’s Favor +2 Erdtree’s Favor +2 | On a branch in the courtyard |
Crimson Amber Medallion +2
| Effect | Variation |
|---|---|
| +8% of Max HP | ‣ Crimson Amber Medallion ‣ Crimson Amber Medallion +1 |
Leyndell, Capital of Ash Grace — Go straight towards the Leyndell Ruins, and there’s an opened manhole in the middle. Carefully make your down until you reach a wooden roof truss. The Crimson Amber Medallion +2 is on the corpse.
Erdtree’s Favor +2
| Effect | Variation |
|---|---|
| +4% HP, +9.6% Stamina, and +8% Equip Load | ‣ Erdtree's Favor ‣ Erdtree's Favor +1 |
Forbidden Lands Grace — Make your back to the Leyndell, Ashen Capital from the grace site. It’s the only way to access the eastern courtyard of the capital. Upon reaching the area, beware of the three Putrid Tree Spirits roaming around. The Erdtree’s Favor +2 is on a branch, southwest of the courtyard.
Every Talisman in Miquella’s Haligtree

There are five Talismans in Miquella’s Haligtree.
| Talisman | Map Location | |
|---|---|---|
| 1 |  Pearldrake Talisman +2 Pearldrake Talisman +2 | Town Plaza with Misbegotten Warriors |
| 2 |  Viridian Amber Medallion +2 Viridian Amber Medallion +2 | In a room, south of Haligtree Town Plaza |
| 3 |  Marika's Soreseal Marika's Soreseal | Imp-Sealed room, east of the Prayer Room |
| 4 |  Dragoncrest Greatshield Talisman Dragoncrest Greatshield Talisman | Inner Balcony of a church that leads to the Haligtree Roots |
| 5 |  Rotten Winged Sword Insignia Rotten Winged Sword Insignia | Millicent at Elphael Inner Wall |
Pearldrake Talisman +2

| Effect | Variation |
|---|---|
| ‣ +9% Elemental Damage Negation (+4% only in PVP) | ‣ Pearldrake Talisman ‣ Pearldrake Talisman +1 |
Haligtree Town Grace — Go down the stairs, but beware of the Misbegotten. Climb up the ladder and kill all the Putrid Corpses. To the right, there’s a Misbegotten Warrior. Kill him to jump safely towards the statue, and the Pearldrake Talisman +2 is on the corpse.
Viridian Amber Medallion +2
| Effect | Variation |
|---|---|
| +15% of Max Stamina | ‣ Viridian Amber Medallion ‣ Viridian Amber Medallion +1 |
Haligtree Town Plaza Grace — Make your way towards a small rooftop before the area where the Putrid Corpses are. Turn around, and jump inside the building. The Viridian Amber Medallion +2 is in the chest guarded by Putrid Corpses.
Marika’s Soreseal
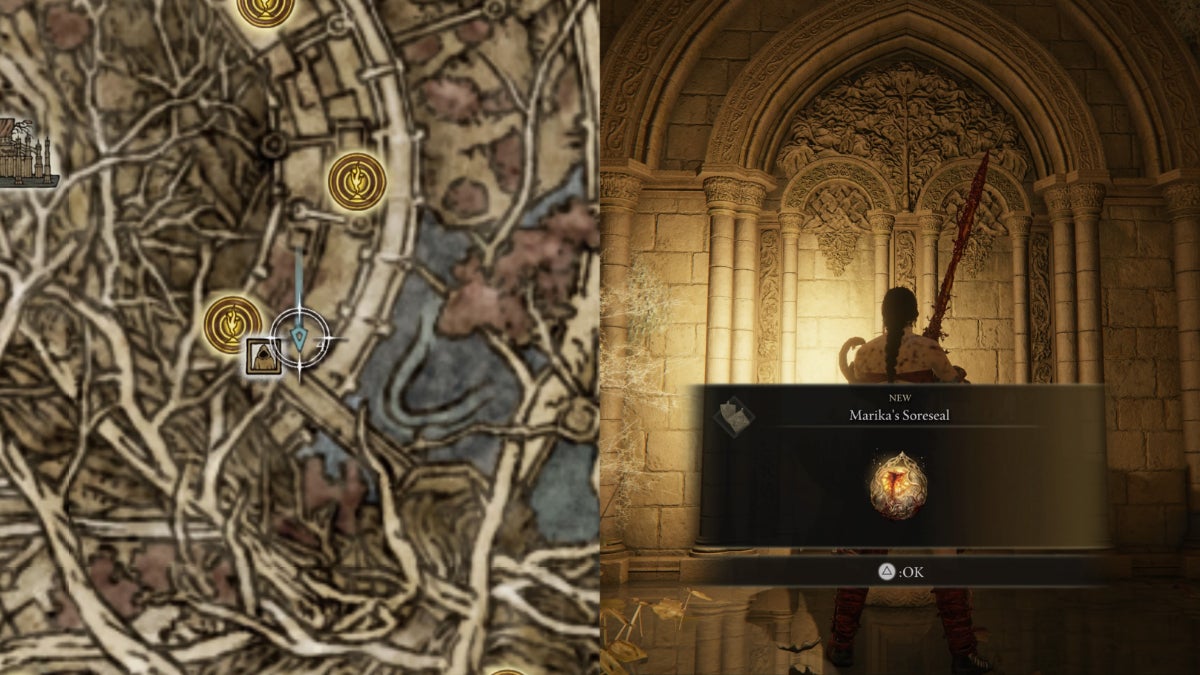
| Effect | Variation |
|---|---|
| ‣ +5 Mind, Intelligence, Faith, and Arcane ‣ -15% Damage Negation | Marika's Scarseal |
Prayer Room Grace — To avoid the revenants, make your way to the rampart guarded by a Putrid Avatar. You can either kill or ignore them to reach the southwest corner of the rampart. Jump down from the balcony onto a rooftop, then jump down to the ground where you can find an Imp-Sealed room. Use two Stonesword Keys to get Marika’s Soreseal on an altar bowl.
Dragoncrest Greatshield Talisman
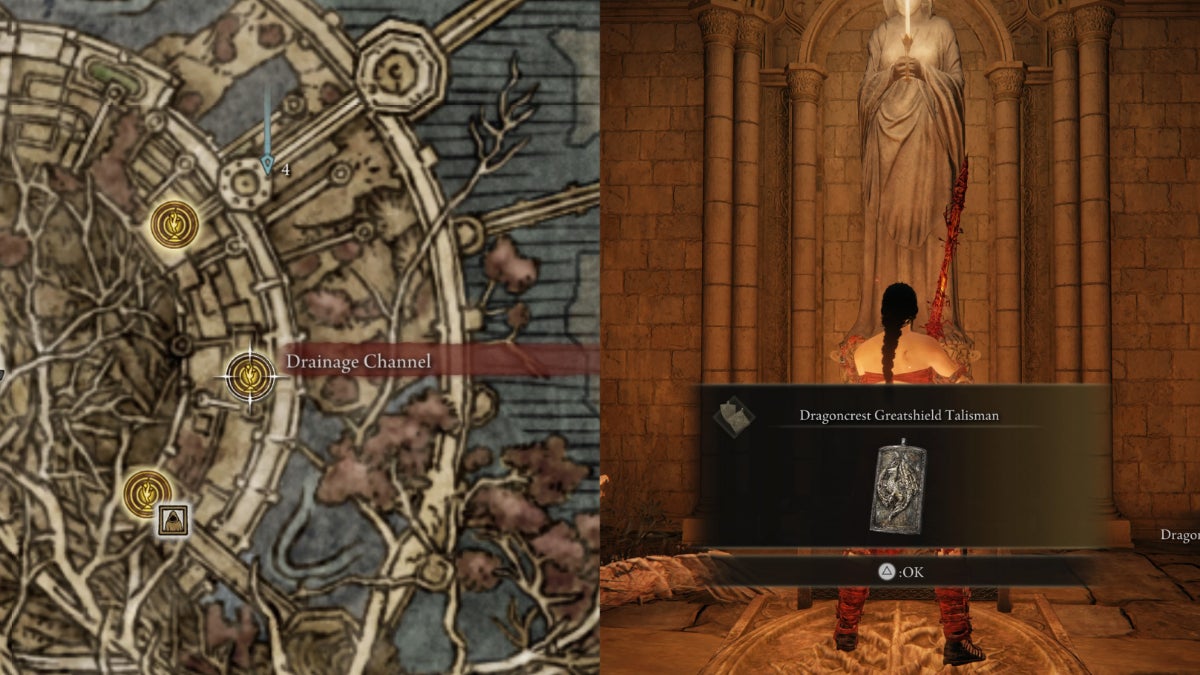
| Effect | Variation |
|---|---|
| +20% Physical Damage Negation (+5% only in PVP) | ‣ Dragoncrest Shield Talisman ‣ Dragoncrest Shield Talisman +1 ‣ Dragoncrest Shield Talisman +2 |
Drainage Channel Grace — Get out of the room, and take a left turn. Follow the branch until the edge, where the mushrooms are. Jump down on the platform, then cross the branch to the other side. Go up the platform, and follow yet another branch that leads to a rooftop. Jump down the hole, and turn left. The Dragoncrest Greatshield Talisman is in the chest guarded by the Lesser Kindreds of Rot.
Rotten Winged Sword Insignia
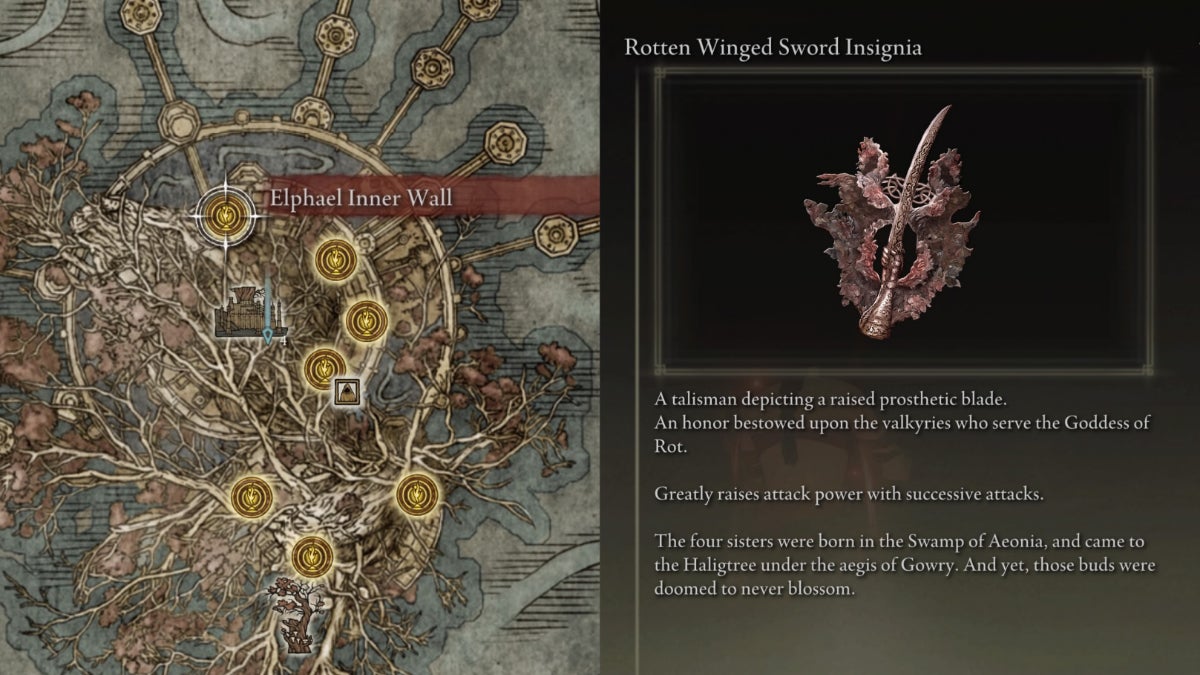
| Effect | Variation |
|---|---|
| ‣ Successively raises DPS, specifically 6%, 8%, and 13%, activates after 3 hits | Winged Sword Insignia |
Elphael Inner Wall Grace —You’re required to kill the Putrid Tree Spirit on a floating swamp to unlock Millicent’s final quest. You’re given the option to assist or kill her. Choose the first one to get the Rotten Winged Sword Insignia. After the battle with her sisters, talk with her and rest at a site of grace. Go back to her spot to get the Talisman off her corpse.