
Boss encounters are one of the many reasons players enjoy Souls games so much, and that sentiment rings very true in Dark Souls 3. The bosses in this game are exactly as most fans expected them, if not more.
FromSoftware’s Souls titles have never been meager when it comes to their bosses. Every single Souls game has always had a large number of boss fights for players to encounter and enjoy–or suffer from, considering how difficult they can be.
Dark Souls 3 is no different. In this game, there are more than 20 bosses for you to fight, including DLC bosses. That said, here is every boss in Dark Souls 3 and a strategy to efficiently defeat them.
Table Of Contents
Every Main Boss in Dark Souls 3
These are the bosses that you’re required to encounter to get one of the endings.
Iunex Gundyr
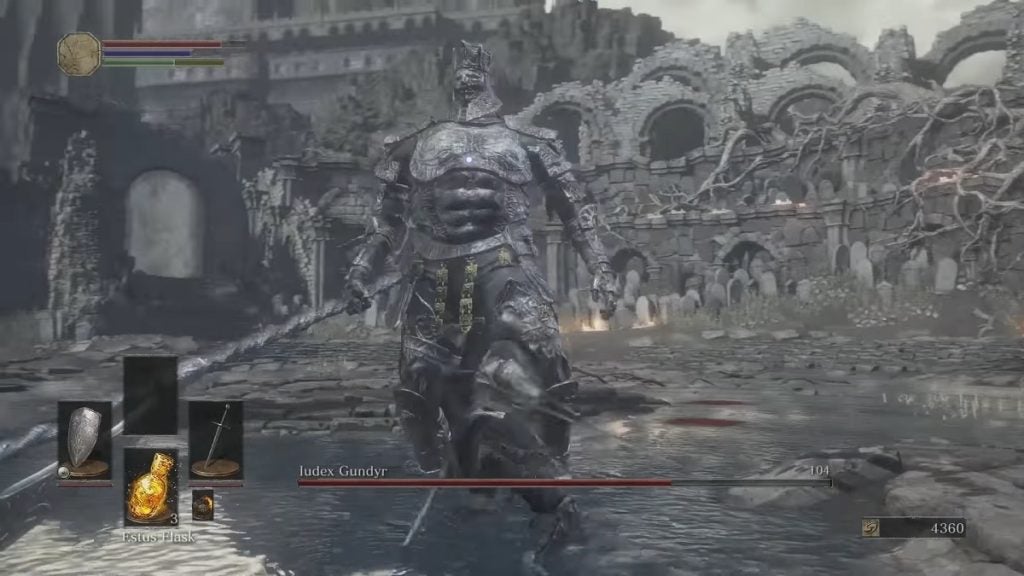
Iunex Gundyr is the first boss that will greet you in Dark Souls 3. He awaits you near the end of the Cemetary of Ashen, before the entrance to Firelink Shrine.
Being the first boss in the game, Iunex Gundry is designed to train you on how the combat system of the game works. He telegraphs his attacks very well, making it easy for you to dodge them. A useful strategy you can employ on him is to simply circle him while keeping your shield up and dodging when necessary. Hit him after every attack.
Once he transforms when his health becomes low enough, stick to his back to avoid his attacks. You can also throw Firebombs at him, which you should collect prior to getting to the boss room, to eliminate him much faster.
Vordt of the Boreal Valley
The Vordt of the Boreal Valley is the boss at the end of the High Wall of Lothric level. This is the boss you must first defeat before you can get to the Undead Settlement.
Vordt’s attacks are very easy to read. The best strategy to employ to defeat this boss is to simply stay underneath or behind him as often as you can. Whenever Vordt winds up his attacks, dodge towards him or beside him to get to the optimum location. You can then start pounding him with attacks when you’re out of his attack range.
During his second stage, Vordt will begin charging at you, which he’ll often do three times consecutively. Stay locked on to him to know when to dodge. Right after these charges, he will then begin to charge up his Ice Breath attack. Run up to him and charge a heavy attack on his head to stagger him.
Vordt is weak against Fire and Dark attacks, so make use of this information as well to defeat him much faster.
Crystal Sage
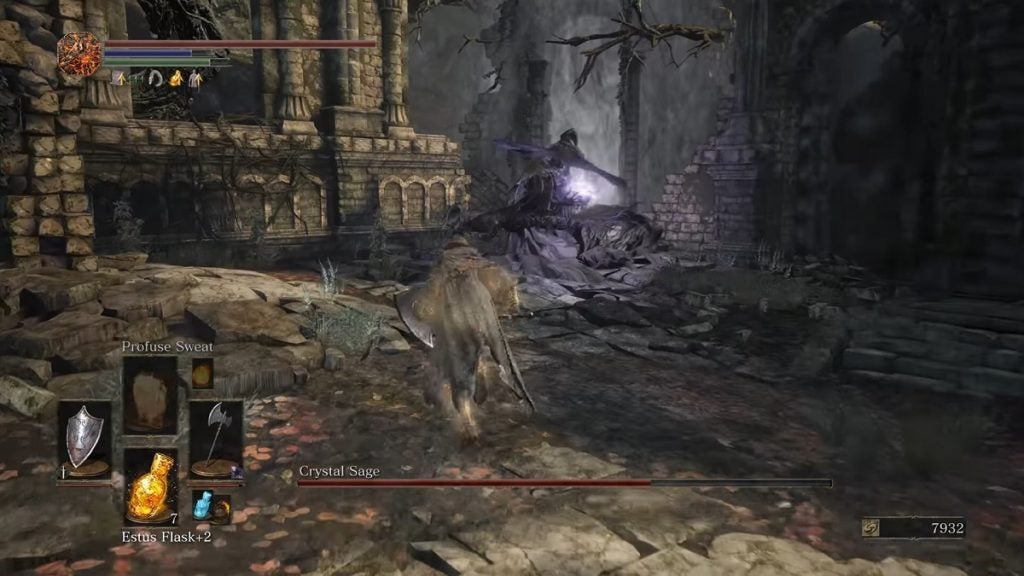
The Crystal Sage is the boss at the end of the Road of Sacrifices.
This boss is generally easy to defeat if you’re aggressive enough. As soon as you enter the boss room, rush towards the Crystal Sage and attack him until your stamina depletes completely. The good thing about this boss is that he can be staggered, allowing you to attack him relentlessly.
Whenever the boss teleports, he will almost always transport to the opposite end of the room, so just be watchful of that. His attack that you need to watch out for most is the Ice Crystals he summons forth from the ground. Whenever the ground beneath you lights up, dodge as fast as you can to avoid getting damaged.
At one point, the boss will summon clones of himself. The position of the real Sage is random, so just attack one to see if it’s real or if it’s a clone. If you don’t deal damage upon attacking, immediately ignore that clone and move on to the next one. Once you find the real one, bombard him with attacks until he teleports again.
Abyss Watchers
The Abyss Watchers are the boss at the end of Farron Keep. It is one of the five fated Lords of Cinder, and the first one you will encounter in the game.
This fight is exactly what you would expect from a FromSoft title. It requires precision and patience if you’re going to beat it. In a typical FromSoft fashion, dodge or block his attacks and only attack back when the window is open. When his health drops to about 50%, another Abyss Watcher will join the fold and both Watchers will begin ganking you.
Just a few moments after, though, a third Watcher will spawn and will attack the other two this time around. Be careful, though, as that Watcher can still attack and damage you. Keep your focus on the Watcher the third one isn’t attacking until their HP finally drops to zero.
Depleting the boss’ HP to zero for the first time doesn’t mean the end of the fight. This will only begin the second phase. This time, no other summons will arrive. It’s just you against one Abyss Watcher with a fire-imbued weapon. If you have a shield or armor that’s fire-resistant, that would immensely make this encounter much easier.
Take note that this boss can be backstabbed, parried, and riposted. If this is a mechanic you’ve already mastered, make use of it during this fight.
Deacons of the Deep
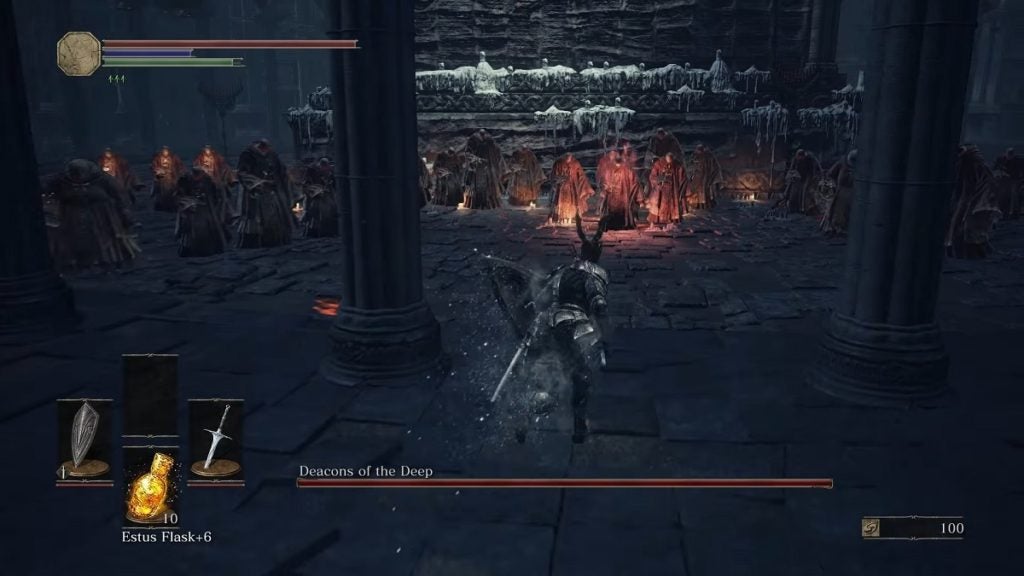
The Deacons of the Deep await at the end of the Cathedral of the Deep level.
Considering the other bosses in the series, the Deacons of the Deep boss fight is generally one of the easier ones. Although there are multiple enemies present during the encounter, focus on the one glowing with a red aura as damaging that one is the only way to deplete the boss’ HP.
Don’t bother with the other Deacons. Killing those who aren’t glowing with a red aura is inconsequential to the overall fight since it won’t deplete the HP and they’ll just respawn after you kill them.
Dodge and run away when necessary. Keep your focus on the main Deacon and the battle should be over in just a minute or two.
High Lord Wolnir
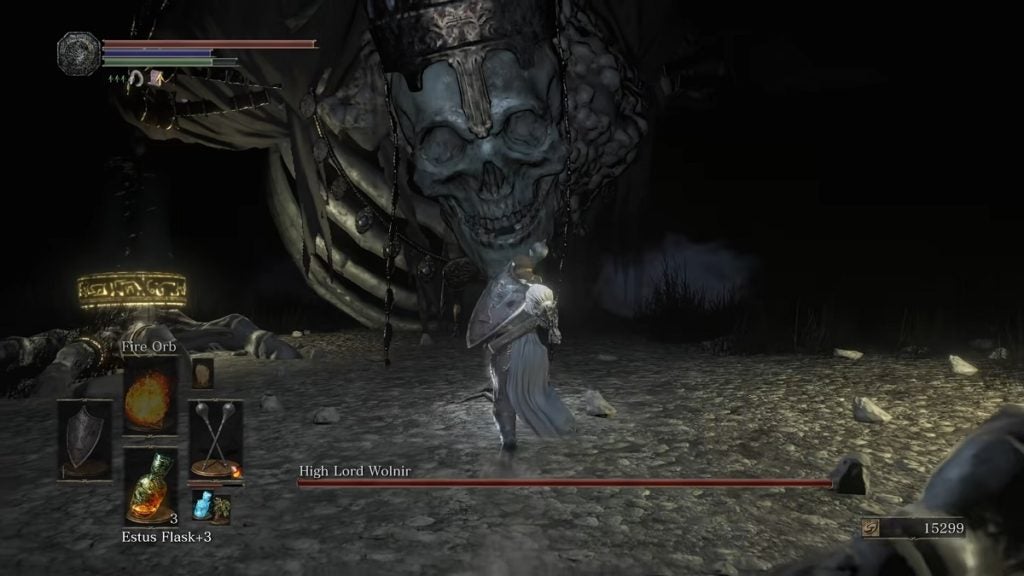
High Lord Wolnir is the boss of the Catacombs of Carthus.
As long as you know where to attack High Lord Wolnir, this encounter can end quickly. What you’ll need to focus on are the glowing bracelets located on both of Wolnir’s wrists. When you attack a bracelet enough, it will explode, dealing massive damage. His overall HP should be depleted completely when you destroy all bracelets.
Pontiff Sulyvahn
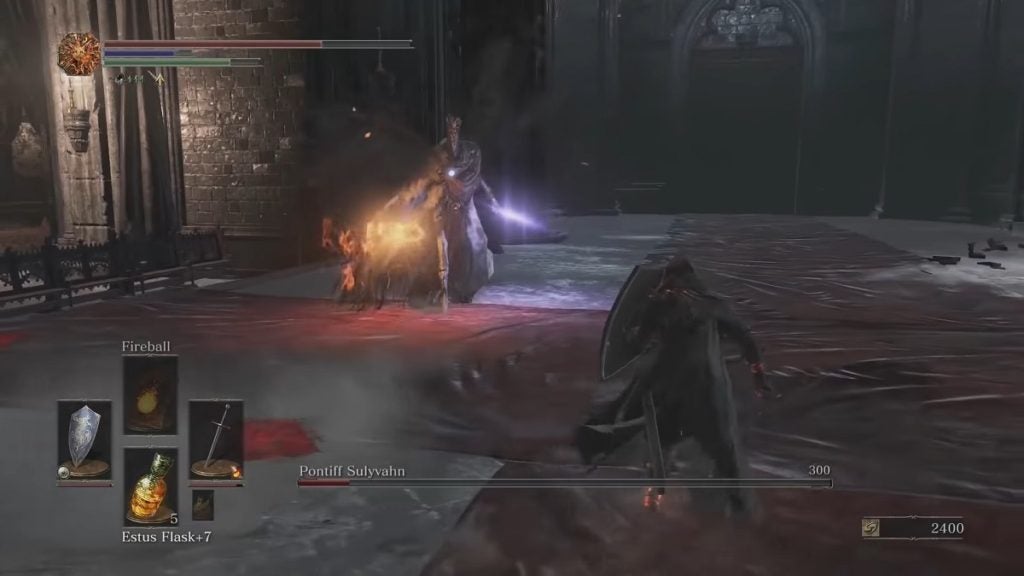
Pontiff Sulyvahn is the boss of the Irithyll of the Boreal Valley. This boss must be defeated before you can proceed further into the level.
This boss is immensely aggressive. To defeat this boss, you’ll need to have a decent amount of stamina so you can dodge his attacks enough to actually land a hit on him when he becomes open.
If you’re quick and precise enough, you can parry Pontiff so you can deal massive damage on him. Otherwise, the best approach is to constantly circle him with strafes and dodges and hit him when the chance arises.
If your build permits it, you can also use a Greatshield for this fight.
During his second phase, which starts when his health drops to about 50%, he’ll grow wings, start attacking you from above, and occasionally summon a clone to fight with him. When the Pontiff ascends to the air, just dodge frequently, getting as far away from him as you can. Whenever he summons a clone, deal with that clone first before returning to the Pontiff.
Yhorm the Giant
Yhorm the Giant is one of the five Lords of Cinder. He is located in the Profaned Capital.
Using the Storm Ruler on Yhorm automatically ensures your victory as he is extremely weak against this weapon. Alternatively, you can also complete Siegward’s questline and he will come to your aid during this boss. If you decide to do the latter, you can simply sit back and watch Siegward defeat this boss for you.
Aldrich, Devourer of Gods
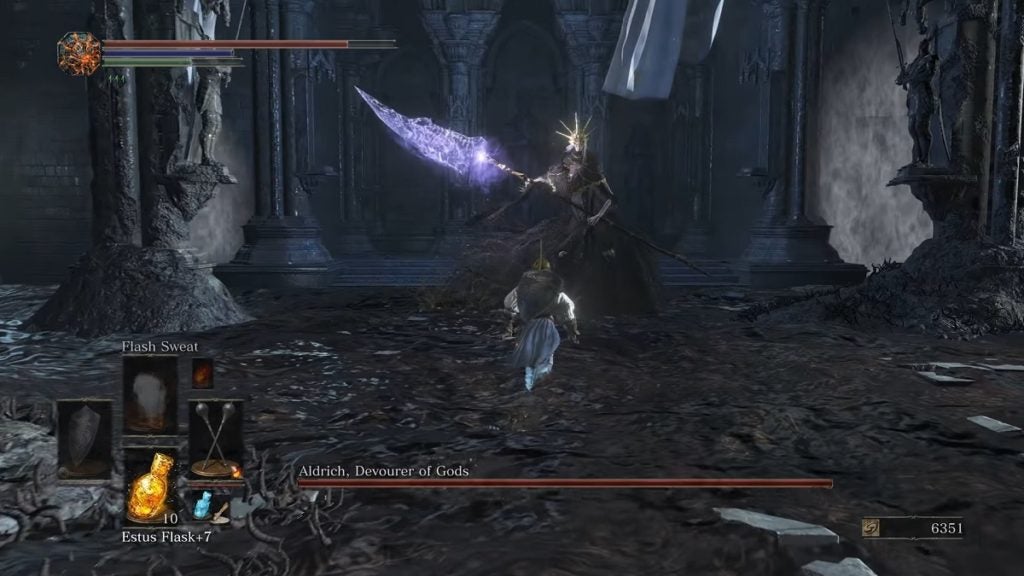
Aldrich is another Lord of Cinder you’ll have to defeat. He is located at the end of Anor Londo.
The best way to deal with Aldrich is to stay behind him as often as you can. As soon as you enter the room, rush towards him and get behind him immediately. Attack his tail constantly until he teleports away.
When he teleports, pan your camera around to quickly find his location. Repeat the same strategy mentioned above, while dodging any spells that he throws your way.
Dancer of the Boreal Valley
The Dancer of the Boreal Valley is a boss located in the High Wall of Lothric. You can’t fight this boss until you defeat three Lords of Cinder. After defeating the three lords, you’ll be automatically transported to the Dancer’s boss room. You can also trigger this fight by killing Emma.
Dealing with the Dancer is very similar to how you fight most of the bosses in this game. If your fight with the Dancer takes place after you’ve defeated three Lords of Cinder already, there’s a very good chance you’re used to the strategy of “dodging and waiting for an opportunity to attack” at this point in the game.
When dodging the Dancer’s attacks, make sure to dodge into or beside her instead of dodging away from her.
Dragonslayer Armour
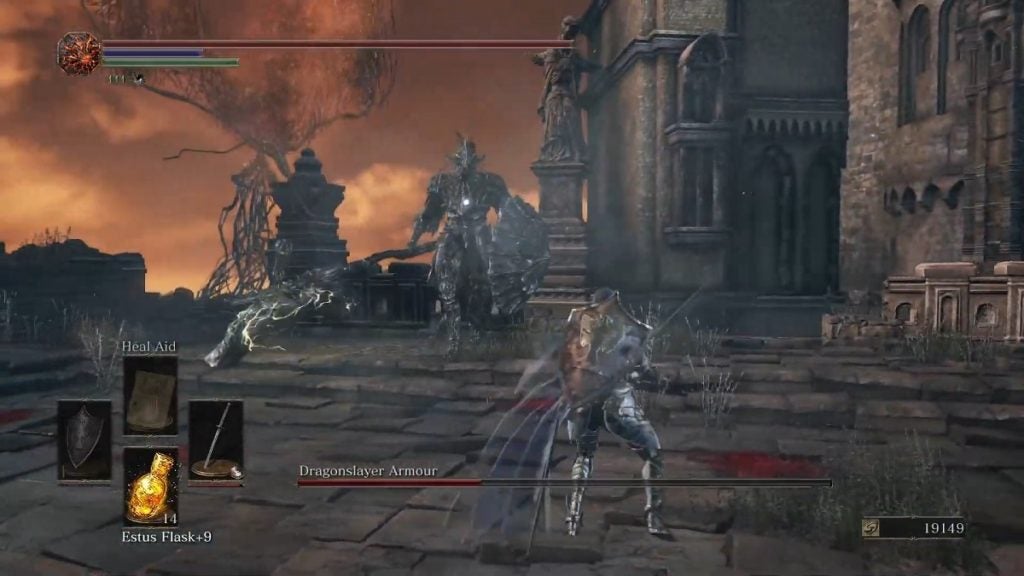
The Dragonslayer Armour is the boss you’ll need to defeat before you can get to the Grand Archives.
This boss’ attacks are very easy to read. As long as you’re able to dodge his attacks well and know when to be on the offensive, you should be able to defeat the boss easily. Make sure you wait for his combos to end before you land attacks of your own.
Always dodge to his right or to his left. Never dodge away from him as some of his attacks have a long reach across.
During the second phase of the fight, the massive butterflies around the arena will begin raining down projectiles. Be sure to manage them too, but never take your eyes away from the boss himself. Keep your targets on him.
Lorian, Elder Prince and Lothric, Younger Prince
Lorian, Elder Prince, is the brother of Lothric, Younger Prince, who is a Lord of Cinder. You can find the twins at the end of the Grand Archives.
You’ll only fight Lorian at the beginning of this encounter. His attacks are very easy to read and dodge. Make sure you only attack him when the window is open. He will occasionally teleport around or behind you. When that happens, make sure to dodge right away as he will always follow a teleport with a melee attack.
When you deplete Lorian’s health, Lothric will join the fight while clinging to his brother’s back. During this phase, Lorian will mostly employ the same attacks, while Lothric will constantly fire a barrage of spells at you. During this phase, make sure to focus your attacks on Lothric. If you deplete Lorian’s health first, the younger brother will just revive him.
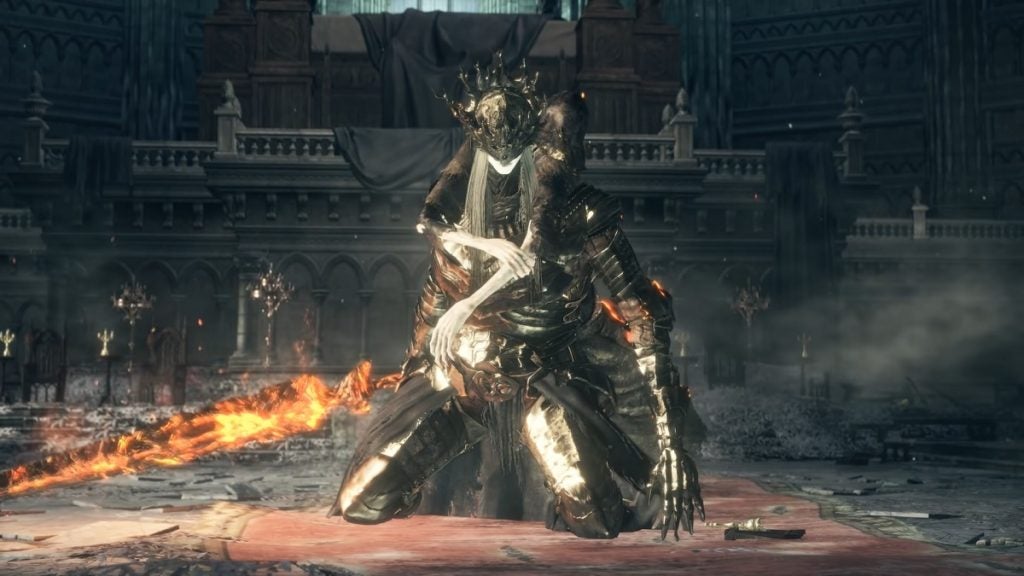
Soul of Cinder
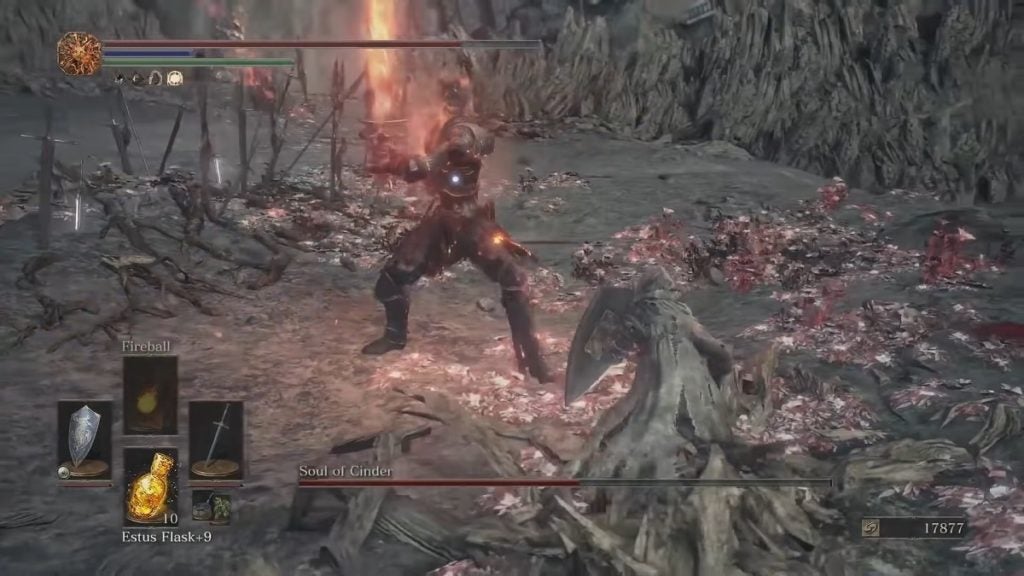
The Soul of Cinder is the final boss in Dark Souls 3 and is located at the Kiln of the First Flame. This area will only become accessible to you after you defeat the four Lords of Cinder.
As the final boss, the Soul of Cinder will challenge you to use everything you’ve learned thus far about the game’s combat system.
During the early stages of the fight, the Soul of Cinder will use a fire sword against you. Later on, however, he’ll start switching between a curved sword, a catalyst, and a Greatlance. He will also start firing pyromancy and faith spells at you.
The best way to deal with the boss is to fight him just as you have with the other bosses leading up to this one. Keep dodging and wait for an opportunity to attack. He can be fairly aggressive so make sure to avoid being greedy.
You’ll need to deplete this boss’ health twice to finally defeat him.
Every Optional Boss in Dark Souls 3
These are the bosses you don’t really need to defeat if your only goal is to finish the game. However, defeating these bosses bring certain benefits and hefty rewards as well.
Curse-Rotted Greatwood
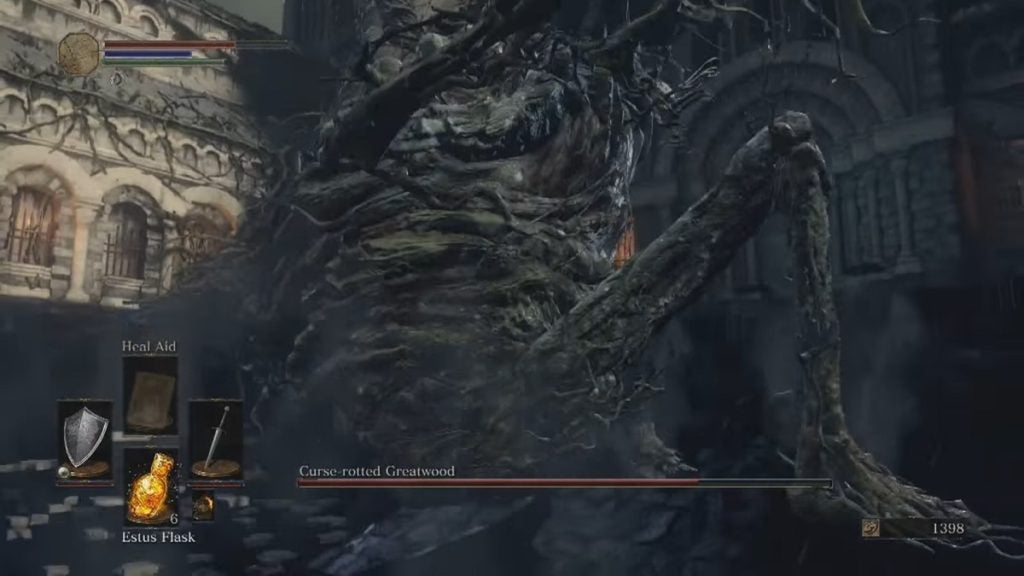
The Curse-Rotted Greatwood is found at the end of the Undead Settlement, near the Cliff Underside Bonfire. The boss is the tree that’s worshipped by a handful of Undead enemies.
During the fight, the Undead enemies around the Curse-Rotted Greatwood will begin attacking you as well. Dealing with them first isn’t recommended since they will just keep respawning until you defeat enough of them. The better approach is to avoid paying attention to them and let the Greatwood’s swipe attacks handle them instead. Focus all of your attacks on the boss itself.
What you’ll need to do is attack the egg sacks located in various locations of the boss’ body. As soon as the fight begins, head directly to its left hand and legs to destroy the egg sacks there. When the boss is open, begin focusing your attacks on the sacks located between the boss’ legs.
Once you’ve depleted about half of the boss’ health, the floor will cave in, sending you to the arena below, and the second phase will begin. During this phase, just wait for the boss to stand up and wait until he falls forward. That’s when you can begin attacking the other egg sacks on his body. Keep repeating this strategy and you should be able to eliminate the boss in no time.
Throughout the fight, it’s better for you to not lock onto the boss for full mobility. You can also imbue your weapon with fire to maximize damage.
Defeating the Curse-Rotted Greatwood will grant you the Transposing Kiln, the item needed to create boss items.
Old Demon King
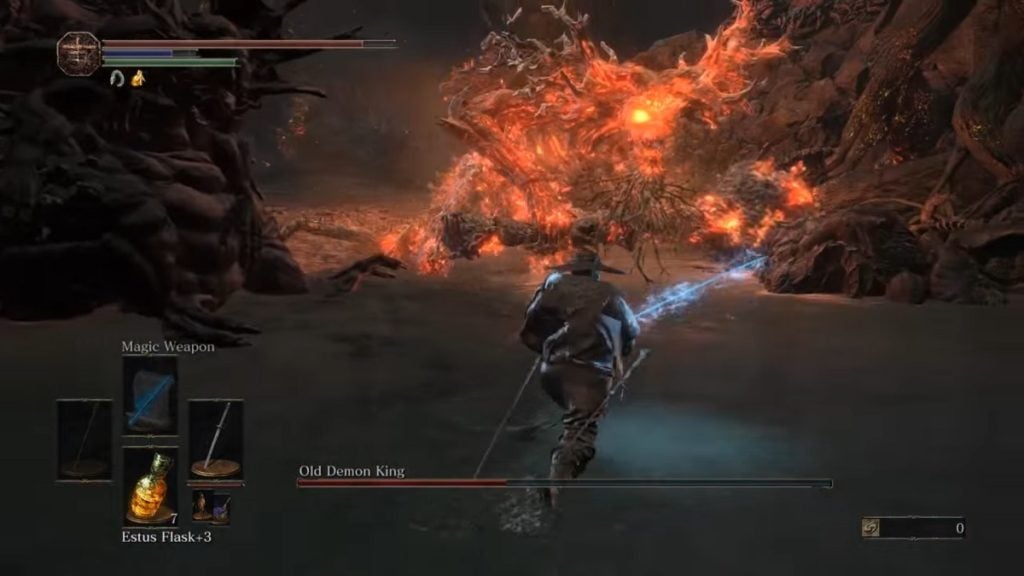
The Old Demon King is the boss of the Smouldering Lake, an optional area in Dark Souls 3. This area can be accessed by destroying the bridge in the Catacombs of Carthus.
This boss is incredibly aggressive. Your window of opportunity for attacks only lasts for about one to two hits. These windows are in between his various attacks. After hitting him once or twice, immediately prepare to dodge his upcoming attack. Wait until the next window arrives to attack him again.
When you see him pounding his hammer to the ground, run away from him as far as you can and wait for the circle of fire to fade away. Repeat the strategy mentioned above until his HP drops to zero.
Mage and Ranged builds will have an easier time with this boss since they can just attack him from afar, whereas melee builds will constantly need to dodge his attacks.
Oceiros, the Consumed King

Oceiros, the Consumed King is located in the Consumed King’s Garden. You can access this area by heading left instead of heading forward to Lothric’s castle right after the Dancer of the Boreal Valley’s boss room.
While Oceiros is very aggressive and agile, his attacks are also very easy to read. Always dodge forward when avoiding his attacks. Hit him when you can before dodging his attacks again.
When you get his health down to about 75%, he’ll get down on all fours. This is when the boss starts to really become more aggressive. However, his attacks can still be dodged easily. Keep employing the same tactic mentioned above and you should be able to defeat him without much trouble.
Even though this boss is technically optional, you’ll need to defeat him if you want to reach “The End of Fire” ending.
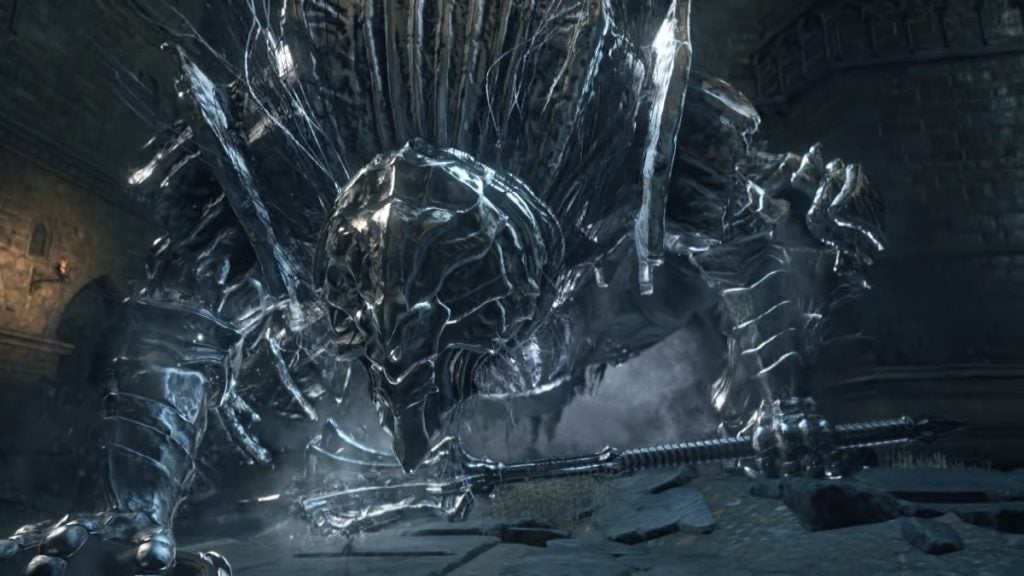
Champion Gundyr
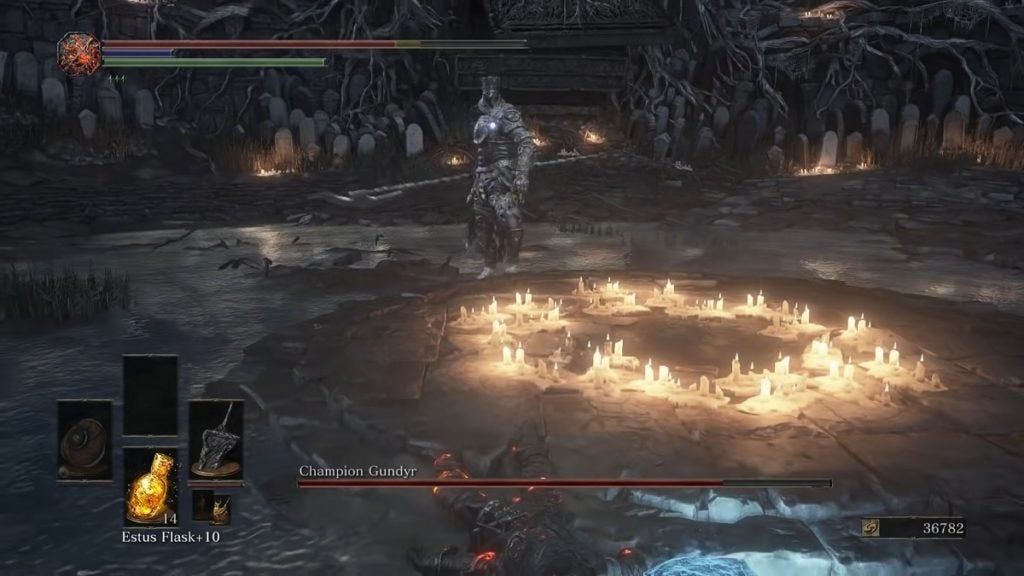
Champion Gundyr is located in the Untended Graves, an area you can access after defeating Oceiros, the Consumed King. The Untended Graves is basically identical to the Cemetary of Ash. Only this time, the area is devoid of light and contains more powerful enemies.
Champion Gundyr acts similarly to Iudex Gundyr. However, he is more aggressive and has new attack patterns this time around. His new attacks and extreme aggressiveness start to show during his second phase, which should trigger when his health reaches 50%.
During the second phase, dodge his attacks as often as you can and limit hitting him to about once or twice. Just be patient and only attack him when an opening is present.
Like Oceiros, this boss is needed to reach “The End of Fire” ending.
Ancient Wyvern
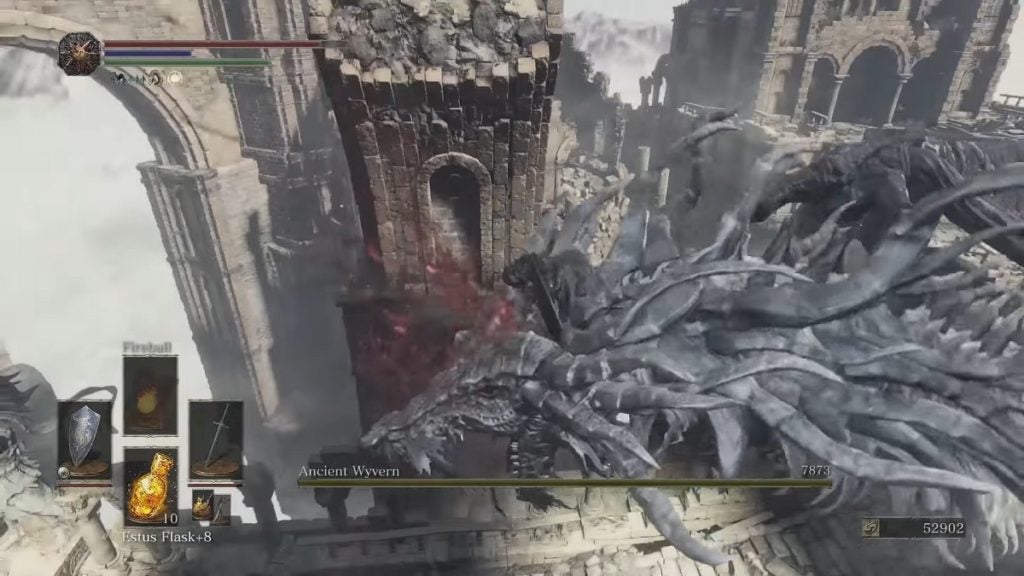
The Ancient Wyvern is located in Archdragon Peak. To get to this optional area, you’ll need to obtain the “Path of the Dragon” gesture, which you can pick up from a Drakeblood Knight’s corpse located beyond Oceiros, the Consumed King’s boss room. Once you acquire the gesture, perform it beside the small dragon statue that’s outside of the Irithyll Dungeon.
The Ancient Wyvern is more of a gimmick boss than anything else. Instead of fighting the boss head-on, run past him and head to the structure to your left. From there, you’re going to want to press forward until you finally reach a platform that’s directly above the Wyvern. Next, simply jump down and do a plunging attack on the boss’ head. This will immediately defeat the enemy.
There are a handful of enemies that await you as you make your way to the aforementioned platform above the Wyvern. Whether you’re going to deal with those enemies or just run past them is completely up to you.
Nameless King
The Nameless King is the boss at the end of Archdragon Peak. This boss is by far one of the most challenging and gratifying ones in the game.
This boss is labeled as the “King of the Storm” at the beginning of the encounter, which refers to the dragon the Nameless King is riding on. During this phase, you’re going to want to focus your attacks on the dragon’s head. Keep your target there to make mobility easier and the camera more comprehensive.
When the dragon takes flight, just move around the arena and dodge the lightning strikes when it comes. When grounded, be sure to dodge into the dragon whenever it or the Nameless King attacks. When you finally deplete the dragon’s HP to zero, the second phase of this encounter will begin and you will fight the Nameless King alone from here on out.
As soon as the second phase begins, get close to the boss as soon as you can. Whenever he fires waves at you as you get close to him, dodge to the side or bring your shield up. When you’re finally close to him, the name of the game is the usual “dodge and wait for an opening to attack” strategy.
Take note that the challenge of the Nameless King comes from the unpredictability of his attacks. Familiarize yourself with his attack patterns to know when to dodge and spot when the openings are. Be patient and you can eventually put down the Nameless King.
Ashes of Ariandel Bosses
These are the bosses you’ll encounter in the Ashes of Ariandel DLC.
Champion’s Gravetender & Gravetender Greatwolf
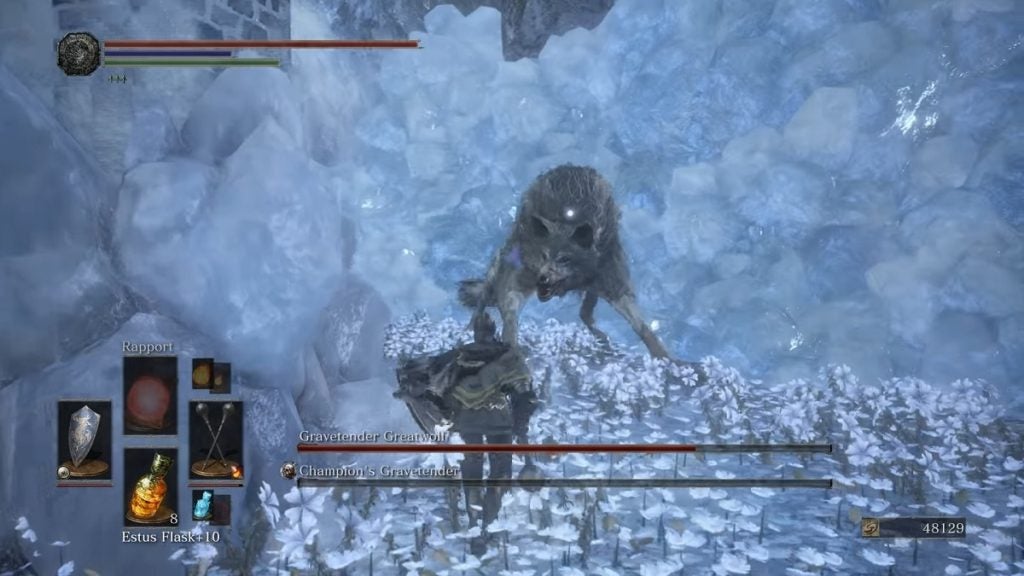
To get to the Champion’s Gravetender & Gravetender Greatwolf boss fight, destroy the rope bridge before the Cathedral where you find Sister Friede. Once cut down, use the bridge, which can now function as a ladder, to get to the bottom of the chasm. You’ll find this boss in this area.
As the boss fight begins, you’ll first fight the Champion’s Gravetender, who is accompanied by three wolves. Kill the wolves first before focusing on the Champion. The fight with the Champion’s Gravetender is very similar to how you’d fight other enemy NPCs or invaders. Just lay your attacks on him relentlessly and you should be able to defeat him easily.
When the Champion’s health drops to about half, he will summon the Gravetender Greatwolf. Make sure to defeat the Champion first before dealing with the Greatwolf.
Although the Greatwolf is much more powerful than the Champion, his attacks are relatively slow and easy to predict. Just dodge when necessary and attack when he’s open.
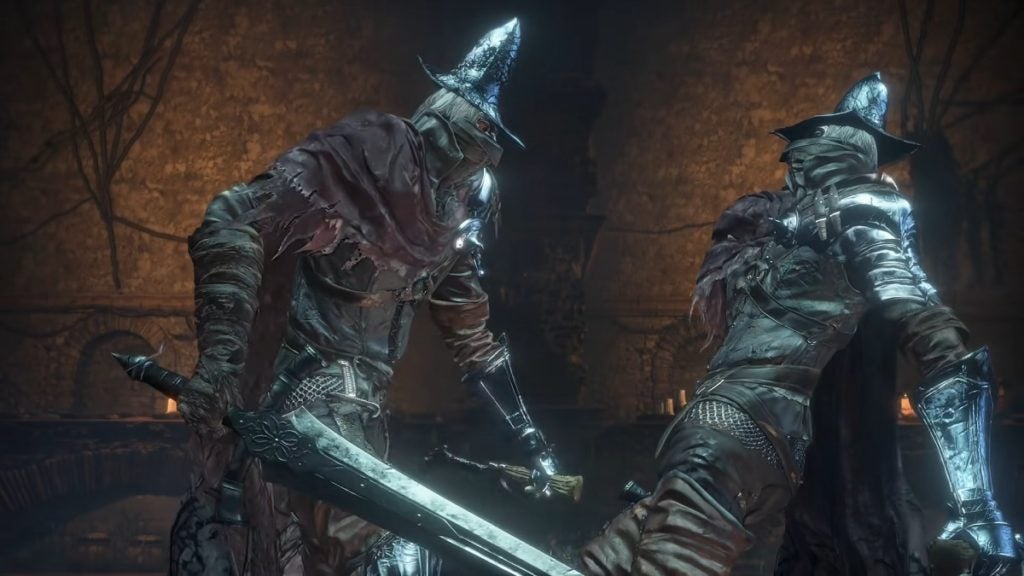
Sister Friede & Father Ariandel

The Sister Friede & Father Ariandel boss fight in Dark Souls 3 is one of the hardest encounters in the game. Aside from being incredibly challenging and precision demanding, this boss also has three phases.
During the first phase, you’ll be fighting Sister Friede alone. You will want to get close to her as often as you can. Dodge her attacks by rolling to either side and only land hits on her in between her combos.
Occasionally, Sister Friede will jump into the air. She will always land behind you, so make sure to watch your back when this happens. Once you finally drop her health down to zero, the second phase will begin.
The second phase will have you fight both Sister Friede and Father Ariandel at the same time. The best way to deal with both of them is to attack whoever’s closest to you. Have your target switch between them depending on who’s closer to you. Attacking either of them will deplete the HP since they’ll have shared health during this phase.
Get as far away as you can from both bosses until they are separated. Do your best to make sure both are separated as often as possible throughout this fight. You do not want to engage them when they’re together.
During this phase, Friede will turn invisible from time to time. When this happens, watch out for a bright orb and attack it as soon as you can. This will gradually replenish their HP if you leave it be.
When you finally manage to deplete their HP to zero, hold your celebrations and start preparing for phase three.
During phase three, you’ll be fighting Blackflame Friede. She’s going to be more aggressive and powerful this time around. For your attacks, wait for her combos to finish before landing hits on her. Don’t be greedy or it will inevitably lead to your demise.
Just be patient and you should be able to finally defeat this incredibly daunting boss battle.
The Ringed City Bosses
The following are the bosses you’ll encounter during The Ringed City DLC.
Demon in Pain, Demon From Below, & Demon Prince
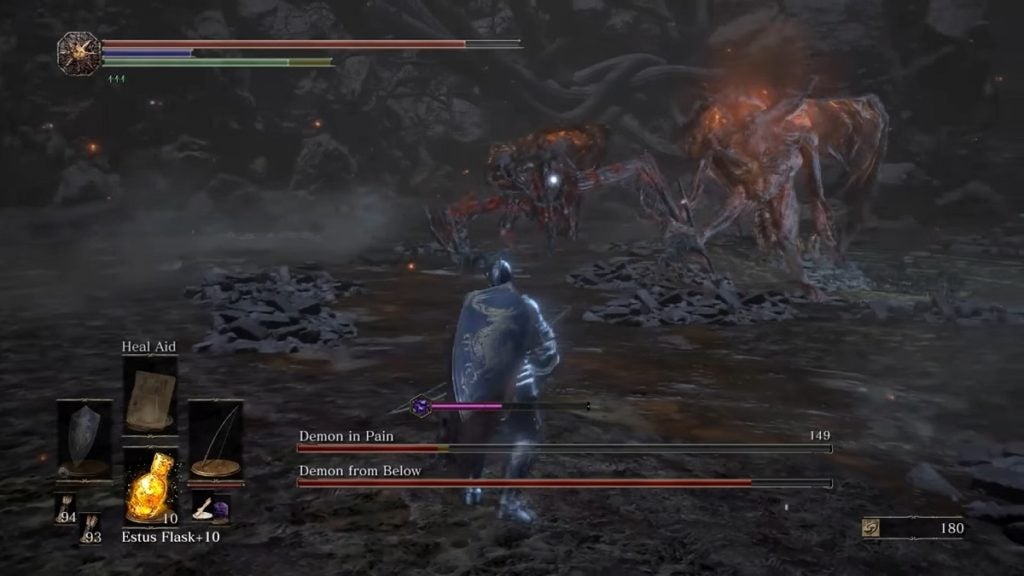
When this fight begins, you’ll be fighting two demons at once. The Demon in Pain and the Demon from Below. During this fight, make sure you keep your focus on one demon. Keep your offensive on one enemy until that enemy’s health drops to zero.
Once the first demon is defeated, proceed to focus on the other demon. The fight should become easier this time around. Once you put down the other demon, that one will rise up again to become the Demon Prince.
This variation of the boss is much more intense and aggressive than the previous two. Stay behind the boss for the remainder of the fight and you should be able to stand victorious eventually.
Halflight, Spear of the Church
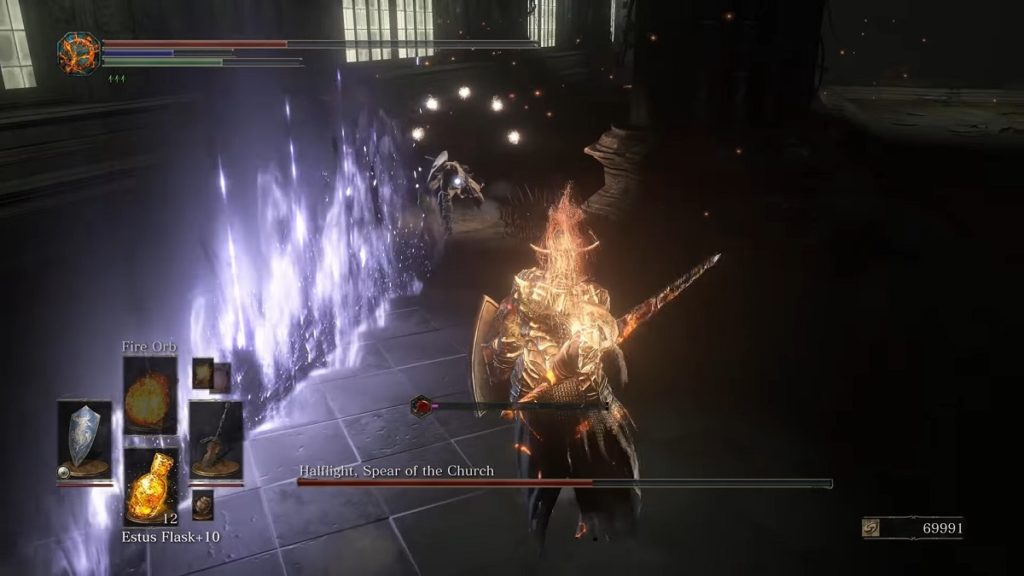
Halflight, Spear of the Church, is the guardian of Princess Filianore. During this fight, not only will you be fighting Halflight, but you’ll also need to deal with two other AI NPCs as well if you’re offline, and other players that belong to the Spear of the Church covenant when you’re online.
At the beginning of the fight, make sure to deal with the other phantom first before dealing with Halflight. If you’re skilled and fast enough, you should be able to take out the phantom before Halflight even arrives.
Although Halflight is a powerful combatant, she functions very similarly to other hostile NPCs, which means you can stagger her easily or perform parries, ripostes, and backstabs at her.
About halfway through the fight with Halflight, she’ll summon another phantom. Deal with that phantom immediately before returning to Halflight. Continue as intended to win the fight.
Darkeater Midir
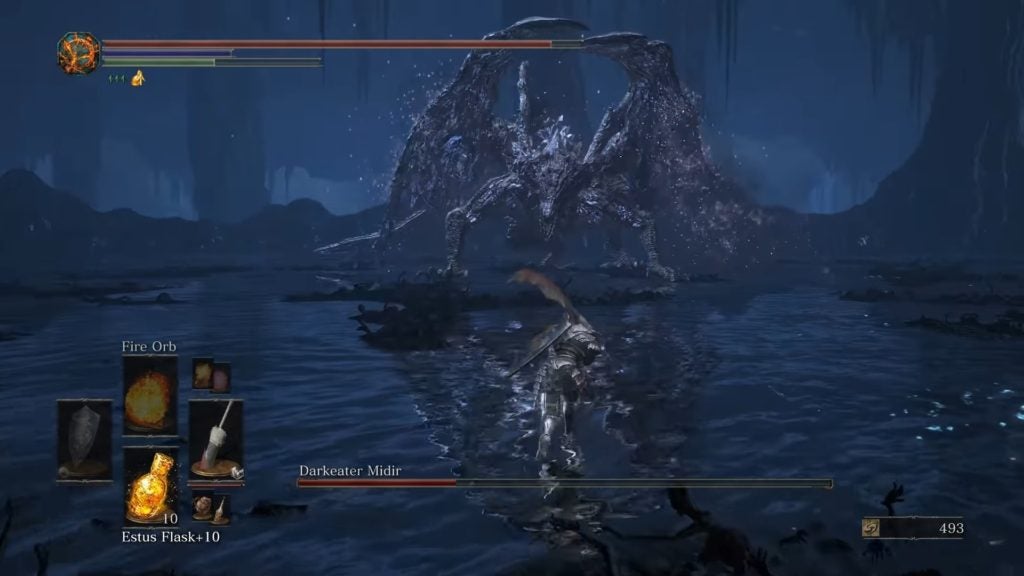
You first encounter Darkeater Midir on the bridge near the Shared Grave bonfire in the Ringed City. If you want to fight Midir in his boss room, you’ll first need to defeat the boss here first.
To deal with Midir on the bridge, stay below his head and dodge when he swipes at you. This encounter can take a while considering Midir’s massive HP, but you should be able to throw him down into the chasm in time.
You can find his boss room by revealing an illusory wall near the elevator in the Inner Wall. The illusory wall is the one portraying a statue that doesn’t hold a sword.
Darkeater Midir’s second encounter is easily one of the hardest boss fights in the game. The best thing to do during this fight is to focus all of your attacks on his head. Dodge as often as you can when the boss is flailing around with his attacks. Only land your own attacks in when he is open.
The only time you should get behind Midir is when he breathes fire directly beneath and across him.
This boss fight can take a while and it will require great precision and patience. With enough time and adaptability, you’ll be able to best this tough opponent.
Slave Knight Gael

Slave Knight Gael is the final boss of The Ringed City DLC.
Although challenging, Gael’s attacks can be easy to read if you observe him long enough. Like many of the other bosses in the game, just dodge and dodge to avoid his attacks and only attack him when he is open.
Be sure to always stay as close to him as possible so you can react to his attacks accordingly. Keep the usual strategy in mind. That is basically the best strategy you can employ on a boss as aggressive and tough as Gael.