
![]() Key Takeaway
Key Takeaway
The Notorious Mark—Svarog, Ruin Reawakened—makes its lair in the Holy Empire of Sanbreque. It lies in wait south of the Mornebrume region in a secluded section of land. To get here quickly, warp to the Caer Norvent Glorieuse Gate obelisk before heading east to Mornebrume and then following the linear path southward.
You’ll be able to start this hunt sometime after you begin the main quest Things Fall Apart.
If you’re looking for Orichalcum (and tons of other rewards) in Final Fantasy 16, the Ruin Reawakened hunt is a great way to get some…if you’re up for a challenge! Tracking down the S-rank Svarog is—quite literally—a baptism by fire.
Table Of Contents
Where to Find Svarog, Ruin Reawakened
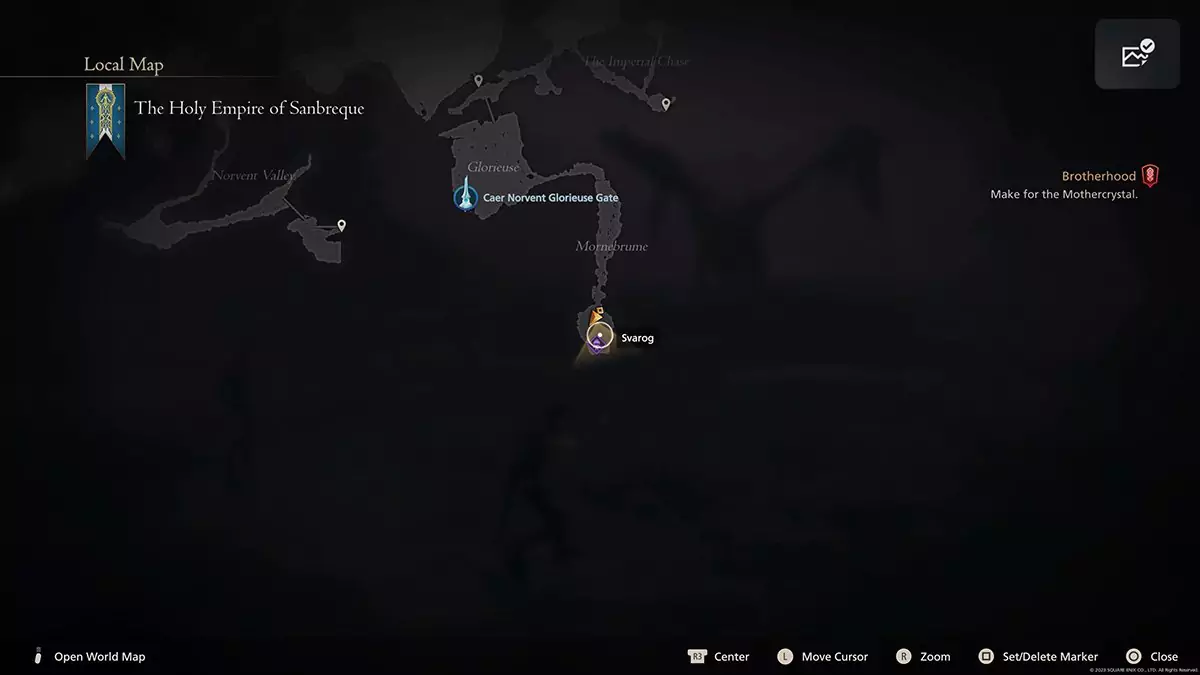
The Ruin Reawakened hunt becomes available sometime after you begin the main quest Things Fall Apart. After checking the Hunt Board (kupo!), you’ll notice that this S-rank Notorious Mark is lurking somewhere in the Holy Empire of Sanbreque. Specifically, you’ll find your scaly prey in a secluded area south of the Mornebrume region.
The fastest way to this spot is to start from the Caer Norvent Glorieuse Gate in the Glorieuse region. From there, head east and follow the curving linear path southward. Keep venturing south until you come to the unmistakable hunt arena where the level 50 Svarog makes its lair. If you need some help finding this locale, look at the image above.
How to Beat Svarog, Ruin Reawakened
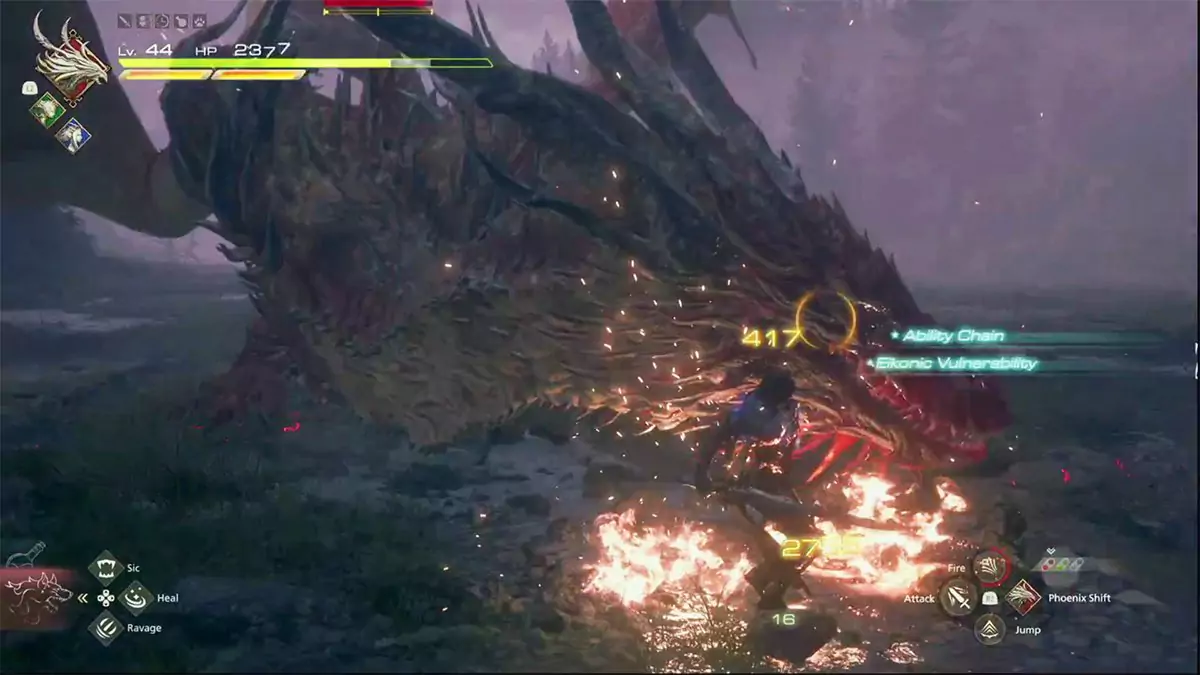
Before battling this burning brute, beware: its abilities deal a dangerous amount of damage. If you’re under level 40, you can easily get taken out if you get hit by Svarog’s stronger attacks twice in a row.
Not unlike another S-rank hunt (we’re looking at you, Pandemonium!), this fight can devolve into a bullet hell game due to the sheer number of fireballs and flaming columns on-screen at the same time. To prepare accordingly, you should know what attacks you’re going up against.
- Blazing Legion: Right from the start, Svarog uses this named ability (its name appears on-screen right before it’s used) to summon a horde of slow-moving fireballs. After they appear, the flaming orbs gradually veer toward your position. However, since they’re so slow, you can run or dodge through them to get clear of this floating minefield. This Blazing Legion fades after a few seconds.
- Fire Beam: Svarog can use a laser-like beam of fire to score the ground in straight lines. Once the lines are drawn, the areas around them glow red. A few seconds later, these red areas erupt with flames. Simply stay away from the burning ground around the created lines to evade this attack. Fire Beams can be drawn either in a line extending away from Svarog or in a line that’s perpendicular to its massive body.
- Red Dawn: This named ability (its name appears on-screen right before it’s used) causes a series of fiery columns to burst up from the ground near the Ruin Reawakened. Right before each erupts, there’s a red circle showing where it’ll rise. Stay away from these spots to avoid taking damage here.
- Flaming Dive-Bomb: Whilst in the air, Svarog may shroud itself in flames before bearing down upon Clive and his companions. This devastating drake dive-bomb hits hard; it can take you out if you’re under level 40 and are at half-health or less. As the dragon approaches from above, dodge to the left or right to steer clear of this severe slam.
- Neck Swipe: Using its great size to its advantage, this Notorious Mark can swing its long neck in a horizontal direction and smash into you. You can dodge through the dragon’s neck or dodge away from the fiery fiend to evade this strike. Also, if you’re close enough to Svarog, you may be far enough from this attack’s hitbox to avoid taking damage. You might not have to do anything!
- Bite: This attack is pretty similar to the Neck Swipe—and can be dodged in the same ways.
- Dragon Dance: This aggressive assault is a named ability (its name appears on-screen right before it’s used) that combines a few of Svarog’s most deadly maneuvers into one dangerous combo. After rearing onto its hind legs, the dragon shoots six fireballs at you in quick succession—all of which you can avoid by continuously dodging in a chosen direction (pick a direction and don’t turn back). Following the flurry of fireballs comes two Fire Beams: one vertical and one horizontal. Lastly, Svarog ends this onslaught by using a Flaming Dive-Bomb.
- Embroil: When this named ability occurs (its name appears on-screen right before it’s used), a comet is called down to strike the land. Once it makes impact, it sends out a searing shockwave. However, that’s not all! Following the shockwave, eight red circles appear on the ground shortly before those spots burst into flame. To escape the embers, you must dodge the initial comet strike, jump over or dodge through the shockwave, and then get away from the red circles before the fire rises.
- Wing Attack: Once in a while, this Notorious Mark will whip around in a circle to slam you with its mighty wings. The windup for this attack is fairly obvious, so get ready to dodge away from Svarog to avoid getting hit. Alternatively, if you’re close enough to the beast’s body, you can avoid this attack without needing to dodge it.
- Tail Slam: This move is pretty much the same as the Wing Attack—and can be dodged in the same ways.
- Claw Crush: If you’re in front of Svarog, it may try to slam you into the ground with its massive claws. When you see this dragon rear up and raise its talons, dodge away from the spot in front of the fiend.
- Last Dance: This named ability (its name appears on-screen right before it’s used) is much like Dragon Dance, but even deadlier. It only occurs when this dreaded dragon drops below 50% health. During Last Dance, Svarog unleashes Blazing Legion, Embroil, Red Dawn, a horizontal Fire Beam, and then ends this terrifying tango with a Flaming Dive-Bomb.
Svarog (and other dragons) have weird hitboxes. When you lock onto your prey during the Ruin Reawakened hunt, you’ll focus on its head. This is not good, as Svarog’s head moves around a lot, and, more often than naught, it’s out of your reach. Don’t lock on during this fight; attack this Notorious Mark’s hind legs to stay as safe as possible…which, admittedly, still isn’t that safe.
As for abilities that’ll come in handy: we recommend using Garuda’s Aerial Blast and Shiva’s Diamond Dust over others due to the huge amount of stagger they apply and their generous range. Garuda’s Deadly Takedown is also quite helpful, as it lets you pause this ancient predator’s onslaught when you drop its Will Gauge below 50%.
Avoid using abilities that run along the ground, like Shiva’s Ice Age and Titan’s Windup, unless Svarog is staggered. Otherwise, you’ll likely miss and potentially leave yourself unable to dodge an incoming attack.
The Ruin Reawakened Hunt Rewards
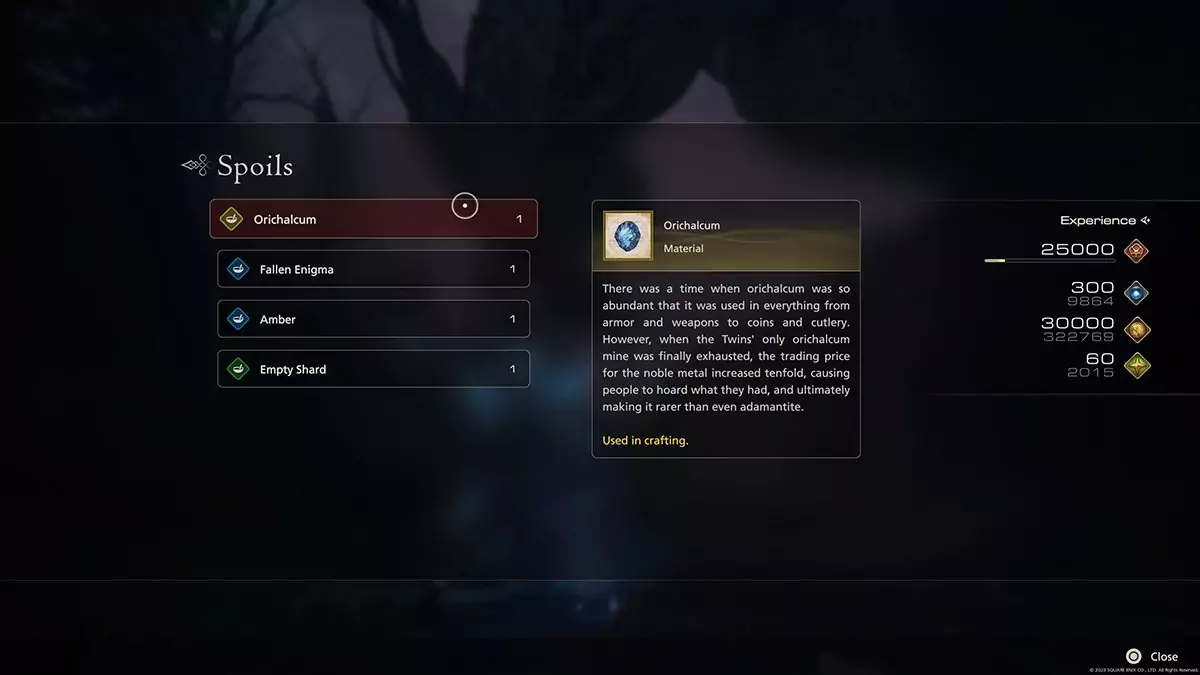
After you complete the Ruin Reawakened hunt, you’ll get the dragon’s hoarded treasure!
- 25,000 Experience
- 300 Ability Points
- 30,000 Gil
- 60 Renown
- 1 Orichalcum
- 1 Fallen Enigma
- 1 Amber
- 1 Empty Shard
The enormous amount of Experience is likely to level Clive up. Also, the great number of Gil received fills your wallet to the point of bursting. When it comes to wealth, the Fallen Enigma, Amber, and Empty Shard you get can be sold for a ton more Gil.
With that said, what you’re really after is the Orichalcum. This mythical metal is needed to create the most powerful equipment in FF16, such as the Ragnarok sword, Ouroboros belt, and the Sons of Ouroboros vambraces. To obtain even more Orichalcum, we advise you to search for more S-rank Notorious Marks, like the Breaker of Worlds. Only then will you wear the greatest of gear!