![]() Key Takeaway
Key Takeaway
The earliest Slitherfang Site that you can find is in the Stillsands area. Specifically, it’s west of the Tallneck location in the Stillsands. From the Stillsands Tallneck location, go west until you find the Rebel Outpost: Stillsands North. From there, go a bit more west and you’ll find a Slitherfang circling a pillar in a large sandy depression.
While you can fight Slitherfangs at the end of some quests, it’s impossible to farm those individuals repeatedly. As such, you’ll need to find Slitherfang Earthgrinders (a high-tier upgrade component) in another way. Thankfully, there’s one spot where you can.
Table Of Contents
Where to Find the Slitherfang Site in the Stillsands
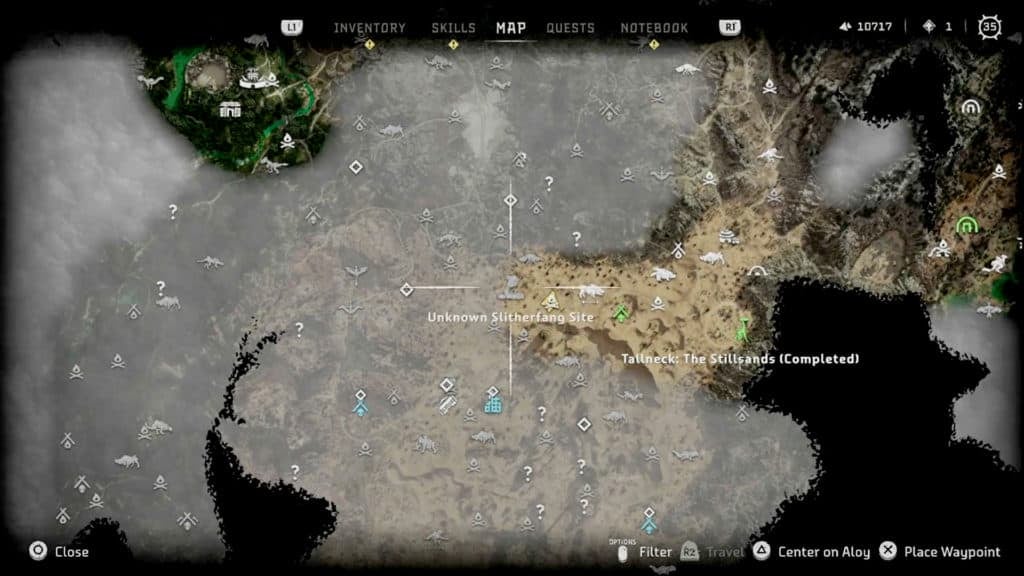
If you’re after Slitherfang components, you’ll need to brave the harsh desert known as the Stillsands. To begin your search, start from the Tallneck location in the northeast of the Stillsands. From there, head west and a bit north until you reach the Rebel Outpost: Stillsands North. Keep heading west and a touch north until “Unknown Slitherfang Site” appears on your map and compass.
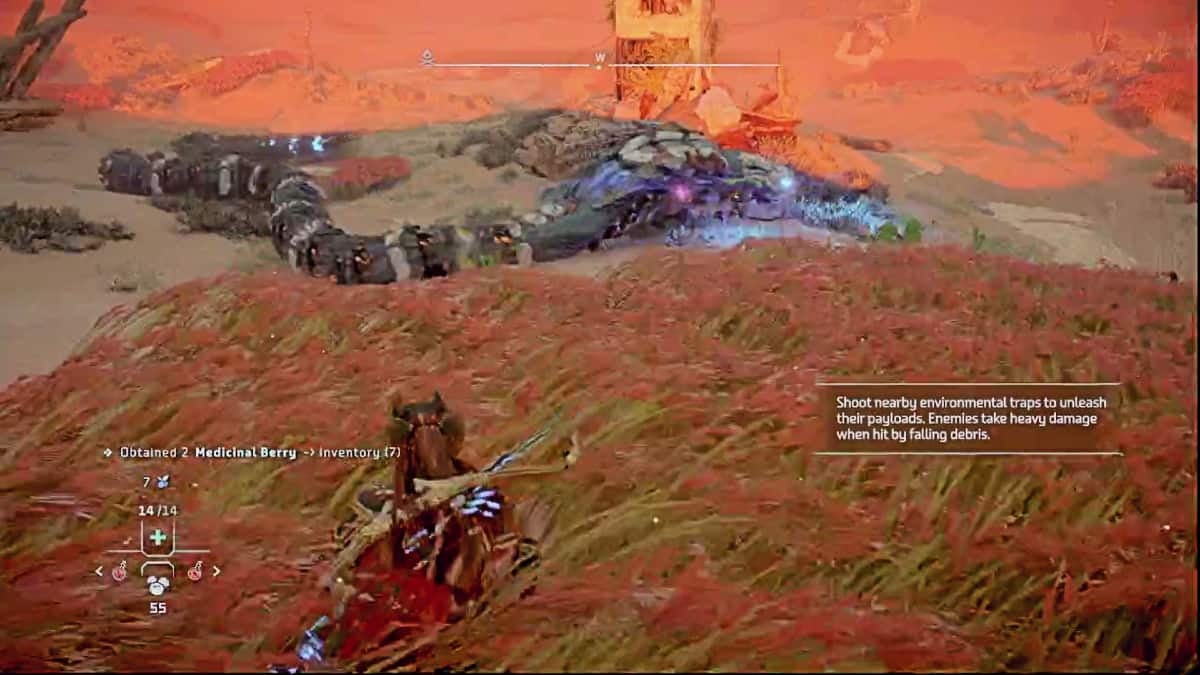
There is only one Slitherfang here—thankfully. These serpentine giants are both strong and fast, so dealing with more than one at a time would be very difficult.
You’ll find this lone Slitherfang (appropriately) slithering around a decrepit tower in the middle of a small valley. This valley is surrounded by high sand dunes, so you should be able to approach this site without being noticed.
Just be wary of the Spikesnout Site to the north and roaming Behemoth Convoys. Drawing the attention of any machines from either group will make your fight against the Slitherfang even more dangerous.
Does the Slitherfang in the Stillsands Respawn?
Yes, it does. Respawn times are often very short in Horizon Forbidden West, and this Slitherfang Site is no exception. Most of the time, after you take out the Slitherfang, you can head to one of the nearby Campfires and then come back immediately to find another one.
Other Locations Where You Can Find a Slitherfang
It’s worth noting that you can also go head-to-head with a lone Slitherfang in the arena by the Memorial Grove in Lowland Clan territory. However, you’ll first need to unlock the Maw of the Arena by completing a few quests for some NPCs in this location.
You can take on the challenge that pits you against a Slitherfang as much as you want, however, there is no opportunity for stealth here. As such, farming the arena Slitherfang for Earthgrinders will be tough.
Furthermore, after you take it down, you won’t have time to harvest its corpse before the challenge ends, meaning that farming this Slitherfang for components, in particular, is mostly pointless.
How to Farm the Slitherfang in the Stillsands for Components

The only component that you need to tear from Slitherfangs in order to get them is Earthgrinders. These components will not be harvestable if you destroy the Slitherfang by conventional methods.
As such, you’ll need to use some strategy to harvest this valuable resource. Thankfully, all other unique Slitherfang components can be looted from its corpse (with a bit of luck).
Tips for Tearing Earthgrinders from Slitherfangs
Each Slitherfang has 3 Earthgrinders in the middle of its neck. The 2 lower ones are larger and easier to hit, however, the third is smaller and close enough to the Slitherfang’s mouth to make tearing it off awkward and challenging.
If the Slitherfang is completely passive (blue light coming from its eyes), it will be constantly slithering around on its belly. This will make getting a clear shot at the Earthgrinders next to impossible. For this reason, you’ll need to get the Slitherfang to rear up.
You can do so by shooting it with an arrow while you’re in the cover of some tall grass. Shooting a machine once while hidden will get them to start searching their surroundings, but won’t immediately initiate combat.
Shooting a Slitherfang while in cover will get them to rear up and look around. It will almost always look in the direction you shot it from, which will give you a clear shot at the Earthgrinders. For an even better view, make sure to tag the Earthgrinders while scanning the Slitherfang.
However, if you don’t want to initiate combat, you’ll need to wait until the yellow searching circle at the top of the screen disappears. The moment it does, activate Concentration to slow down time and shoot one of the Earthgrinders. If done correctly, this won’t initiate combat and will only get the Slitherfang to begin searching for you again.
It should be mentioned that this method can potentially get the Slitherfang to search through the tall grass you’re hiding in. If any part of its large body touches you, it will find you and will initiate combat. To avoid this, if you see the serpentine machine getting too close, throw a rock away from your location. This will make the Slitherfang search elsewhere.
The Best Weapons to Use for Tearing Earthgrinders from Slitherfangs
For the most part, a Hunter Bow or Sharpshot Bow is the best for tearing Earthgrinders from Slitherfangs. There are some variants of these weapon types that possess ammo with high tear damage and low impact damage. Such ammo is the best for tearing components without hurting the Slitherfang too much.
In regards to Hunter Bows, the Slicing Hunter Bow is a great choice for tearing components, as it can shoot Advanced Hunter Arrows, which deal high tear damage. You can buy this rare Hunter Bow in either Plainsong and Scalding Spear for 549 Metal Shards and 1 Clawstrider Circulator.
An even better Hunter Bow for component tearing is the Sunshot Hunter Bow, which can shoot even more effective Advanced Hunter Arrows. To get this very rare Hunter Bow, you’ll need to complete all of the Salvage Contracts in the Stillsands for Runda. You can find this Oseram armorer in a camp southwest of the Slitherfang Site in the Stillsands.
If you prefer Sharpshot Bows, a great one to use for component tearing is the Cleaving Sharpshot Bow. The Tear Precision Arrows that it can shoot can not only tear components that it hits but also has a small area of effect. This means that if you slightly miss your target component, there’s still a good chance of tearing it off. You can get this rare Sharpshot Bow from Dekka after completing the main quest called “The Broken Sky”.
After you’ve cleared some of the Lowland Clan’s territory, you can find an even better Sharpshot Bow for tearing components. The Glowblast Sharpshot Bow is, to put it simply, a better version of the Cleaving Sharpshot Bow. This very rare Sharpshot Bow can be bought from Raintrace and Thornmarsh for 1,035 Metal Shards, 1 Large Machine Core, and 1 Thunderjaw Circulator.
How to Destroy Slitherfangs Easily

While Slitherfangs have 3 weaknesses, none of them are as useful as you would think. You can build up fire, frost, or plasma on these giant metal cobras with relative ease, but doing so will require a lot of ammo and the effects aren’t that effective. You’re better off neutralizing the Slitherfang’s attacks and then using a ton of explosive damage.
In addition, do not bother using acid or shock damage against Slitherfangs, as they are highly resistant to such damage types. Even though this machine is technically resistant to purgewater as well, this is arguably one of the best elements to use against these metallic serpents.
Why Use Purgewater Against Slitherfangs
It will be difficult to build up the drenched status effect with most purgewater weapons—except Blastslings. Blastslings can build up any element on a target fairly quickly, even if the machine is resistant to that type of damage.
As such, bringing a Blastsling that launches Purgewater Bombs can be very helpful against machines that specialize in outputting elemental damage.
Since Slitherfangs love to spit acid and zap you with electricity, drenching them can make a fight against one much easier. When drenched, a machine cannot use elemental attacks for a short time.
This means that, if drenched, a Slitherfang can only use melee attacks. If you’re far enough away, this, in turn, means that the Slitherfang would not be able to hurt you for a while.
A great Blastsling to use here would be the Corrosive Blastsling, which, among other ammo types, can lob Purgewater Bombs. You can buy this very rare Blastsling from Scalding Spear and Thornmarsh for 1,437 Metal Shards, 1 Large Machine Core, and 1 Bellowback Circulator.
Why Use Explosive Damage Against Slitherfangs
Explosive damage is, by far, the best damage type to use against machines if you don’t care about destroying components. There are no machines that resist explosive damage, which means it is always effective in a fight. With that said, be sure to tear the Earthgrinders from a Slitherfang before you start blasting it with explosions (that is if you want Earthgrinders).
Spike Throwers are arguably the hardest-hitting weapon type in Horizon Forbidden West. As such, bringing one that has explosive ammo to fight a Slitherfang can make the battle go a lot easier. Especially if you disable the metallic serpent’s elemental attacks with purgewater first.
It’s worth noting that a Spike Thrower with explosive ammo will deal damage twice: once upon impact and a second time when the explosion goes off. Furthermore, such weapons and ammo will stagger even the biggest foes and can potentially knock them down.
If you’re looking for a Spike Thrower that has explosive ammo, consider using the Heartshatter Spike Thrower. This rare Spike Thrower can launch Explosive Spikes, which deal a generous amount of damage. You can buy this weapon in Bleeding Mark for 632 Metal Shards and 1 Spikesnout Circulator.