The world of Stardew Valley is packed full of underwater life just waiting to be found. Fishing is a vital in-game skill, and increasing your Fishing level can make it much easier to make big money. Fishing is also necessary for completing bundles and finding select artifacts for the museum.
Table Of Contents
Fishing in Stardew Valley
Once you get a fishing rod, you can fish in any body of water you find in Stardew Valley. You’ll need to cast your line and participate in a small mini-game to determine if you’re successful in catching a fish.
You’ll obtain your first fishing rod from Willy quite early in the game. Visit the Fish Shop after receiving his letter on the 2nd of Spring to get the Bamboo Rod for free.
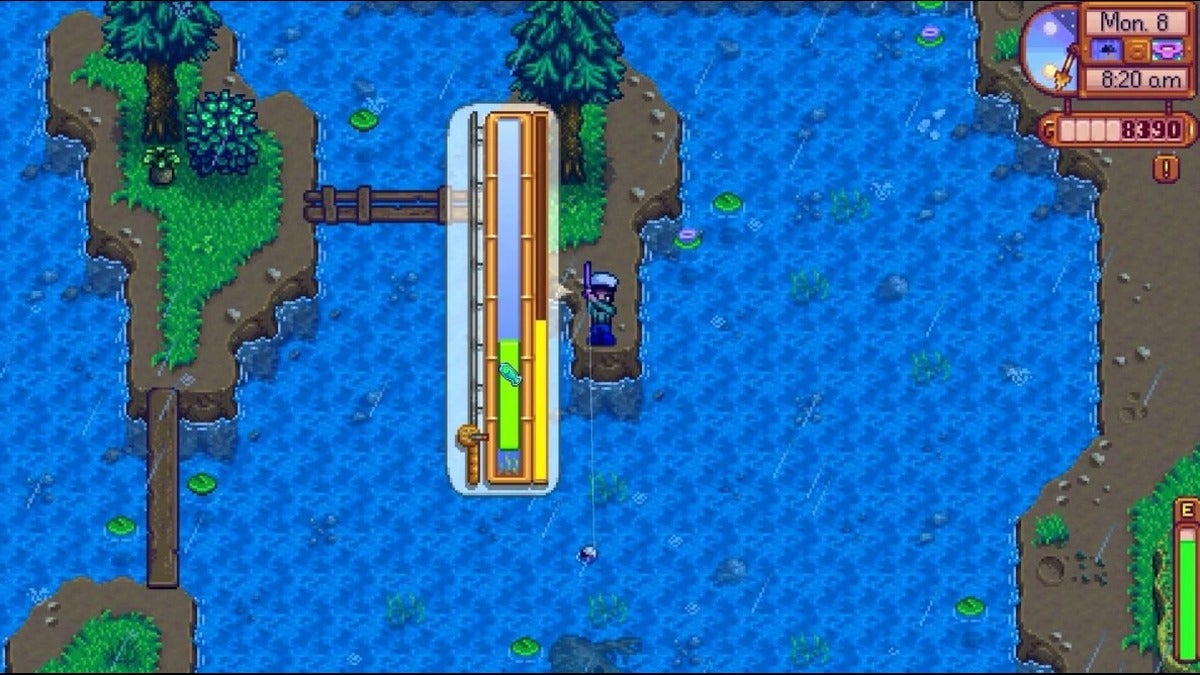
To fish, you’ll need to decide how far you’d like to throw your fishing line. This is determined by a small red and green bar that appears above your head once you press and hold the Use Tool button, inside of which is a line moving from left to right. You’ll want to cast when the bar is as full as possible. If you cast at just the right time, you’ll see the word ‘Max’ appear on the screen. Yes, you want to aim for the Max cast–the length of your cast has a bit of influence over the fish you’ll catch and its quality.
If you manage to throw your line into a pool of bubbles, the fish in the area will bite more quickly. This also increases your chance of catching a rare type of fish.
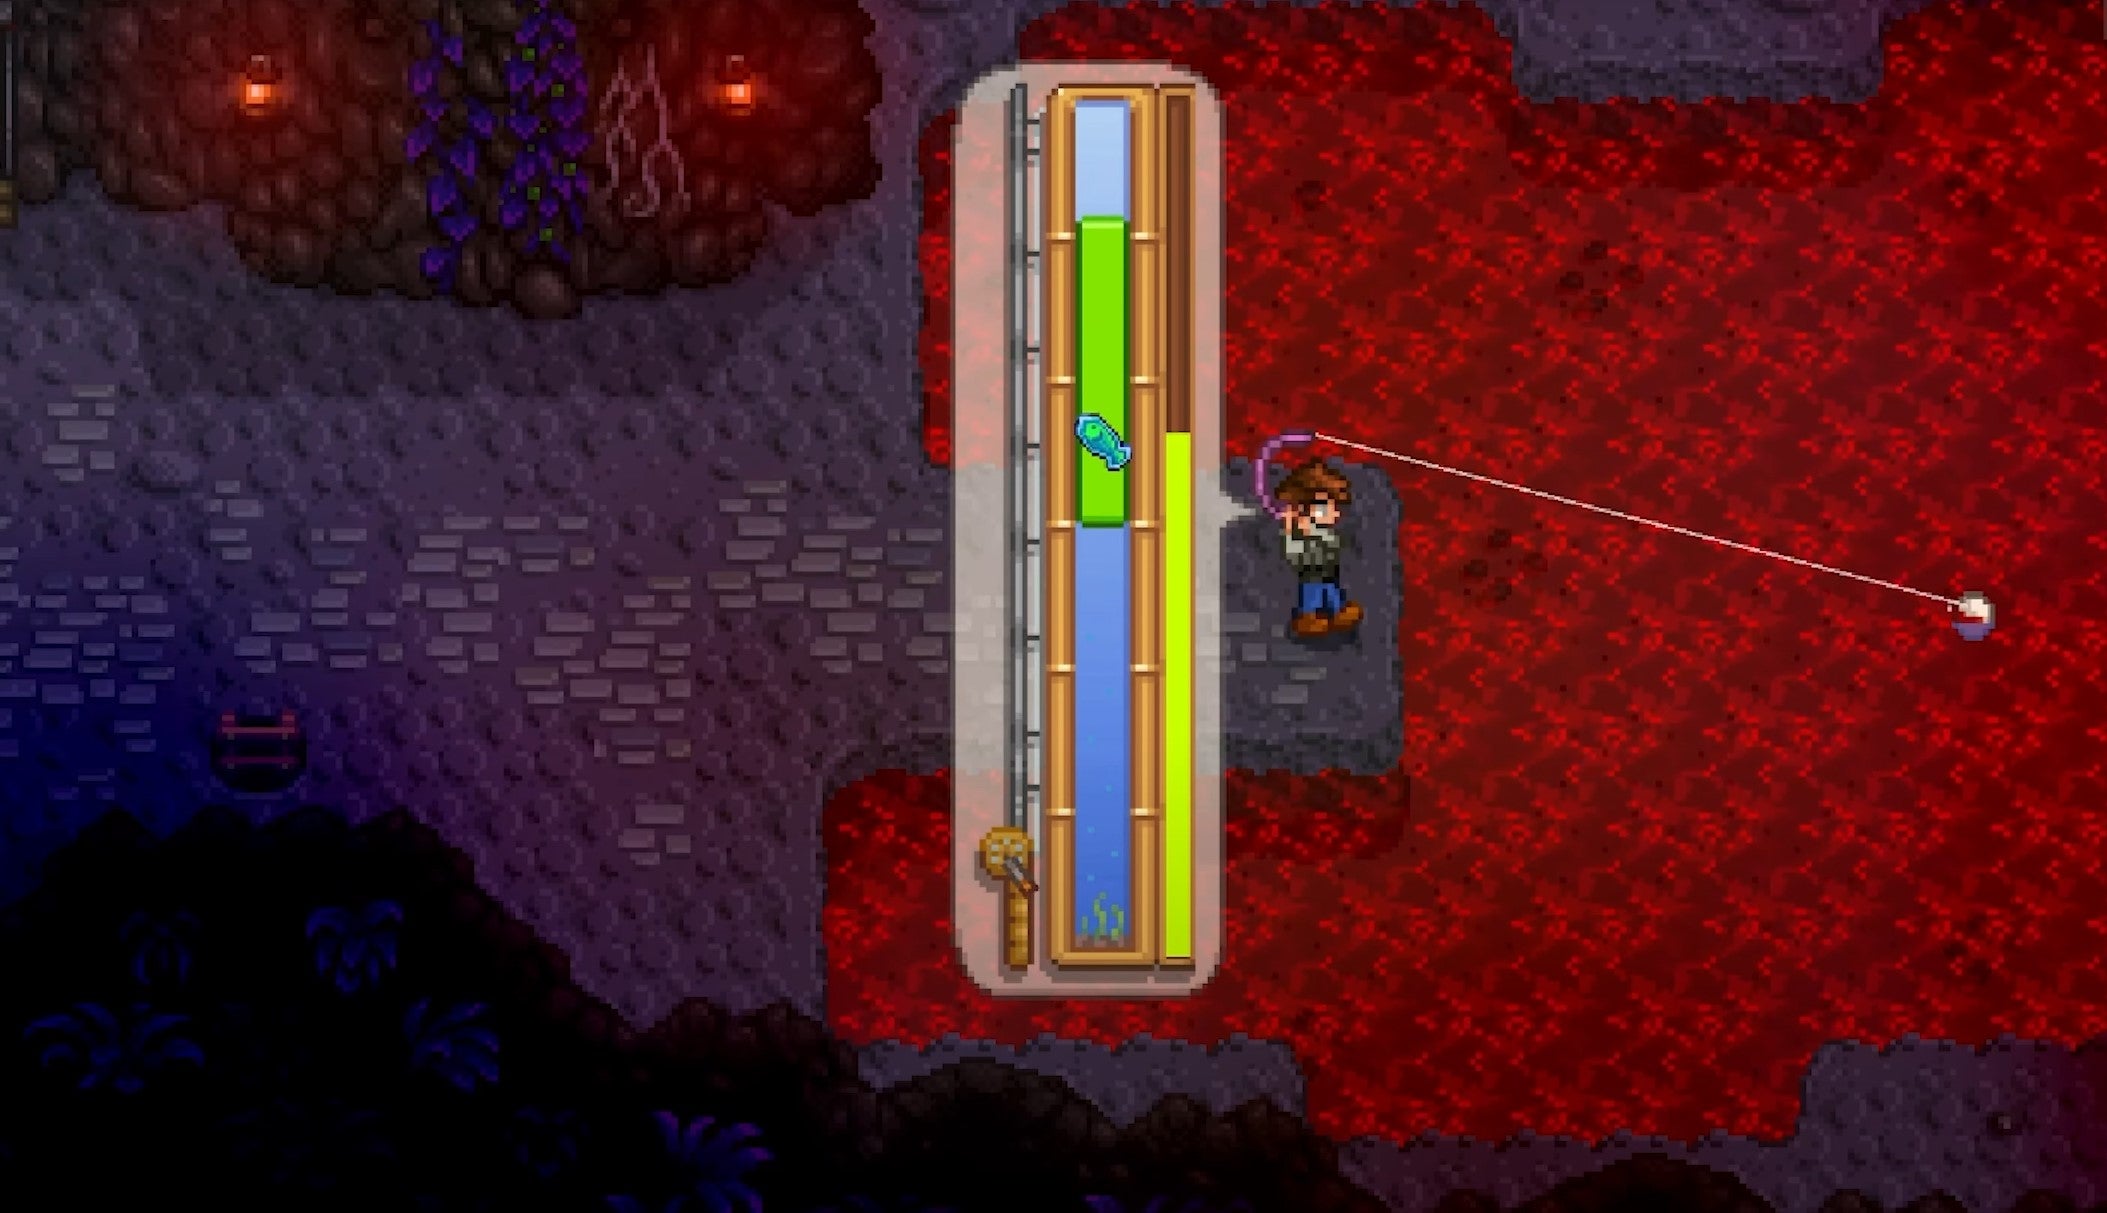
Once you throw out your line, an exclamation mark will appear over your character’s head when you get a bite. The moment you see this, press the Use Tool button again to start the mini-game.
You’ll see a fish bar on the left and a progress bar on the right of the interface. The progress bar on the right will indicate how close you are to catching the fish, with green meaning you’ve almost got it and red meaning that it’s about to get away. Throughout the course of the mini-game, this bar will go up and down, so you’ll need to keep a very close eye on it to ensure your prey doesn’t escape.
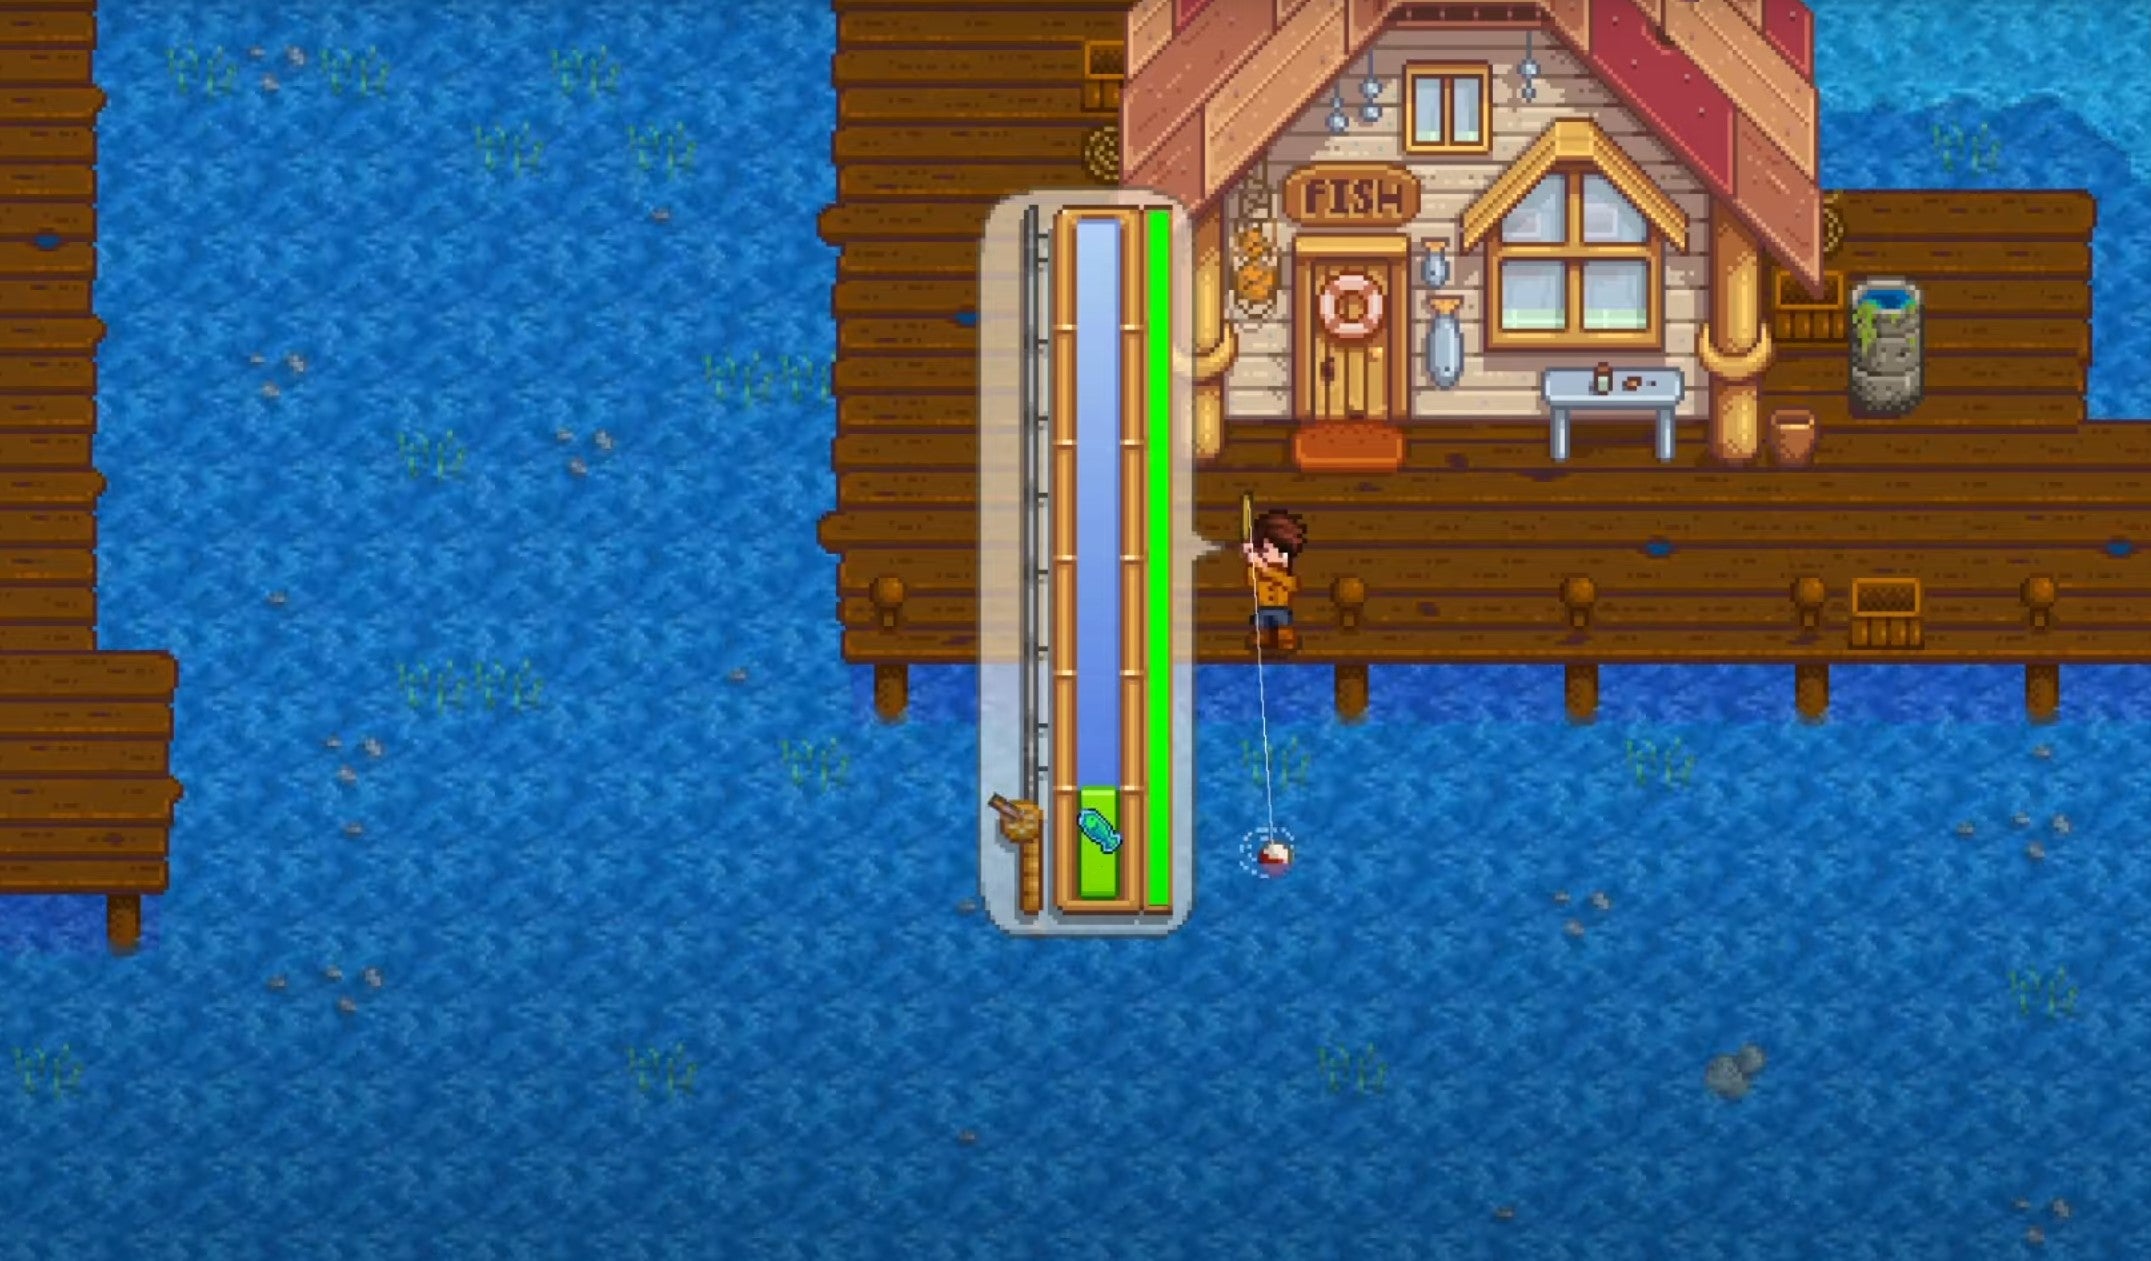
To successfully catch a fish, you’ll need to keep the fish within the fish bar until the progress bar on the right is completely full. The fish bar also contains a green triangle called the Fishing Bar. You will control this during the encounter by pressing, holding, and releasing the Use Tool button. Pressing it will make the Fishing Bar go up. Holding it will keep it still. Releasing it will cause it to go down.
If you are successful in your attempt, you’ll achieve a ‘Perfect Catch,’ which will increase both your experience earned and the quality of the fish.
While fishing may seem difficult at first, you’ll soon start to notice patterns in each fish’s movements. Some move slowly before trying to dart away, while others move extremely fast during the entire encounter.
Occasionally, you may even discover a treasure chest while fishing. To claim it, you’ll need to keep it within the Fishing Bar until a separate progress bar is completely filled. The catch? You’ll only get to keep the treasure if you manage to catch the fish. These chests can contain ore or artifacts that can be donated to the museum, so try to snag them when you can.
Certain types of rods also allow you to attach bait, and each type of bait offers a unique effect. Use bait often to maximize your fishing efficiency and success rate.
Fishing Levels and Skills
The Fishing Skill is increased by catching fish or items, harvesting Crab Pots, or collecting items from Fish Ponds. There are ten Fishing levels in total.
With each Fishing level, you are granted +1 Fishing Rod Proficiency. The maximum amount of time before a fish bites is decreased by 0.25 seconds with each level gained, and the minimum fish size and the size of the green bar in the mini-game is also increased.
At level five, you’ll need to choose between the Fisher and Trapper professions. Fisher gives bonuses when you catch a fish using a fishing rod, while Trapper gives bonuses related to using Crab Pots. At level 10, you can unlock a second bonus for either of these professions.
Each level also grants specific bonuses.
| Fishing Level | Unlocks |
|---|---|
| Fishing Level 1 | •Casting distance increased by one tile |
| Fishing Level 2 | •Crafting recipe for Bait unlocked •Fiberglass Rod and Bait now available for purchase at Willy's Fish Shop |
| Fishing Level 3 | •Crap Pots available for purchase at Willy's Fish Shop •Crafting recipe for Crab Pot unlocked •Recipe for Dish o' the Sea unlocked |
| Fishing Level 4 | •Casting distance increased by one tile •Crafting recipe for Recycling Machine unlocked |
| Fishing Level 5 | Unlocks two professions (choose one) •Fisher (Fish will sell for 25% more) •Trapper (Resources needed to craft Crab Pots reduced to 25 wood and 2 copper bars) |
| Fishing Level 6 | •Iridium Rod, Lead Bobber, Spinner, and Trap Bobber available for purchase at Willy's Fish Shop •Crafting recipe for Spinner unlocked •Crafting recipe for Trap Bobber unlocked |
| Fishing Level 7 | •Cork Bobber and Treasure Hunter lure available for purchase at Willy's Fish Shop •Crafting recipe for Cork Bobber unlocked •Crafting recipe for Treasure Hunter lure unlocked |
| Fishing Level 8 | •Casting distance increased by one tile •Crafting recipe for Barbed Hook unlocked •Crafting recipe for Dressed Spinner unlocked •Crafting recipe for Worm Bin unlocked •Barbed Hook and Dressed Spinner available for purchase at Willy's Fish Shop |
| Fishing Level 9 | •Magnet available for purchase at Willy's Fish Shop •Crafting recipe for Magnet unlocked •Recipe for Seafoam Pudding unlocked |
| Fishing Level 10 | Unlocks additional profession bonus •Fisher Angler - fish will sell for 50% more Pirate - chance of uncovering treasure while fishing doubled •Trapper Luremaster - Crab Pots no longer require Bait Mariner - trash will no longer appear in Crab Pots |
Fishing Rods, Bait, and Tackle
As previously mentioned, Willy gives you a Bamboo Rod for free at the start of the game. He sends you a letter on the 2nd of Spring inviting you to visit the Fish Shop.
Four fishing rods are available in Stardew Valley:
- Training Rod
- Bamboo Rod
- Fiberglass Rod (Must be Fishing level 2) – Can equip bait
- Iridium Rod (Must be Fishing level 6) – Can equip bait and tackle
While the Training Rod may be the easiest to use, it can only be used to catch common fish. The Bamboo Rod is a great choice until you can acquire the Fiberglass or Iridium Rods, the latter of which is the best in the game.
The Fiberglass Rod can be purchased at Willy’s Fish Shop for 1,800g after reaching Fishing level 2. The Iridium Rod becomes available at Willy’s Fish Shop for 7,500g after reaching Fishing level 6.
You don’t need to use bait to fish, but bait will cause fish to bite faster. Certain types of bait also have unique properties and benefits.
| Bait Name | Description | Price | Crafting Ingredients |
|---|---|---|---|
| Bait | Causes fish to bite faster and lowers chance of getting trash. (Recipe earned at Fishing level 2.) | 5g | Bug Meat (1) |
| Magnet | Increases the chance of finding treasure by 15%. (Recipe earned at Fishing level 9.) | 1,000g | Iron Bar (1) |
| Wild Bait | Grants the chance to catch two fish at once, excluding Legendary Fish. (Recipe earned at Linus' 4-heart event.) | N/A | Fiber (10) Slime (5) Bug Meat (5) |
| Magic Bait | Allows you to catch fish from any season, time, or weather, from any water source. | 5 Qi Gems | Radioactive Ore (1) Bug Meat (3) |
There are seven types of tackle that can be attached to the Iridium Rod. Each lasts for 20 uses. After this, you can either buy another one from the Fish Shop or craft a new one.
Each tackle also grants a unique bonus.
| Tackle | Bonus |
|---|---|
| Barbed Hook | Causes the Fishing Bar to stick to the fish you're attempting to catch |
| Cork Bobber | Slightly increases the size of the Fishing Bar |
| Dressed Spinner | Entices fish to bite |
| Lead Bobber | Prevents Fishing Bar from bouncing when dropped |
| Spinner | Slightly encourages fish to bite |
| Trap Bobber | Slows down the decrease rate of the catch progress bar |
| Treasure Hunter | Increases chance of finding Treasure Chests |
Using a Dressed Spinner allows you to catch more fish in a day, leading to more profits.
List of Fish
These are all fish available to catch in Stardew Valley, sorted by season.
Any Season Fish
| Name | Location | Weather | Time |
|---|---|---|---|
| Blue Discus | Ginger Island Pond and Rivers | Any | Anytime |
| Bream | River (Pelican Town, Cindersnap Forest) | Any | 6pm - 2am |
| Bullhead | Mountain Lake | Any | Anytime |
| Carp | Mountain Lake, Secret Woods Pond, The Sewers | Any | Anytime |
| Chub | Cindersnap Forest River, Mountain Lake | Any | Anytime |
| Ghostfish | Mines (20, 60), Dropped by Ghosts | Any | Anytime |
| Ice Pip | Mines (60) *Requires Fishing Level 5 | Any | Anytime |
| Largemouth Bass | Mountain Lake | Any | 6am - 7pm |
| Lava Eel | Mines (100) *Requires Fishing Level 7 | Any | Anytime |
| Lionfish | Ginger Island Ocean | Any | Anytime |
| Sandfish | The Desert | Any | 6am - 8pm |
| Scorpion Carp | The Desert *Requires Fishing Level 4 | Any | 6am - 8pm |
| Slimejack | Mutant Bug Lair | Any | Anytime |
| Stingray | Ginger Island Pirate Cove | Any | Anytime |
| Stonefish | Mines (20) *Requires Fishing Level 3 | Any | Anytime |
| Void Salmon | Witch's Swamp | Any | Anytime |
| Woodskip | Secret Woods Point | Any | Anytime |
Spring Fish
| Name | Location | Weather | Time |
|---|---|---|---|
| Anchovy | Ocean | Any | Any |
| Catfish | River (Pelican Town, Cindersap Forest), Secret Woods Pond, Witch's Swamp | Rain | 6am - 12am |
| Eel | Ocean | Rain | 4pm - 2am |
| Flounder | Ocean | Any | 6am - 8pm |
| Halibut | Ocean | Any | 6am - 11am 7pm - 2am |
| Herring | Ocean | Any | Any |
| Sardine | Ocean | Any | 6am - 7pm |
| Shad | River (Pelican Town, Cindersap Forest) | Rain | 9am - 2am |
| Smallmouth Bass | River (Pelican Town), Cindersap Forest Pond | Any | Any |
| Sunfish | River (Pelican Town, Cindersap Forest) | Sun, Wind | 6am - 7pm |
Summer Fish
| Name | Location | Weather | Time |
|---|---|---|---|
| Catfish | River (Pelican Town, Cindersap Forest), Secret Woods Pond, Witch's Swamp | Rain | 6am to 12am |
| Dorado | River (Cindersap Forest) | Any | 6am - 7pm |
| Flounder | Ocean | Any | 6am - 8pm |
| Halibut | Ocean | Any | 6am - 11am 7pm - 2am |
| Octopus | Ocean | Any | 6am - 1pm |
| Pike | River (Pelican Town, Cindersap Forest) | Any | Any |
| Pufferfish | Ocean | Sun | 12pm - 4pm |
| Rainbow Trout | River (Pelican Town, Cindersap Forest), Mountain Lake | Sun | 6am - 7pm |
| Red Mullet | Ocean | Any | 6am - 7pm |
| Red Snapper | Ocean | Rain | 6am - 7pm |
| Shad | River (Pelican Town, Cindersap Forest) | Any | 9am - 2am |
| Sturgeon | Mountain Lake | Any | 6am - 7pm |
| Sunfish | River (Pelican Town, Cindersap Forest) | Sun, Wind | 6am - 7pm |
| Super Cucumber | Ocean | Any | 6pm - 2am |
| Tilapia | Ocean | Any | 6am - 2pm |
| Tuna | Ocean | Any | 6am - 7pm |
Fall Fish
| Name | Location | Weather | Time |
|---|---|---|---|
| Albacore | Ocean | Any | 6am - 11am 6pm - 2am |
| Anchovy | Ocean | Any | Any |
| Catfish | River (Pelican Town, Cindersap Forest), Secret Woods Pond, Witch's Swamp | Rain | 6am - 12am |
| Eel | Ocean | Rain | 4pm - 2am |
| Midnight Carp | Mountain Lake, Cindersap Forest Pond | Any | 10pm - 2am |
| Red Snapper | Ocean | Rain | 6am - 7pm |
| Salmon | River (Pelican Town, Cindersap Forest) | Any | 6am - 7pm |
| Sardine | Ocean | Any | 6am - 7pm |
| Sea Cucumber | Ocean | Any | 6am - 7pm |
| Shad | River (Pelican Town, Cindersap Forest) | Rain | 9am - 2am |
| Smallmouth Bass | River (Pelican Town), Cindersap Forest Pond | Any | Any |
| Super Cucumber | Ocean | Any | 6pm - 2am |
| Tiger Trout | River (Pelican Town, Cindersap Forest) | Any | 6am - 7pm |
| Tilapia | Ocean | Any | 6am - 2pm |
| Walleye | River (Pelican Town, Cindersap Forest), Cindersap Forest Pond, Mountain Lake | Rain | 12pm - 2am |
Winter Fish
| Name | Location | Weather | Time |
|---|---|---|---|
| Albacore | Ocean | Any | 6am - 11am 6pm - 2am |
| Halibut | Ocean | Any | 6am - 11am 7pm - 2am |
| Herring | Ocean | Any | Any |
| Lingcod | River (Pelican Town, Cindersap Forest), Mountain Lake | Any | Any |
| Midnight Carp | Mountain Lake, Cindersap Forest Pond | Any | 10pm - 2am |
| Perch | River (Pelican Town, Cindersap Forest), Mountain Lake, Cindersap Forest Pond | Any | Any |
| Pike | River (Pelican Town, Cindersap Forest), Cindersap Forest Pond | Any | Any |
| Red Mullet | Ocean | Any | 6am - 7pm |
| Red Snapper | Ocean | Rain (Use Rain Totem) | 6am - 7pm |
| Sardine | Ocean | Any | 6am - 7pm |
| Sea Cucumber | Ocean | Any | 6am - 7pm |
| Squid | Ocean | Any | 6pm - 2am |
| Sturgeon | Mountain Lake | Any | 6am - 7pm |
| Tiger Trout | River (Pelican Town, Cindersap Forest) | Any | 6am - 7pm |
| Tuna | Ocean | Any | 6am - 7pm |
| Walleye | River (Pelican Town, Cindersap Forest), Cindersap Forest Pond, Mountain Lake | Rain (Use Rain Totem) | 12pm - 2am |
Tips on Catching Legendary Fish
Some fish are harder to find than others, but Legendary Fish are on another level. These five creatures are only found in very specific locations, and, with the exception of the Mutant Carp, all require that you have acquired a certain Fishing level. You’ll be able to recognize a Legendary Fish easily, as it has a crown on its head in the mini-game window.
There’s only one of each Legendary Fish per save file in Stardew Valley. This means that if you decide to sell them, you won’t be able to catch them again.
| Name | Location | Season | Weather | Time |
|---|---|---|---|---|
| Angler | North of JojaMart on the wooden plank bridge *Requires Fishing Level 3 | Fall | Any | Anytime |
| Crimsonfish | East pier on the beach *Requires Fishing Level 5 | Summer | Any | Anytime |
| Glacierfish | South end of the arrowhead shaped island in Cindersap Forest *Requires Fishing Level 6 | Winter | Any | Anytime |
| Legend | The Mountain Lake near the underwater log *Requires Fishing Level 10 | Spring | Rain | Anytime |
| Mutant Carp | The Sewers | Any | Any | Anytime |
Equipping the Trap Bobber to your Iridium Rod is a very helpful way to hunt down a Legendary Fish, as they are notoriously difficult to reel in. Also equipping the Wild Bait greatly increases your chances of pulling in the fish you’re after.
Prior to embarking on your Legendary Fish hunt, chow down on some Dish o’ the Sea. This dish requires Fishing level 3 to craft and increases your Fishing skill by 3 for 5 minutes and 35 seconds.
Night Market Fish
The Night Market is held on the 15th, 16th, and 17th of Winter from 5pm to 2am at The Beach. While there are plenty of festivities to take part in, anyone interested in fishing will want to embark on the Submarine Ride.
The Submarine Ride runs from 5pm to 11pm and takes you on a deep sea fishing excursion for a cool 1,000g. This takes 30 in-game minutes there and 30 in-game minutes back, and has three specific fish that you can only catch on the submarine.
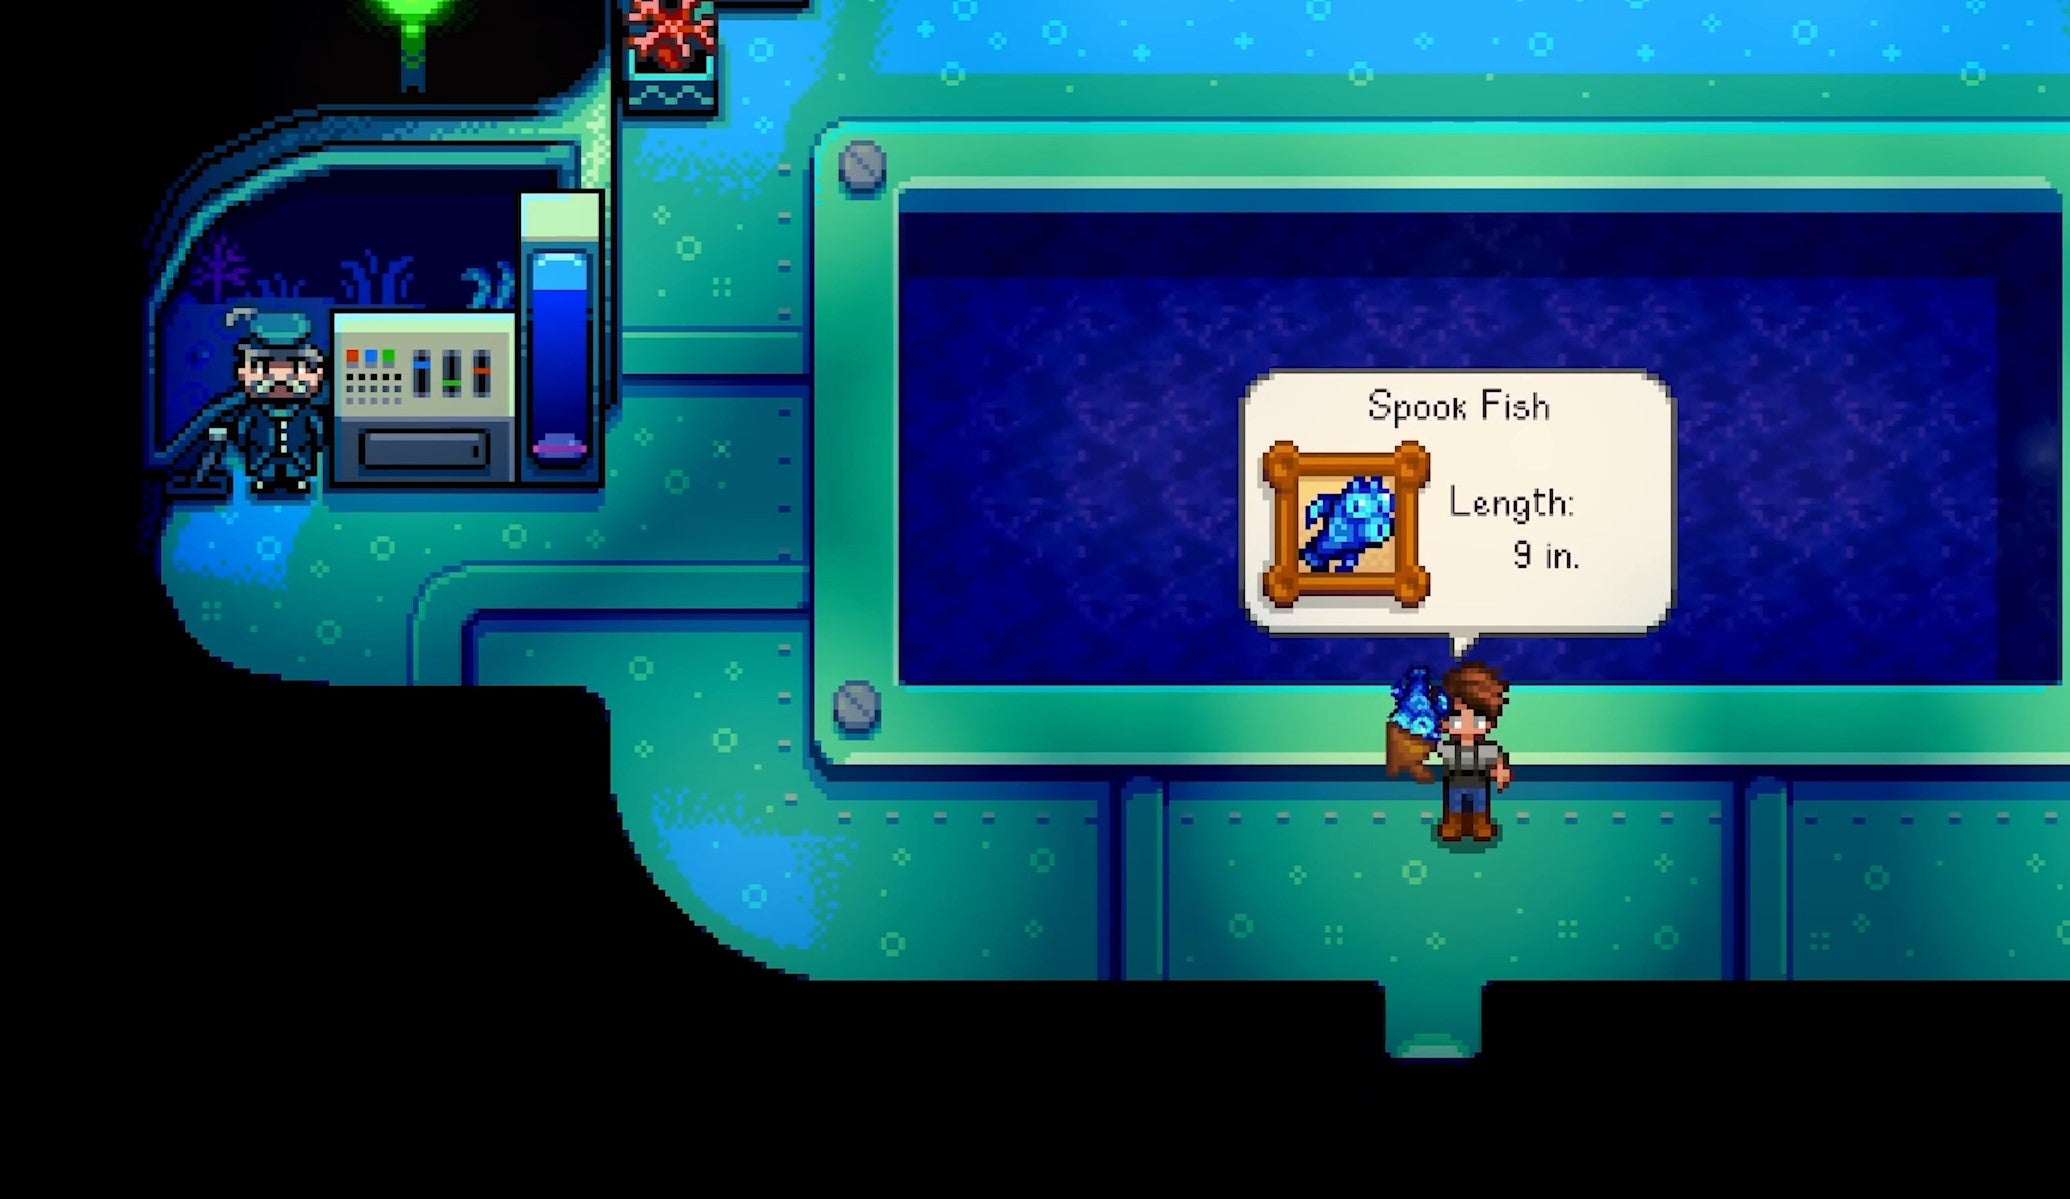
Submarine-exclusive fish include:
- Blobfish
- Midnight Squid
- Spook Fish
You can also catch these fish and items during the excursion:
- Octopus
- Sea Cucumber
- Super Cucumber
- Pearl
- Seaweed
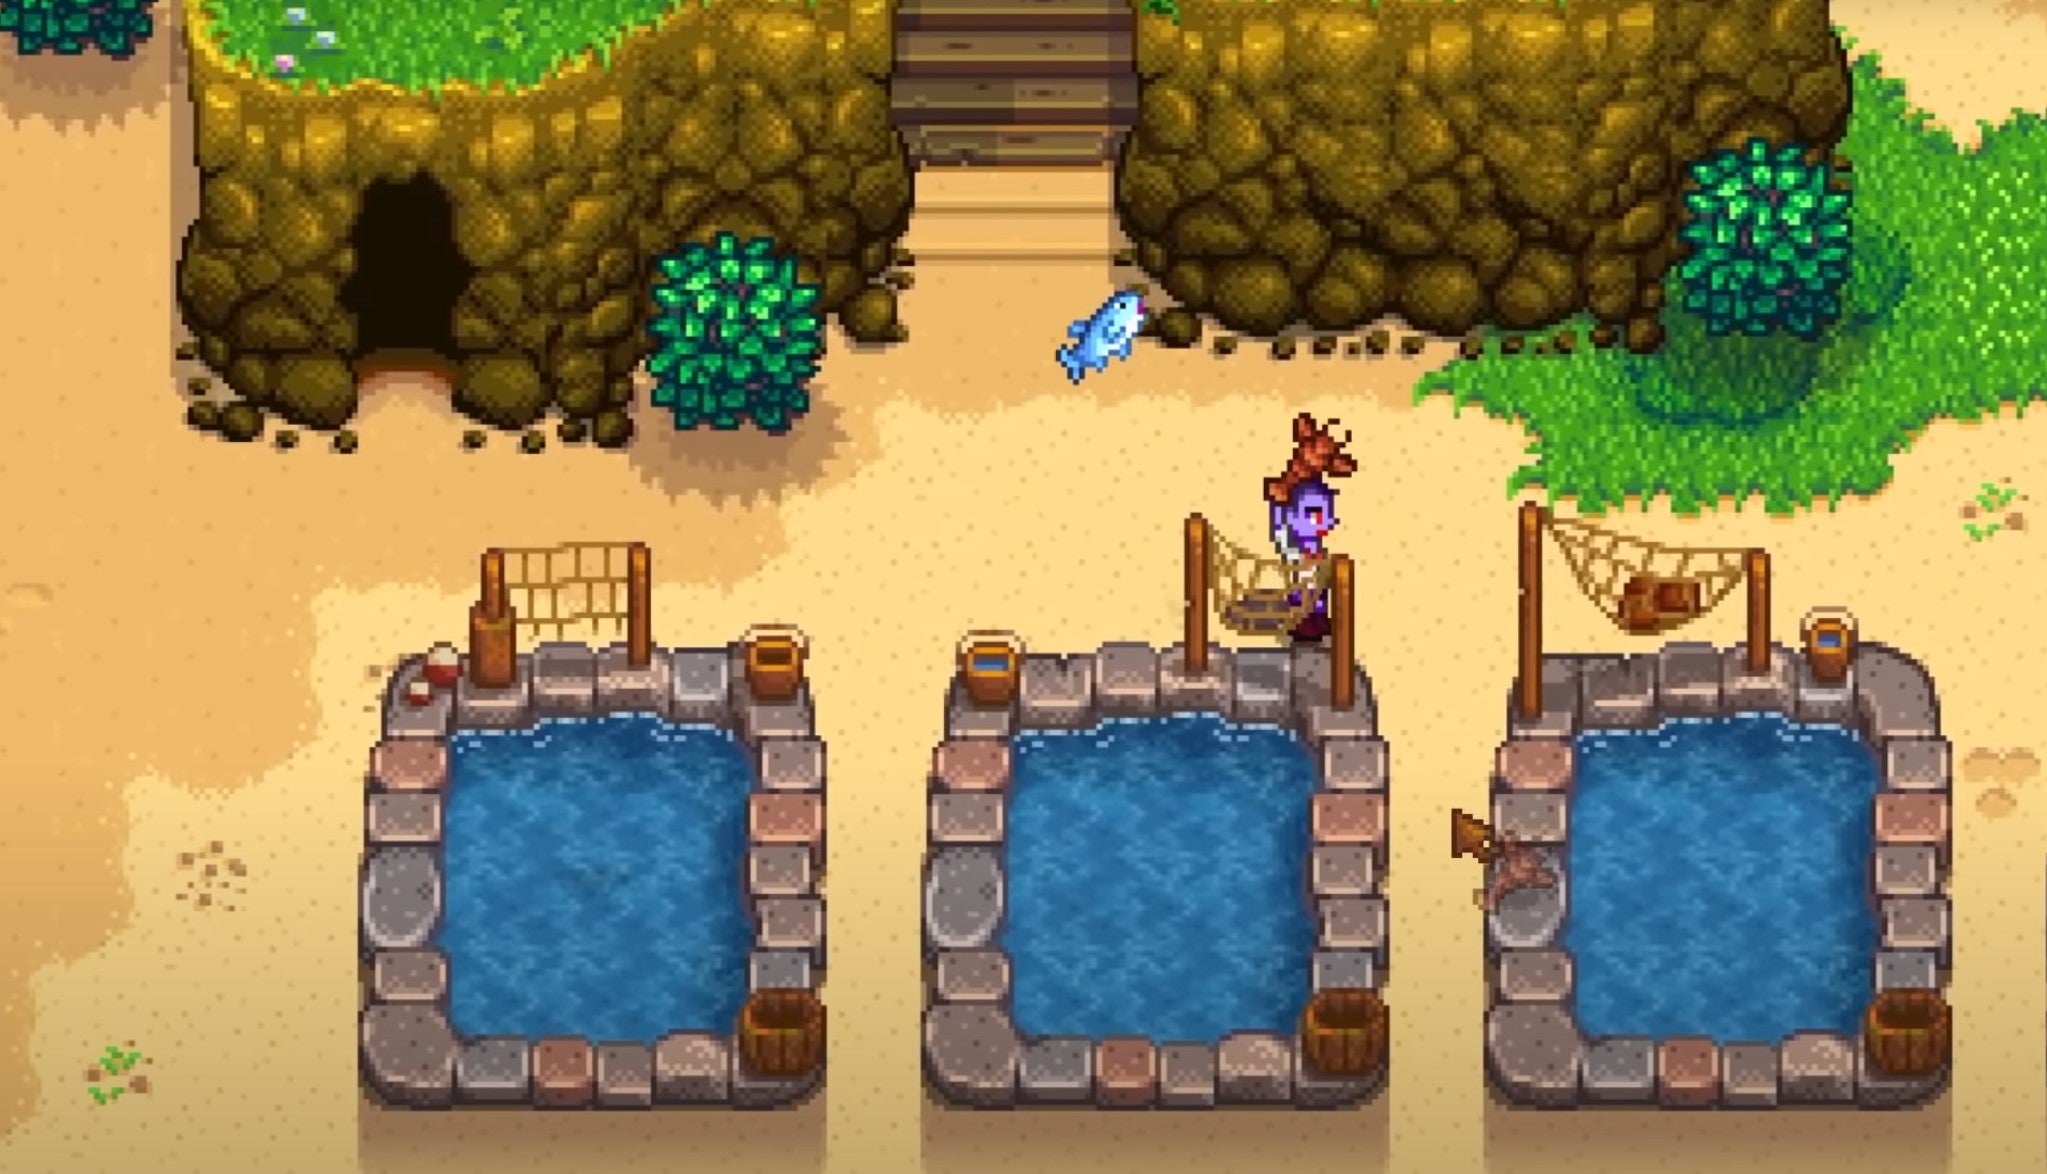
Fish Ponds and Breeding
A great way to make a larger profit through fishing is to build a fish pond on your farm. By placing the fish you’ve caught into one of these ponds, you can breed even more fish to sell for Gold. You can also score some useful items.
How to Build a Pond
To build a pond on your farm, you’ll need:
- 5,000g
- 200 Stone
- 5 Seaweed
- 5 Green Algae
Stone is collected by breaking stones on your farm, in Skull Cavern, or in The Mines. Seaweed is found by fishing in the ocean at any time during the year, and is also found in the tidal pools on The Beach, which becomes available once you repair the broken bridge with 300 pieces of wood.
You can find Green Algae by fishing at any spot during any season, with the exception of the pond on your farm. Green Slimes can also drop Green Algae, though this is quite rare.
After collecting these resources, visit Robin at the Carpenter’s Shop to the west of the Mountain Lake any time from 9am to 5pm. Select the Fish Pond option from the construction menu and select where you’d like to place it on your farm. Fish Ponds take up a 5×5 space, so ensure you have a space cleared out before visiting Robin. It takes Robin three days to finish building it.
You can place any fish into a Fish Pond, with the exception of Legendary Fish and clams. Each Fish Pond can only hold one type of fish. If you’d like to change what fish you’re keeping in a certain Pond, select the Empty Pond option on the Fish Pond menu. Take the fish currently living in the pond out first or they will be destroyed upon selecting this option.
Upon placing two fish into a pond, they will begin to reproduce until reaching capacity.
Increasing Pond Capacity
Completing capacity quests allows you to breed even more fish in each pond. Most fish allows you to place three into a pond before needing to raise the capacity cap, with some exceptions. (Tiger Trouts, for example, don’t reproduce at all.)
When a Fish Pond reaches capacity, an exclamation mark appears above it. You can then start a Fish Quest, in which you’ll need to collect a certain set of items. Doing so increases the capacity, with the maximum being 10 fish.
Here are the items you’ll need.
| Fish | Population - 1 | Population - 3 | Population - 5 | Population - 7 |
|---|---|---|---|---|
| Albacore | 3 Driftwood 1 Frozen Geode 1 to 2 Seaweed | 2 Clam 2 Coral | 2 Aquamarine 1 Mussel 2 Sea Urchin |
|
| Anchovy | 3 Driftwood 1 Frozen Geode 1 to 2 Seaweed | 2 Clam 2 Coral | 2 Aquamarine 1 Mussel 2 Sea Urchin |
|
| Blobfish | 3 Coral 2 Frozen Tear 2 Sea Urchin | 5 Coffee Bean 1 Mayonnaise 1 Pizza | 1 Cookie 1 Green Tea 1 Wine | 1 Rainbow Shell 1 Rice Pudding |
| Bream | 3 Acron 10 Bug Meat 3 Maple Seed 3 Pine Corn | 3 Gold Ore 1 Maple Syrup 5 Mixed Seeds | 1 Crayfish 1 Honey 2 Jade 1 Periwinkle |
|
| Bullhead | 10 Bug Meat 2 to 3 Clay 2 to 3 Green Algae 5 Slime | 2 to 3 Common Mushroom 1 to 2 Earth Crystal 1 Limestone | 1 Mudstone 1 Snail 5 Wild Bait |
|
| Carp | 2 Green Algae | 2 Cave Carrot | ||
| Catfish | 2 Amethyst 3 Copper Bar 3 Red Mushroom 2 Topaz | 10 Bat Wing 2 Earth Crystal 5 Mixed Seeds 2 to 3 Purple Mushroom | 1 Diamond 3 Iron Bar 1 Mayonnaise 1 Pickles |
|
| Chub | 3 Acron 10 Bug Meat 3 Maple Seed 3 Pine Corn | 3 Gold Ore 1 Maple Syrup 5 Mixed Seeds | 1 Crayfish 1 Honey 2 Jade 1 Periwinkle |
|
| Cockle | 5 Clay | 10 Bug Meat 5 Quartz | 1 Sea Urchin 5 Solar Essence 1 Wild Bait |
|
| Crab | 5 Clay | 10 Bug Meat 5 Quartz | 1 Sea Urchin 5 Solar Essence 1 Wild Bait |
|
| Crayfish | 5 Clay 15 Fiber | 10 Bug Meat 1 Cave Carrot 5 Hardwood | 1 Field Snack 5 Solar Essence 1 Wild Bait |
|
| Dorado | 2 Bream 2 Carp 2 Chub | 2 Bullhead 2 Largemouth Bass | 2 Ghostfish 2 Sandfish 2 Woodskip |
|
| Eel | 3 Driftwood 1 Frozen Geode 1 to 2 Seaweed | 2 Clam 2 Coral | 2 Aquamarine 1 Mussel 2 Sea Urchin |
|
| Flounder | 3 Driftwood 1 Frozen Geode 1 to 2 Seaweed | 2 Clam 2 Coral | 2 Aquamarine 1 Mussel 2 Sea Urchin |
|
| Ghostfish | 5 Quartz | 5 Cave Carrot | 5 White Algae | 1 Dwarf Scroll I 1 Dwarf Scroll II 2 Refined Quartz |
| Halibut | 3 Driftwood 1 Frozen Geode 1 to 2 Seaweed | 2 Clam 2 Coral | 2 Aquamarine 1 Mussel 2 Sea Urchin |
|
| Herring | 3 Driftwood | 1 Coral | ||
| Ice Pip | 10 Iron Ore | 5 Frozen Tear | 10 Coal 1 Crystal Fruit 5 Frozen Geode | 4 Iron bar 10 Refined Quartz |
| Largemouth Bass | 10 Bug Meat 2 to 3 Clay 2 to 3 Green Algae 5 Slime | 2 to 3 Common Mushroom 1 to 2 Earth Crystal 1 Limestone | 1 Mudstone 1 Snail 5 Wild Bait |
|
| Lava Eel | 3 Fire Quartz | 1 Basalt 2 Diamond 1 Dwarf Scroll III | 2 Mega Bomb | 1 Iridium Bar |
| Lingcod | 2 Bream 2 Carp 2 Chub | 2 Bullhead 2 Largemouth Bass | 2 Ghostfish 2 Sandfish 2 Woodskip |
|
| Lobster | 5 Clay | 10 Bug Meat 5 Quartz | 1 Sea Urchin 5 Solar Essence 1 Wild Bait |
|
| Midnight Carp | 10 Bug Meat 2 to 3 Clay 2 to 3 Green Algae 5 Slime | 2 to 3 Common Mushroom 1 to 2 Earth Crystal 1 Limestone | 1 Mudstone 1 Snail 5 Wild Bait |
|
| Midnight Squid | 3 Coral 2 Sea Urchin | 2 Sardine | 1 Ocean Stone | |
| Mussel | 5 Clay | 10 Bug Meat 5 Quartz | 1 Sea Urchin 5 Solar Essence 1 Wild Bait |
|
| Octopus | 3 Coral 1 Honey 1 Oyster 3 Refined Quartz | 1 Dried Starfish 2 Emerald 2 to 3 Omni Geode 2 to 3 Purple Mushroom | 1 Green Tea |
|
| Oyster | 5 Clay | 10 Bug Meat 5 Quartz | 1 Sea Urchin 5 Solar Essence 1 Wild Bait |
|
| Perch | 3 Acron 10 Bug Meat 3 Maple Seed 3 Pine Corn | 3 Gold Ore 1 Maple Syrup 5 Mixed Seeds | 1 Crayfish 1 Honey 2 Jade 1 Periwinkle |
|
| Periwinkle | 5 Clay 15 Fiber | 10 Bug Meat 1 Cave Carrot 5 Hardwood | 1 Field Snack 5 Solar Essence 1 Wild Bait |
|
| Pike | 2 Bream 2 Carp 2 Chub | 2 Bullhead 2 Largemouth Bass | 2 Ghostfish 2 Sandfish 2 Woodskip |
|
| Pufferfish | 3 Driftwood 1 Frozen Geode 1 to 2 Seaweed | 2 Clam 2 Coral | 2 Aquarmarine 1 Museel Sea Urchin |
|
| Rainbow Trout | 3 Coral 1 Honey 1 Oyster 3 Refined Quartz | 1 Dried Starfish 2 Emerald 2 to 3 Omni Geode 2 to 3 Purple Mushroom | 1 Diamond 3 Gold Bar 1 Iridium Ore 1 Jelly 1 Pickles |
|
| Red Mullet | 3 Driftwood 1 Frozen Geode 1 to 2 Seaweed | 2 Clam 2 Coral | 2 Aquamarine 1 Mussel 2 Sea Urchin |
|
| Red Snapper | 3 Driftwood 1 Frozen Geode 1 to 2 Seaweed | 2 Clam 2 Coral | 2 Aquamarine 1 Mussel 2 Sea Urchin |
|
| Salmon | 3 Acron 10 Bug Meat 3 Maple Seed 3 Pine Corn | 3 Gold Ore 1 Maple Syrup 5 Mixed Seeds | 1 Crayfish 1 Honey 2 Jade 1 Periwinkle |
|
| Sandfish | 3 Cactus Fruit 3 Coconut | 1 Golden Relic | ||
| Sardine | 3 Driftwood 1 Frozen Geode 1 to 2 Seaweed | 2 Clam 2 Coral | 2 Aquamarine 1 Mussel 2 Sea Urchin |
|
| Scorpion Carp | 3 Cactus Fruit 3 Coconut | 1 Golden Relic | ||
| Sea Cucumber | 3 Driftwood 1 Frozen Geode 1 to 2 Seaweed | 2 Clam 2 Coral | 2 Aquamarine 1 Mussel 2 Sea Urchin |
|
| Shad | 3 Acron 10 Bug Meat 3 Maple Seed 3 Pine Corn | 3 Gold Ore 1 Maple Syrup 5 Mixed Seeds | 1 Crayfish 1 Honey 2 Jade 1 Periwinkle |
|
| Shrimp | 5 Clay | 10 Bug Meat 5 Quartz | 1 Sea Urchin 5 Solar Essence 1 Wild Bait |
|
| Slimejack | 20 Slime | 10 Bug Meat | 1 Algae Soup 5 Wild Bait | 1 Petrified Slime |
| Smallmouth Bass | 3 Acron 10 Bug Meat 3 Maple Seed 3 Pine Corn | 3 Gold Ore 1 Maple Syrup 5 Mixed Seeds | 1 Crayfish 1 Honey 2 Jade 1 Periwinkle |
|
| Snail | 5 Clay 15 Fiber | 10 Bug Meat 1 Cave Carrot 5 Hardwood | 1 Field Snack 5 Solar Essence 1 Wild Bait |
|
| Spook Fish | 3 Amethyst 3 Coral 3 Iron Bar 1 Oyster 3 Red Mushroom 3 Refined Quartz | 1 Dried Starfish 2 Emerald 1 Granite 2 to 3 Omni Geode 2 to 3 Purple Mushroom | 1 Diamond 3 Gold Bar 1 Iridium Ore 1 Mayonnaise 1 Pickles |
|
| Squid | 3 Coral 1 Sea Urchin | 2 Sardine | ||
| Stonefish | 10 Copper Ore | 5 Earth Crystal | 10 Coal 5 Geode | 4 Copper Bar 4 Refined Quartz |
| Sturgeon | 1 Diamond | 1 Jelly 2 Maple Syrup 1 Pickles | 3 Omni Geode | 1 Nautilus Shell |
| Sunfish | 2 Acorn 2 Geode | 1 Amethyst 3 Mixed Seeds | ||
| Super Cucumber | 3 Coral 1 Honey 1 Oyster 3 Driftwood 3 Refined Quartz | 1 Dried Starfish 2 Emerald 2 to 3 Omni Geode 2 to 3 Purple Mushroom | 1 Diamond 3 Gold Bar 1 Iridium Ore 1 Jelly 1 Pickles 1 Sea Urchin |
|
| Tilapia | 3 Driftwood 1 Frozen Geode 1 to 2 Seaweed | 2 Clam 2 Coral | 2 Aquamarine 1 Mussel 2 Sea Urchin |
|
| Tuna | 3 Driftwood 1 Frozen Geode 1 to 2 Seaweed | 2 Clam 2 Coral | 2 Aquamarine 1 Mussel 2 Sea Urchin |
|
| Void Salmon | 5 Void Essence | 10 Bat Wings | 1 Diamond 1 Void Egg | 1 Iridium Ore |
| Walleye | 3 Acorn 10 Bug Meat 3 Maple Seeds 3 Pine Cone | 3 Gold Ore 1 Maple Syrup 5 Mixed Seeds | 1 Crayfish 1 Honey 2 Jade 1 Periwinkle |
|
| Woodskip | 10 Hardwood | 2 to 3 Commum Mushroom 2 to 3 Red Mushroom | 1 Oak Resin 1 Pine Tar | 2 Jade 1 Tea Leaves |
Pond Products
As more fish begin living in your Fish Pond, you’ll start to find more items in your chum bucket. These items may not appear every day.
| Fish | Population 1+ | Population 3+ | Population 5-6 | Population 7-8 | Population 9-10 |
|---|---|---|---|---|---|
| Albacore | 1 Roe | 1 Roe | |||
| Anchovy | 1 Roe | 1 Roe | |||
| Blobfish | 1 Roe | 2 Roe | 1 Pearl 5 Farm Warp Totems |
||
| Bream | 1 Roe | ||||
| Bullhead | 1 Roe | ||||
| Carp | 1 Roe | ||||
| Catfish | 1 Roe | ||||
| Chub | 1 Roe | ||||
| Cockle | 1 Broken CD 1 Broken Glasses 1 Driftwood 1 Roe 1 to 3 Seaweed 1 Soggy Newspaper 1 Trash | 1 Coral 1 Sea Urchin | 1 Beach Warp Totem 1 Nautilus Shell |
||
| Coral | 1 Dolomite 1 Limestone |
||||
| Crab | 1 Broken CD 1 Broken Glasses 1 Driftwood 1 Roe 1 to 3 Seaweed 1 Soggy Newspaper 1 Trash | 1 Coral 1 Sea Urchin | 1 Beach Warp Totem 1 Nautilus Shell |
||
| Crayfish | 1 Broken CD 1 Broken Glasses 1 Driftwood 1 to 3 Green Algae 1 Roe 1 Soggy Newspaper 1 Trash | 2 to 3 Mixed Seeds | 1 Mountains Warp Totem | ||
| Dorado | 1 Roe | 20 Bug Meat | |||
| Eel | 1 Roe | 1 Roe | |||
| Flounder | 1 Roe | 1 Roe | |||
| Ghostfish | 1 Roe | 1 Quartz | 3 Quartz 1 Refined Quartz 3 Pale Broth 5 White Algae |
||
| Halibut | 1 Roe | 1 Roe | |||
| Herring | 1 Roe | ||||
| Ice Pip | 1 Roe | 5 Iron Ore | 1 Diamond 1 to Frozon Geodes 1 Frozen Tear |
||
| Largemouth Bass | 1 Roe | ||||
| Lava Eel | 1 Roe | 5 Gold Ore | 2 to 3 Roe 5 Spicy Eels 5 to 10 Magma Geodes |
||
| Lingcod | 1 Roe | 20 Bug Meat | |||
| Lobster | 1 Broken CD 1 Broken Glasses 1 Driftwood 1 Roe 1 to 3 Seaweed 1 Soggy Newspaper 1 Trash | 1 Coral 1 Sea Urchin | 1 Beach Warp Totem 1 Nautilus Shell |
||
| Midnight Carp | 1 Roe | ||||
| Midnight Squid | 1 Squid Ink | 2 Squid Ink | |||
| Mussel | 1 Broken CD 1 Broken Glasses 1 Driftwood 1 Roe 1 to 3 Seaweed 1 Soggy Newspaper 1 Trash | 1 Coral 1 Sea Urchin | 1 Beach Warp Totem 1 Nautilus Shell |
||
| Octopus | 1 Roe | 1 to 10 Omni Geodes | |||
| Oyster | 1 Broken CD 1 Broken Glasses 1 Driftwood 1 Roe 1 to 3 Seaweed 1 Soggy Newspaper 1 Trash | 1 Coral 1 Sea Urchin | 1 Beach Warp Totem 1 Nautilus Shell |
||
| Perch | 1 Roe | ||||
| Periwinkle | 1 Broken CD 1 Broken Glasses 1 Driftwood 1 to 3 Green Algae 1 Roe 1 Soggy Newspaper 1 Trash | 2 to 3 Mixed Seeds | 1 Mountains Warp Totem | ||
| Pike | 1 Roe | 20 Bug Meat | |||
| Pufferfish | 1 Roe | 1 Roe | |||
| Rainbow Trout | 1 Roe | 1 Prismatic Shard 1 Rainbow Shell |
|||
| Red Mullet | 1 Roe | 1 Roe | |||
| Red Snapper | 1 Roe | 1 Roe | |||
| Salmon | 1 Roe | ||||
| Sandfish | 1 Roe | 2 Roe | 3 Roe 2 to 5 Cactus Seeds |
||
| Sardine | 1 Roe | 1 Roe | |||
| Scorpion Carp | 1 Roe | 2 Roe | 3 Roe 2 to 5 Cactus Seeds |
||
| Sea Cucumber | 1 Roe | 1 Roe | |||
| Sea Urchin | 1 Roe | 5 Roe | |||
| Shad | 1 Roe | ||||
| Shrimp | 1 Broken CD 1 Broken Glasses 1 Driftwood 1 Roe 1 to 3 Seaweed 1 Soggy Newspaper 1 Trash | 1 Coral 1 Sea Urchin | 1 Beach Warp Totem 1 Nautilus Shell |
||
| Slimejack | 1 Roe | 1 Green Algae | 10 to 50 Slime 1 Green Slime Egg |
||
| Smallmouth Bass | 1 Roe | ||||
| Snail | 1 Broken CD 1 Broken Glasses 1 Driftwood 1 to 3 Green Algae 1 Roe 1 Soggy Newspaper 1 Trash | 2 to 3 Mixed Seeds | 1 Mountains Warp Totem | ||
| Spook Fish | 1 Roe | 1 Treasure Chest | |||
| Squid | 1 Squid Ink | ||||
| Stonefish | 1 Roe | 5 Copper Ore | 1 Diamond 1 to 5 Geodes 30 Stone |
||
| Sturgeon | 1 Sturgeon Roe | 2 Sturgeon Roe | |||
| Sunfish | 1 Roe | ||||
| Super Cucumber | 1 Roe | ||||
| Tiger Trout | 1 Roe | 2 Roe | |||
| Tilapia | 1 Roe | 1 Roe | |||
| Tuna | 1 Roe | 1 Roe | |||
| Void Salmon | 1 Roe | 5 to 10 Void Essence | 3 Roe 1 Void Egg |
||
| Walleye | 1 Roe | ||||
| Woodskip | 1 Roe 1 to 5 Wood | 5 Hardwood | 5 to 10 Wood | 1 to 5 Acorn 1 to 5 Maple Seed 1 to 5 Pine Cone |
Best Fish for Fish Ponds
If you’re hoping to get rich from your Fish Pond, the Lava Eel should be your creature of choice. These notoriously difficult fish to catch are only acquired on the 100th floor of The Mines, or at the Forge area of the Volcano on Ginger Island, but that rarity makes them an easy way to line your pockets.
Once you place two Lava Eels into your pond, they’ll begin producing Roe. The base price for a single Lava Eel is 700g, and the price of their Roe is an impressive 380g. The Eels also produce Magma Geodes which will appear in your chum bucket. You can bring these to Clint the Blacksmith who will open them for 25g each, netting you a wide array of resources from Iridium Ore to geode minerals.
Other excellent choices for profitable fish include Sturgeon, Blobfish, Rainbow Trout, and Ice Pip. The roe produced by a Sturgeon can be used to make Caviar, which can be sold for anywhere from 500g to 700g.