
![]() Key Takeaway
Key Takeaway
Here’s how to gameshare on Steam by using the Family Library Sharing function:
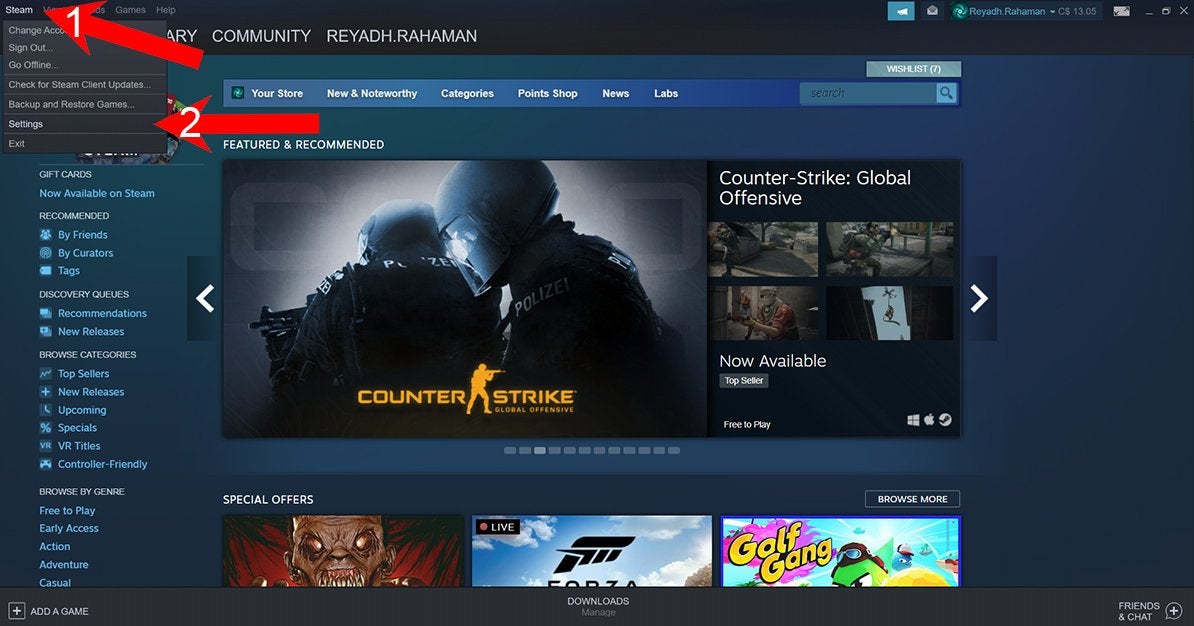
- Click “Steam” in the top-left corner
- Click “Settings” from the drop-down menu
- Click on the “Family” tab of the pop-up menu
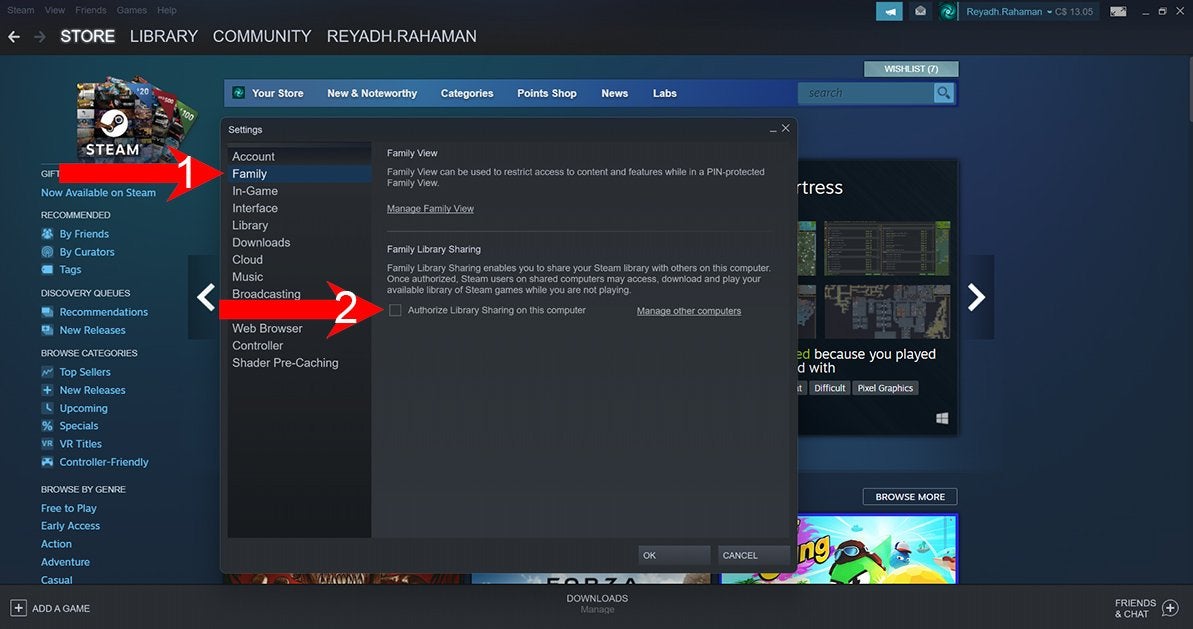
- Check the box next to the text that says “Authorize Family Sharing on this computer”
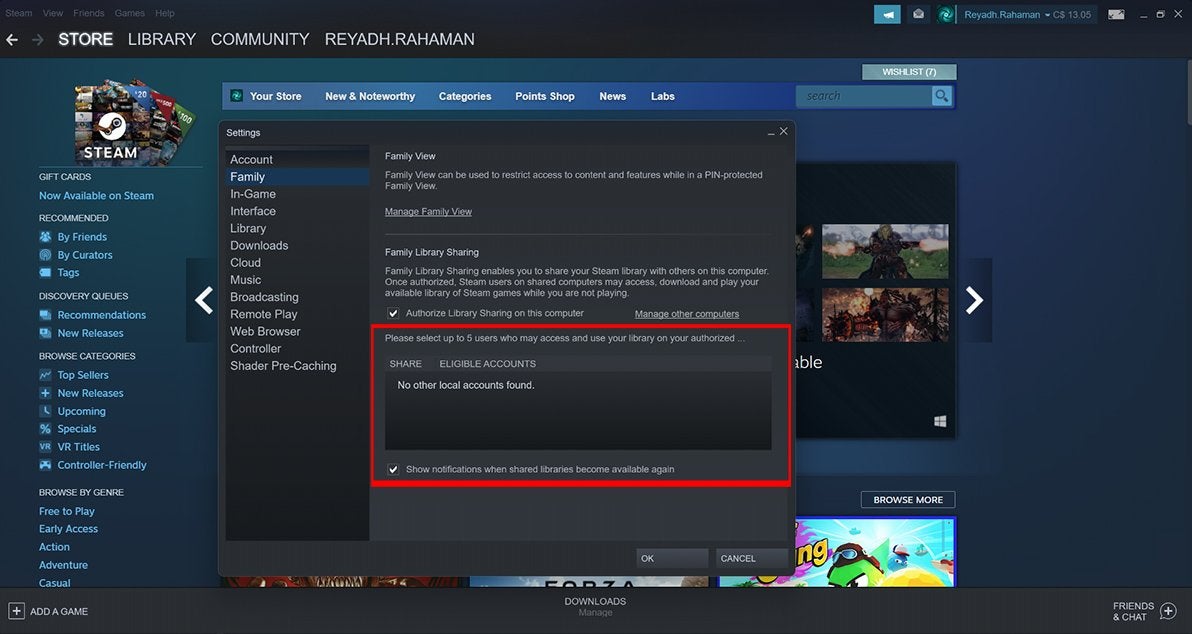
- Select eligible accounts with which to share your games library
You’ll want to gameshare on Steam to let others in on the digital fun. By using a function called Family Library Sharing, you can give a few people access to your games library. You, your friends, and your family can enjoy the same titles for free!
Table Of Contents
How to Use Gameshare on Steam
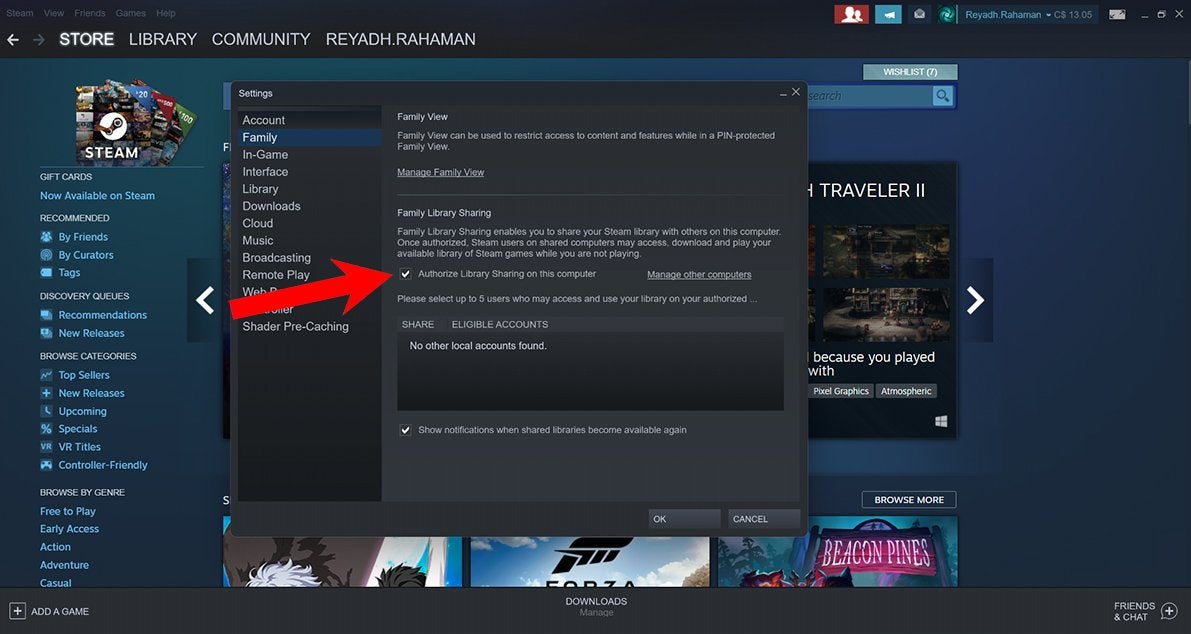
First, open Steam and click Steam in the top-left corner of the window. It is the left-most option in the top menu bar. This causes a dropdown menu to appear. Now, click Settings to open a pop-up menu.
On this pop-up menu, click Family on this small window’s left side. It is the second tab down (right below “Account”). After that, check the box next to Authorize Library Sharing on this computer by clicking inside the little square.
Once you’ve checked the box, a few things appear in the bottom part of the pop-up menu:
- A message saying that you can select up to five users with whom you can share your games library
- A box showing accounts that are eligible for library sharing (if no one is eligible, you’ll get a “No other local accounts found” message)
- An option box that you can check or uncheck to show notifications when shared libraries become available
In the box showing eligible accounts for library sharing, click the accounts with whom you want to share your games library.
That’s it! Once you’ve selected the eligible accounts, the people with whom you shared your games library can access titles from your account on their devices. However, gameshare on Steam is limited for a few reasons.
Limitations and Restrictions
You can only share your games library with a maximum of five other accounts. Also, you can only do so across 10 devices in total. With that said, all 5 of those accounts and all 10 of those devices can share their games libraries with you as well. This means that you can create a small yet robust gaming network with those close to you.
On top of that, videos, software, and free games are excluded from gameshare on Steam; you can only share certain non-free games. Additionally, some non-free games don’t allow game sharing. To find a list of games in your Steam library that do not support Family Library Sharing, take a look at the pop-up Settings menu.
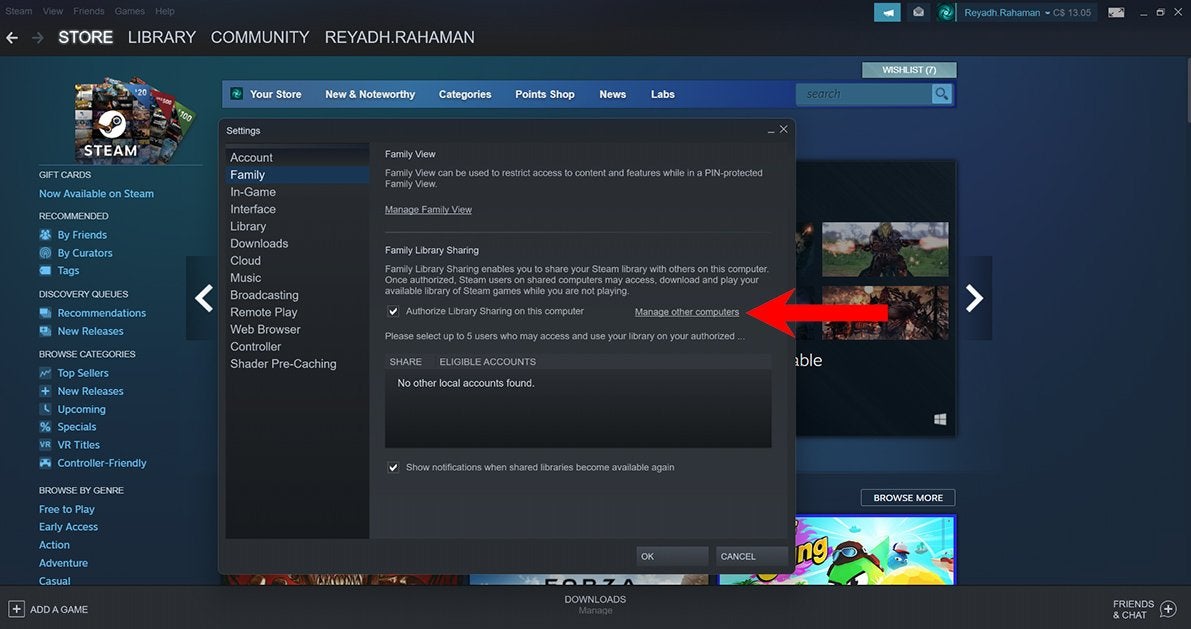
Next to “Authorize Library Sharing on this computer”, you’ll see a clickable line of text that says “Manage other computers”. Click Manage other computers to go to a Steam page called “Manage Family Library Sharing”.
On the page called “Manage Family Library Sharing”, there is a line of text at the bottom that mentions that some games cannot be shared. There is a clickable line of text that says Show excluded games. Click this bit of text to show the list of games in your library that cannot be shared.
Using Steam Guard for Safe Sharing
To begin: the risk level of sharing your Steam games library with others depends on with whom you share your library. As such, make sure to only share your games library with those you trust. With that said, if you’re worried about your Steam security, there’s something you can do to enhance the protection from threats.
Steam Guard is a function that makes users follow an additional step before they can access their account on any device. For example, it’s like when you log into your bank account and need to input a code that your bank texts you.
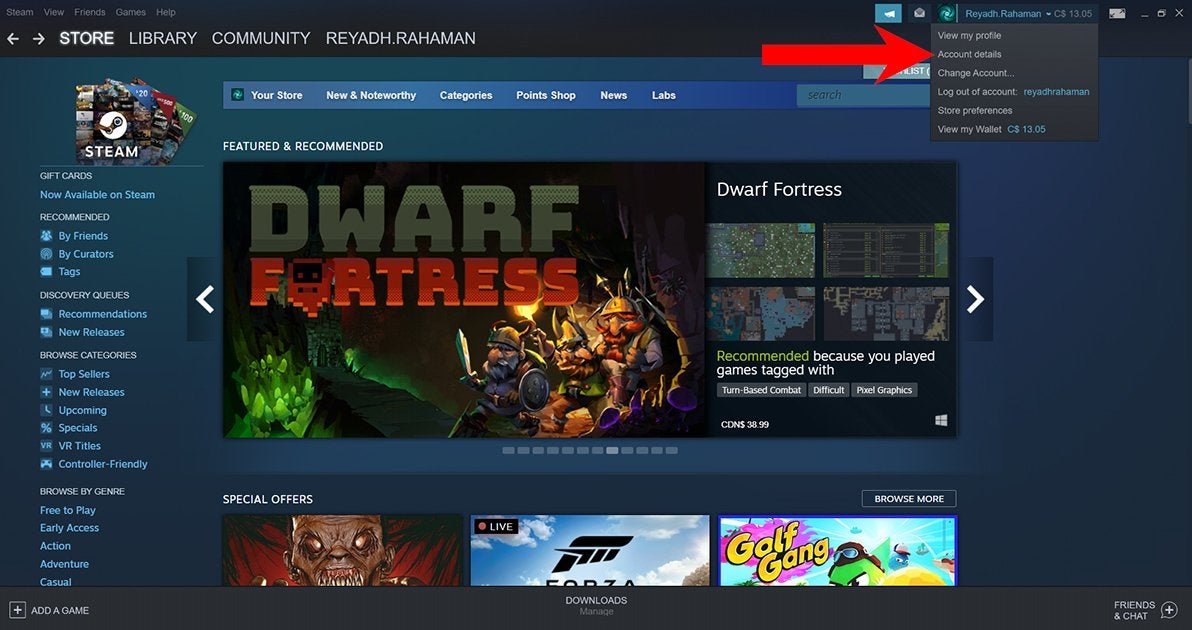
To find the Steam Guard menu, start from the Steam desktop client’s homepage and click your username in the top-right corner.
When you do, you’ll see a small dropdown menu. Here, click Account Details.
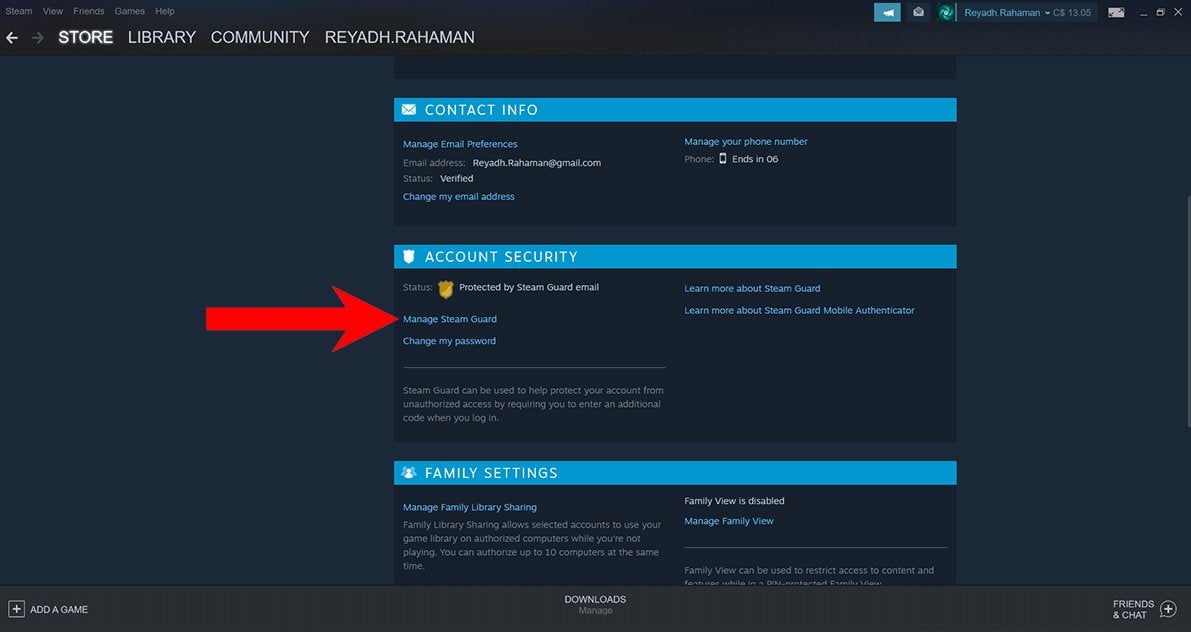
This brings you to the page showing all of the details of the account you’re currently logged into. Scroll down until you see a heading called “Account Security”. This heading has a small shield-shaped symbol next to it. To adjust your Steam Guard’s settings, click Manage Steam Guard under the “Account Security” heading.
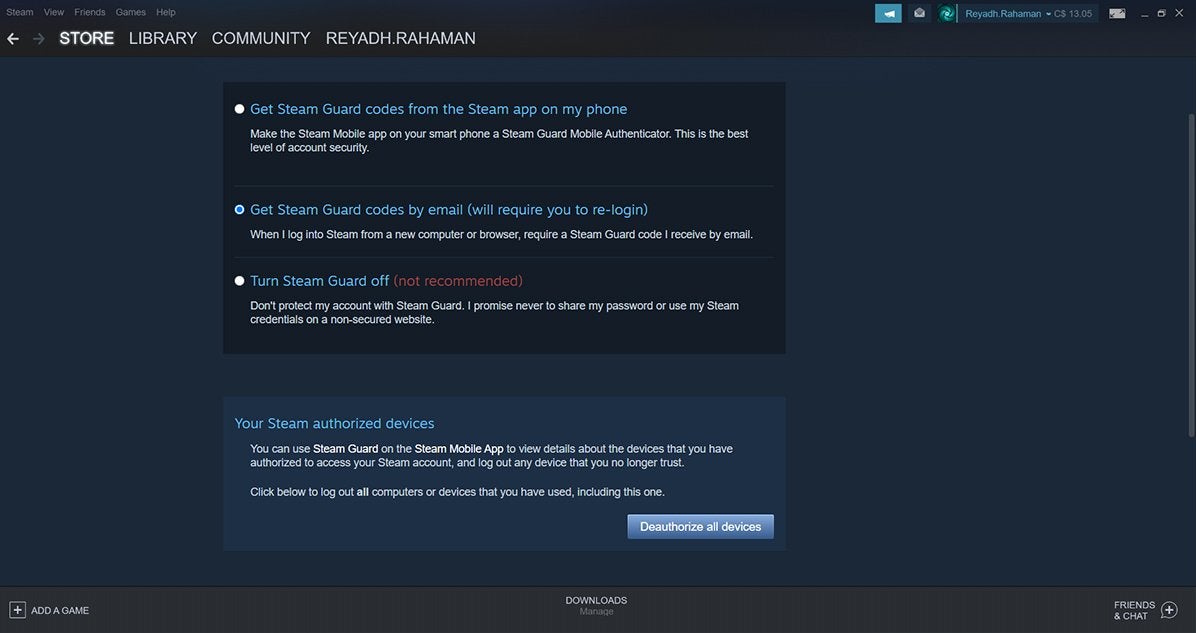
At this point, you have four main options:
- Get Steam Guard codes from the Steam app on your phone (lets the Steam app on your smartphone act as an authenticator)
- Get Steam Guard codes by email (you’ll get an email with a Steam Guard code when you log into your account on a new computer or browser)
- Turn Steam Guard off (removes any of the two functions mentioned above)
- Deauthorize all devices (log out of every device that you have used)
Managing Shared Libraries
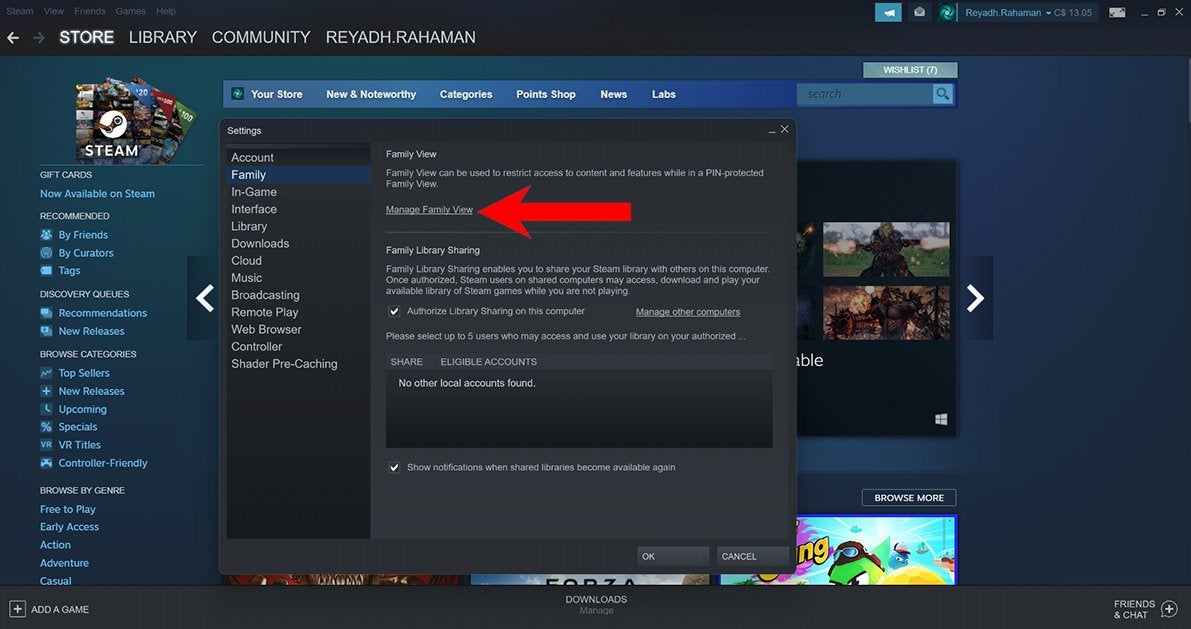
To prevent others from seeing certain games in a shared library, you’ll need to head into the pop-up Settings menu. Click Steam in the top-left corner and then Settings to open this menu. Once there, click Family on the left side of this pop-up menu. Near the top, there is some clickable text that says Manage Family View.
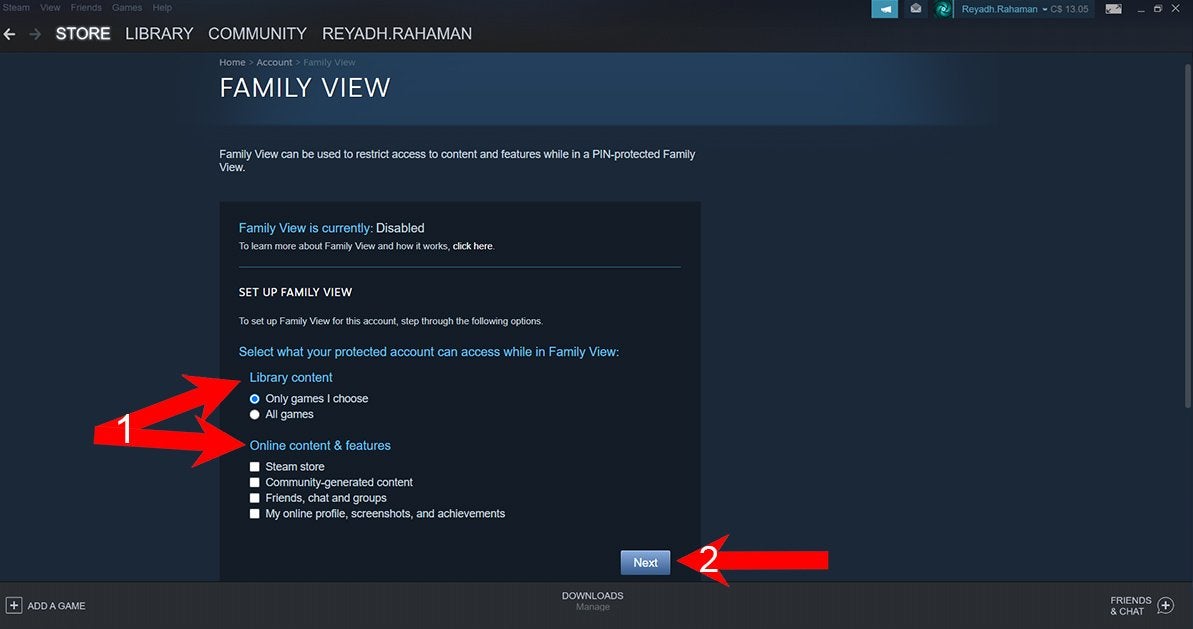
Next, you’ll end up on the “Family View” page. Here, you can select what games you want to let others see in your library while in Family View. This is also the page where you set up Family View; it’s all the same process.
The first option (called “Library Content”) lets you select whether you want to only allow games you choose to be shown or your entire library. Below that, there are boxes you can check to allow certain content and features to be visible, such as the Steam store, your friends list, and more.
Once you’ve selected what you want to be visible, click the Next button at the bottom-right of the page.
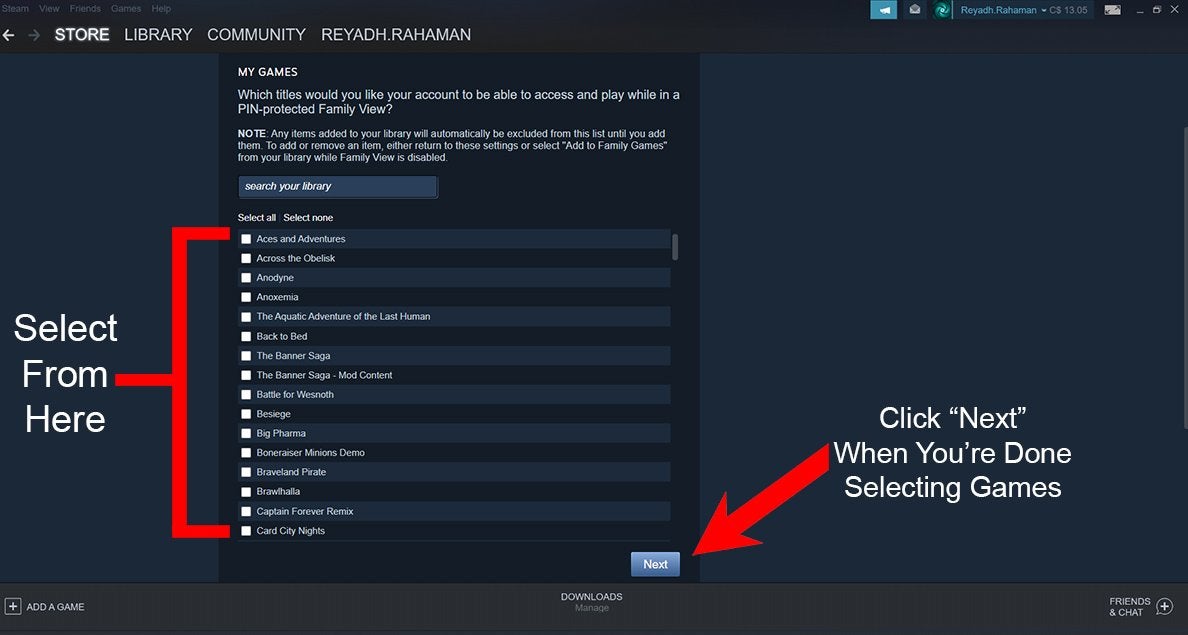
If you choose the Only games I choose option under “Library Content”, the following page will show you a list containing all of the games in your library. Be sure to only select games that you want to share. Games you select from this menu will be the only ones that others can see in Family View. You can also choose Select all or Select none if you’d prefer.
After selecting the games that you want to remain visible in Family View, click Next at the bottom-right of the page.
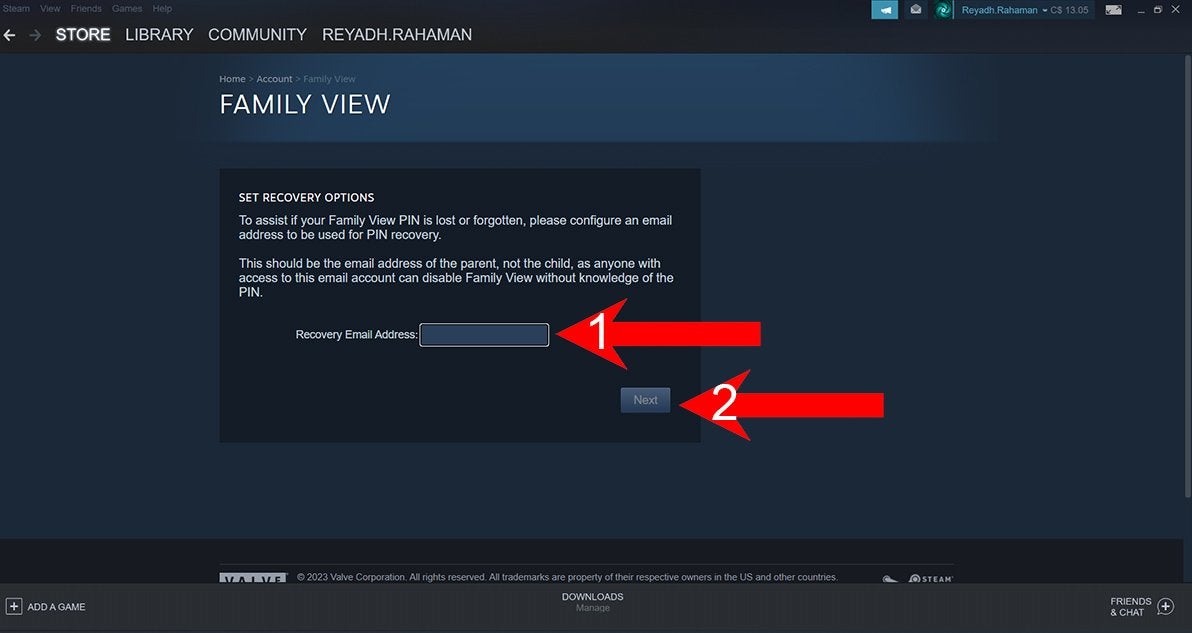
At this point, you’ll be on a page asking for an email address. This is to help with the recovery of your PIN in case you forget or lose it. Make sure to only input your own email address. If you don’t have a PIN yet, don’t worry, the step after this is to create one. After inputting an email, click the Next button.
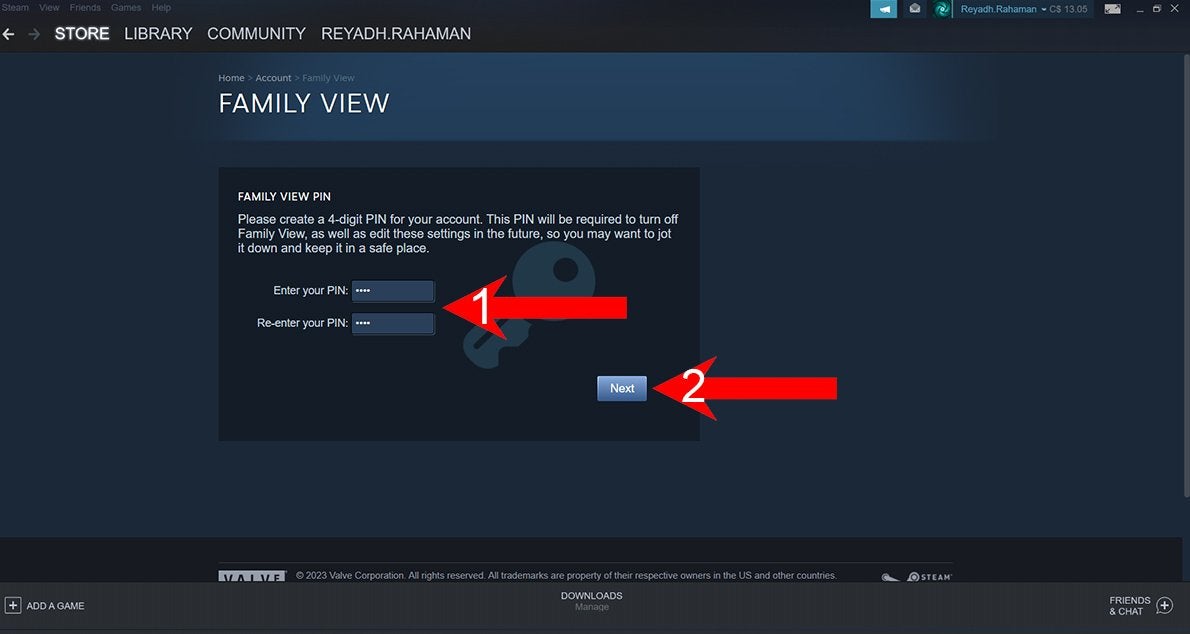
Now that you’ve set up a recovery email, it’s time to create a PIN number. Enter any 4-digit number into both of the text fields and then click Next at the bottom-right of the page.
We recommend using a complex PIN number that does not follow any predictable patterns. For example, PIN numbers like “1234” and “9876” are not very secure due to being easy to guess.
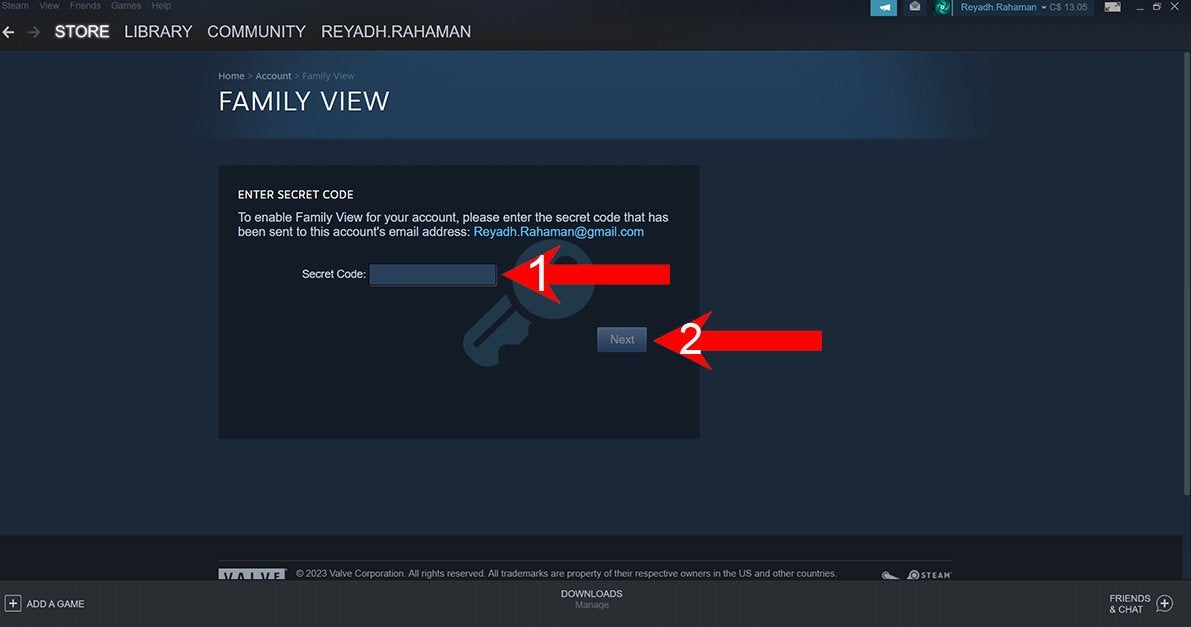
The next step is to input the Secret Code that you were emailed following the creation of your PIN number. The Secret Code gets sent to the email address connected to the Steam account that you’re currently using.
Input that Secret Code into the text field and then click Next to proceed.
You’re done! Now Family View is enabled. The following page gives you an overview of how to use Family View. You can also print off the information on this page for future reference.
Here’s a breakdown of how Family View works once it is setup:
- Before your Family View settings will be applied, you must close your Steam desktop client’s window and then open it (you don’t need to log out and log back in)
- After resetting your Steam desktop client’s window, you’ll see the Family View icon (it looks like two white silhouettes in front of a colored background at the top-right of the window near your username)
- If you are not in Family View, the icon will be red
- If you are in Family View, the icon will be green
- To turn Family View on, click the icon and then confirm that you want to turn Family View on by selecting “OK”
- To turn Family View off, click the icon and then enter your PIN number
To disable Family View, you must get back to the Family View page. To get here again, click on Steam in the top-left corner of the homepage, click Settings, then click on the Family tab before clicking the underlined text that reads Manage Family View.
If Family View is enabled, there is a button near the top of this page to disable it that has the text Disable Family View. Keep in mind that if you disable Family View, you’ll have to go through all the steps mentioned in this section to set it up again.
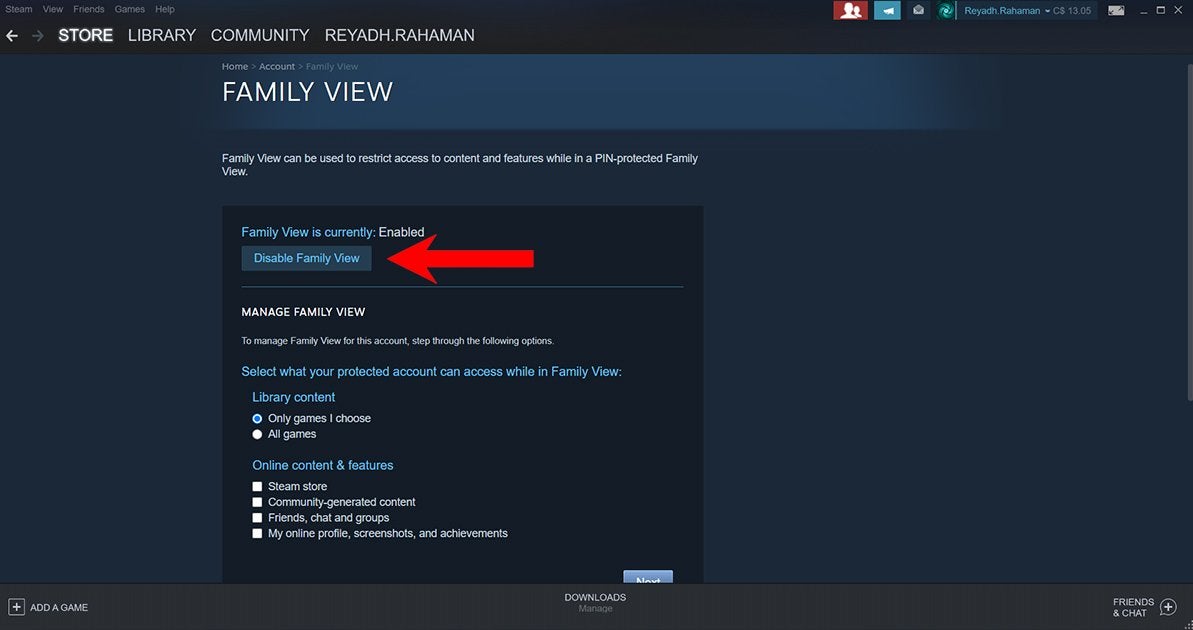
After you click “Disable Family View”, Steam asks you to confirm whether you actually want to disable Family View or not. Confirm that this is indeed what you want to do—or back out if you change your mind.
When Family View is disabled, there will be no red or green icon near your username at the top-right of the window. The red icon (Family View turned off) or green icon (Family View turned on) can only appear if Family View is enabled.
Deactivating Gameshare on Steam
To stop sharing your games library with others, you simply need to uncheck the box that authorizes library sharing.
You can find it by clicking Steam at the top-left of your screen, and then clicking Settings from the dropdown menu. Click Family on the left and you’ll see the checked box next to Authorize Library Sharing on this computer.
This stops others from being able to see your games library. Recheck this box at any time to start sharing your games library again.
Removing and Hiding Shared Games
To manage what games are visible directly from your library, start by clicking the Library tab at the top of the Steam desktop client window. Then, right-click the game you want to remove or hide. This brings up a small menu that has a few different options. The one you’re looking for if you want to remove or hide a game is Manage.
When you hover over “Manage” in this small menu, you’ll see a few more options—including Remove from Family Games and Hide this game. As such, you can use the “Remove from Family Games” option to make sure that people with whom you are sharing your games library cannot see this specific game.
With that said, you only get the option to “Remove from Family Games” if you have Family View enabled. Family View does not need to be on (green icon)—it just needs to be enabled (green or red icon).
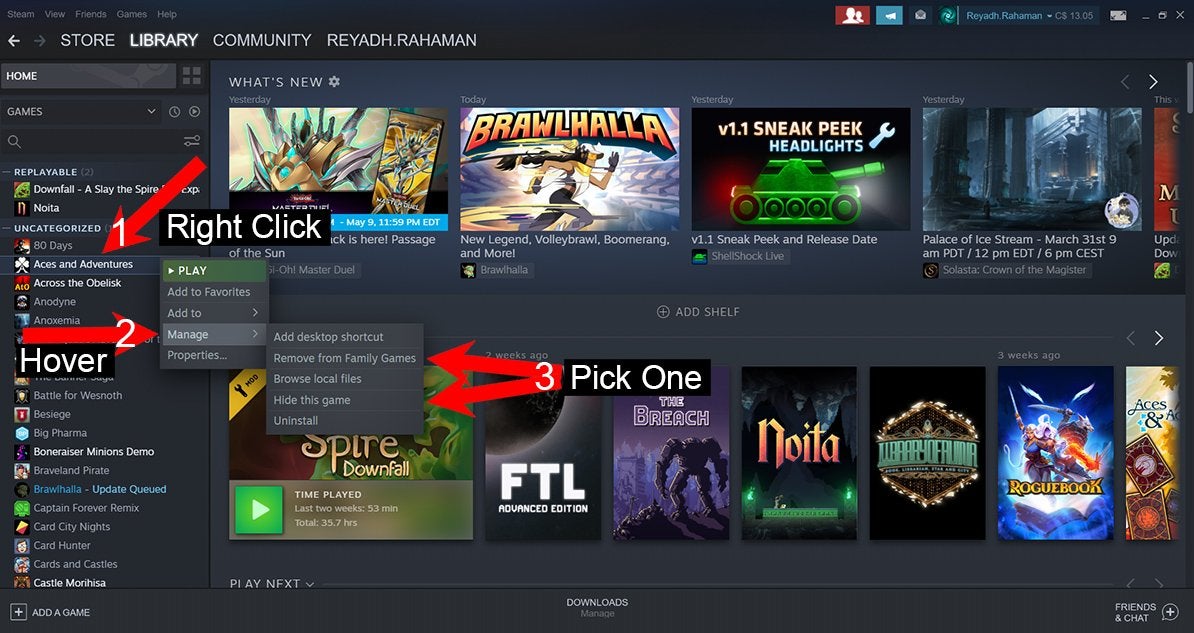
To add a game to Family View, follow the same steps but click Add to Family Games instead of “Remove from Family Games”.
Alternatively, you can hide games in your library to avoid seeing them entirely. You do this by selecting the Hide this game option from the same small menu shown above. Unlike the “Remove from Family Games” option, the “Hide this game” option is available regardless of whether Family View is enabled or disabled.
After you hide a game, you need to search its title in the games library search bar to find it. When you do, you’ll see a Hidden label. Click the plus sign (+) next to the “Hidden” label to show hidden games. At this point, you can right-click the hidden game to bring up the same small menu as before. Now, you can hover over Manage to find the Remove from Hidden option.