![]() Key Takeaway
Key Takeaway
To craft an Anvil in Minecraft, you need to combine three Blocks of Iron and four Iron Ingots on a Crafting Table.
Once you build one, you can use an Anvil to repair, rename, and enchant items. Doing so requires you to spend Experience Levels and use up resources specific to the item you’re enhancing. Furthermore, the more you work on the same item, the more expensive it’ll get.
Anvils break after being used a lot, so you’ll always need to make more if you plan to do a lot of blacksmithing.
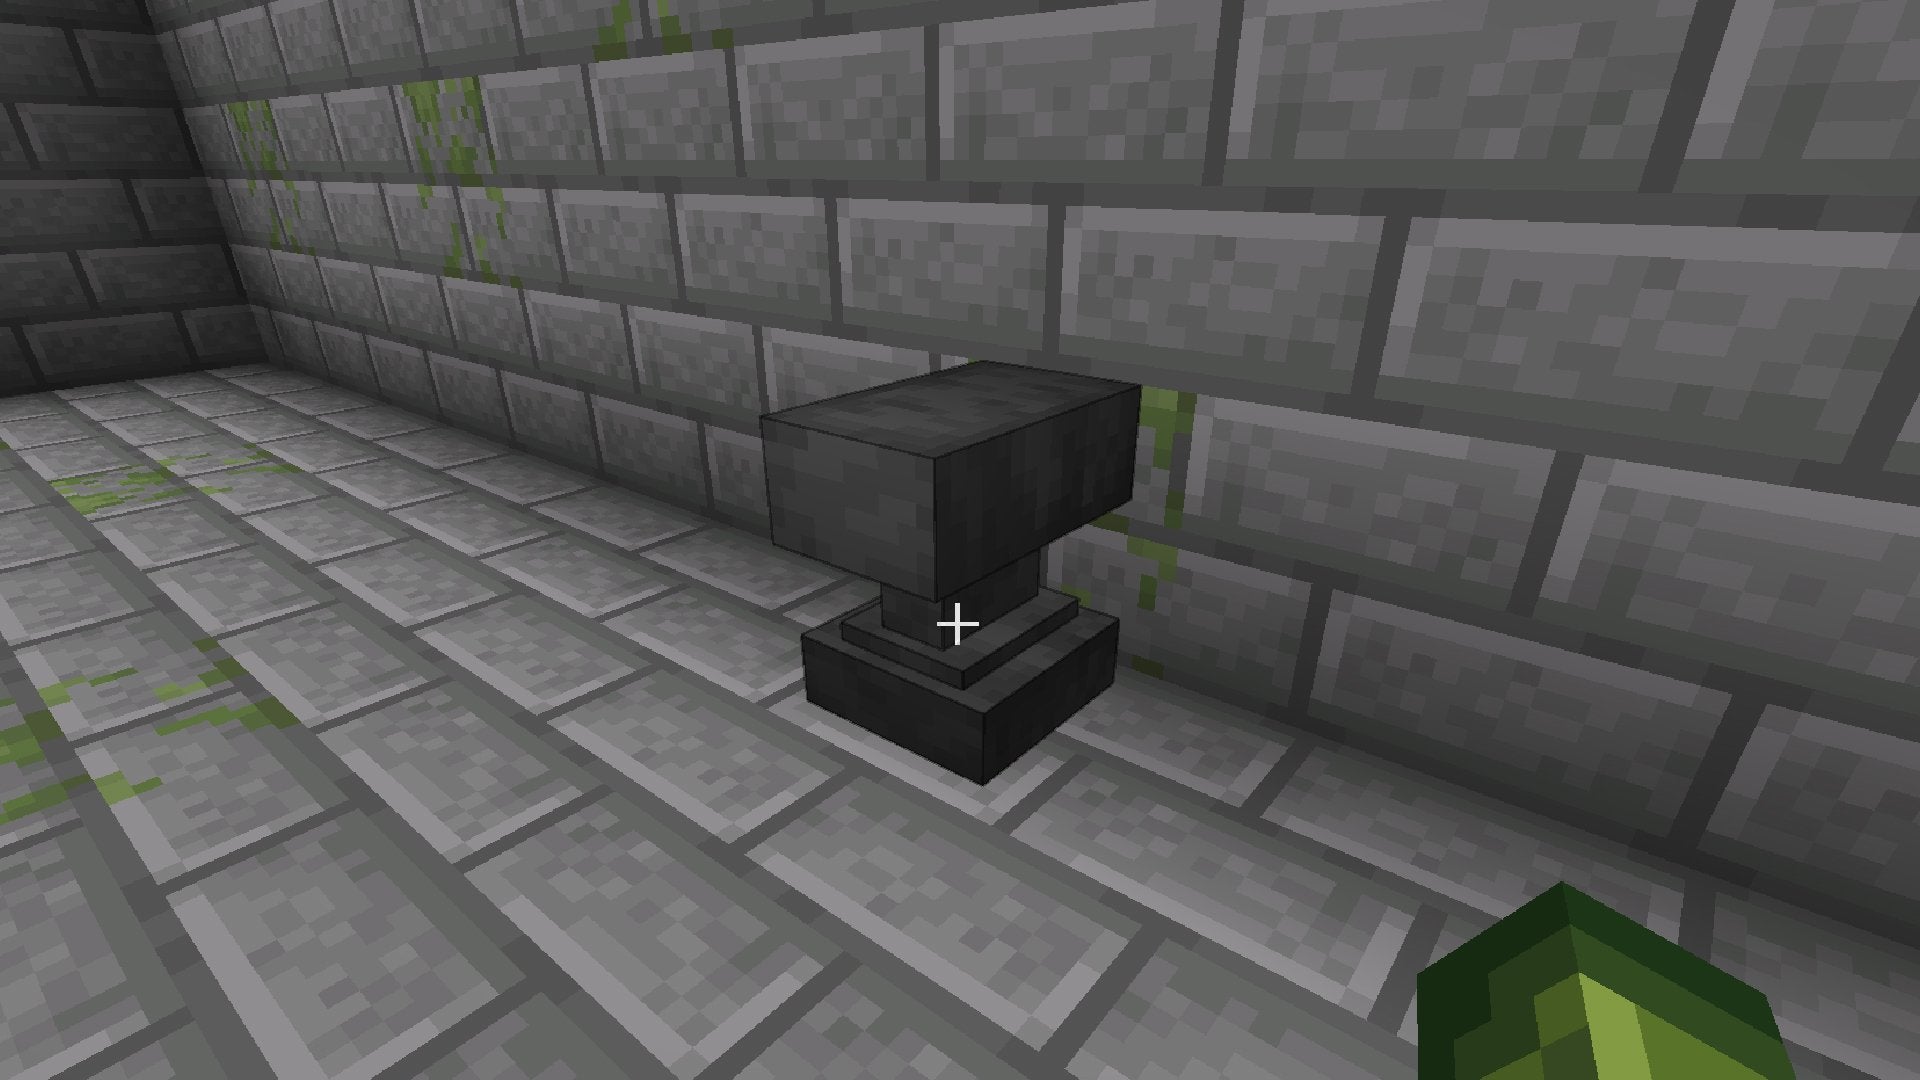
One of the most versatile and useful blocks in Minecraft is the Anvil. On this mass of iron, you can repair your most important items, give them a cool name, and even use it as a substitute for an Enchanting Table in some cases. Thankfully, making an Anvil is easy.
Table Of Contents
How to Get an Anvil in Minecraft
An Anvil in Minecraft is made from three Blocks of Iron and four Iron Ingots. Altogether, you’ll need 31 Iron Ingots to craft an Anvil. Once you have the resources, place the three Blocks of Iron in a horizontal line in the top three slots of a Crafting Table. Afterward, line the bottom three slots with three Iron Ingots. Lastly, place one Iron Ingot in the middle slot and you’ll get one Anvil.
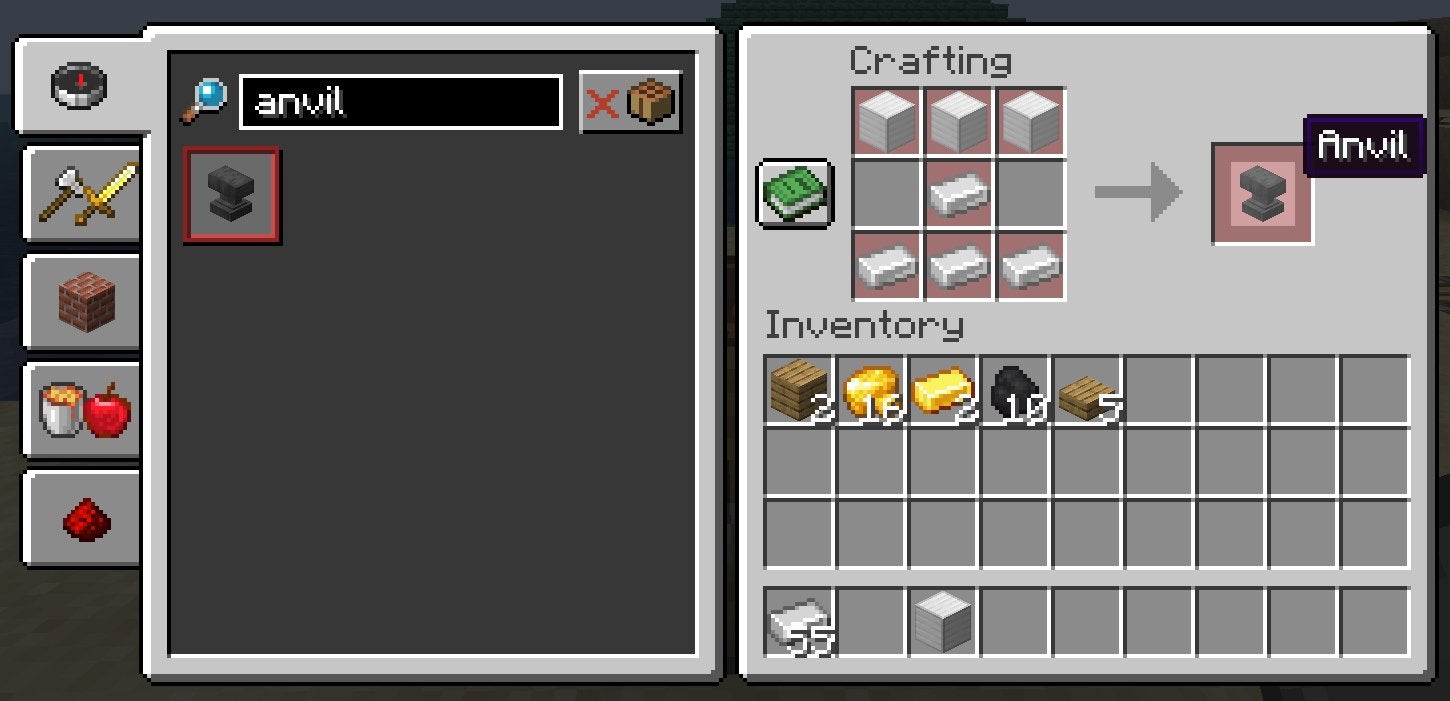
To craft a Block of Iron, place nine Iron Ingots on a Crafting Table. To create an Iron Ingot, you need to smelt Raw Iron in a Furnace. Raw Iron comes from Iron Ore, which you can find by mining underground or exploring stony areas with lots of exposed blocks.
Alternatively, instead of making your own Anvil, you can potentially find one. Damaged Anvils spawn in the forge room of Woodland Mansions; however, these structures are very rare and hard to spot, so getting an Anvil from them is not efficient. Furthermore, the Anvil found in the forge room of Woodland Mansions is damaged. This means it does not have as many uses as a new Anvil you craft yourself. To pick up an Anvil, you must mine it with any type of Pickaxe.
General Tips for Using an Anvil in Minecraft
Before we get into the finer details, there are some general-use concepts you need to know about Anvils.
Anvils Break After a While
Every time you use an Anvil, there’s a 12% chance it’ll get worn down. Moreover, Anvils have three stages of wear and tear. The first time an Anvil gets worn down, it becomes “chipped.” The second time it gets worn down, an Anvil becomes “damaged.” When an Anvil gets worn down in a “damaged” state, it breaks, leaving nothing behind.
Anvils Require Experience Levels to Be Used
You spend Experience Levels when using an Anvil. Depending on the task at hand, certain acts will cost different amounts of Experience.
Repairing items initially does not cost that much Experience, but doing so repeatedly on the same item increases the Experience cost.
Putting Enchantments on items often costs the same as the Enchantment would if being applied to an item on an Enchanting Table. As such, higher-level Enchantments cost more Experience to manipulate on an Anvil.
Items Used on an Anvil Get Work Penalties
When you first repair an item on an Anvil, there is no penalty. However, each time you tinker with that same item again, the amount of Experience you need goes up.
Here’s how the Work Penalties add up over time:
- First Anvil use: no penalty
- Second Anvil use: 1 additional level needed
- Third Anvil use: 3 additional levels needed
- Fourth Anvil use: 7 additional levels needed
- Fifth Anvil use: 15 additional levels needed
- Sixth Anvil use: 31 additional levels needed
After this point, you cannot repair or Enchant an item. This is due to Anvils only being able to accept jobs up to level 39.
Repairing Items on an Anvil
There are two ways to repair items on an Anvil in Minecraft. One technique requires multiples of the same item and the other allows you to use refined metals to patch up your best gear.
Combining Items to Repair Them
The first method is to use the Anvil similarly to how you would use a Grindstone: place two items of the same type on the Anvil’s two input slots. The item in the leftmost slot (the first slot) is the one that does not get consumed. However, the item in the slot to the right (the second slot) will be consumed.
When items are repaired this way, the item in the first slot gets all the durability from the item in the second slot—plus an extra 12%.
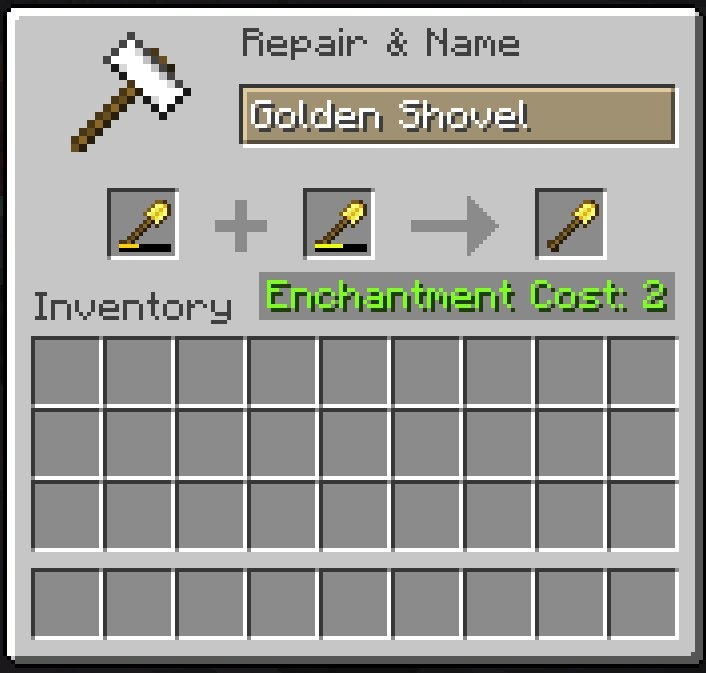
Thankfully, the Anvil interface shows you how many Experience Levels you need per task. This can be noted from the number to the right of “Enchantment Cost.”
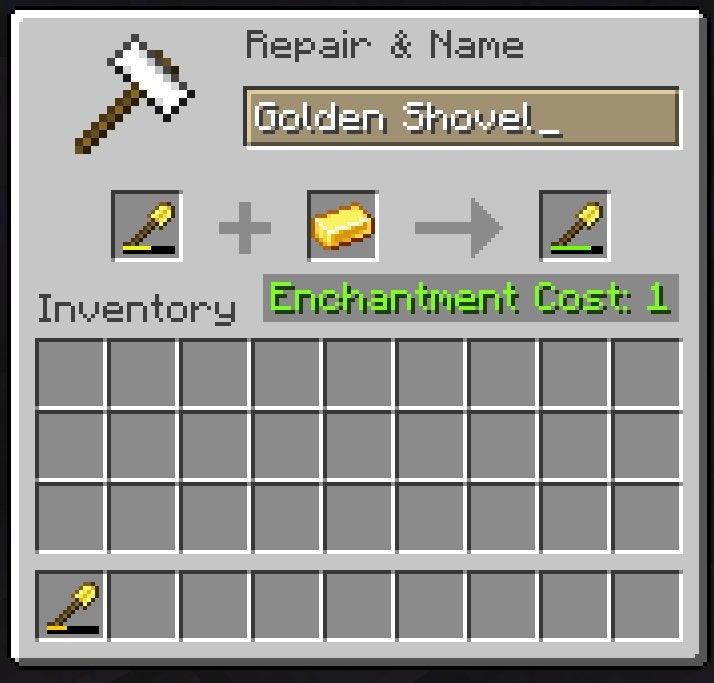
Repairing Items With Base Resources
Depending on the item you want to repair, it may be better to use base resources instead of combining full items. For many types of items (those made of wood, metal, Diamonds, or Netherite), you can use their respective base resources to repair the item in question in increments of 25%.
Let’s say you want to repair a Diamond Chestplate that’s almost completely used up. If you put it on an Anvil alongside one Diamond, you’ll restore 25% of its durability. Or, if you do so with two Diamonds, you’ll restore 50% of its durability. Three Diamonds result in 75% durability restoration and four Diamonds completely repair the Diamond Chestplate.
In the case of items that need a lot of base resources, like Chestplates, Leggings, and Helmets, it’s more efficient to use this method for repairing them. Alternatively, for items that don’t need a lot of base resources to be crafted—like Shovels—combining two of the same items is better for saving on resources.
Here’s a list of general item types and what you need to repair them:
- Wooden tools (including Shields) need Wooded Planks of any type
- Stone tools need Cobblestone or Cobbled Deepslate (or Blackstone in the Java Edition)
- Leather armor needs Leather
- Iron and Chainmail tools and armor need Iron Ingots
- Golden tools and armor need Gold Ingots
- Diamond tools and armor need Diamonds
- Netherite tools and armor need Netherite Ingots
- Turtle Shells need Scutes
- Elytra need Phantom Membranes
Enchanting Items on an Anvil
One of the main differences between Grindstones and Anvils is that Grindstones don’t let you transfer Enchantments, whereas Anvils do. On an Anvil, you can combine two items with different Enchantments to get a product possessing all Enchantments from its predecessors. Keep in mind that some Enchantments cannot be on the same item, like Sharpness and Smite.
What’s more, you can also combine Enchanted Books!
Combing the Enchantments on Items With an Anvil
The Enchantments on an item in the second slot are put onto the one in the first slot. The item in the second slot then gets destroyed.
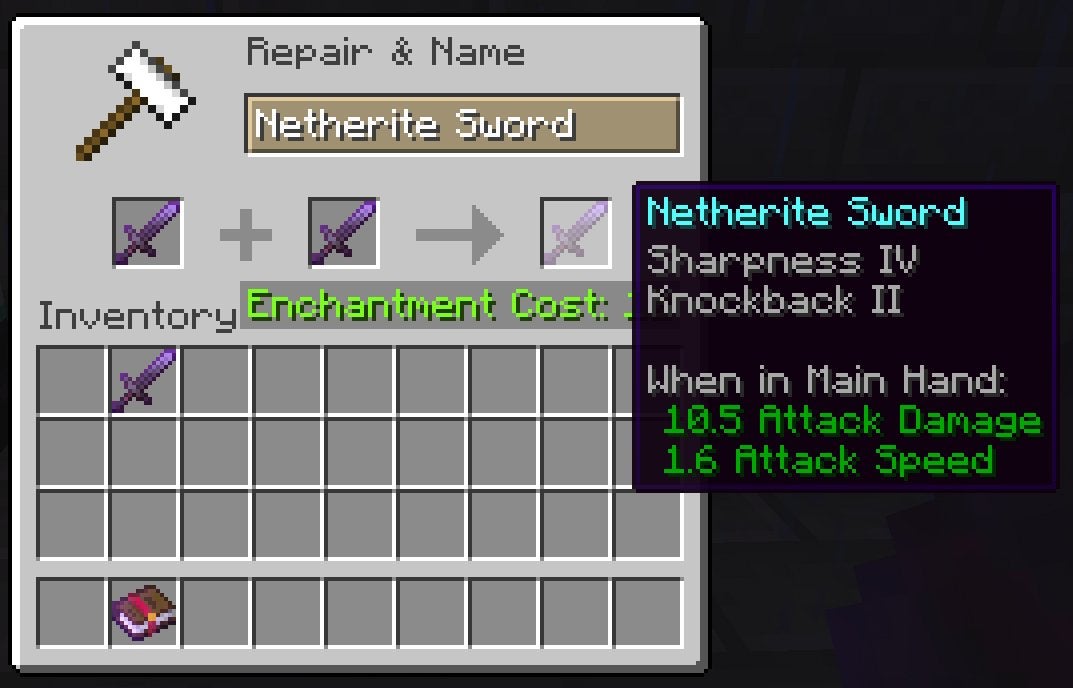
Interestingly, you can increase the level of Enchantments this way as well! If the Enchantments on two of the same item are equal, the item in the first slot will have its Enchantment level raise by one. For instance, two Diamond Swords—that each have Knockback I—will cause the sword in the first slot to get Knockback II.
Alternatively, if the Enchantment on the second item is higher than that on the first item, the first item’s Enchantment level is raised to match that on the item in the second Anvil slot.
To define the process further, you can only combine items of the exact same type for this repair and enchanting method. For instance, you can fuse two Diamond Swords, but you cannot do the same with a Diamond Sword and an Iron Sword.
Merging Enchanted Books
Similar to merging tools and armor, you can also combine Enchanted Books on an Anvil in Minecraft. This lets you increase the level of an Enchantment. Additionally, you can put multiple Enchantments on the same Enchanted Book. This works the same as combining tools and armor, but no durability is restored.
Renaming Items on an Anvil
In the text box at the top of the Anvil’s interface, you can input a name for whatever item you’re working on. This initially costs one level, but the price increases through Work Penalties.
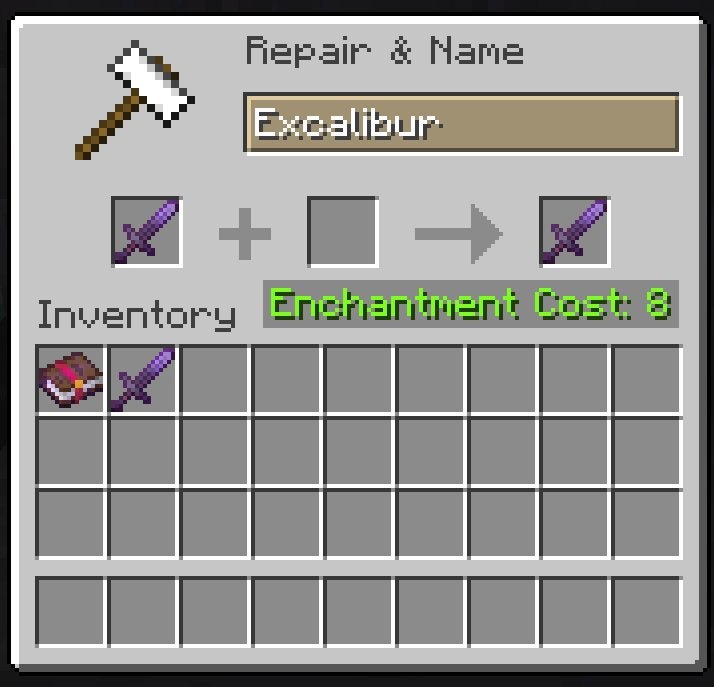
The maximum character limit for naming items in the Java Edition is 50 while in the Bedrock Edition, it’s only 30.
Fun Naming Facts
- You must rename a Name Tag on an Anvil before you can use it to rename something
- Renaming a “Bucket of (insert aquatic mob name)” also renames the mob stored inside
- A Spawn Egg that gets renamed will hatch into a mob with the same name as the one placed on the Spawn Egg
- Named items cannot stack with items of the same type that do not have the same name
Altering Maps With an Anvil (Bedrock Edition-Only)
In the Bedrock Edition of Minecraft, you can use an Anvil to increase the size of a Map as well as clone it. Map size increase in this manner is done by placing a Map on the first slot of an Anvil and then putting eight pieces of Paper in the second slot.
To clone a Map on an Anvil, place the Map you want to clone in the first slot. Next, place an Empty Map in the second slot.
You can also create a Locator Map on an Anvil. Simply place a Map in the first slot and a Compass in the second slot to do so.
Using an Anvil to Make a Funny Trap
Similar to Sand and Gravel blocks, Anvils fall if there’s nothing underneath them. If a falling Anvil lands on a player or mob, it deals damage proportional to the distance it falls.
For every one block of space an Anvil falls (beyond the first), it deals one Heart of damage. As such, an Anvil that falls two blocks before landing on a living entity reduces that entity’s health by one Heart. This keeps increasing until a cap of 20 Hearts worth of damage (a fall the distance of 21 blocks).
The damage from a falling Anvil gets reduced by 25% if the entity it lands on is wearing a Helmet. The type of Helmet is irrelevant.
Hilariously, if a player is killed by a falling Anvil, the death text states that they were “squashed by a falling anvil.”
With a bit of creative planning, you can drop an Anvil on your friends to take them out in the most cartoony way possible!
Blocking TNT Explosions With an Anvil
If you’re not satisfied with dropping an Anvil on someone as a prank, there’s more you can do!
When an Anvil is placed on a block of TNT, and that TNT explodes, the Anvil will fall into the previously occupied spot. When this happens, the explosion can’t extend beyond the initial explosion site, as the Anvil immediately blocks the path outwards when it falls into the space where the TNT was located. This results in the explosion going off but no damage being done to the surroundings.
As such, if your friend is about to do some blast mining, you can place an Anvil on top of their TNT block to prevent the usual effects of an explosion. Better yet, this doesn’t damage the Anvil at all!
With so many functional—and entertaining—uses for an Anvil in Minecraft, you’ll want to make at least a few. While you’re at it, make sure to craft a Smithing Table as well for all your tool and armor enhancement needs!