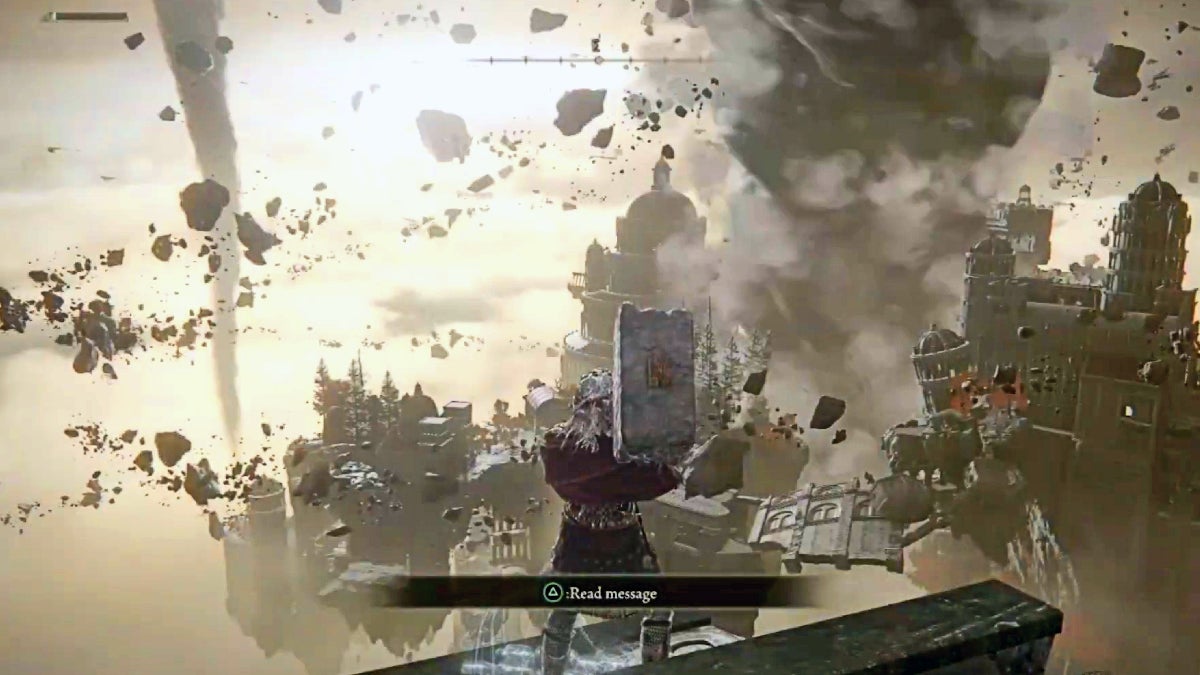
At the Four Belfries, the first teleporter will lead you to the windy outskirts of Crumbling Farum Azula. Here, you’ll find a pair of powerful foes guarding an excellent talisman. You’ll also witness an impressive sight in the distance.
Table Of Contents
If you need more visual references for topics mentioned in this article, check out the video below:
What You’ll Need to Activate the First Teleporter
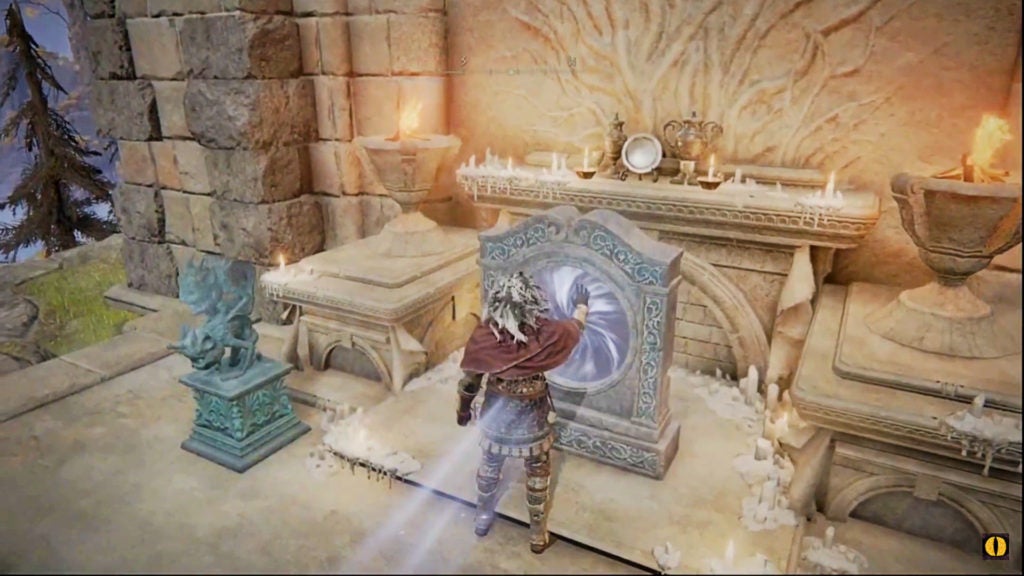
Like the other two teleporters at the Four Belfries, you’ll need an Imbued Sword Key to activate this one. There are three such items in the entire game, however, one is located very nearby. At the base of the fourth belfry, you’ll find a chest with one Imbued Sword Key in it. Simply insert this magic blue key into the head of the stone imp statue to unlock a teleporter.
To get the other two Imbued Sword Keys, you’ll have to explore the Academy of Raya Lucaria and Sellia, Town of Sorcery. The key in Raya Lucaria can be found on a corpse in the tower of a rooftop area. And the one in Sellia can be found in the northeasternmost sealed chamber. However, to drop the blue barrier, you’ll need to light the town of sorcery’s tower braziers.
When you get through the first teleporter, be ready for a bit of parkour and a pair of powerful foes.
Drop Down Path to the Beastmen (00:40 in the Video)
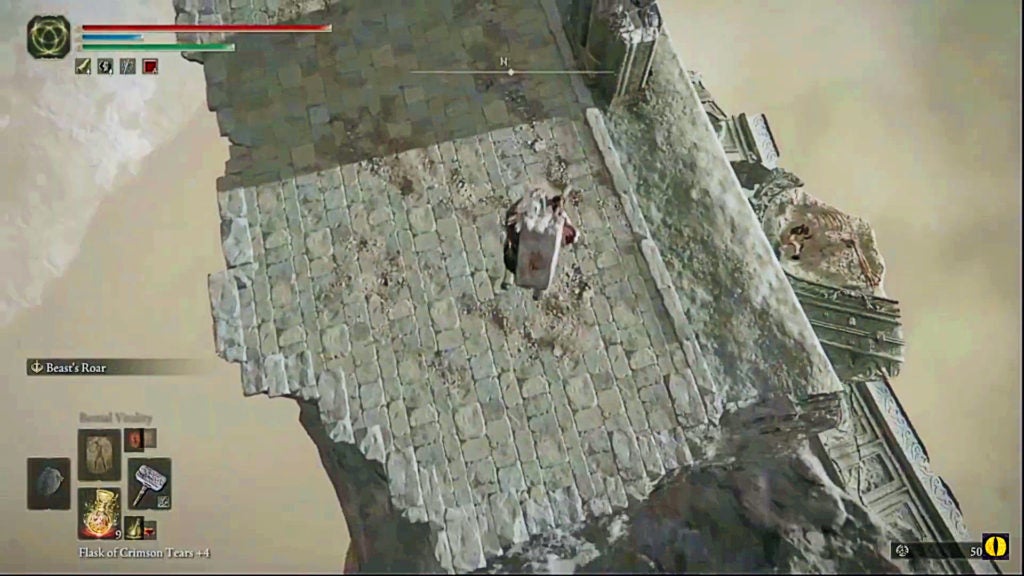
When you spawn into the floating outskirts of Crumbling Farum Azula, go north and jump to the floating bit of ruins below you. Afterward, turn east and peek over the edge. You’ll see a broken piece of a wall depicting a skeletal beast of some sort. Drop down to this floating platform carefully.
If you miss the jump here, you’ll either die from fall damage or take a lot of it, depending on where you land. The area below this floating platform is actually a descending slope. As such, landing further east will be more likely to kill you, as that side is further down.
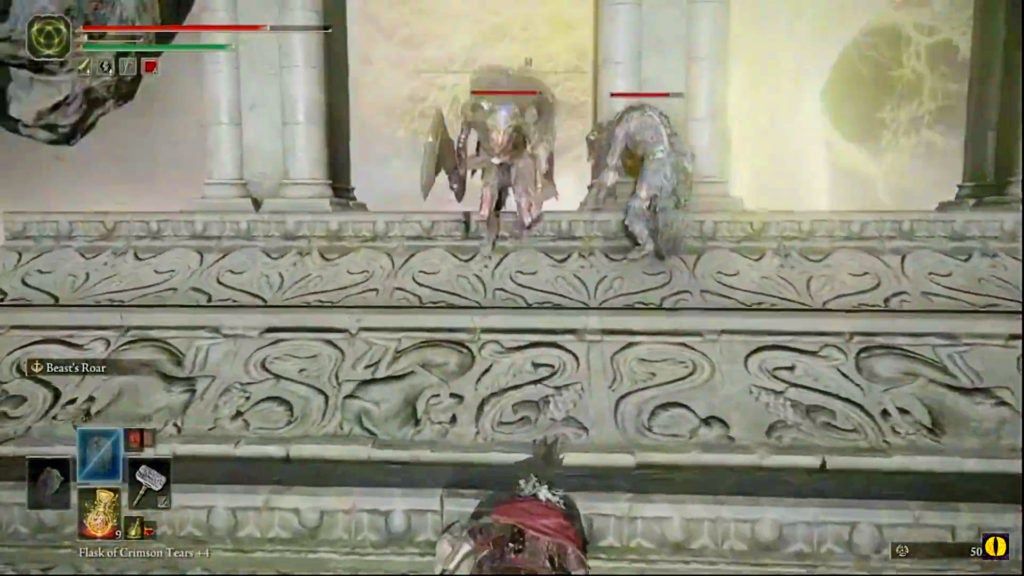
Weaken or Kill the Beastmen With Ranged Attacks
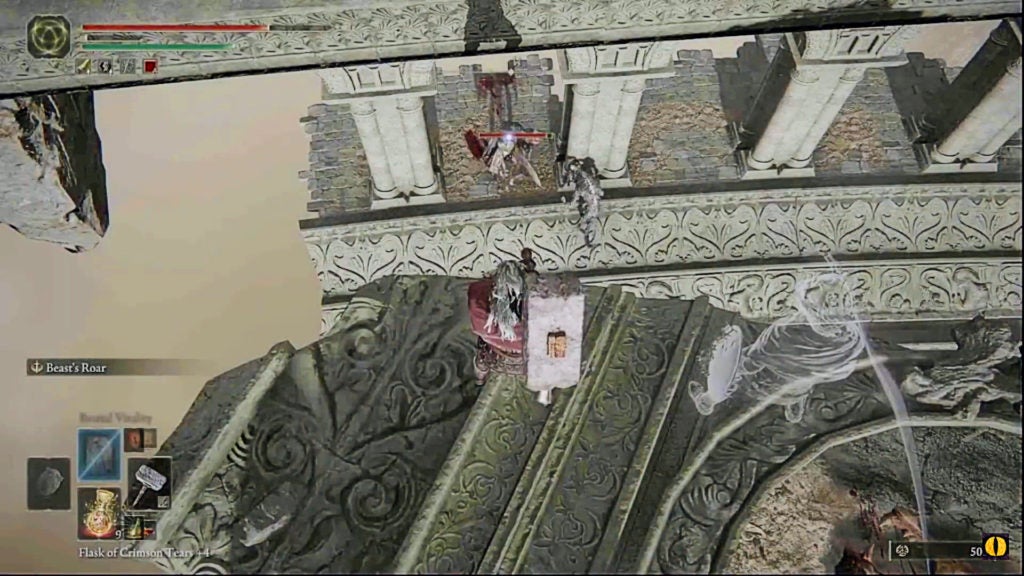
From this vantage point, you have a great spot to snipe the beastmen below. There will be one with a greatsword and another with a ranged weapon. A two-on-one fight against both of these fierce foes can go bad very quickly—especially in an area where there are many places to fall to your doom.
As such, if you have any ranged attacks, now would be the time to use them. Ranged weapon builds and spellcasters should have an easy time taking out one or both of the beastmen at this point. However, melee builds will have to get their hands dirty—as usual.
When you’re ready to go head-to-head with the beastmen, drop down the west side of the floating platform. If you can, try to land a jumping attack on one of the beastmen—especially the smaller one with the ranged weapon.
How to Beat the Two Beastmen in Melee Combat
While facing both beastmen at once can be a challenge, there are some combat tactics that can help a lot here:
- Take out the weaker for first (evens the odds)
- Get rid of ranged threats (decreases overall HP and stamina loss)
- Use the terrain to your advantage (lots of instant-death drops nearby)
In this specific scenario, the smaller beastman is both the weaker foe and the one causing ranged threats. As such, your first priority should be to slay the beastman who hurls sharp objects at you. Thankfully, this target has a fair deal less HP than the beastman with the greatsword.
How to Take Out the Small Beastman Quickly (01:00 in the Video)

However, less HP than the big brute is still a fair bit. The smaller beastman has about 1,500 HP that you’ll need to deplete. Prior to jumping down to the beastmen, make sure to buff your weapon if you can. Fire damage seems to be particularly effective against beastmen in Elden Ring. As such, Fire Grease is a great weapon coating to use at this point.
The smaller beastman will constantly jump back or to the side to get away from you—all while chucking sickles your way. Between the sickle-throwing and greatsword attacks, you’ll need to dodge quite a lot. For this reason, stamina-enhancing items and equipment can be useful to equip prior to this battle.
You’ll want to be aggressive and stay on the move, as both beastmen are relentless with their attacks. Continuously moving will make it harder for the foes to track you and will also let you keep up with the smaller beastman easier.
Running attacks and rolling attacks are especially helpful for getting hits on the ranged beastman. Running attacks can be performed by using your normal attack while running. Furthermore, rolling attacks can be performed by using a normal attack while you are coming out of a dodge roll.
How to Take Out the Big Beastman (01:35 in the Video)
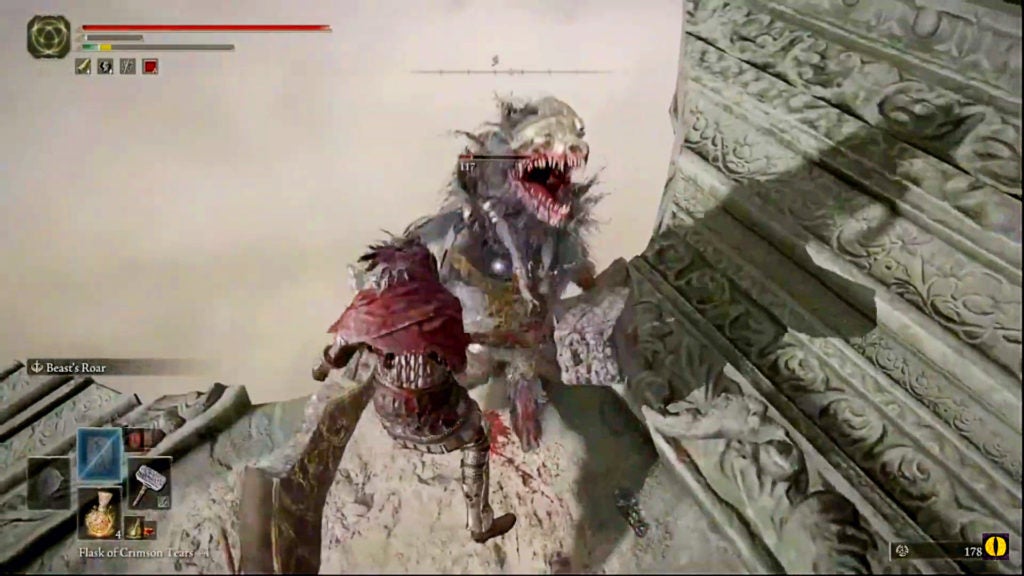
If you’ve fought the Beastman of Farum Azula boss in the Groveside Cave within Limgrave, you’ll be fairly prepared for this foe. This Azula beastman is identical to that early-game boss in terms of moveset. As such, you can use whatever tactics you used on that boss in this confrontation.
With that said, this beastman will have about twice as much health as that boss. The Beastman of Farum Azula in Groveside Cave has about 2,000 HP whereas this beastman has close to 4,000 HP.
Depending on your build, different strategies will work better. For dexterity builds, it’s recommended to dodge through or parry the beastman’s attacks. Although the foe wields a greatsword, many of its attacks can be parried. Additionally, using an upgraded version of the parry skill, such as Thop’s Barrier or Carian Retaliation, can yield better results.
For strength builds, you’ll want to activate your beast-mode against this beastman. Despite being a bit larger than you, this Azula beastman has pretty low poise. Due to this, you can stunlock them if you have a big enough weapon. Greatswords, greataxes, great hammers, and colossal weapons would be ideal to use for this tactic. Hitting the beastman hard enough can also break their guard and allow you to perform a critical attack on them for big damage. Two-handing your weapon will further enhance this strategy.
Unlike the smaller beastman, this bigger one isn’t quite as good with its positioning. As such, the fiend will sometimes jump right up against the edge of a deathly drop. If you can push them back at this point, you may be able to knock them into the swirling skies below.
Where to Find the Pearldrake Talisman (02:50 in the Video)
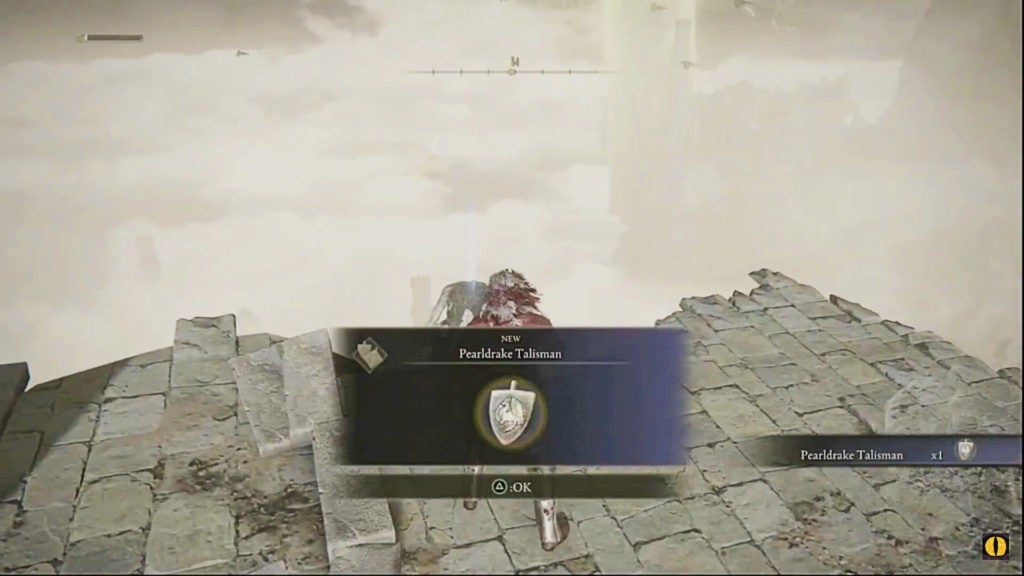
After you clear the area of enemies, head north and peek downwards to spot another platform made from debris. There are no more foes here, so it’s safe to jump down. On the western edge of this platform, you’ll find a corpse holding an item. Looting this body will give you the Pearldrake Talisman, which is one of the better overall talismans that you can find in the early or mid-game.
What the Pearldrake Talisman Does
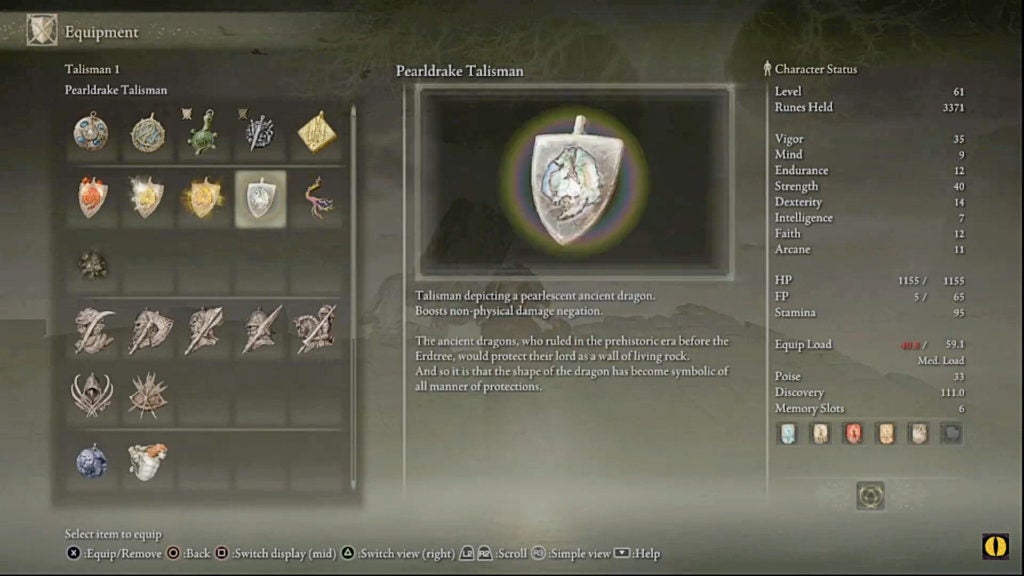
Like other ‘drake’ talismans, the Pearldrake Talisman increases defensive stats. However, unlike the others, this one gives you higher damage negation versus multiple damage types. This is due to the Pearldrake Talisman increasing your damage negation stats versus magic, fire, holy, and lighting-type damage. It will increase damage negation for these specific defensive stats by four to five points each.
For these universally increased defenses, the Pearldrake Talisman is a great item to have equipped when you’re exploring and don’t know what threats to expect. Furthermore, you can equip the Pearldrake Talisman and another ‘drake’ talisman at the same time. Additionally, their effects will stack, which further increases the viability of such talismans.