![]() Key Takeaway
Key Takeaway
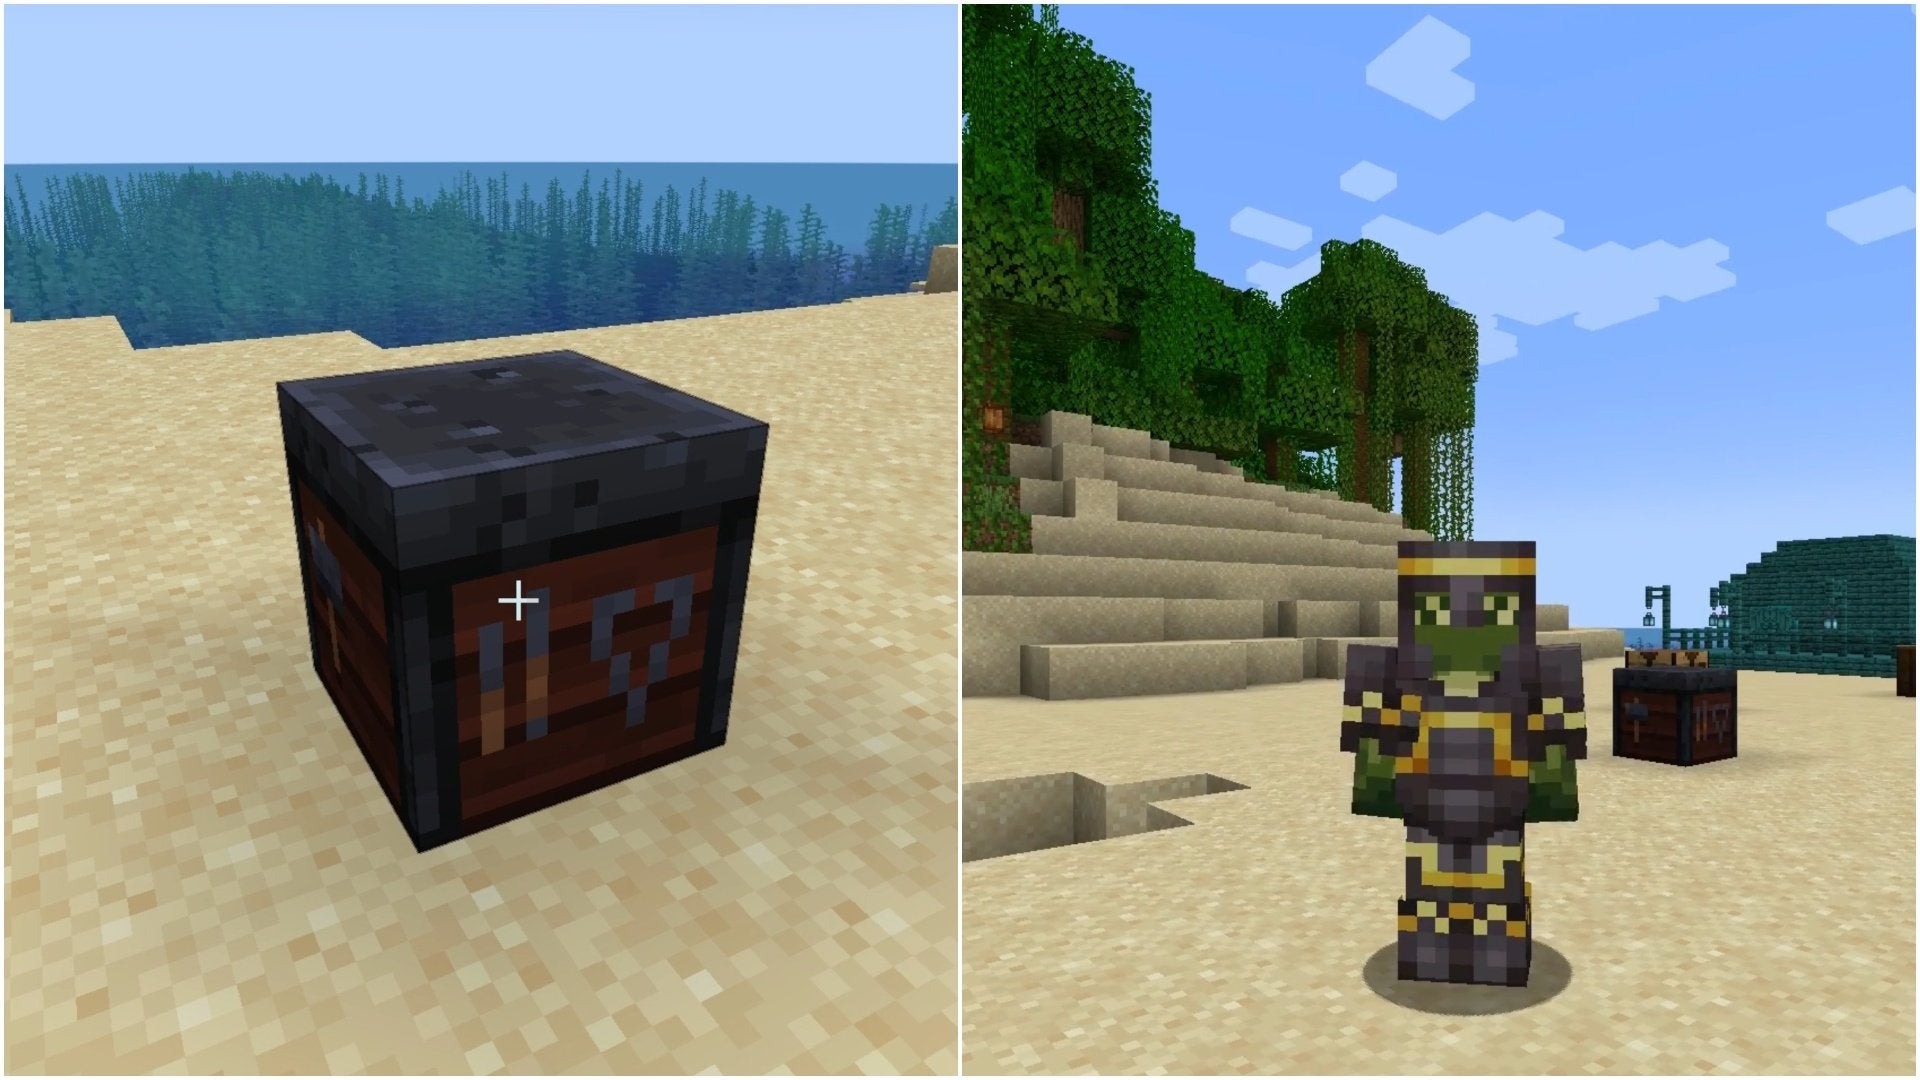
Here’s everything a Smithing Table can be used for currently in Minecraft:
- Upgrading Diamond tools and armor into Netherite
- Putting Armor Trims onto pieces of armor
- Turns unemployed Villagers into Toolsmith Villagers
- Can be used as fuel in a Furnace
- Be placed under a Note Block to create a bass sound
The next time you walk by a Village’s Smithing Table in Minecraft, consider taking it. Not only can it upgrade Diamond tools and armor into something better, but it can also beautify your best equipment! However, for these feats, you’ll need specific Smithing Templates.
Table Of Contents
How to Get a Smithing Table in Minecraft
Although the top-tier armor and tools in Minecraft are hard to get, a Smithing Table is not! You can make a Smithing Table on a Crafting Table by placing four Wood Planks (any kind) in a square before putting two Iron Ingots above the wooden square. In the end, the recipe is 2×3 in size. Since Wood Planks and Iron Ingots are relatively easy to get, you can make a Smithing Table in no time!
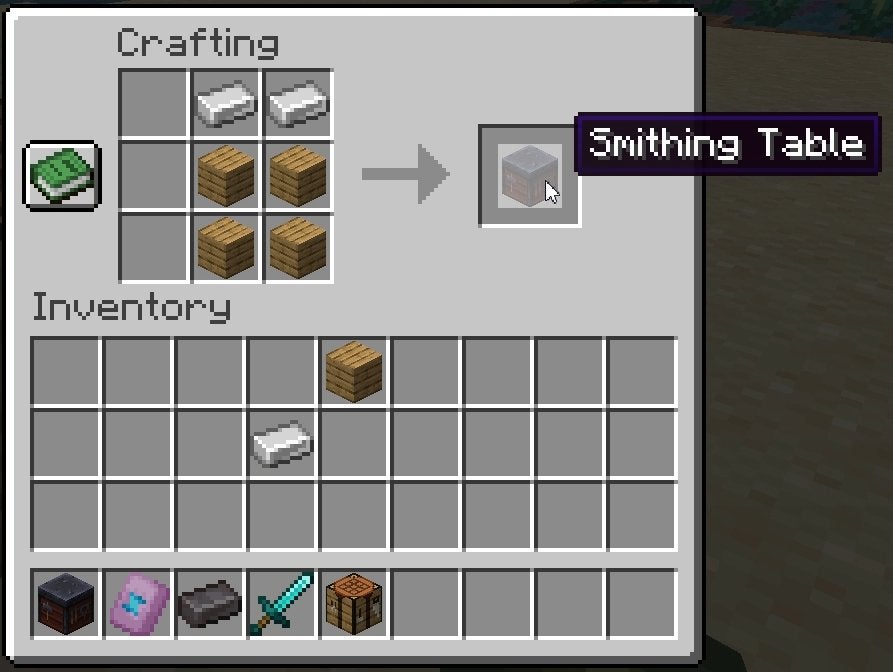
Alternatively, you can always take one from a Village, as Smithing Tables naturally spawn in the houses of Toolsmith Villagers. On top of that, if you get lucky, you can also find a Smithing Table in Trail Ruins.
Upgrading Diamond Gear Into Netherite With a Smithing Table
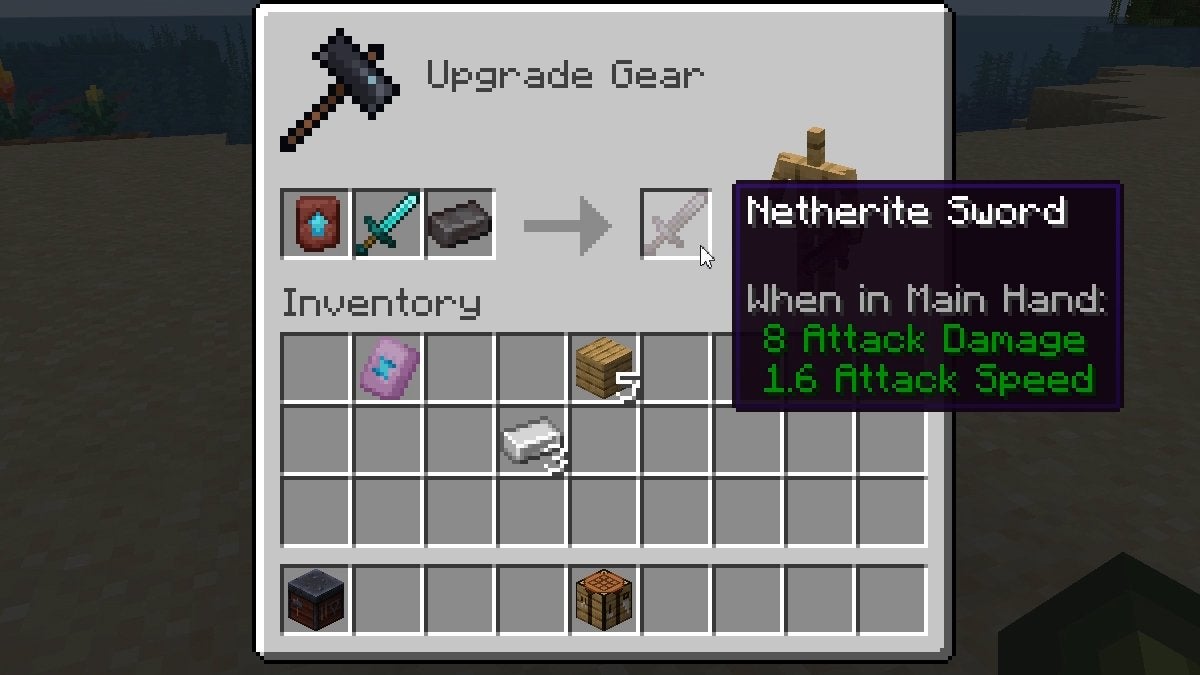
To upgrade Diamond tools and armor into Netherite, you need a Netherite Upgrade Smithing Template, the piece of Diamond gear you want to upgrade, and a Netherite Ingot. Once you have these components, you must combine them all on a Smithing Table. Each item has its own slot: the Netherite Upgrade Smithing Template goes on the far left, the piece of equipment goes in the middle, and the Netherite Ingot goes on the right.
After you slot everything into its proper place, a Netherite item appears to the right of the arrow. Pick it up to claim your gorgeous new piece of gear!
How to Get a Netherite Upgrade Smithing Template
The only way to get a Netherite Upgrade Smithing Template is to find one in a Chest of a Bastion Remnant. Bastion Remnants are structures that only spawn in the Nether. They can be generated in any Nether biome except Basalt Deltas.
How to Get a Netherite Ingot
Similar to obtaining a Netherite Upgrade Smithing Template, you’ll need to scour the Nether for materials to craft a Netherite Ingot. Specifically, you need to look for Ancient Debris in the Nether. Once you find some Ancient Debris, you must mine it with a Diamond Pickaxe to acquire it.
Keep in mind that Ancient Debris never spawns touching open air; it’s always buried. Ancient Debris spawns in two clusters per chunk: one group of one to three blocks between levels 8 and 24, and another group of one to two between levels 8 and 119.
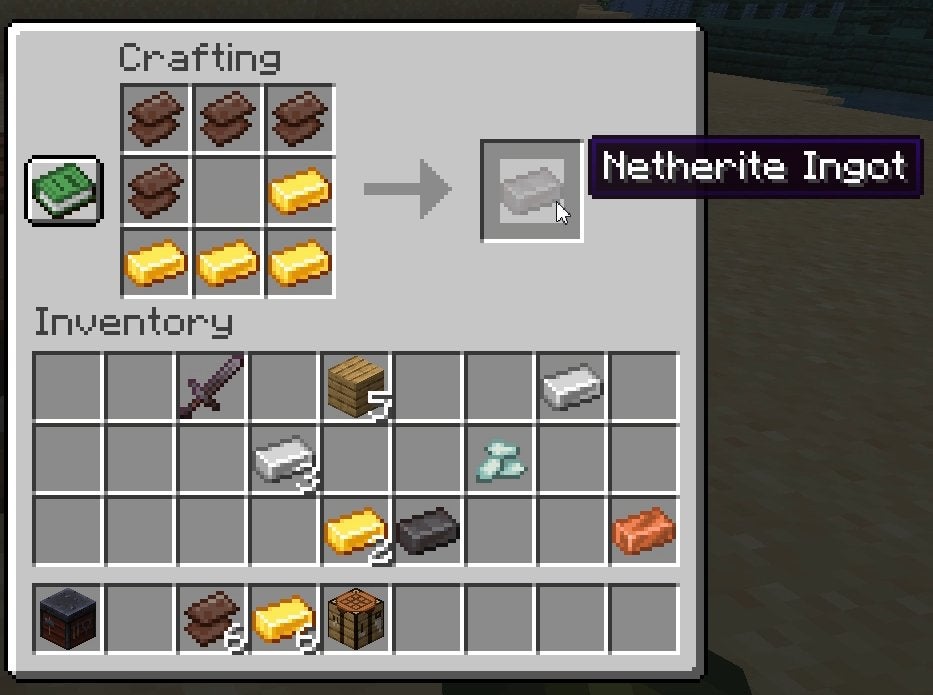
Following the acquisition, you’ll then need to smelt the Ancient Debris in a Furnace to get one Netherite Scrap per smelted Ancient Debris. However, that’s not quite the end of the process—unfortunately. You need four Netherite Scraps (which means finding at least four Ancient Debris blocks) for one Netherite Ingot.
Lastly, you have to get Gold Ingots as well. The best way to get Gold Ingots is to combine the plentiful Gold Nuggets you can harvest from Nether Gold Ore. It takes nine Gold Nuggets to make one Gold Ingot. Furthermore, it takes four Gold Ingots—combined with four Netherite Scraps—to craft one Netherite Ingot.
How to Put Armor Trims on Armor With a Smithing Table
To put Armor Trims on your armor, you need to combine it with an Armor Trim Smithing Template on a Smithing Table. This process is very similar to upgrading your Diamond gear into Netherite. You can do this with Helmets, Chestplates, Leggings, and Boots.
You place the Armor Trim Smithing Template on the far left slot of a Smithng Table, the bit of gear you want to enhance in the middle slot, and the material you plan to use as the trim on the right slot. The trimmed piece of equipment appears in the slot right of the arrow.
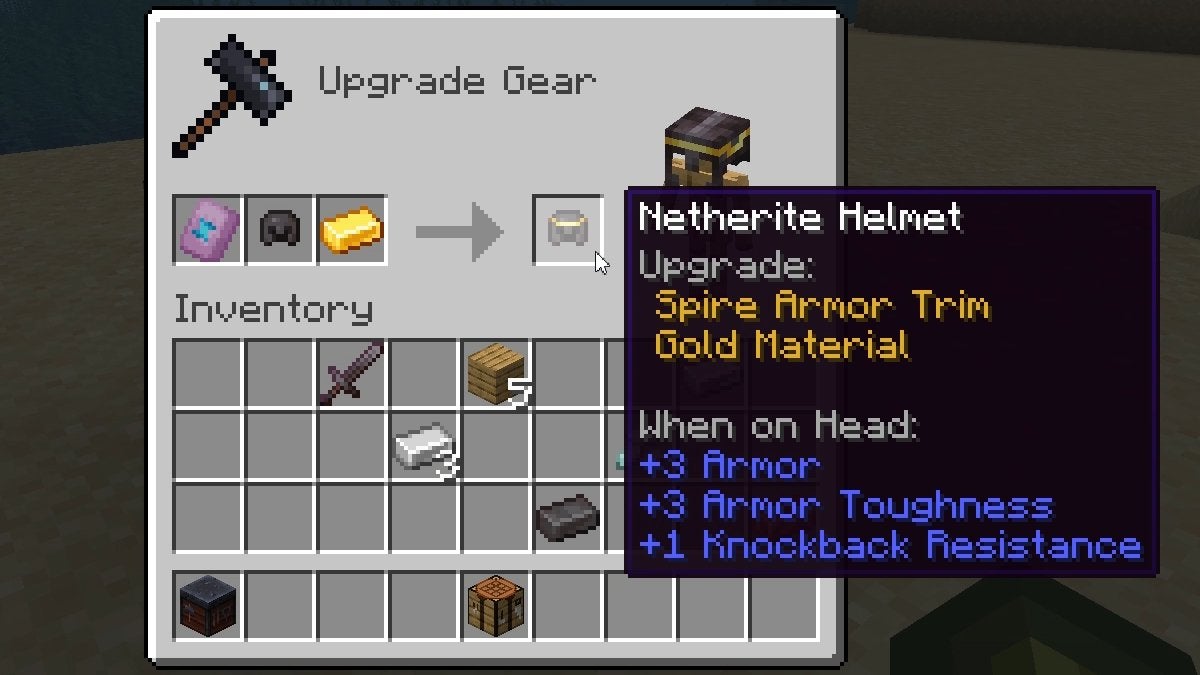
In the Smithing Template slot, you can put any type of Armor Trim Smithing Template to apply trims to a piece of armor. Then, in the equipment slot, you can only put pieces of armor—you can’t put trims on tools, unfortunately. Lastly, you can only use 10 different materials for trim colors.
Here’s every type of material you can use for Armor Trims and what color they give you:
- Redstone Dust: Red
- Copper Ingot: Orange
- Gold Ingot: Yellow
- Emerald: Green
- Diamond: Cyan
- Lapis Lazuli: Blue
- Amethyst Shard: Purple
- Nether Quartz: White
- Iron Ingot: Silver
- Netherite Ingot: Black
How to Get Armor Trim Smithing Templates
Armor Trim Smithing Templates can be found in the Chests of various structures. Furthermore, you can dust Suspicious Gravel with a Brush to uncover more near Trail Ruins. Here’s every type of structure that has Chests that may contain Armor Trim Smithing Templates:
- Ancient City
- Bastion Remnant
- Desert Temple
- End City
- Jungle Temple
- Nether Fortress
- Pillager Outposts
- Shipwreck
- Stronghold
- Woodland Mansion
You have a 20% chance to get one Tide Armor Trim Smithing Template when you kill an Elder Guardian. Three Elder Guardians can be found in each Ocean Monument. Ocean Monuments can spawn in the following aquatic biomes:
- Deep Ocean
- Deep Lukewarm Ocean
- Deep Cold Ocean
- Deep Frozen Ocean
Thankfully, you can also duplicate Smithing Templates on a Crafting Table. To do so, place one in the top-middle slot of a Crafting Table before putting one piece of the required material for that template in the center slot. Afterward, fill the other seven slots with Diamonds. This outputs two of the inputted Smithing Template from the rightmost slot.
Here’s the required material for duplicating all Smithing Templates:
- Netherite Upgrade and Rib Armor Trim: Netherrack
- Sentry, Vex, and Coast Armor Trims: Cobblestone
- Wild Armor Trim: Mossy Cobblestone
- Dune Armor Trim: Sandstone
- Wayfinder, Raiser, Shaper, and Host Armor Trims: Terracotta
- Ward and Silence Armor Trims: Cobbled Deepslate
- Tide Armor Trim: Prismarine
- Snout Armor Trim: Blackstone
- Eye Armor Trim: End Stone
- Spire Armor Trim: Purpur Block
Turning Unemployed Villagers Into Toolsmith Villagers
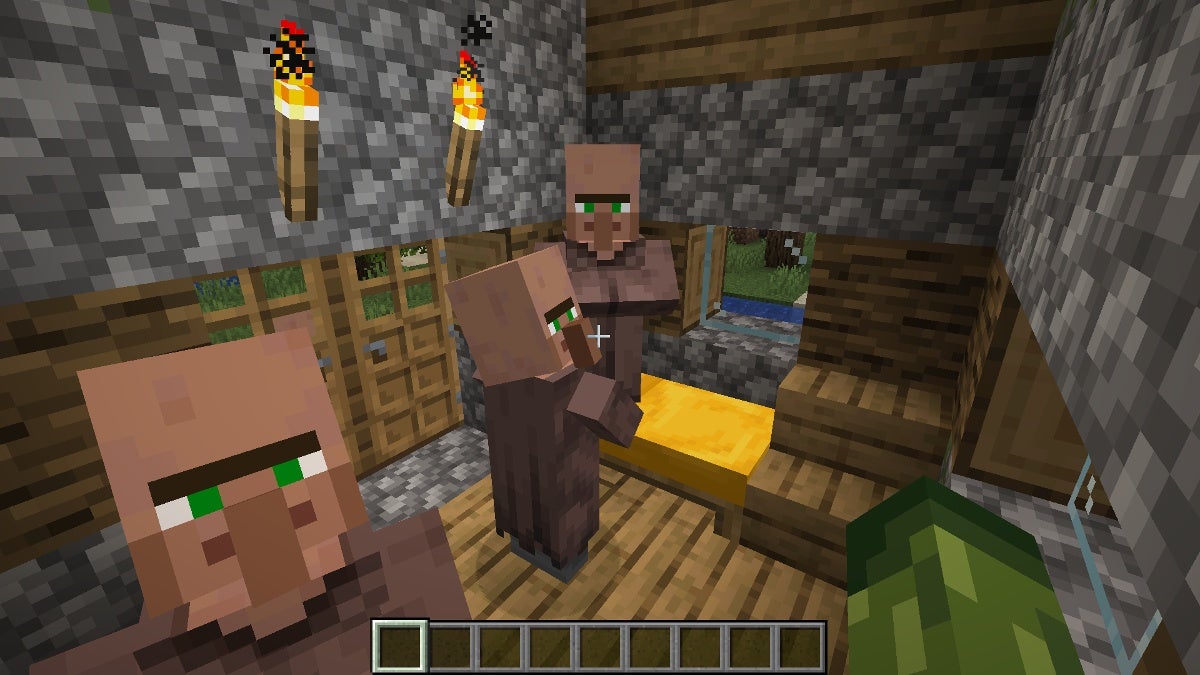
Besides the armor customization aspects of using a Smithing Table in Minecraft, you can also use it to turn unemployed Villagers into Toolsmith Villagers. To turn an unemployed Villager into a Toolsmith Villager, place a Smithing Table near an unemployed Villager and wait until they touch it.
To make sure that the unemployed Villager doesn’t wander off, you can trap them in a house with a Smithing Table by replacing the door with Cobblestone or Dirt blocks. You can free them once they turn into a Toolsmith Villager.
Other Uses for Smithing Tables in Minecraft
While these last two uses are far more mundane, you never know when such knowledge may be helpful!
Since Smithing Tables are mostly made of wood, you can use them as fuel in a Furnace. Doing so lets you smelt or cook one and a half items. We don’t recommend you do this unless you’re desperate, as it’s not an efficient use of resources—particularly of the two Iron Ingots that went into crafting the Smithing Table.
You can put a Smithing Table under a Note Block to produce a bass sound. Use this alongside Note Blocks placed over different blocks to play a Minecraft symphony!
We’re glad that the humble Smithing Table has gained more and more uses in Minecraft over the years. From being literally useless to becoming a Job Site Block to then evolving into a device to trick out your armor and tools—the Smithing Table has come a long way! We can’t wait to see what new and cool functions the developers give other less-than-handy Job Site Blocks. We’re looking at you, Fletching Table!


