After you exit Level 5 – Catfish’s Maw, you’ll need to search the Ancient Ruins north of Yarna Desert for a key. This key, the Face Key, will let you unlock the entrance to the sixth dungeon. However, before going to the ruins, you can use the Hookshot to complete the trading quest and acquire some important items!
Table Of Contents
Complete the Trading Quest to Get the Magnifying Lens
In terms of trading quest progress, you should have the Hibiscus at this point in the game. The flower was obtained from giving Papahl a Pineapple on the Tal Tal Mountain Range. However, for the next step in the sequence, you’ll need to head to Animal Village.
Trade the Hisbiscus for a Goat’s Letter in Animal Village
When you teleport back to Animal Village’s Warp Point, go to the house just east of the colorful one. This will lead you into the home of Christine the goat. if you talk to her while you have the Hibiscus, she will entrust you to deliver an important message for her.

Trade the Goat’s Letter for a Broom Northwest of the Mysterious Forest
Christine will ask you to deliver the Goat’s Letter to Mr. Write, who lives just northwest of the Mysterious Forest. The quickest way to Mr. Write’s home is from the Warp Point north of Dampé’s shack.
From there, go west through Goponga Swamp and past the Telephone Booth. From the south, you’ll have to leap across a few small holes in the ground.
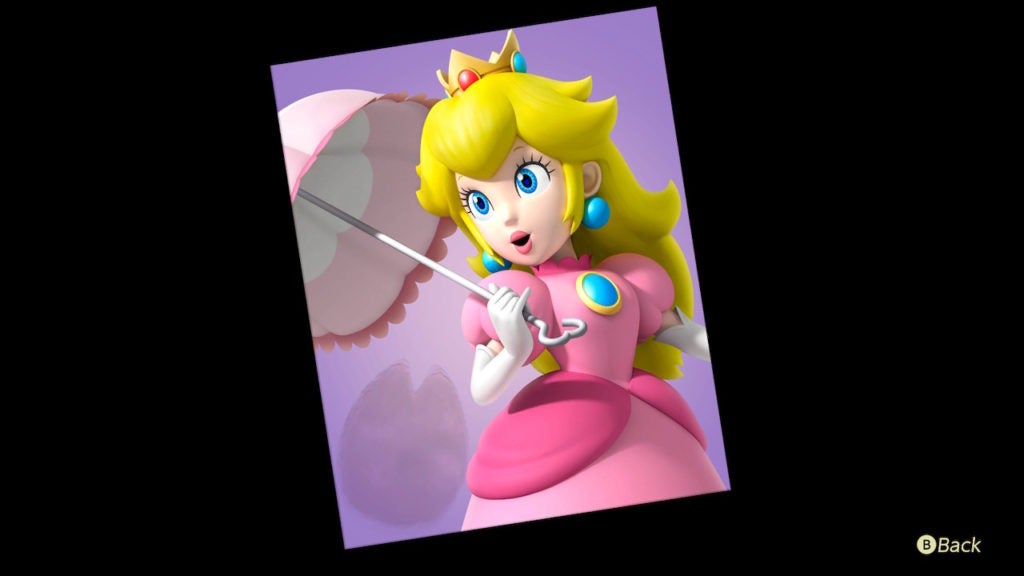
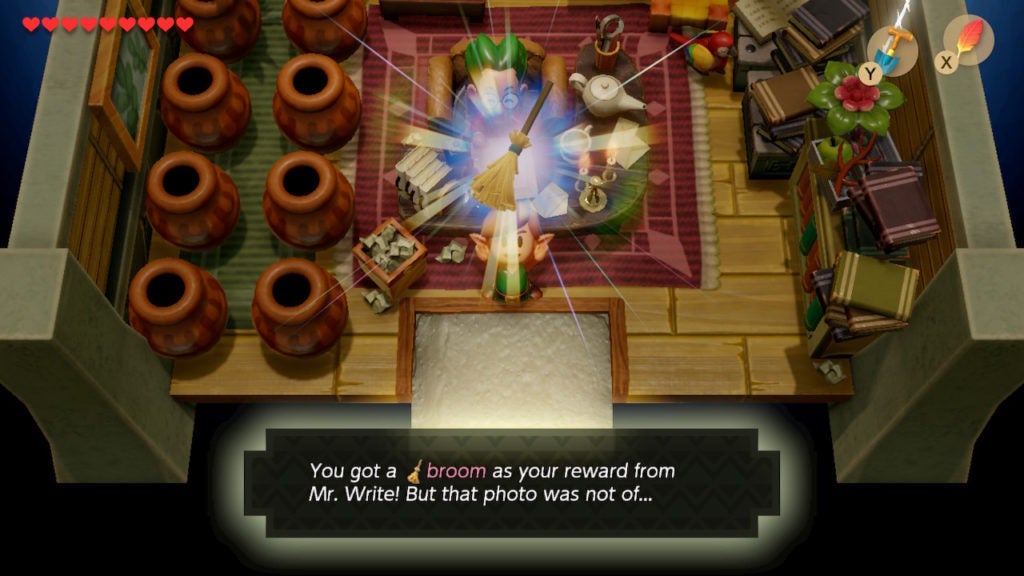
Enter the house and speak with Mr. Write for some…interesting dialogue. It’ll become obvious that Christine and Mr. Write’s interactions are less than truthful, with Christine pretending that she is not a goat. With the letter, she even includes a photo of someone that she claims is her but is actually just a photo of Princess Peach (with a hoof print in the bottom left corner).
Mr. Write will be happy to receive the Goat’s Letter and will reward you. However, since he doesn’t have too many possessions of value, he gives you a Broom. You should now leave Mr. Write to respond to his pen pal. It’s time to use the Broom for the next step in your trading quest.
Trade the Broom for a Fishing Hook in Mabe Village
You’ll need to go to Mabe Village for the next step. Here, you’ll need to seek out Grandma Yahoo in front of Old Man Ulrira’s house. When you speak to her while possessing the Broom, you can trade it to her in exchange for a Fishing Hook.
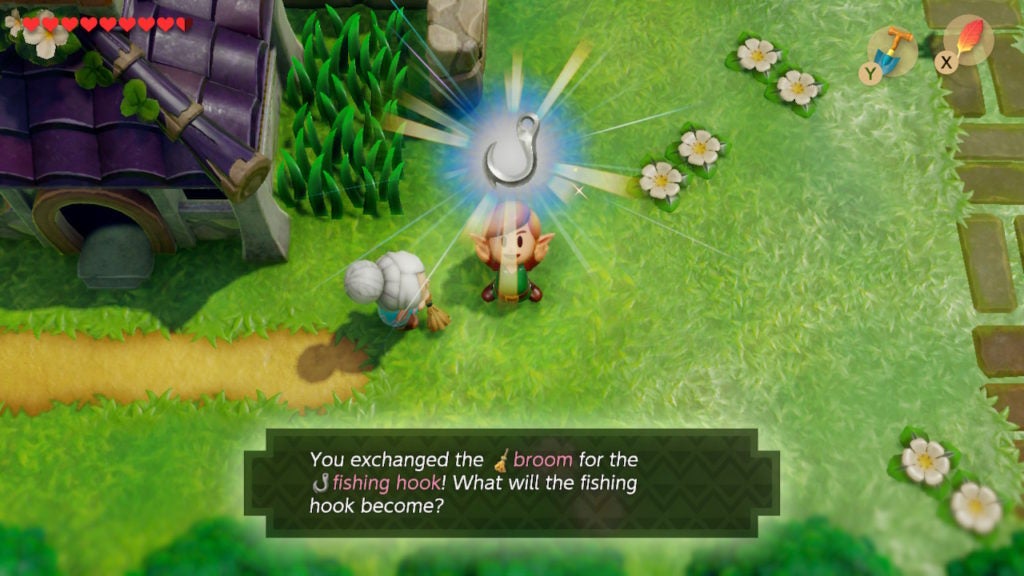
Afterward, you’ll need to bring the Fishing Hook to a fisherman for the next trading quest item. However, the angler you seek is not the one in Mabe Village.
Trade the Fishing Hook for a Necklace in Martha’s Bay
There are 2 potential ways that are both pretty efficient for getting to the spot where the Fisherman is hanging out in Martha’s Bay. They will be under a bridge to the southeast of the entrance to Level 5 – Catfish’s Maw.
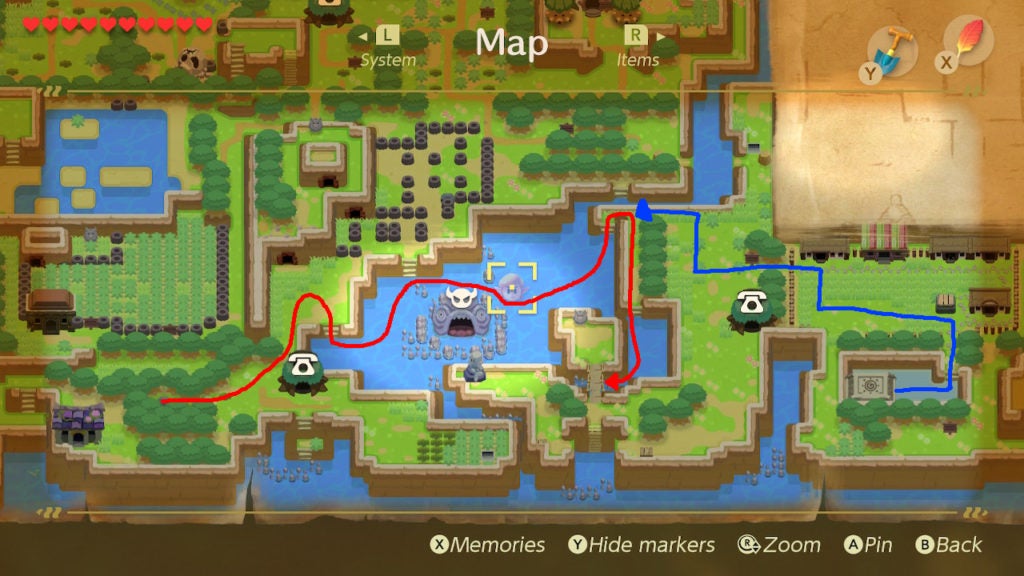
From the Warp Point in Martha’s Bay, you can travel east of the entrance to Catfish’s Maw. Use a stretch of land to the north and east to travel south into another part of the bay. Then, swim south and then west to go under the bridge.
Alternatively, you can also get here from Animal Village pretty quickly. From the Warp Point in the south of the village, proceed to the north of the vertical line of trees west of town. From there, go south along the thin stretch of land and into the southeastern waters of the bay. Keep going south and then west to swim under the bridge.
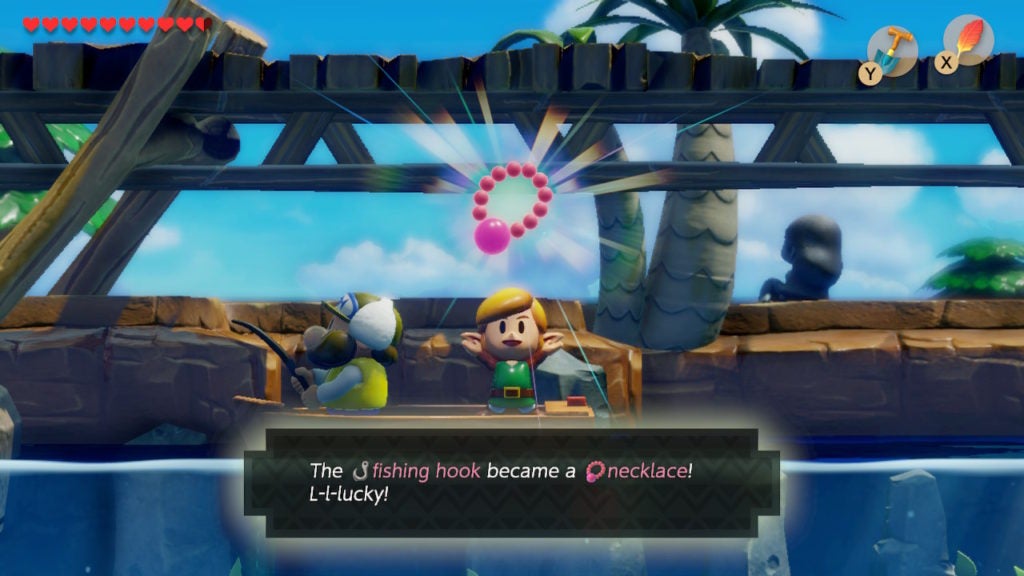
Beneath the structure, you’ll find a Fisherman who will accept your Fishing Hook in exchange for whatever he can catch with it. In this case, you’ll get a Necklace from the angler’s first cast with the Fishing Hook. You’ll need to trade the Necklace to someone nearby to get the last item in the trading quest.
Trade the Necklace for a Scale in Martha’s Bay
The Necklace you now possess actually belongs to the Mermaid who lives in Martha’s Bay. She lost it a little while ago and will reward you if you return the piece of jewelry to her. To find the Mermaid, head to the part of Martha’s Bay that’s northeast of the stone catfish’s head.
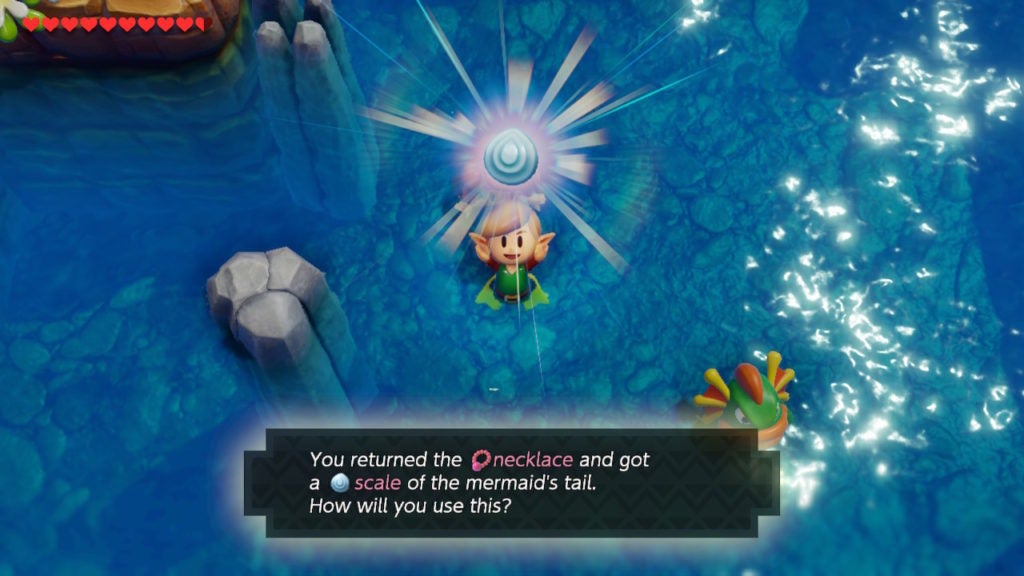
If you speak to the Mermaid while you have the Necklace, she’ll give you a Scale from her tail in exchange for her prized string of pink pearls. With the Scale in hand, you can now uncover the area that leads to the Magnifying Lens.
Get the Hint to Find the Magnifying Lens’ Location
To get a hint on what to do with the Mermaid’s Scale, head to Schule Donavitch’s house in Animal Village. Enter the red crocodile’s colorful abode and speak to them to learn of a Mermaid Statue.
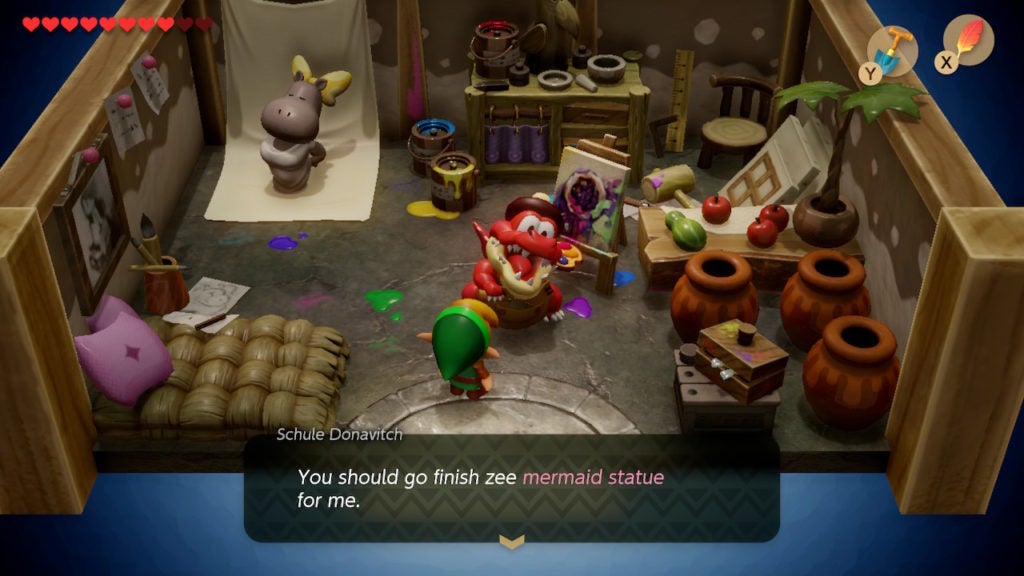
Apparently, Schule was at some point making a Mermaid Statue. However, since they are currently busy working on a painting, Schule will ask you to complete the statue for them. All you need is the Scale in your possession.
Find the Mermaid Statue
To find the Mermaid Statue, travel west out of Animal Village and go south. When you can’t go any further south, walk a bit more to the west.
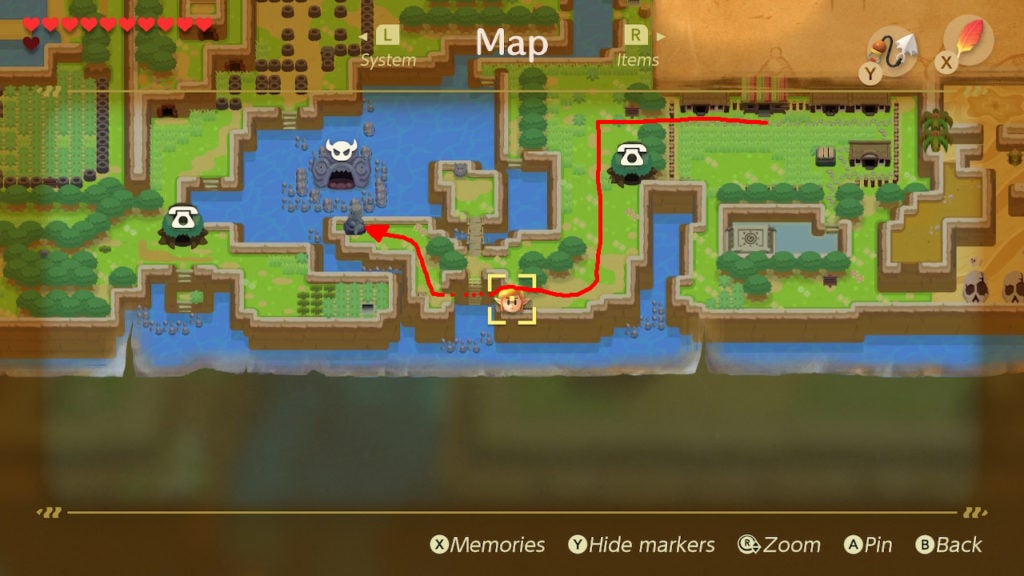
This will lead you to an area with a gap that you’ll need to cross with the Hookshot.
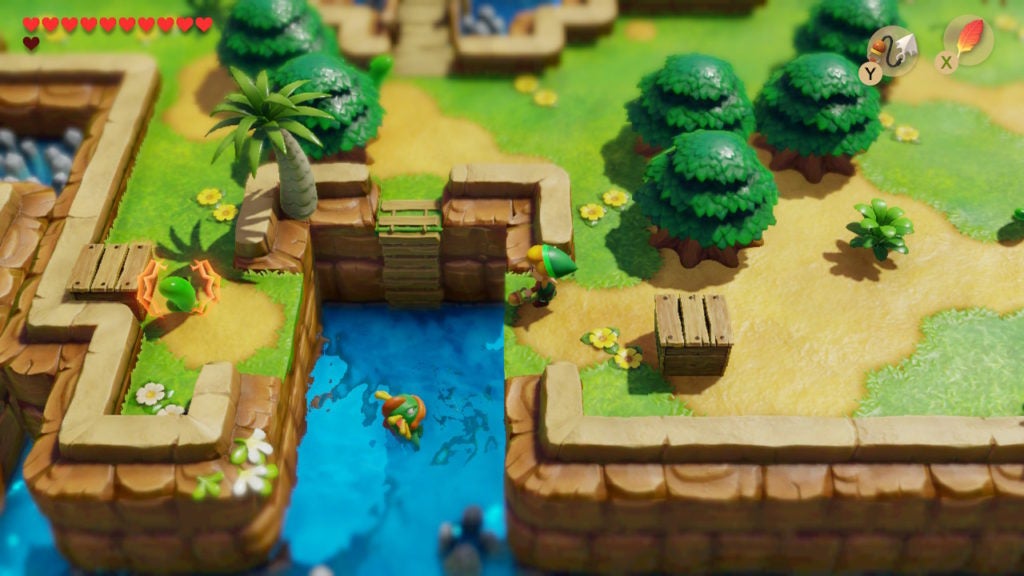
Take aim at the wooden box on the far side and shoot your Hookshot at it to cross the gap. When you’re on the western side, go northwest to find the Mermaid Statue.
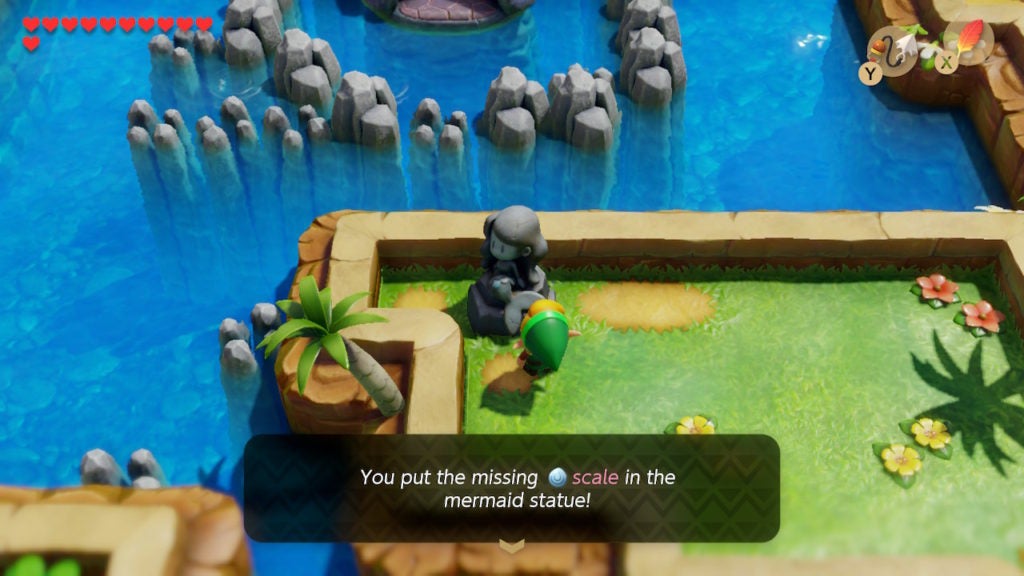
Interact with the Mermaid Statue to use the Scale on it. When you put the Scale into the open slot, the statue will move to the west and reveal a hidden staircase. Descend the staircase to find yourself in an underground cavern.
Pick Up the Magnifying Lens
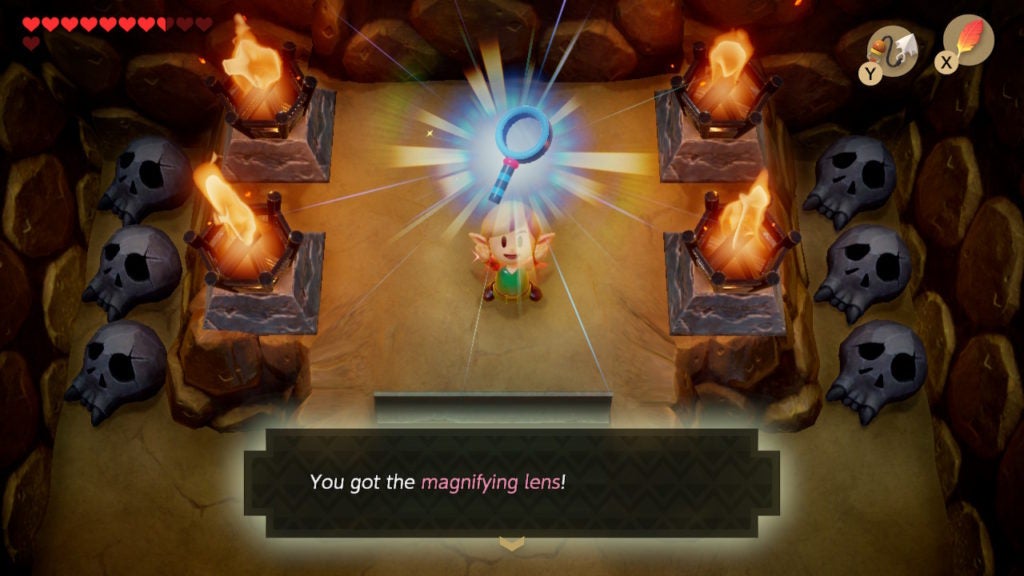
Underground, you’ll seemingly be in an empty room. However, this is false, as there are a few enemies here—but they’re invisible. Carefully make your way north as soon as you can to enter the other half of this cave and find the Magnifying Lens sitting on a raised area. Pick it up to get an item that will make invisible things visible, be they enemy or object.
You can test out this passively-working item by heading south. In the previous portion of the cave, you’ll be able to see the Arm-Mimic and Red Zol foes now. Afterward, make your way out of the cave. It’s now recommended to get the Boomerang, as it will be very handy in the Ancient Ruins. Furthermore, the Boomerang outclasses the Bow and Arrow Set as a ranged weapon due to performing similar functions but without consuming ammunition and a few more subtle reasons.
However, before you head out to obtain this awesome weapon, you’ll want to pop back to Animal Village for a couple of Secret Seashells first.
Get 2 Secret Seashells in Animal Village
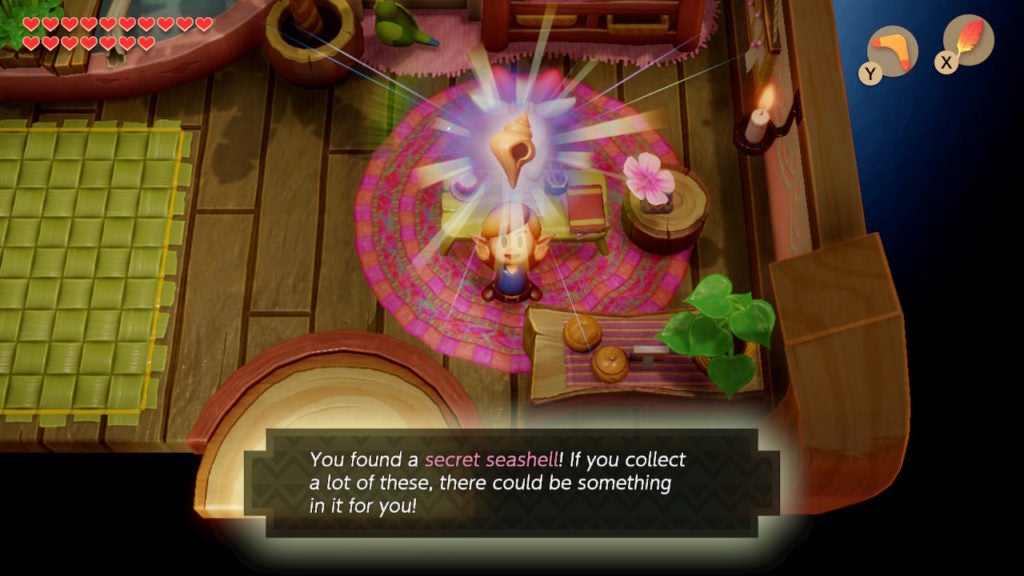
Head back into Christine’s house to speak with the goat. She’ll be happy that you delivered her letter to Mr. Write and will thank you with 1 Secret Seashell.
After that, head into the house east of Christine’s abode. Before, it seemed like this house was empty, but upon entering it after gaining the Magnifying Lens, you’ll notice a peaceful Zora in the northeast corner.
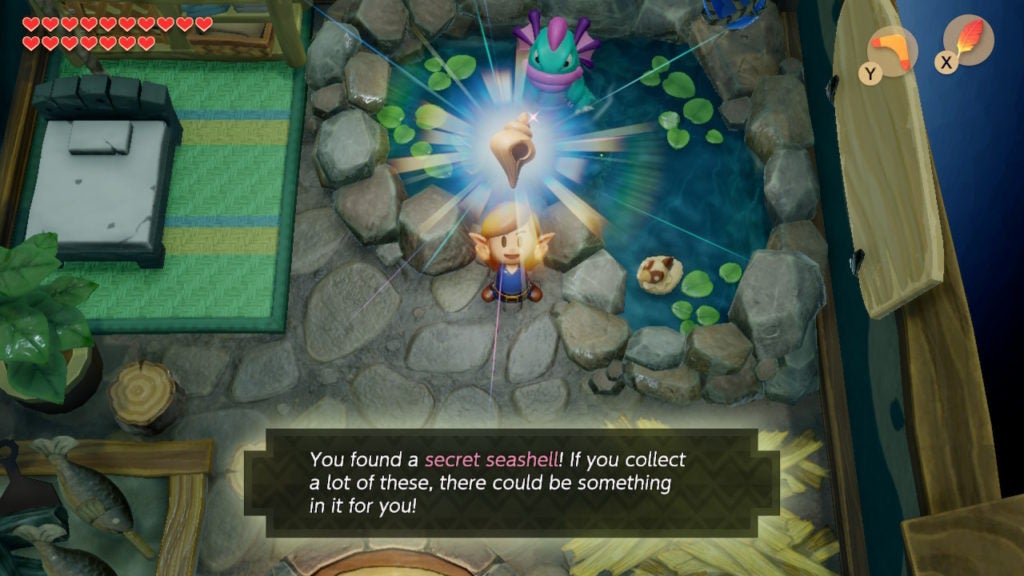
It turns out that the Zora stays invisible to avoid trouble. They will offer you 1 Secret Seashell in exchange for you to keep quiet about their presence. Since they mean no one any harm, there’s no reason not to accept the Zora’s request. With the goods gathered up from Animal Village, you can now proceed to the location of the Boomerang.
How to Get the Boomerang
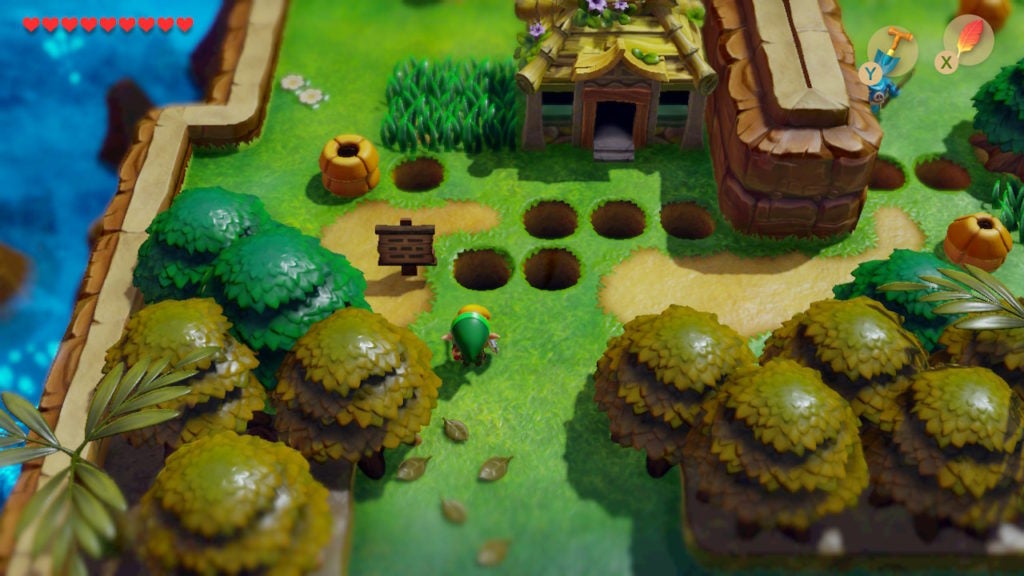
You’ll first need to go to Toronbo Shores—south of Sale’s house. The quickest way here is to teleport to the Warp Point in Martha’s Bay and travel west across the wide gap that leads to the Pink Ghost’s rundown house. Keep going west until you make it to the center of the beach.
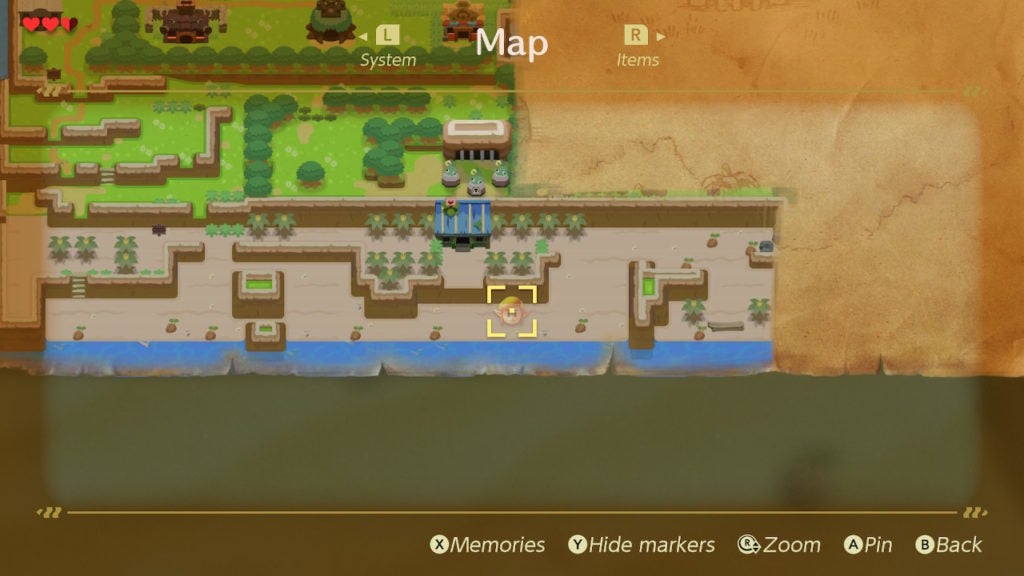
There will be a crack in a wall that you can blow open with a Bomb. Within, you’ll meet another NPC who was previously invisible to you.
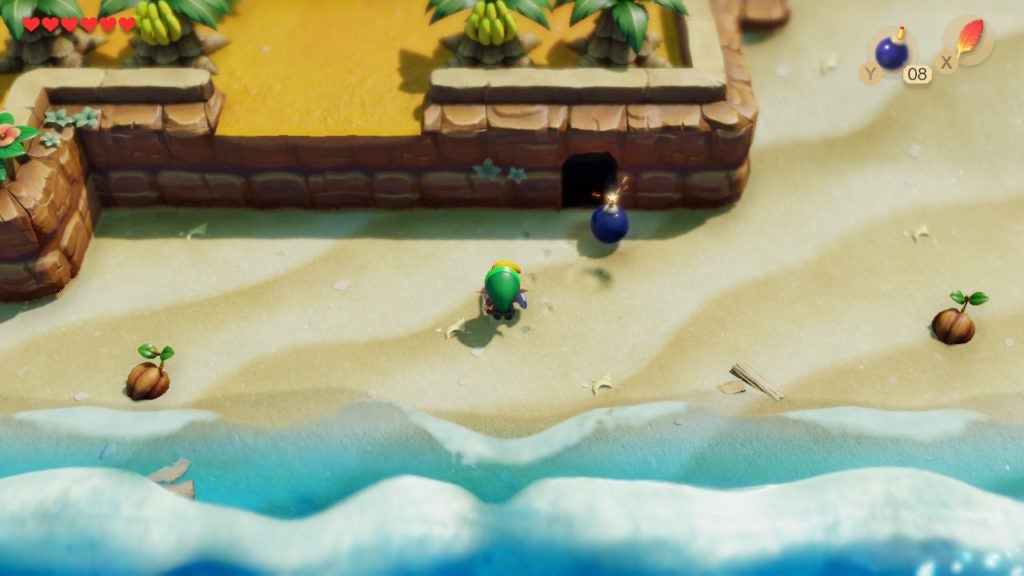
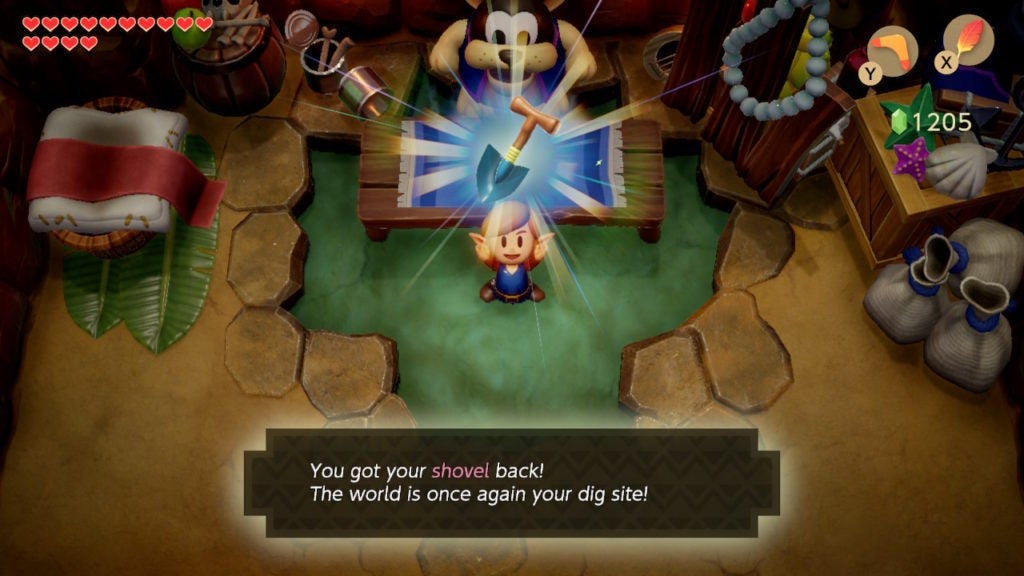
Here, you’ll meet Goriya, who will trade you a Boomerang for a specific item. They’ll be vague with what they want in exchange for the Boomerang, however, through trial and error (or by reading this walkthrough), you can figure out that Goriya will accept your Shovel in trade for the Boomerang.
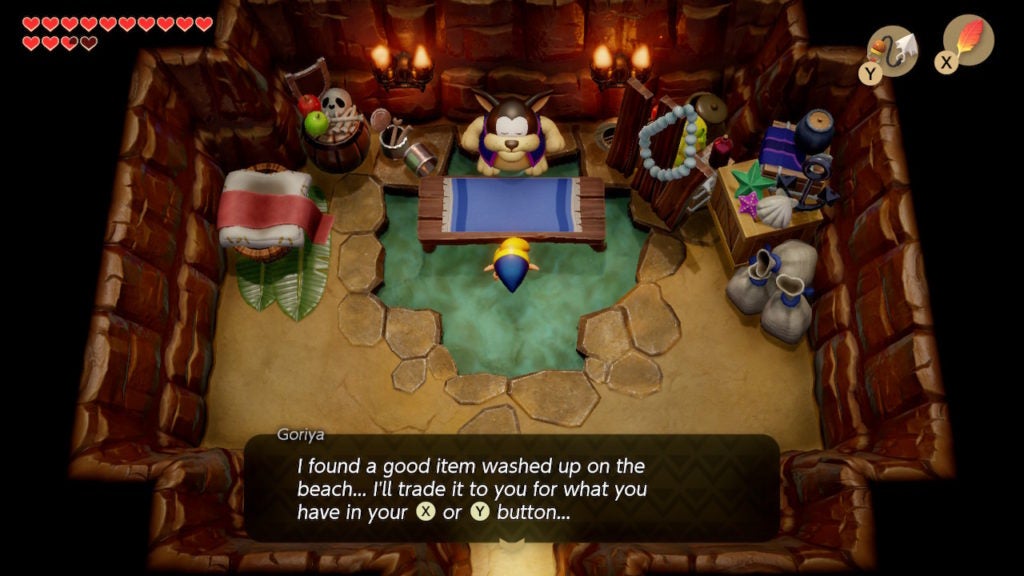
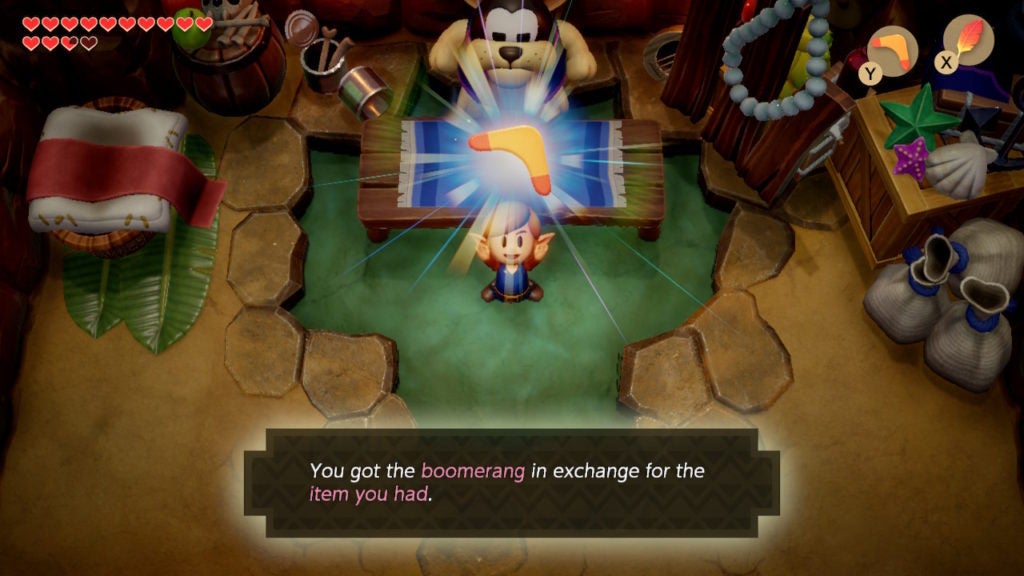
To initiate the trade, equip your Shovel and then offer it to Goriya with either the X or Y button (whichever the Shovel is equipped to) while you speak with the merchant. Afterward, you will receive the Boomerang—which is arguably the best weapon in the game!
Buy Your Shovel Back From Goriya
However, you don’t have to leave your Shovel behind. You’ll still need it to find collectibles and other goods. Thankfully, Goriya will sell it back to you for 300 Rupees, which is the same price you bought it for at the Town Tool Shop a while ago.
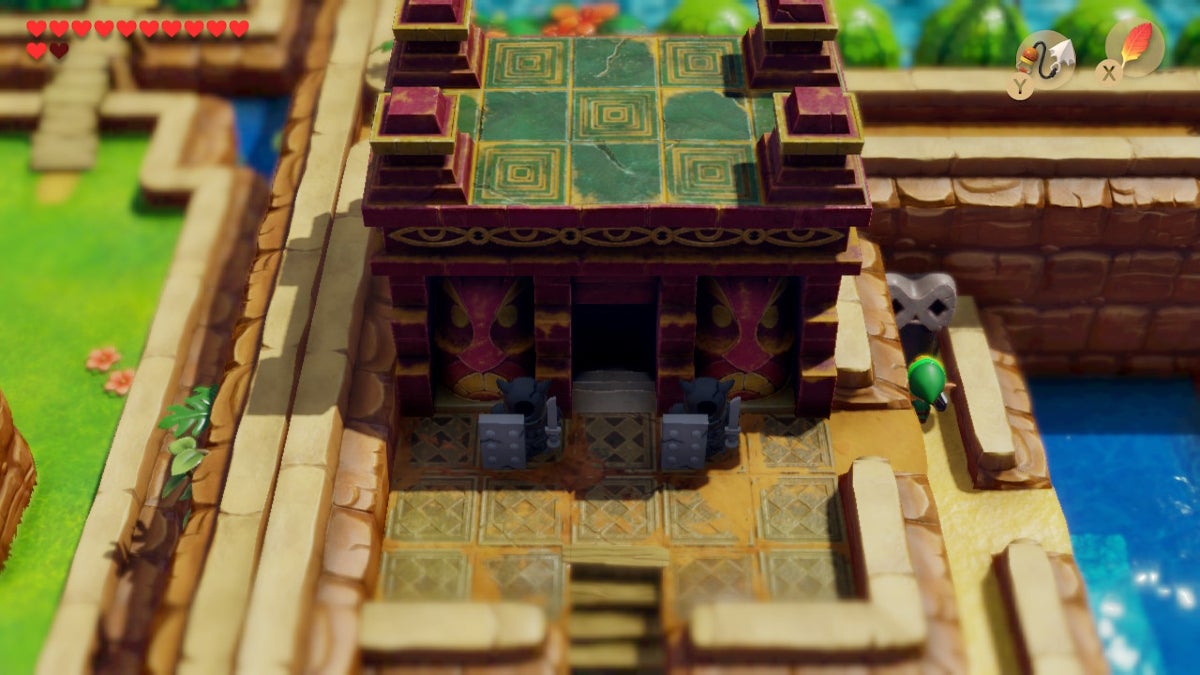
Now that you’re armed properly, it’s time to head to the Ancient Ruins and ransack it for the Face Key (and some other loot).
How to Get Into the Ancient Ruins
The best way to get to the Ancient Ruins swiftly is to first go back to Animal Village yet again. Leave out of the village’s northwest entrance and then go north until you find a thin passage that leads east.
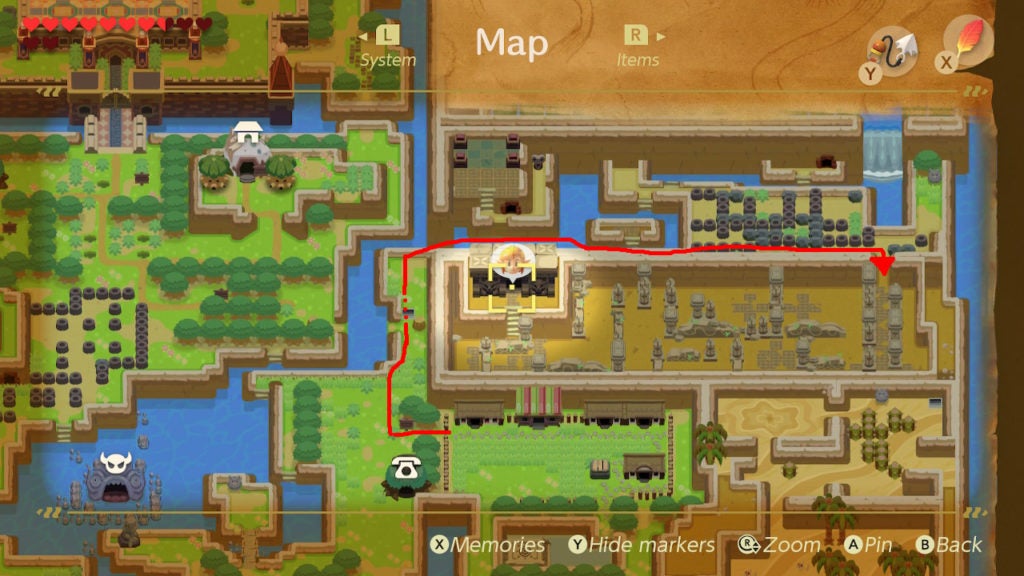
Along the way, you’ll get a message from the wise Owl that let’s you know you’re on the right path. Keep going east until you reach a passage that opens up to the south.
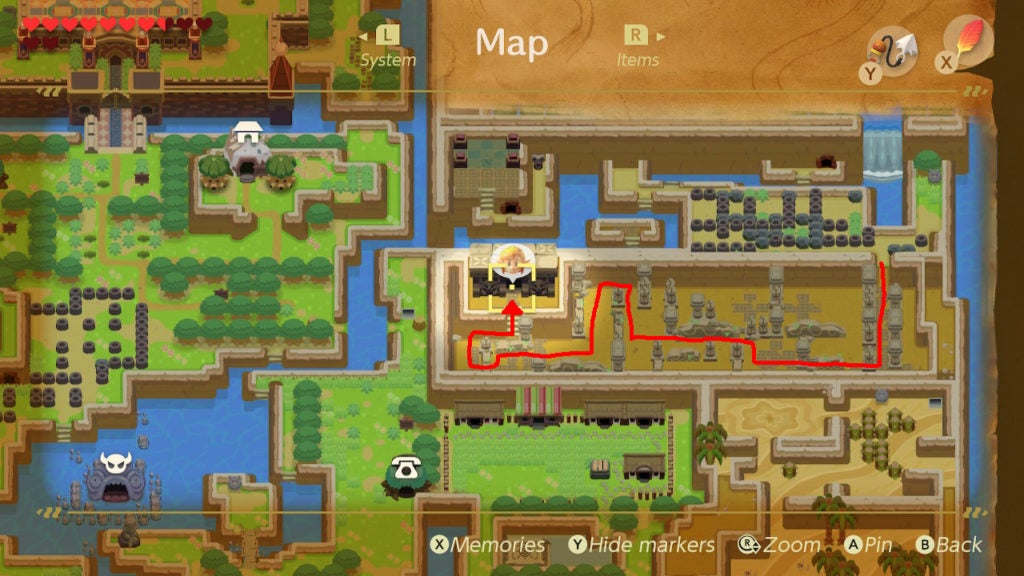
How to Get Through the Ancient Ruins
You’ll have to progress through the ruins by activating Armos statues that are blocking the way. You can activate them all to oblierate their kind with the Boomerang, however, you only need to defeat a few along a specific path to make it to the shrine. It’s also possible to take out Armos with the Bow and Arrow Set, though, it’s more efficient just to use the Boomerang.
How to Beat the Armos Knight in the Shrine of the Ancient Ruins
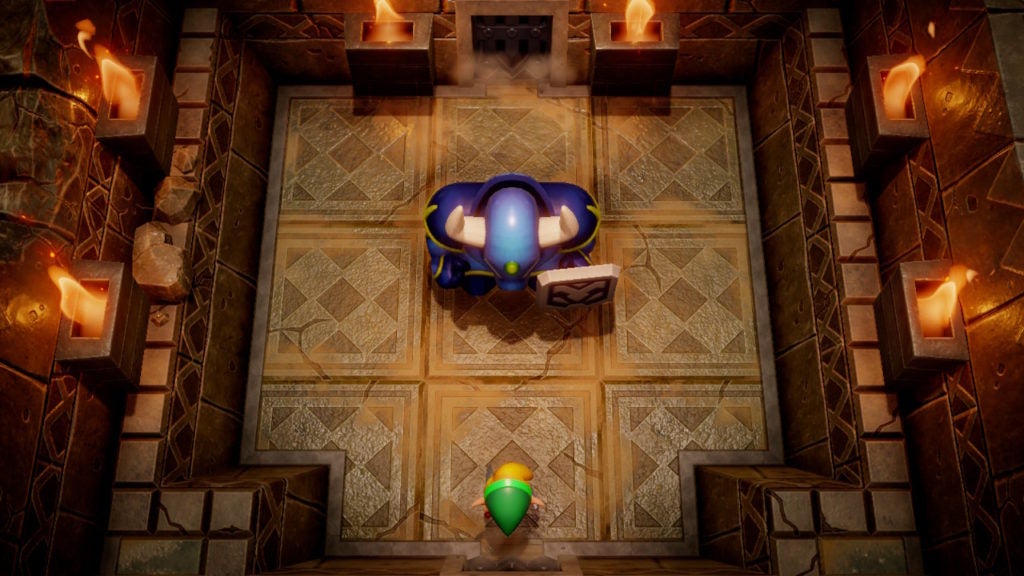
After you make it to the shrine, enter it to come face to face with a mighty foe: an Armos Knight. This stalwart adversary will be difficult to damage at first, but, you can weaken them with either the Bow and Arrow Set or the Boomerang. You can hit the Armos Knight in the head with your ranged weapon to break their helmet. When you do, you’ll then be able to hurt them with your Sword.
Alternate Ways to Break the Armos Knight’s Armor
In addition to using ranged attacks, you can use the Pegasus Boots to dash into the foe to damage their armor. On top of that, spin attacks from your Sword are also able to break the tall adversary’s helm. With that said, using ranged weapons like the Bow and Arrow Set or the Boomerang is still quicker and easier.
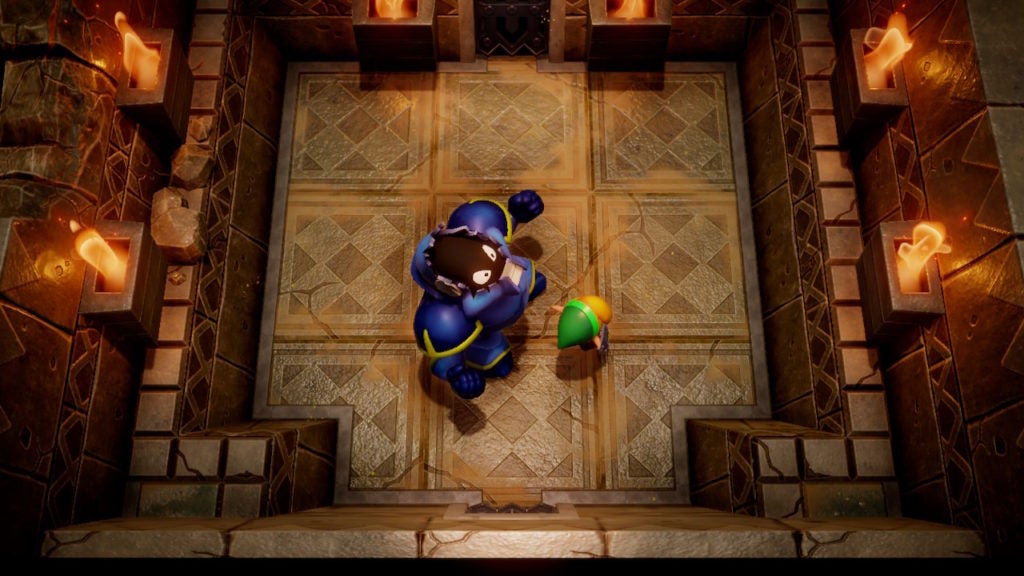
Strike the huge warrior in the head until they go down. When they do, you’ll be able to loot the Face Key from their remains.

Though, before proceeding directly to the next dungeon, you should go north inside of this shrine to find a mural in the room beyond that contains some lore.
Look at the Mural in the North of the Shrine
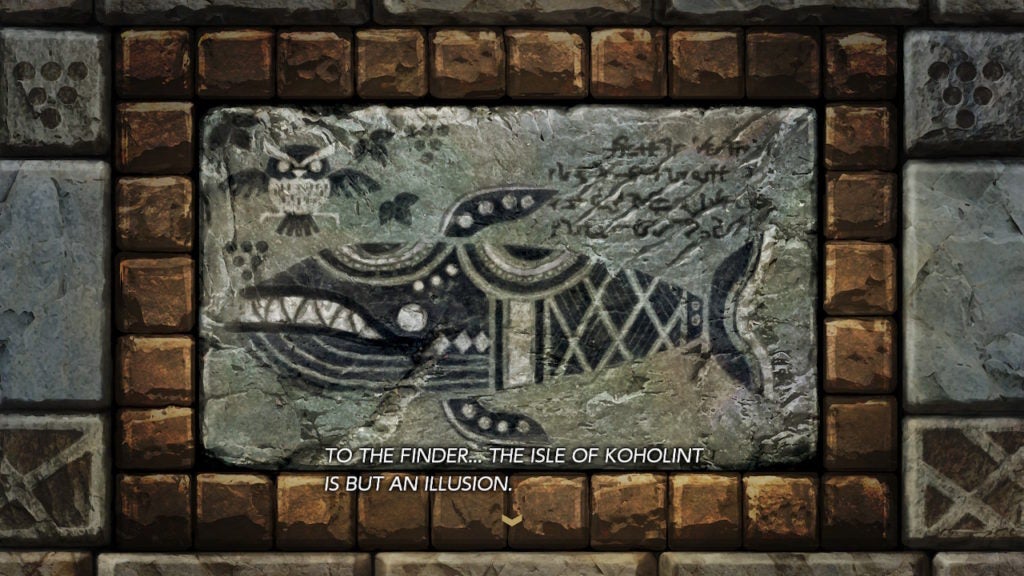
In the northern room, you’ll have to light 2 torches with Magic Powder before inspecting a mural on the north wall. What you see when you take a closer look at it will reveal the deepest secret of Koholint Island. The engraving states that the island is an illusion—a dream—being had by the sleeping Wind Fish. The text goes on to state that when the Wind Fish awakens, the entire island will disappear.
After you’ve read the relief and have left the shrine, the Wise Owl will swoop down to give you a cryptic message about whether or not everything is a dream. When they fly off, you’ll be free to head to the next dungeon. However, before that, it’s recommended to grab a Secret Seashell from the center of the Ancient Ruins.
The Secret Seashell in the Ancient Ruins
Proceed from the temple to the central part of the ruins. There will be 4 Armos statues here. Beneath the southeastern Armos is a hidden staircase. Activate and defeat them to clear the way to it.
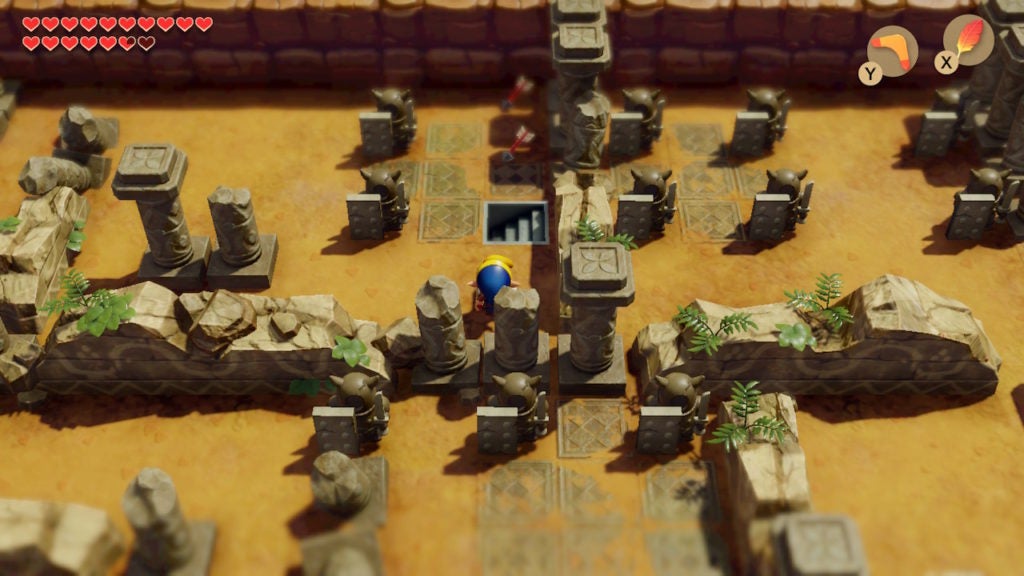
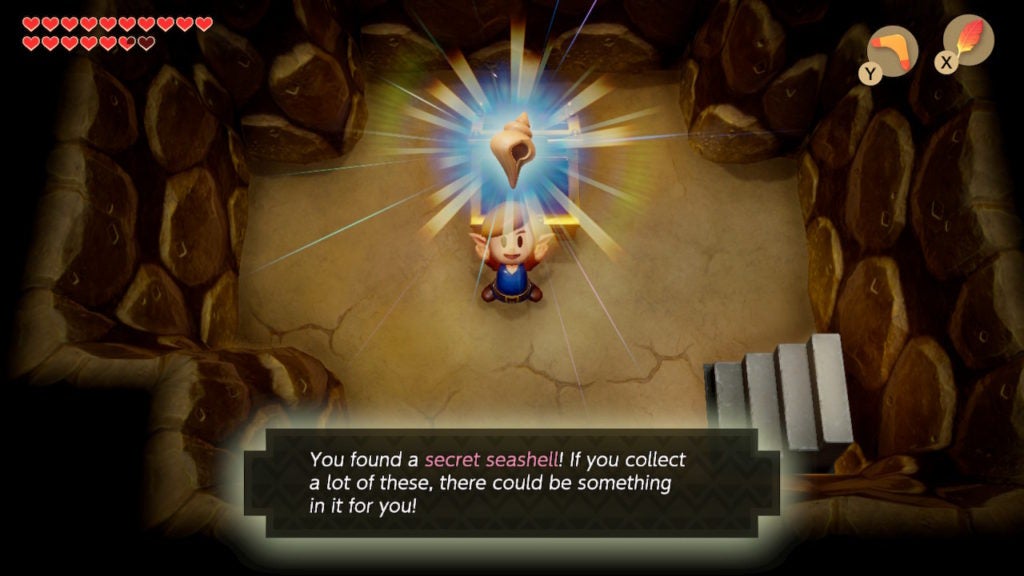
Underground will be a small room with a chest. Within the chest will be 1 Secret Seashell. After you grab it, make your way out of the Ancient Ruins.
How to Find the Entrance to the Next Dungeon
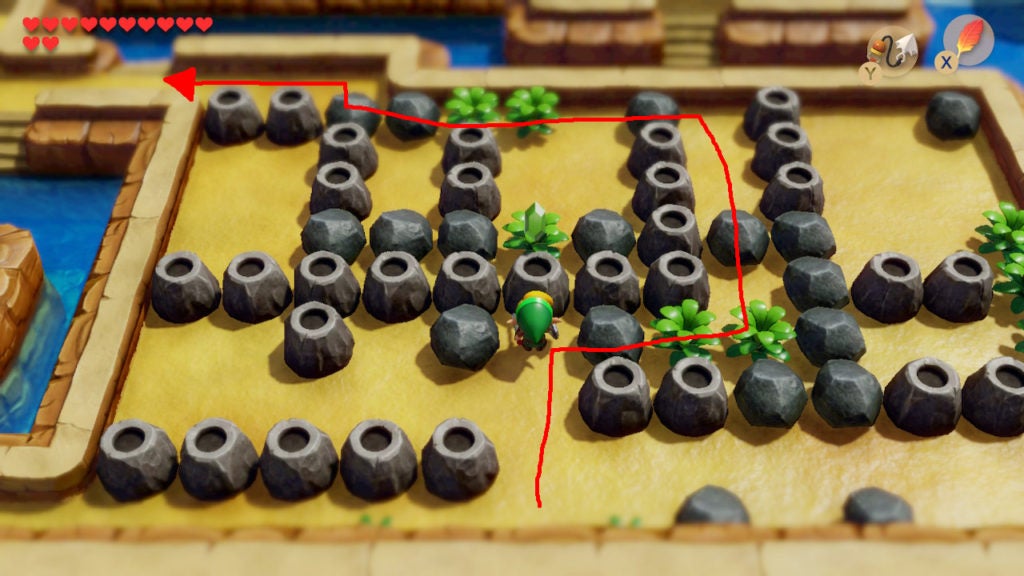
From the entrance into the Ancient Ruins, go a bit west to find yourself in a maze of rocks and shrubs. You’ll need to go north and west to approach the next dungeon. Navigate the maze by moving the rocks and shrubs out of your way.
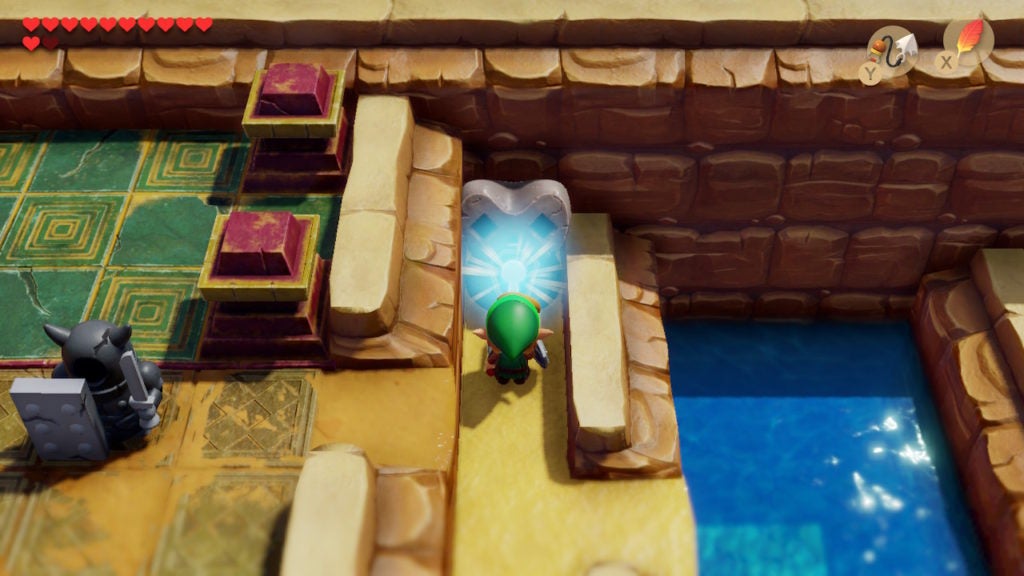
After you exit to the northwest of the maze, descend the stairs you find there, and enter the water. Swim to the little island south of you and activate the Armos statue on the west to reveal a hidden staircase beneath it.
When you descend the staircase, you’ll be in an underground passage with water that leads to the west. Cross the water and ascend the staircase that you find on the other side. Emerging will bring you to a large island to the northwest of the small island. This larger portion of land has some ornate stonework, a couple of Armos statues, and a keyhole.
Insert the Face Key into the keyhole you find to cause the entrance to the sixth dungeon to appear. Next, you’ll need to fight your way through Level 6 – Face Shrine.