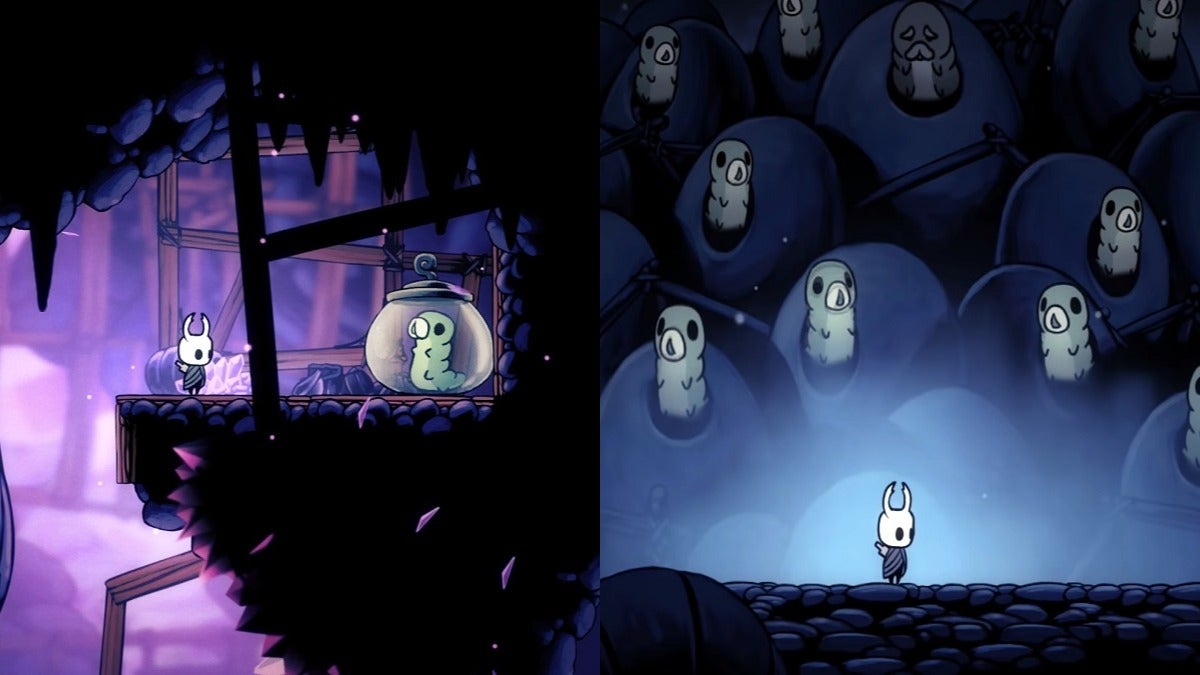
One of the most prominent collectibles, yet only ever vaguely explained in Hollow Knight, are the Grubs. They’re cute little creatures and you just can’t help but go out of your way to rescue them. Here’s everything you need to know about them.
Table Of Contents
What Are Grubs?
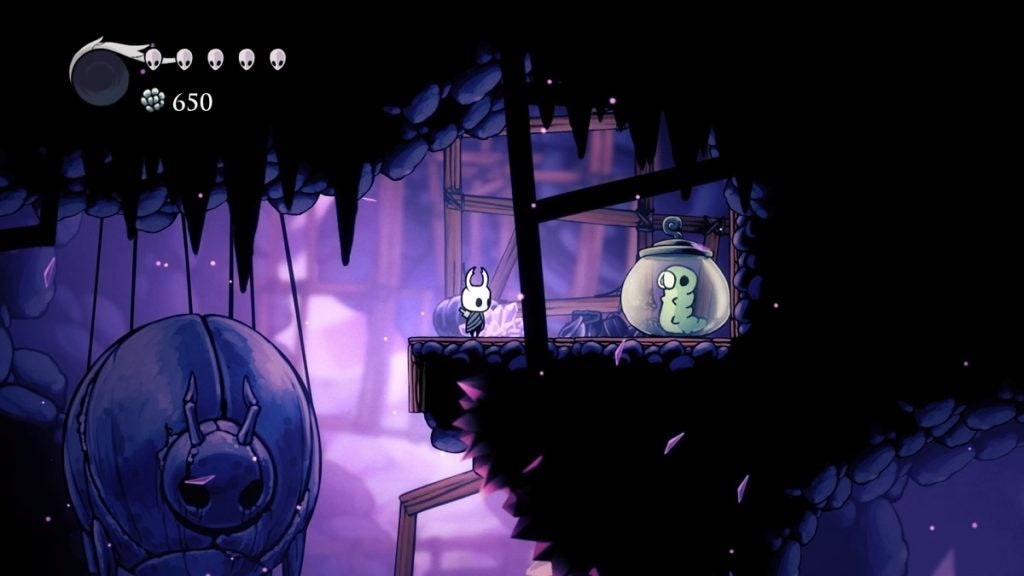
Grubs are small, green worms trapped inside glass jars. Breaking the jar will automatically free the Grub. In the beginning, you may find it odd how they just burrow underground after being freed. However, you can actually find them back with the Grubfather.
The Grubfather can be found in the northwestern part of the Forgotten Crossroads. As soon as you drop down to this level from Dirtmouth, simply continue heading to the left and you should find yourself in the Grubfather’s room. All the Grubs you free will eventually find their way back here.
Every Grub Location
There are 46 Grubs in Hollow Knight. You can make the process of collecting all of them much easier for yourself by acquiring the Collector’s Map from The Collector in the Tower of Love. However, if you want to know exactly where each Grub is and how to get to their locations, then we’ve saved you the trouble. Here’s where every grub is located in Hollow Knight.
Grubs in the Forgotten Crossroads
Grub #1:
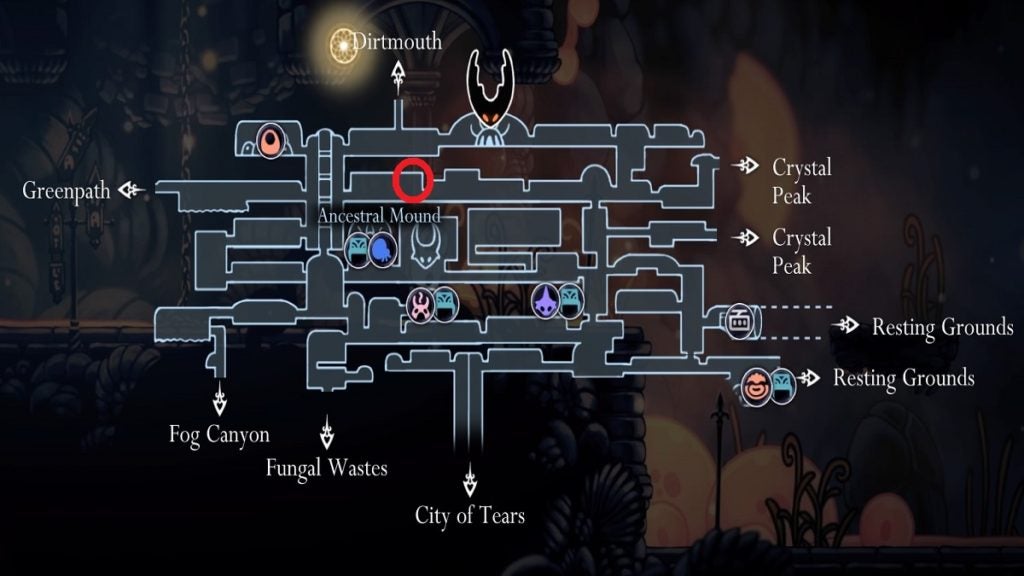
You’re going to need the Monarch Wings to reach this Grub’s location. After dropping down from Dirtmouth, head to the left until you reach the room with the hanging platforms. Drop down until you see an opening to another room on the right wall at the center of this area. Proceed to the next room to easily spot the Grub on a higher ledge. Double jump to reach its position and free it.
Grub #2:
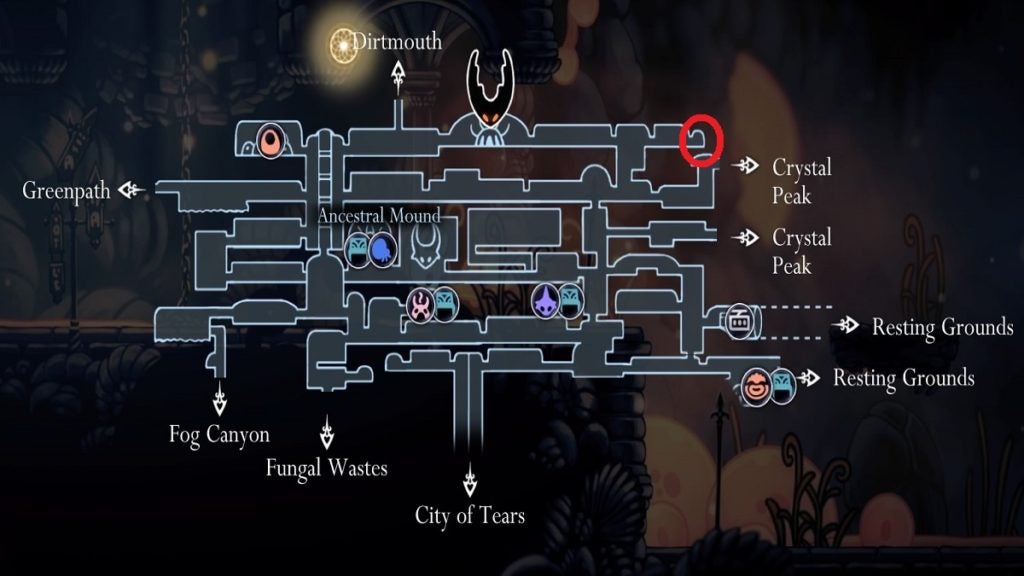
From the Dirtmouth entry point, continue heading to the right until you reach a Husk Guard. Defeat this enemy to reach the Grub behind him.
Grub #3:
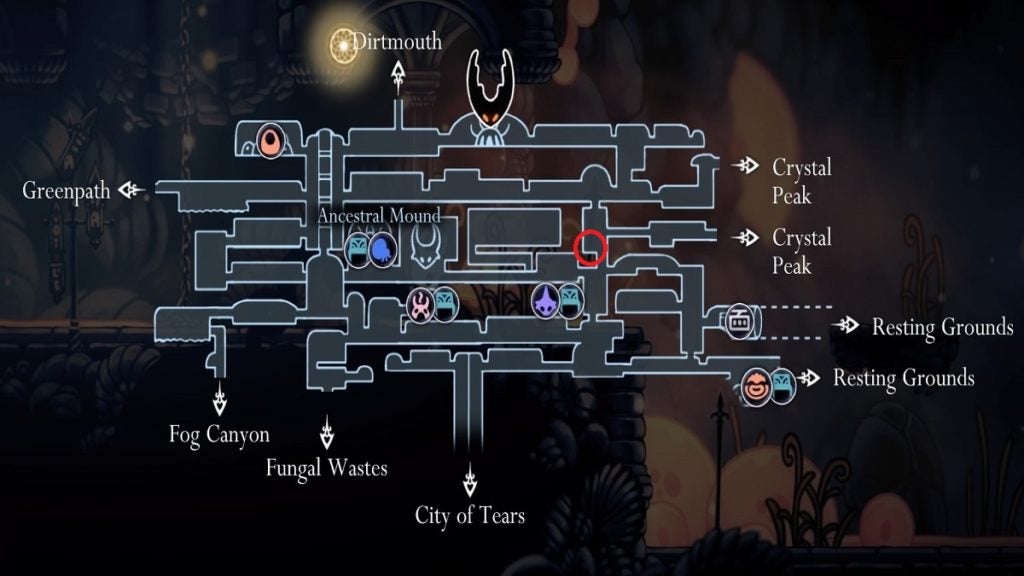
From the Forgotten Crossroads Stag Station, exit the room and climb your way up until you reach an opening to the next room on the right. Across from and slightly above that entrance is a ledge with a breakable wall. Break the wall open to reach this Grub.
Grub #4:
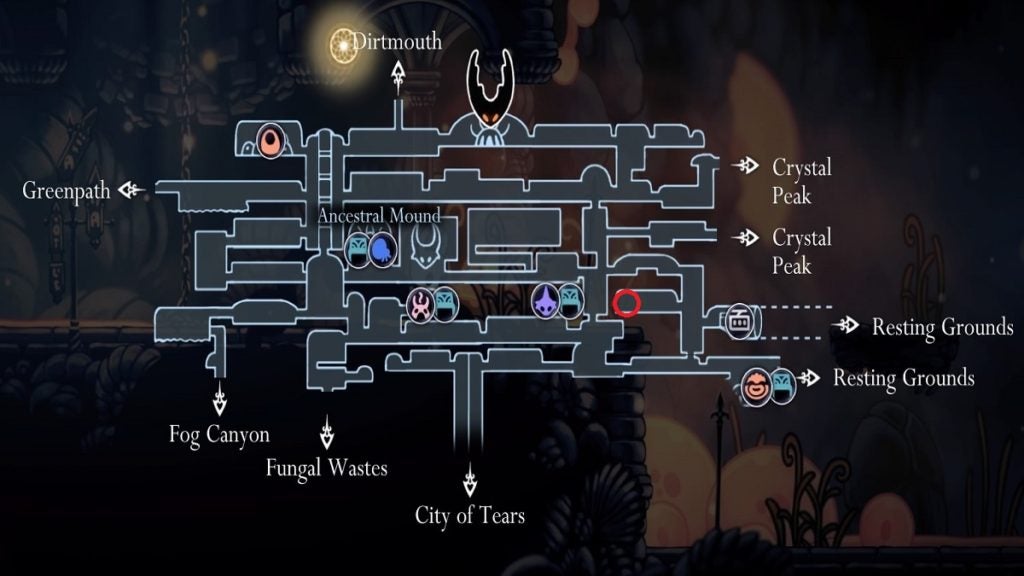
From the previous Grub, exit the secret room and proceed to the room on the right. Continue moving forward until you have to enter another area again. From this area, hug the wall on the left and drop down to find another entrance to another room. The Grub is in this room. If you don’t have the Mothwing Cloak and the Monarch Wings yet, you can also Nail bounce on the spikes to reach the Grub at the end of the room.
Grub #5:
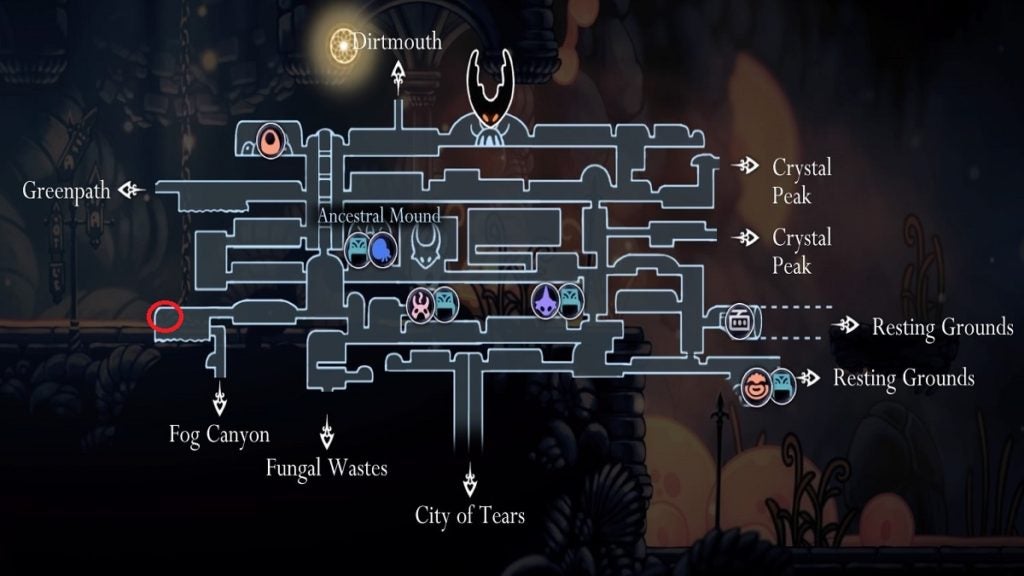
From where Cornifer is in the Forgotten Crossroads, continue downwards while staying on the left side of the room to find an opening to another room. From here, simply keep pushing forward to find the Grub.
Grubs in Greenpath
Grub #6:
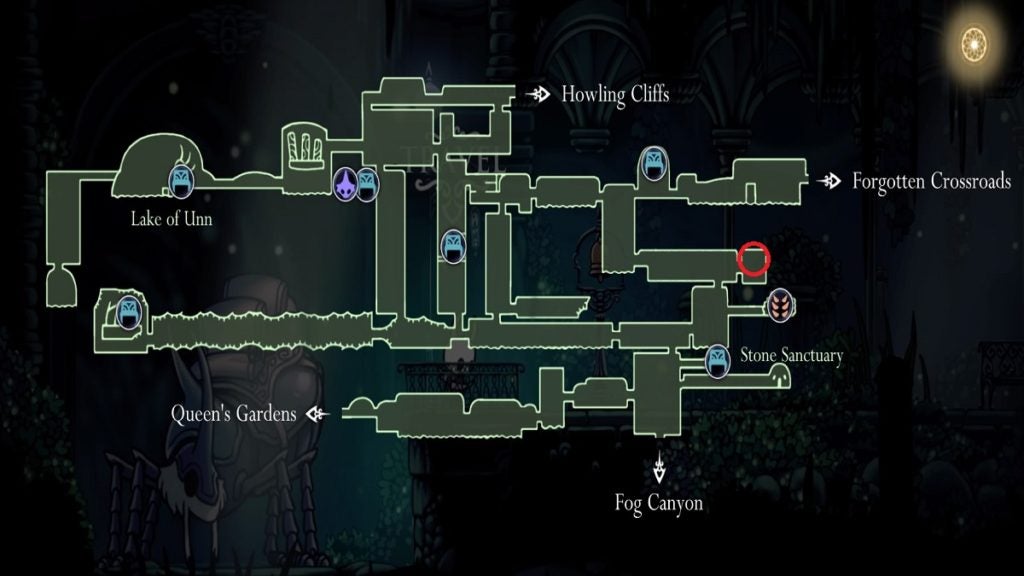
One Grub in Greenpath is found in the area above where Cornifer is. To reach the room where the Grub is hidden, cut the rope that’s holding a platform in place. The rope can be reached by reaching a platform that’s covered in darkness. The path will reveal itself automatically as soon as you jump to it.
Grub #7:
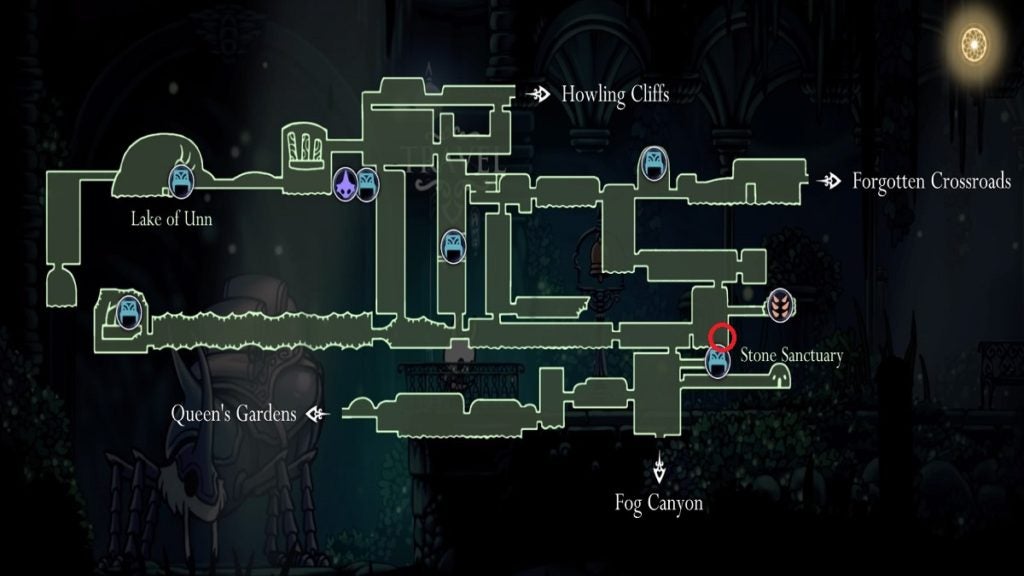
This Grub is in the room right before where the Hunter is. You will easily spot the Grub when you break the platform that lands on the acid pool.
Grub #8:
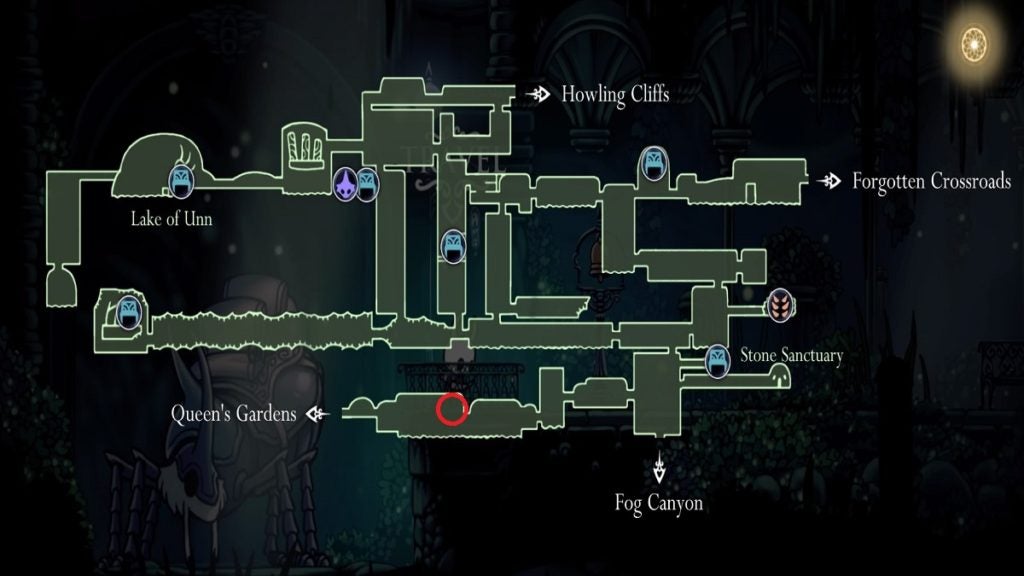
This Grub is in the pathway that leads to Queen’s Garden. It’s also right beside a Vessel Fragment. You can easily reach this area by following the path the platforms take in the area where the Durandoos are.
Grub #9:
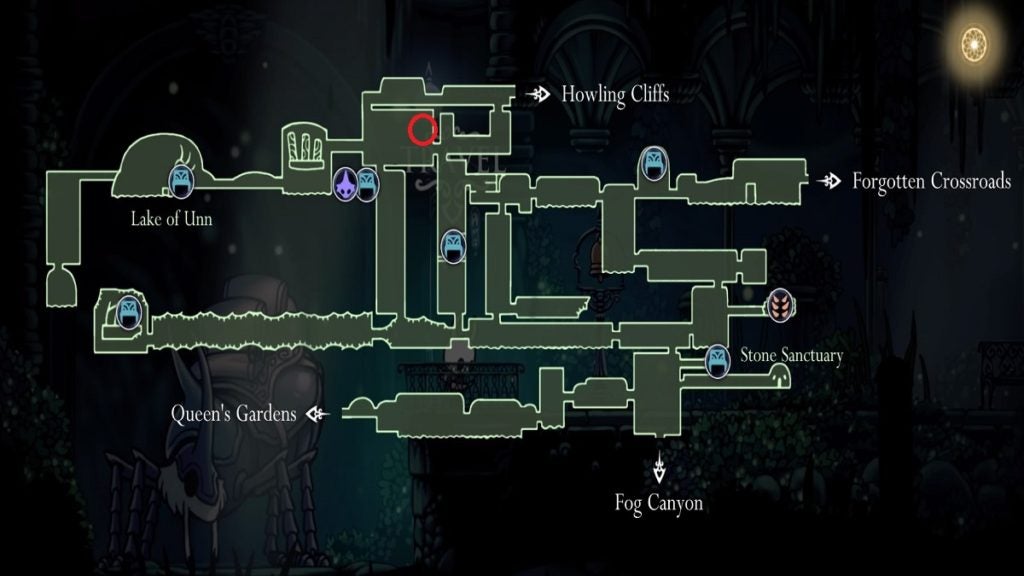
This Grub is in the area before the Hornet Protector’s arena. It’s located behind a locked gate that’s protected by a Moss Knight. The gate will automatically open after you defeat this enemy.
Grubs in Crystal Peak
Grub #10:
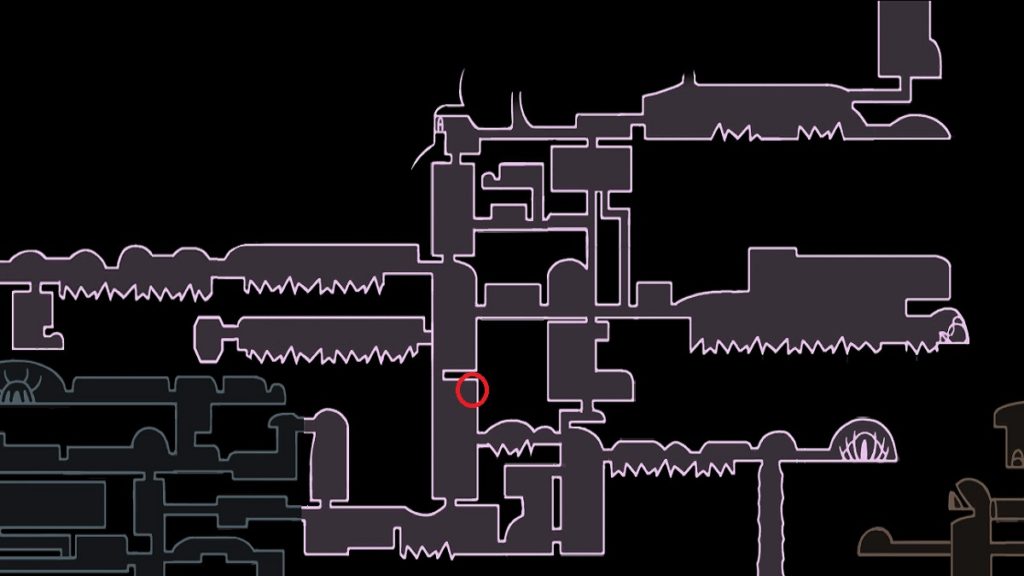
One Grub in this level is located northwest of the southern bench. From this bench, head to the left and proceed to the level above. Continue climbing up until you reach a locked gate with a visible Grub behind it. You can actually reach this room by returning back down and riding the conveyor belt that’s parallel to the wall of thorns. Platform your way through this area and you will eventually reach the Grub.
Grub #11:
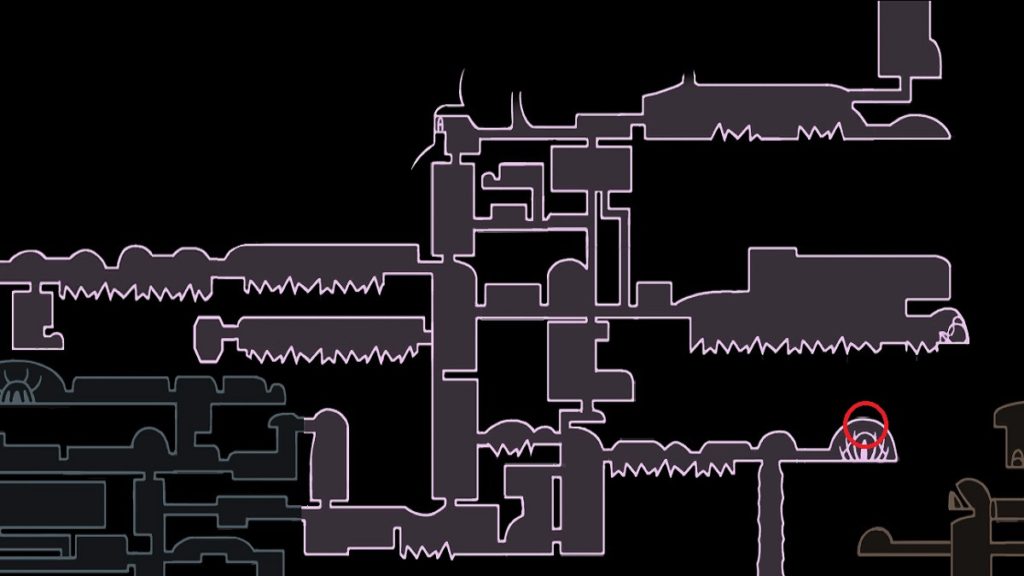
This Grub is in the Crystallised Mound, just to the right of the area of where the Descending Dark spell is. When you reach the fork before getting to the Descending Dark spell area, take the path on the right instead of the left, continue moving forward, and you will eventually come across the Grub.
Grub #12:
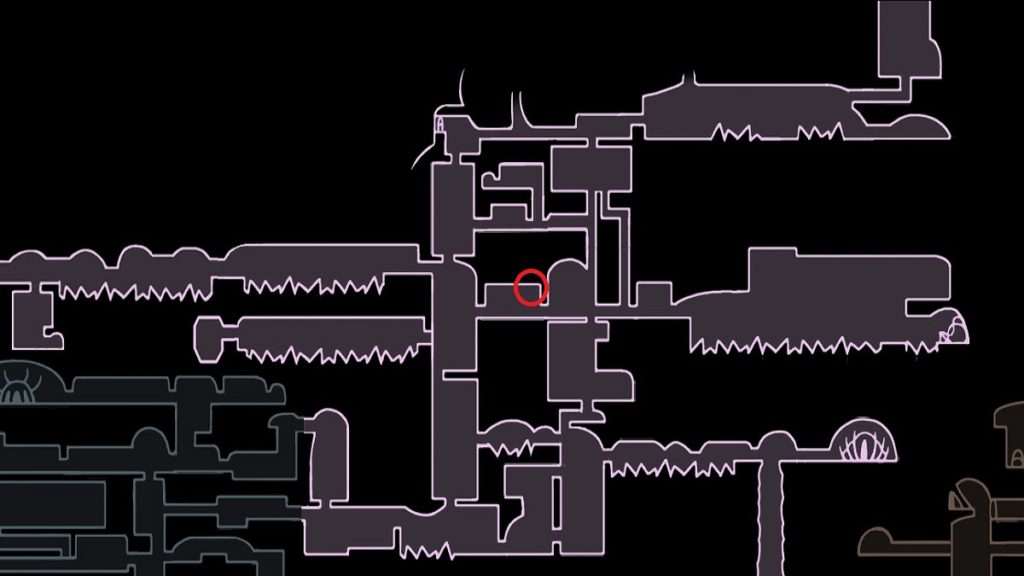
The area filled with traps below the northern bench houses this next Grub. The area in question here is the one that has trap machinations that smash the ground in intervals. Time your movements properly to reach the end of the area to finally reach the Grub.
Grub #13:
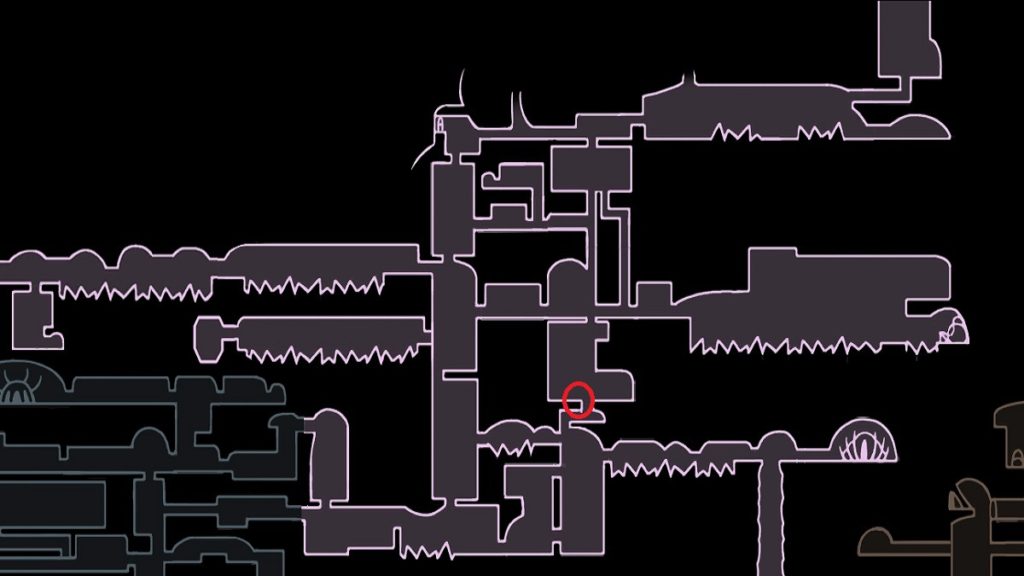
From the previous Grub, proceed to the next level on the right. Continue forward until you see an opening to another level on the ground. Once here, continue dropping until you spot the same kind of traps from the level before. Navigate forward while avoiding the traps until you spot another opening on the ground. Drop down to locate the Grub.
Grub #14:
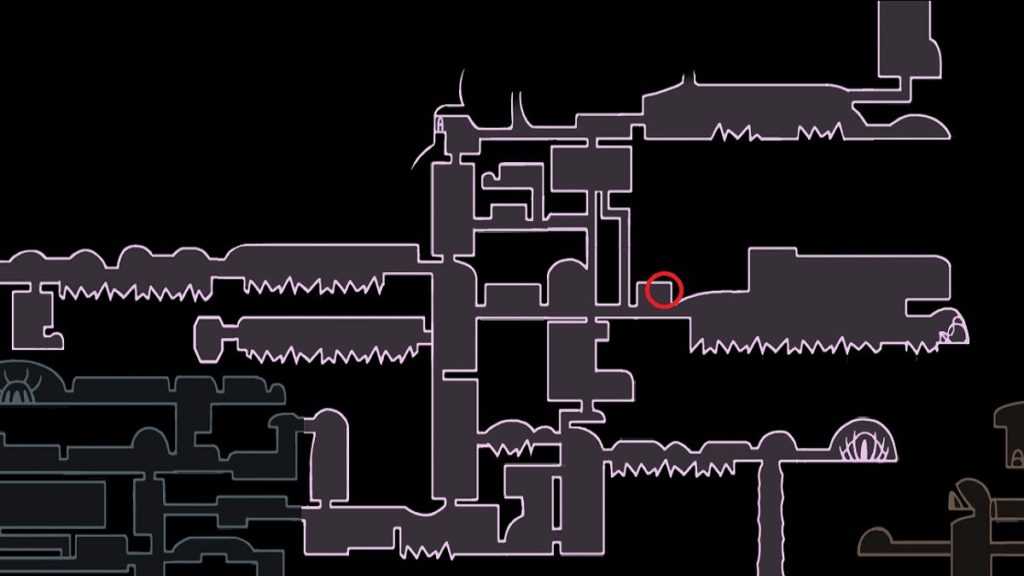
This Grub is in the area just before the massive location that houses the Crystal Heart. It’s in the area with the big, hanging bug. You can reach this area by using the Crystal Heart ability.
Grub #15:
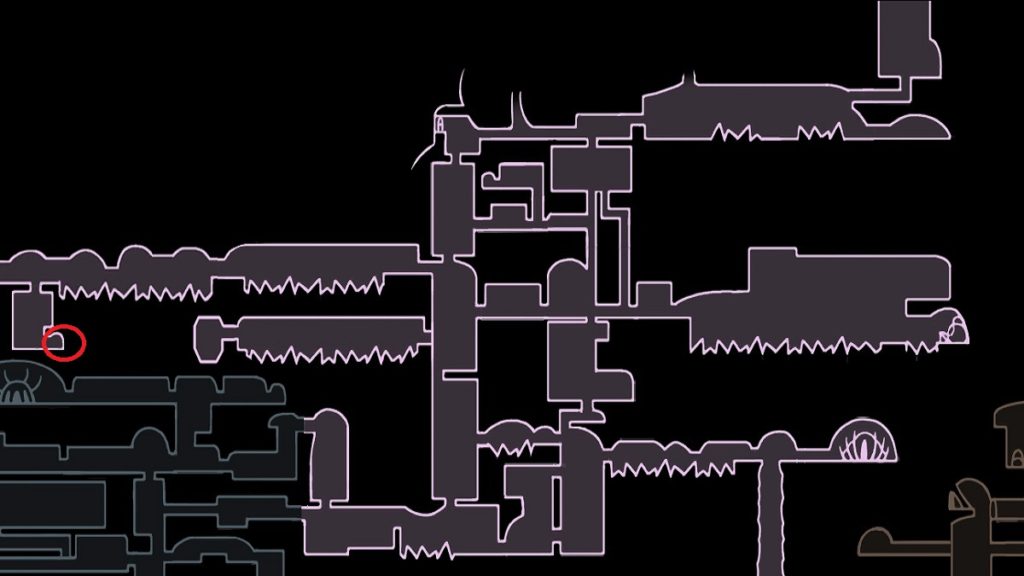
This Grub is in the area right after the entryway to the Crystal Peak from Dirtmouth. The area can be accessed via a hole in the ground. Drop down this opening and continue until you spot a Grub. Break the jar and you’ll find that this Grub is actually a Grub Mimic, a type of enemy that takes the form of a Grub to fool its prey. Defeat this enemy and destroy the breakable wall behind it. Continue forward to find the real Grub.
Grub #16:
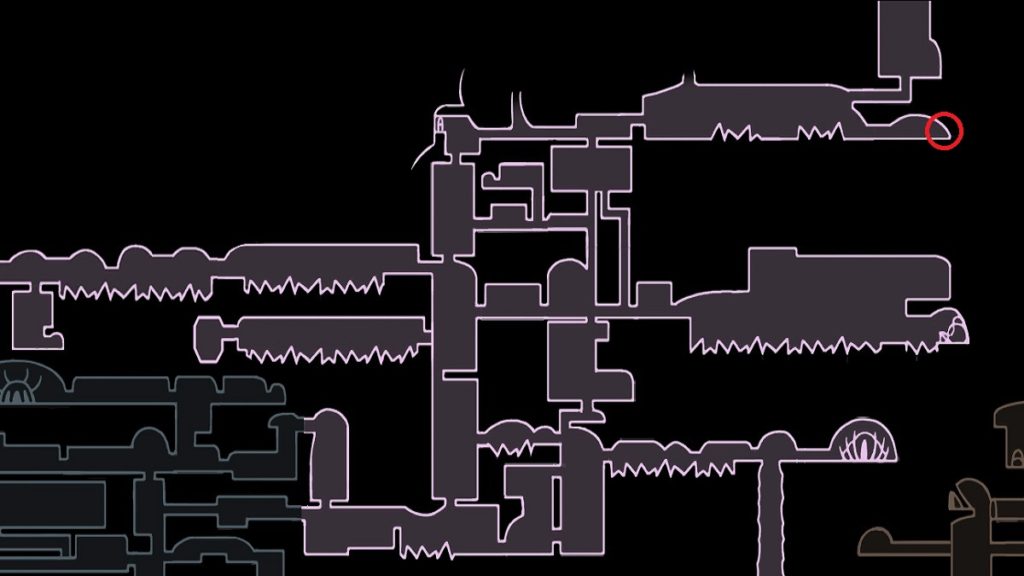
This Grub is in the area beneath the entrance to the Hallownest’s Crown. Instead of taking the upper platform that leads to Hallownest’s Crown, take the path below and keep pressing forward and you will eventually find this Grub.
Grubs in Fungal Wastes
Grub #17:
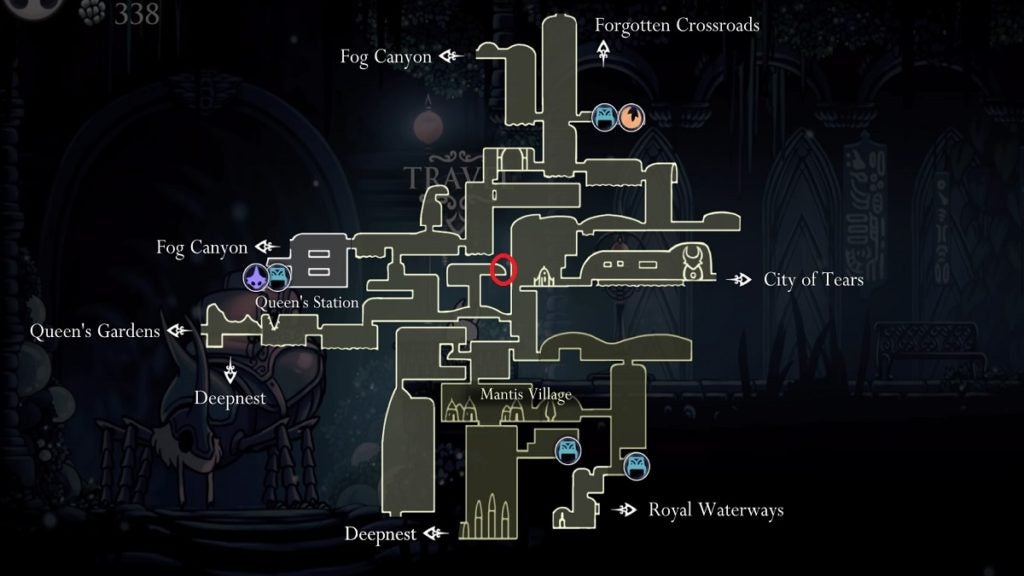
This Grub is situated right in the middle of the Fungal Wastes. The easiest starting point to reach this Grub is to start from the area where you meet Hornet in this level. From there, head to the left, drop down, and then take the entrance to the left. Proceed forward until you come across a vertical passage area with mushrooms you can bounce on. Once at the top, head to the right and you should find this Grub.
Grub #18:
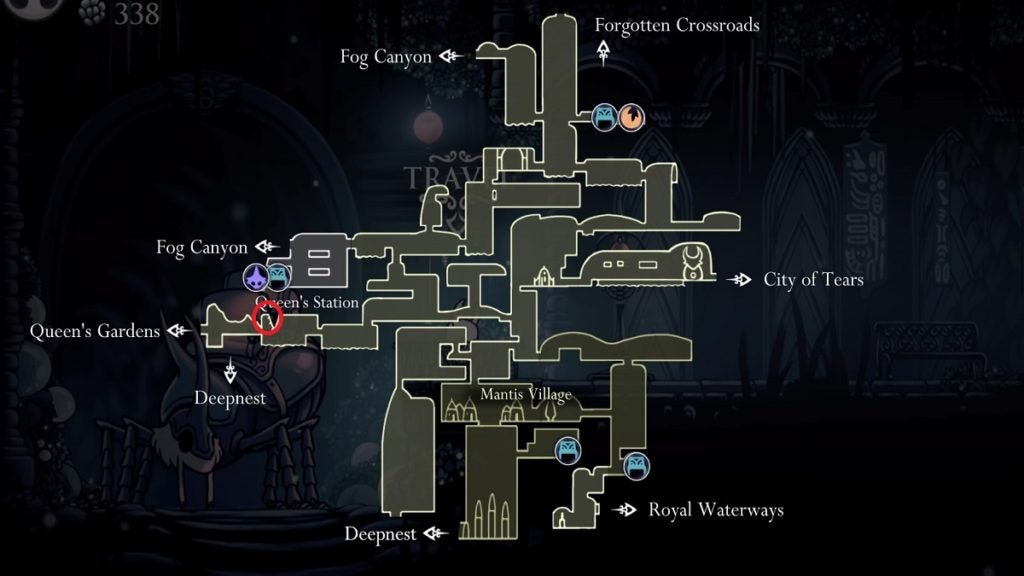
This Grub is in the area underneath the Queen’s Station. From the Station bench, exit to the right, proceed and drop down on the hole on the ground, continue downward, and once you reach the ground, head to the left to find another hole you can drop down on. Proceed to the left until you reach the next room. This Grub is in the upper left corner section of this area.
Grub in Fog Canyon
Grub #19:
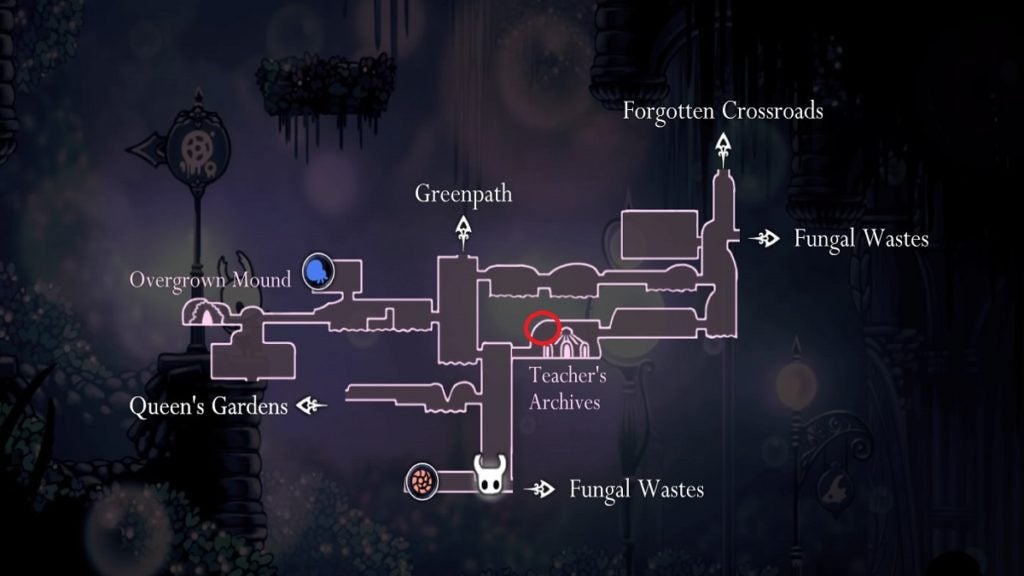
This Grub is the only one in Fog Canyon, and it’s in the upper left corner in the area where you can find the Teacher’s Archive. To reach the platform where the Grub is, use the platform on the upper right and use the Crystal Heart to make your way across. You should immediately land in the area where the Grub is.
Grubs in Royal Waterways
Grub #20:
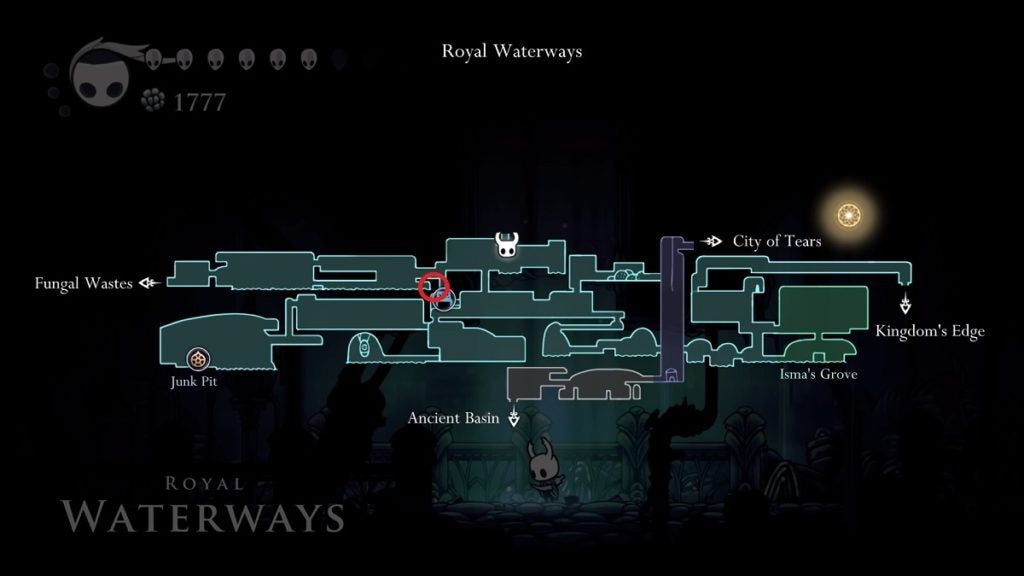
For this Grub, start from the bench and climb up until you spot the bench sign that points downwards. From here, head to the left and drop down to the water. There’s a wall you can break on the right once here. The Grub should be right behind the wall.
Grub #21:
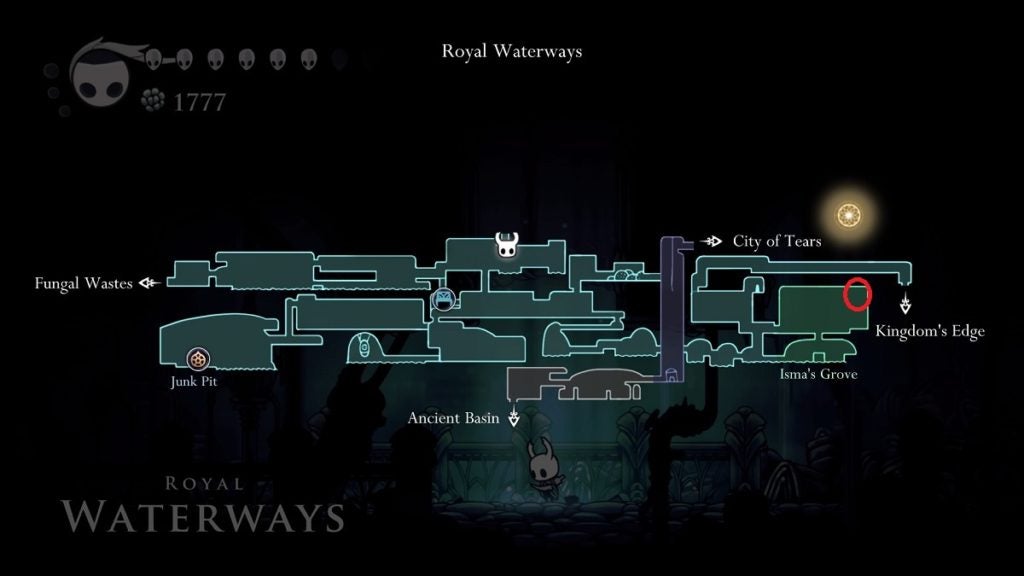
From where you can collect Isma’s Tear, drop down and you should find a small gap to the right. Swim forward and climb up at the end. The Grub is at the very top of this area.
Grub #22:
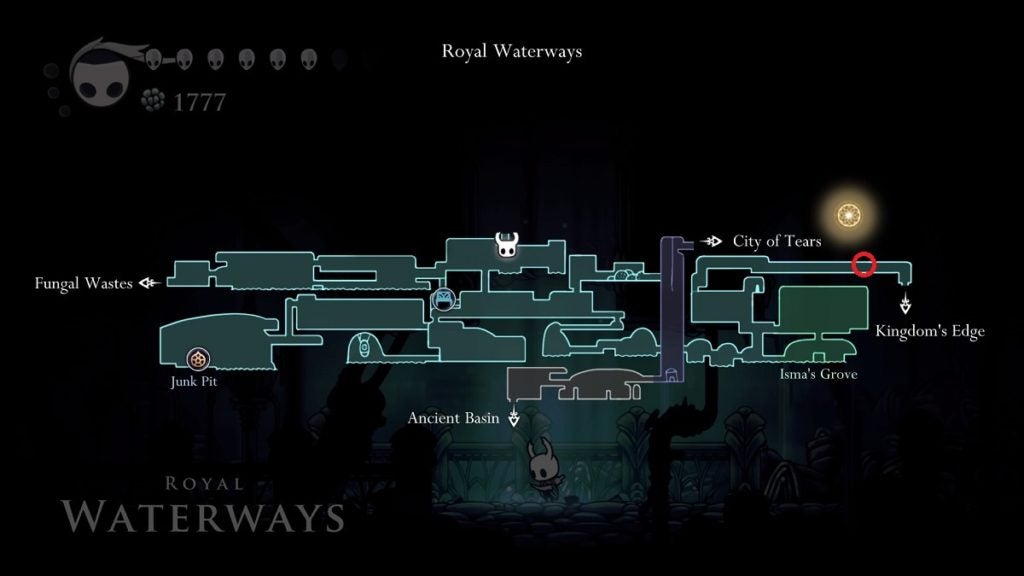
Use the secret entrance from the City of Tears to the Royal Waterways. Once you reach the latter level, proceed to the left and climb upwards once you reach a dead-end to find the entrance to the next area. Continue forward and use the Crystal Heart to cross the massive gap. As soon as you spot a gap that opens up a path above the area, stop and climb upwards. Once at the top, continue heading to the left to find the Grub.
Grubs in City of Tears
Grub #23:
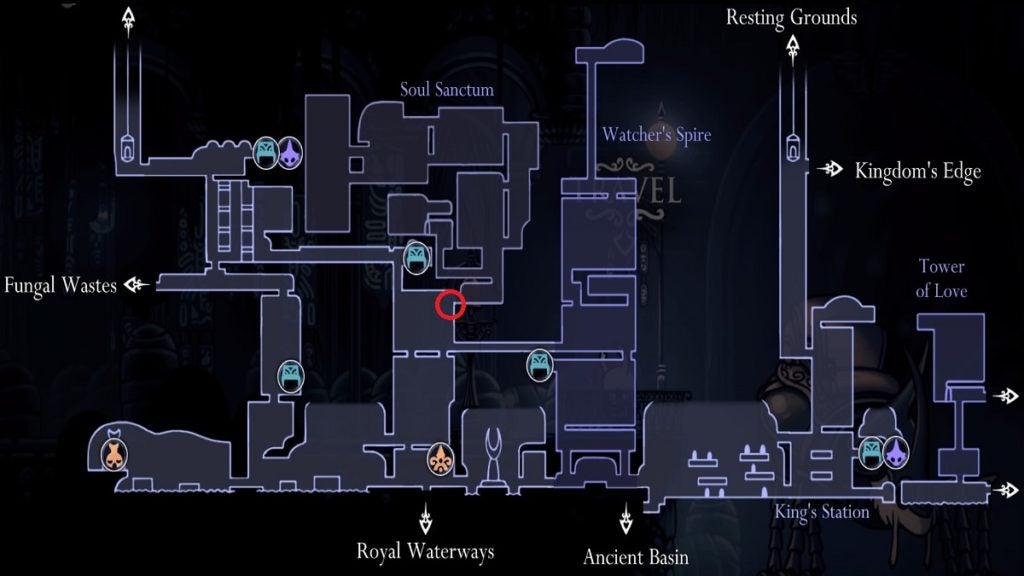
This Grub is located below the bench beside Cornifer. From the bench, drop down and proceed to the right, and then use the lift once to head downwards. You’ll spot the Grub easily in this room.
Grub #24:
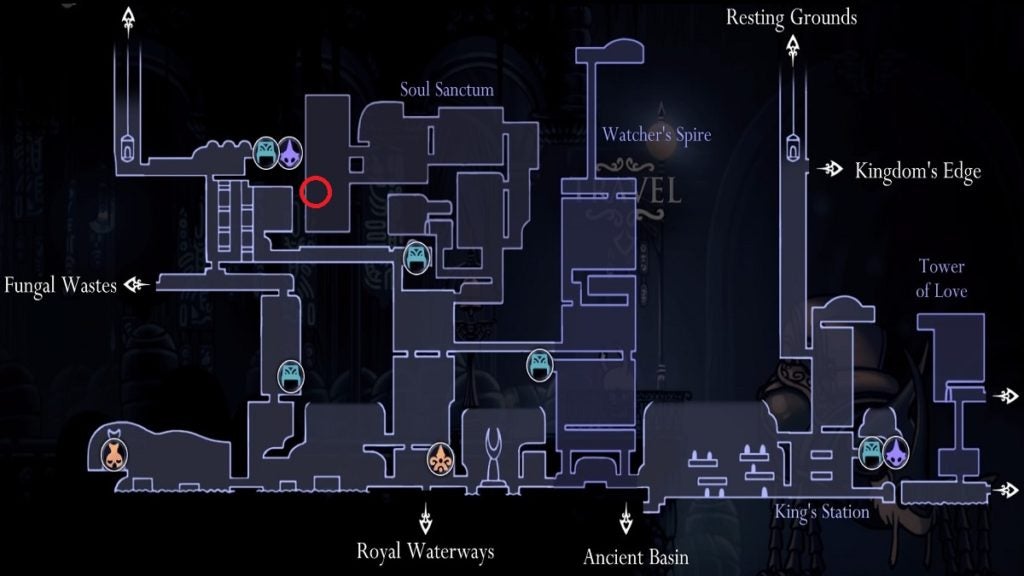
This Grub is in the Soul Sanctum. When you arrive at the aforementioned level, progress through the level until you come across a Soul Totem that’s right beside a breakable floor. Break the floor with Desolate Dive or Descending Dark to find the Grub.
Grub #25:
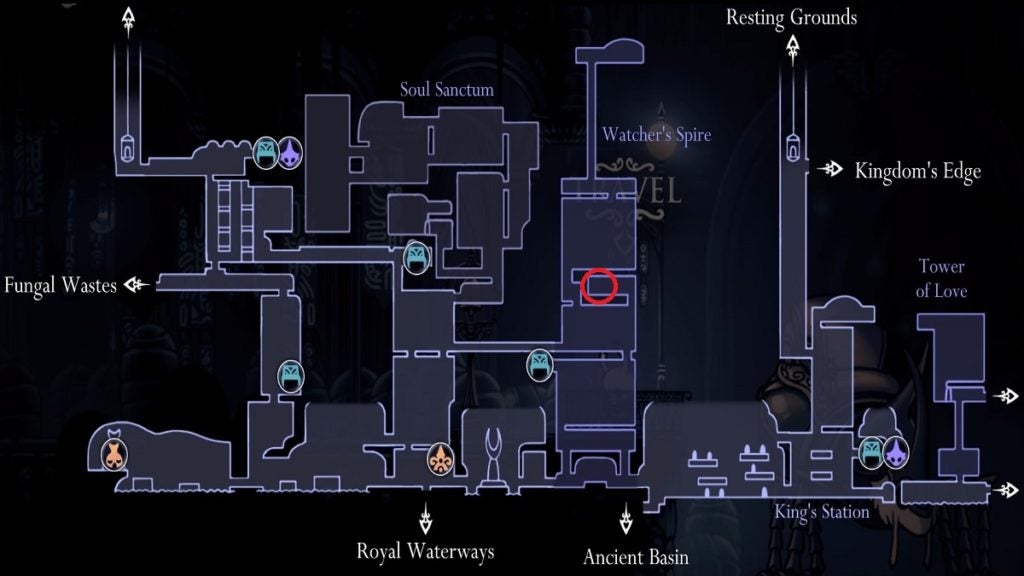
From the bench before the Watcher’s Spire, continue forward until you find an entrance to the next room on the ceiling. Continue forward until you come across a lift. Take the lift up, and once at the top, head right and continue forward. The grub can be found in the next area.
Grub #26:
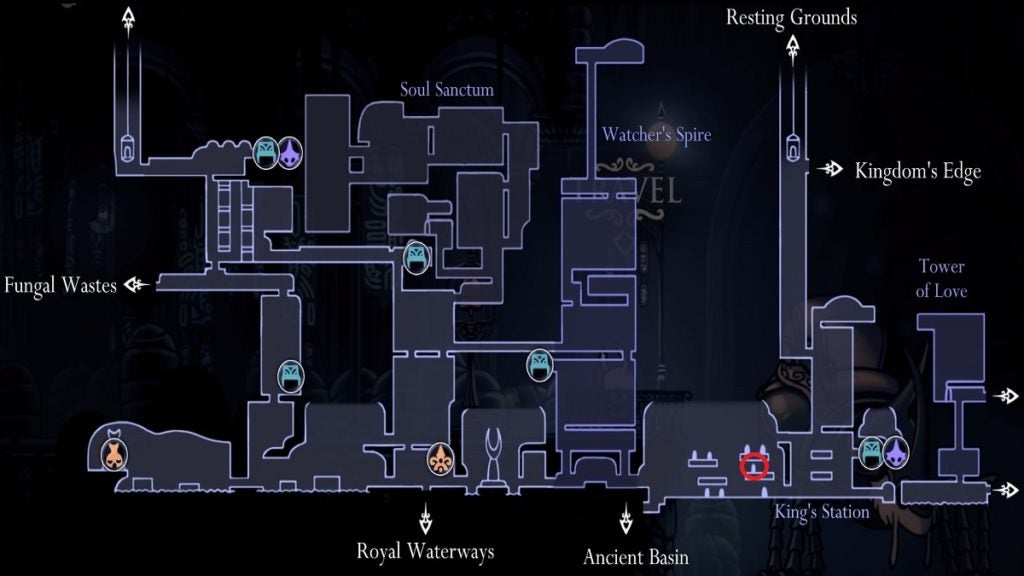
From King’s Station, exit the room and continue to the next room on the left by taking the lower pathway. From there, jump to the platform above you to find a secret room. The Grub is in this room.
Grub #27:
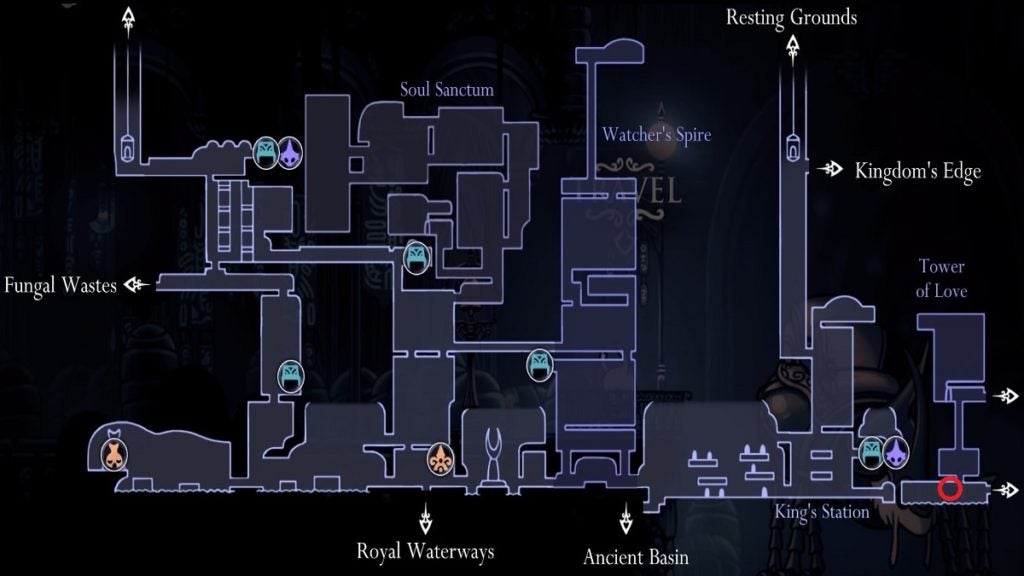
From King’s Station, exit, jump down and take the entrance on the right. From here, you should find a gap on the wall you can swim under at the far end of the room. Continue forward to find the Grub.
Grub #28, 29, & 30:
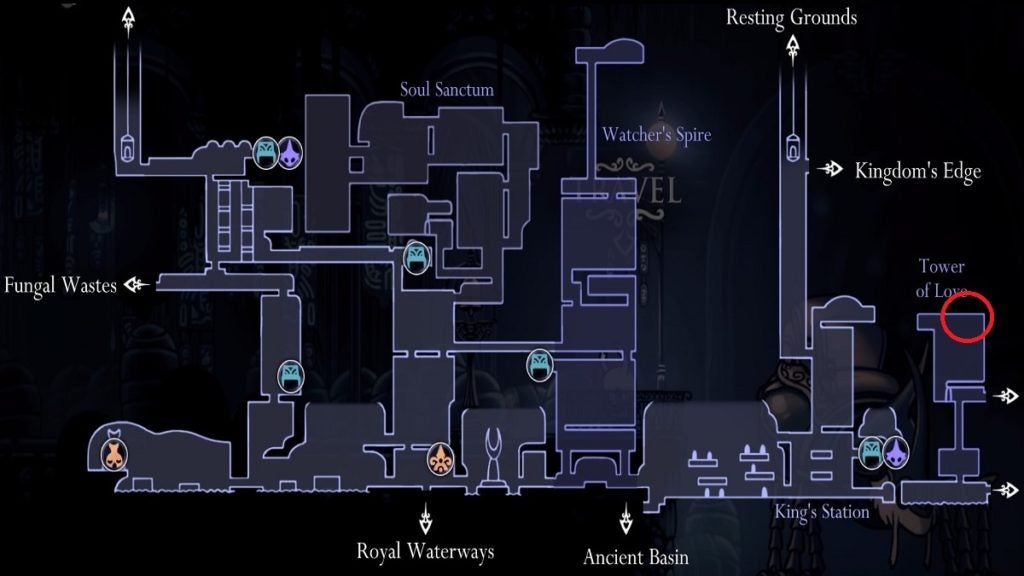
Defeat the Collector in the Tower of Love and proceed forward. You’ll find three Grubs beyond the Collector’s boss room. You can also find the Collector’s Map way further on this level.
Grubs in Kingdom’s Edge
Grub #31:
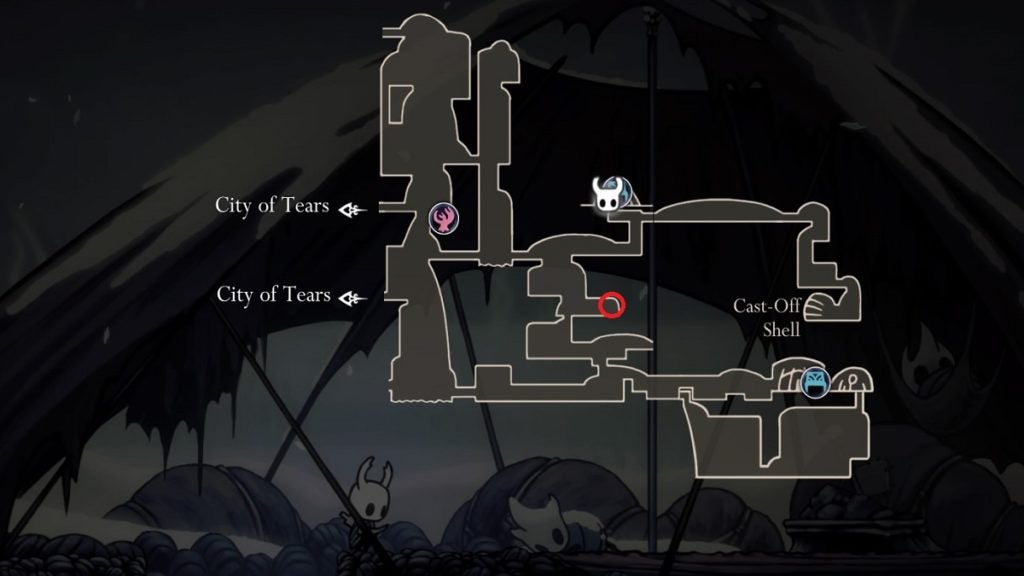
Start from Markoth’s boss room. From there, continue heading to the left until you come across an opening in the ceiling that leads to the next area. Enter and continue to the right until you can find an opening pathway. Continue forward, climb at the end, and then push on to find the Grub.
Grub #32:
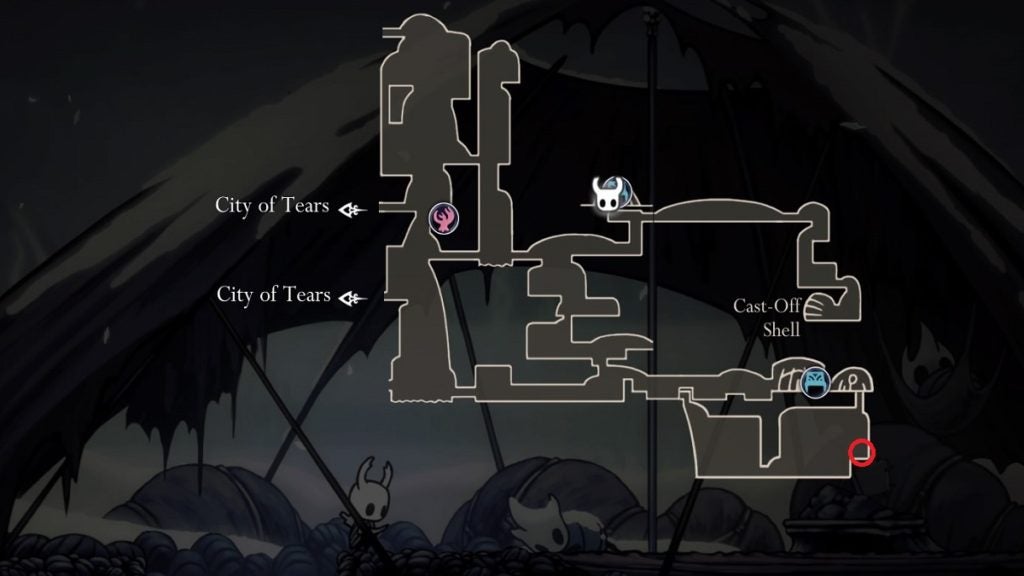
From Nailmaster Oro’s hut, head to the right to enter the next room. Once here, walk to the right side of the room and walk around to find a breakable ground you can use Desolate Dive or Descending Dark on. Break this ground to enter the room below. Continue until you find yourself in a room with spikes on the ground and one Great Hopper. Carefully dash through the opening on the right and continue forward to find the Grub.
Grubs in The Hive
Grub #33:
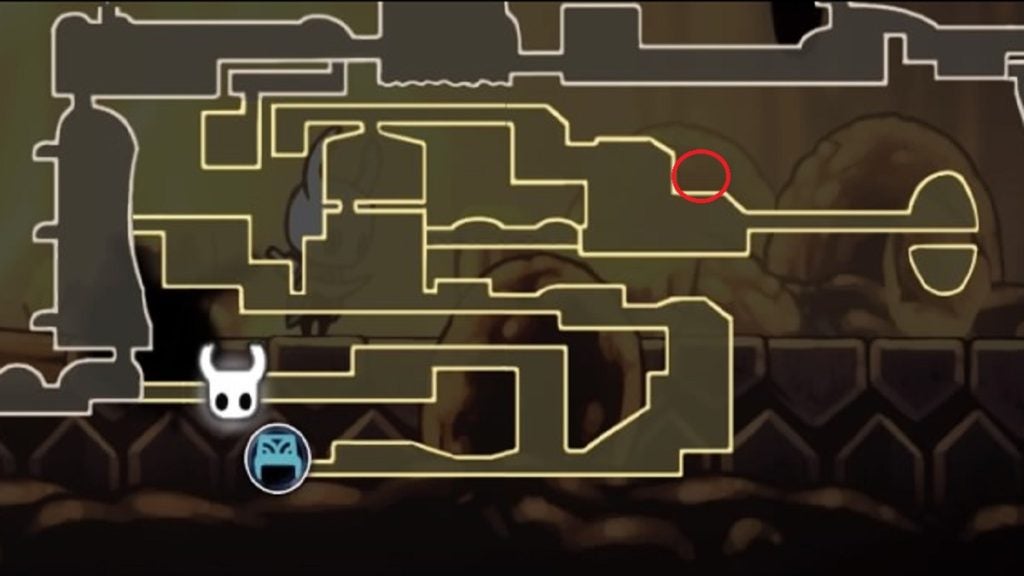
One Grub in The Hive is found in a secret area located before the Hive Knight’s boss room. Just before you take the opening path before the Hive Knight, head to the upper area of the room and climb all the way up until you’re at the upper right-most area of the room. From here, use Crystal Heart to dash across, but pay attention to the ceiling as you’re dashing. As soon as you spot an opening above you, stop dashing and jump upwards. From there, just continue going forward to find the Grub.
Grub #34:
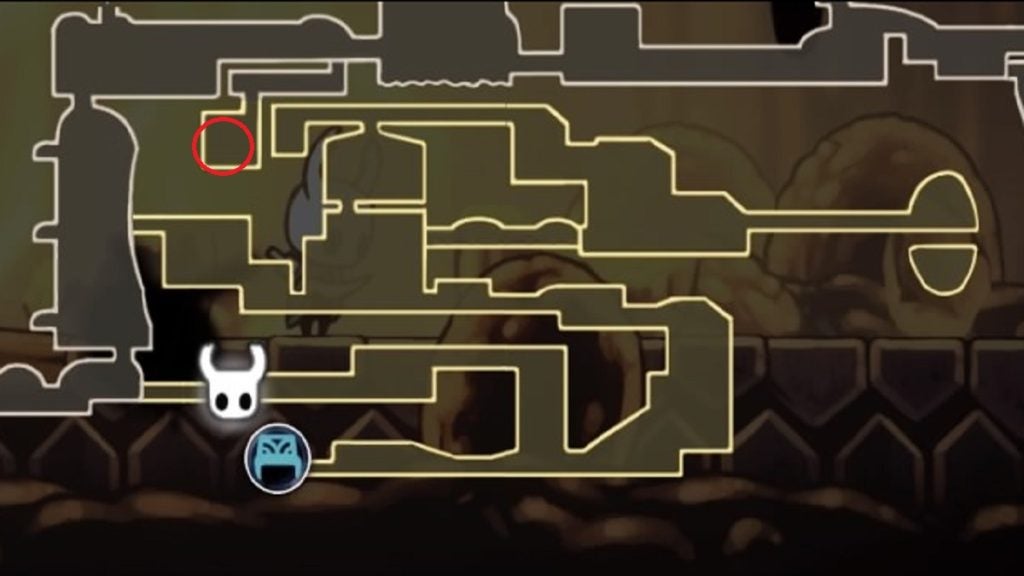
While this Grub is in The Hive, its entrance can only be accessed from the Kingdom’s Edge. From the tram, continue to the right, as if you’re making your way through to Kingdom’s Edge. When you reach the walkway before the massive chasm, you’ll come across a patch of ground that you can break. Break this ground and continue pressing on. You’ll eventually find the Grub as you continue forward.
Grubs in Queen’s Gardens
Grub #35:
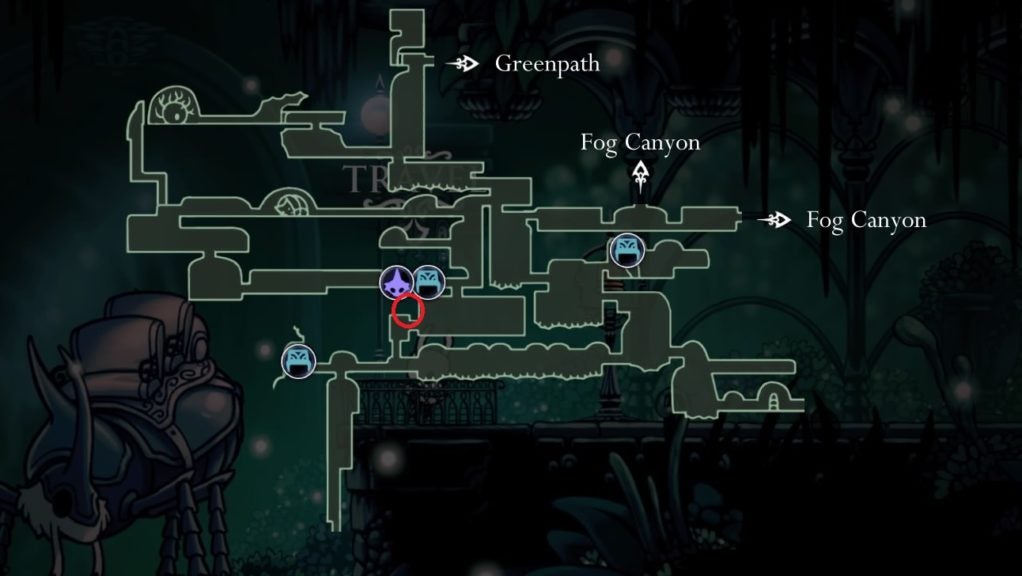
From Queen’s Garden Stag Station, head to the room on the right and take the path down. Once in the next room, just proceed to the left to find the Grub.
Grub #36:
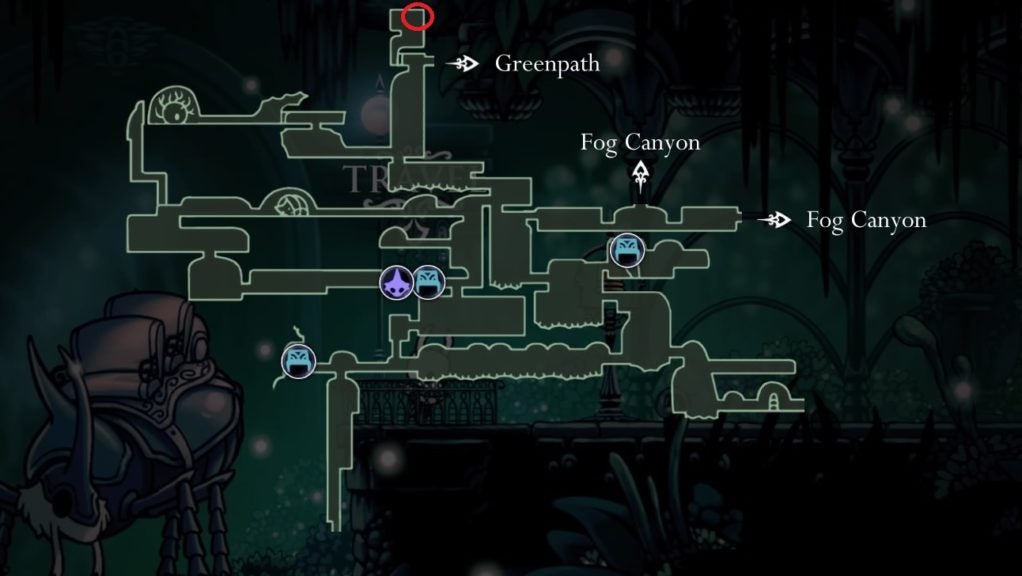
This Grub is at the top-most area of the Queen’s Gardens. Take note of its location on the map as posted above and make your way through to the area. You’ll know you’re getting close once you’re at the area where you’ll need to use Crystal Heart to dash from the left side of the area to the right while avoiding the spikes on the ground. The Grub should be at the end of this platforming section.
Grub #37:
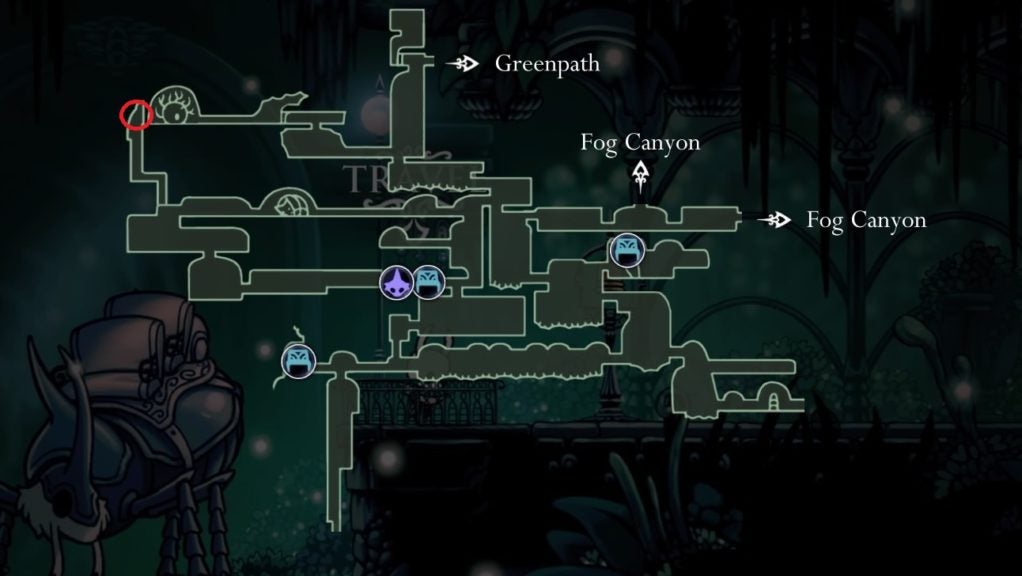
Located in the area left of where the White Lady is. To access the room, head to Marmu’s location and proceed to the left until you come across an opening in the ceiling. Continue making your way up to find another opening. Continue upwards once again and you’ll eventually find yourself face-to-face with a Grub.
Grubs in Deepnest
Grub #38:
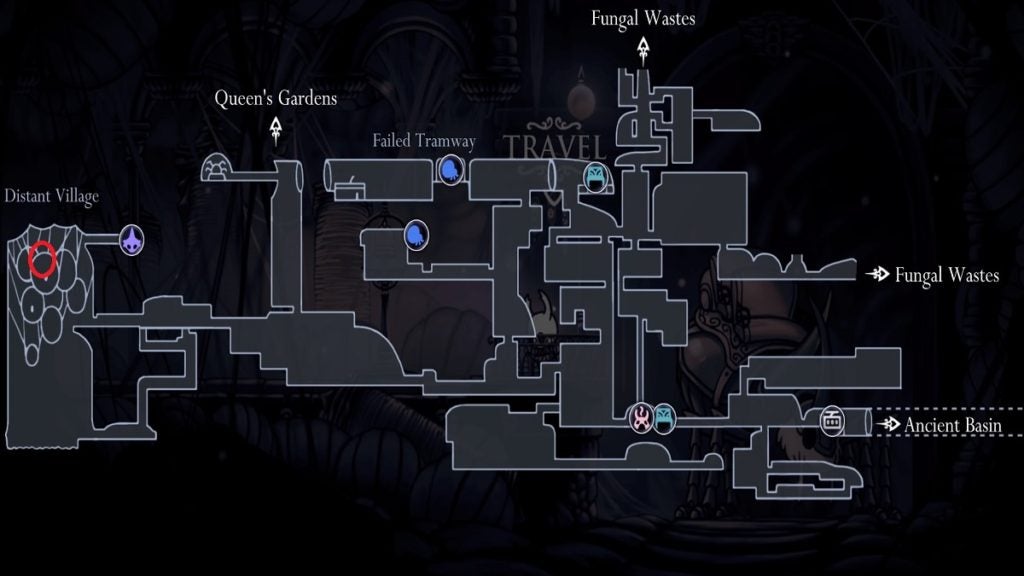
This Grub is located in the Beast’s Den. Once inside this area, continue making your way through to Herrah and you’ll stumble upon the Grub along the way.
Grub #39:
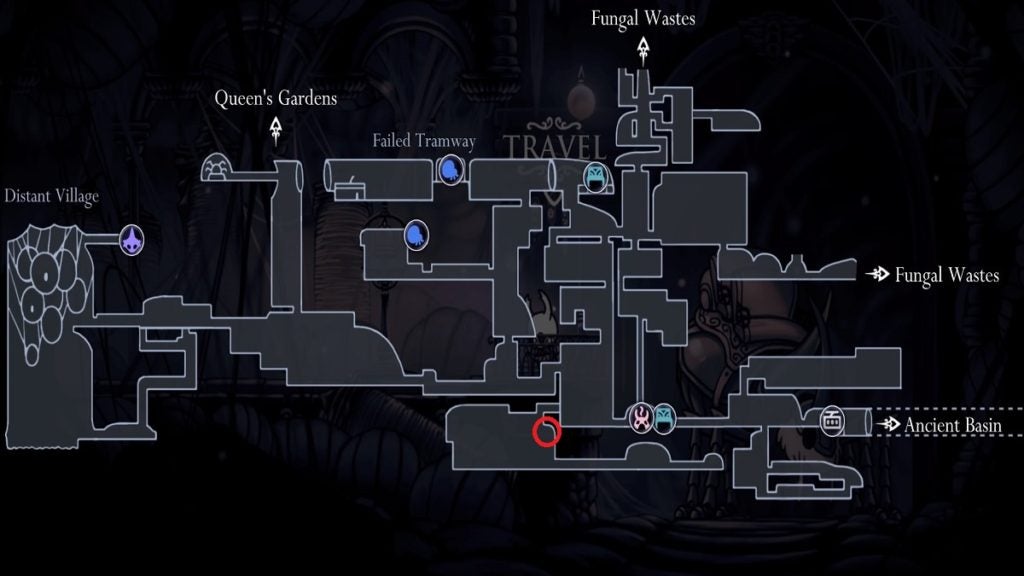
From the bench near the hot spring, proceed to the left and take the path that leads to Nosk. You’ll see the Grub below immediately after you pass through the entrance.
Grub #40:
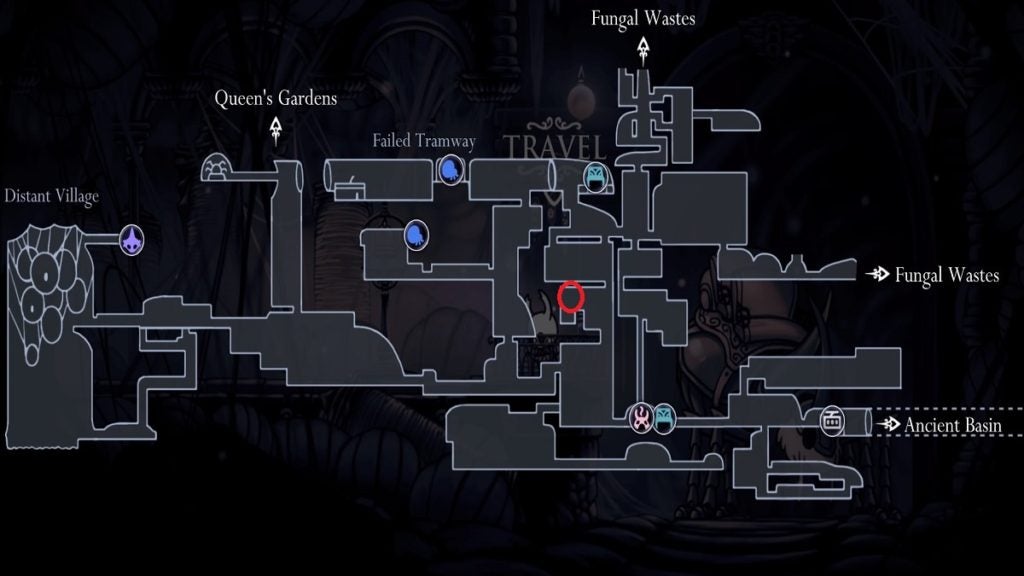
From the same bench as before, proceed to the room on the left and make your way up to the level. When you reach the area marked on the map above, use Crystal Heart to make your way across, climb upwards, and then jump on the platform to reach the Grub.
Grub #41:
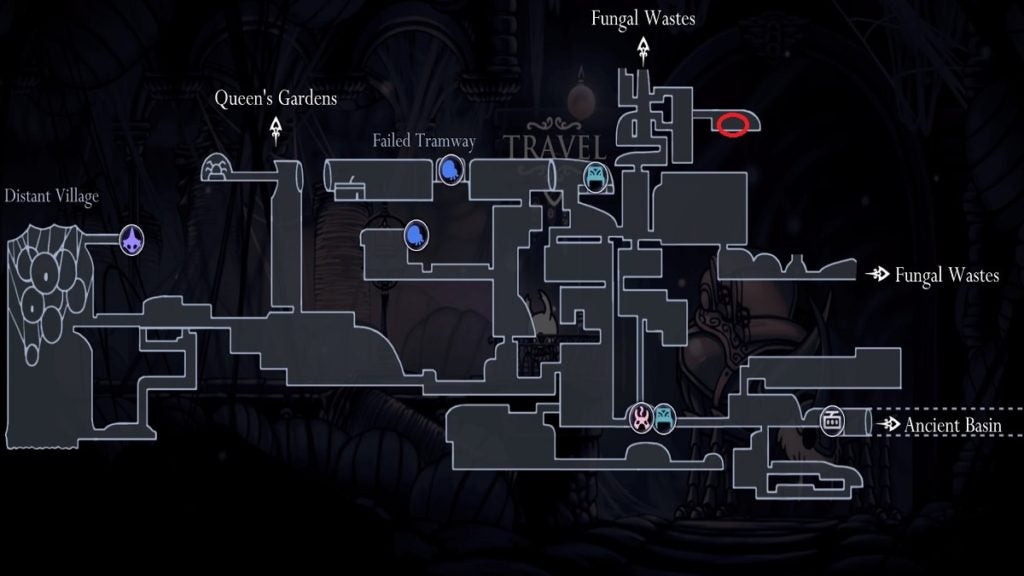
From the bench to the right of the Failed Tramway, head down and take the entrance on the right. From there, climb your way up while avoiding the Garpedes until you spot an entrance on the ceiling. As soon as you enter the next room, head to the right and continue heading upwards. From the area with the massive gap, use the Crystal Heart from the platform on the left to reach the room on the right. This place contains an entrance that leads to the room you want to be in. Once in the next room, head to the right and find a breakable wall on the right side of the room. In the next area, there should be four Grub jars in front of you. Three of these jars contain Grub mimics. The real Grub is the third from the left.
Grub #42:
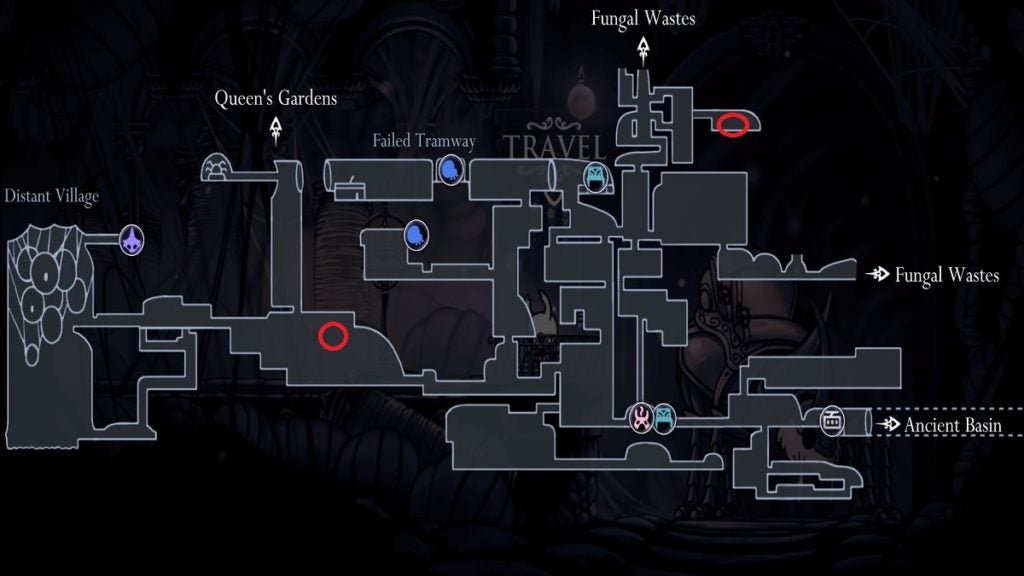
The fastest way to reach this area is from the Distant Village Stag Station. Head to the area shown in the image above. You will be able to spot the Grub above you easily as you reach tall caverns with narrow platforms that you can jump on.
Grubs in Ancient Basin
Grub #43:
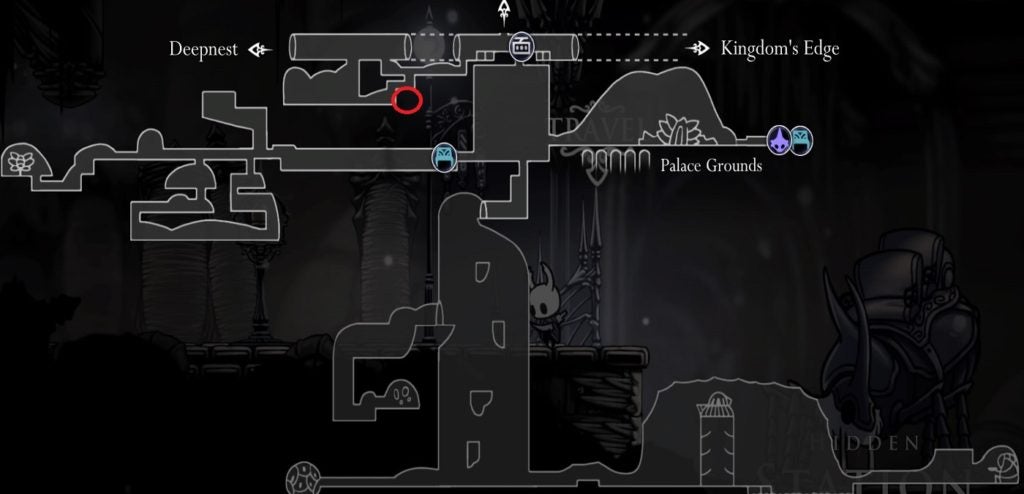
Exit the tram from the Ancient Basin and directly head to the left to find an opening in the ground. Jump down to proceed. From there, head to the left and jump down as soon as you spot an opening. That will land you directly on breakable ground. Use Desolate Dive or Descending Dark to access the room below, which houses a Grub.
Grub #44:
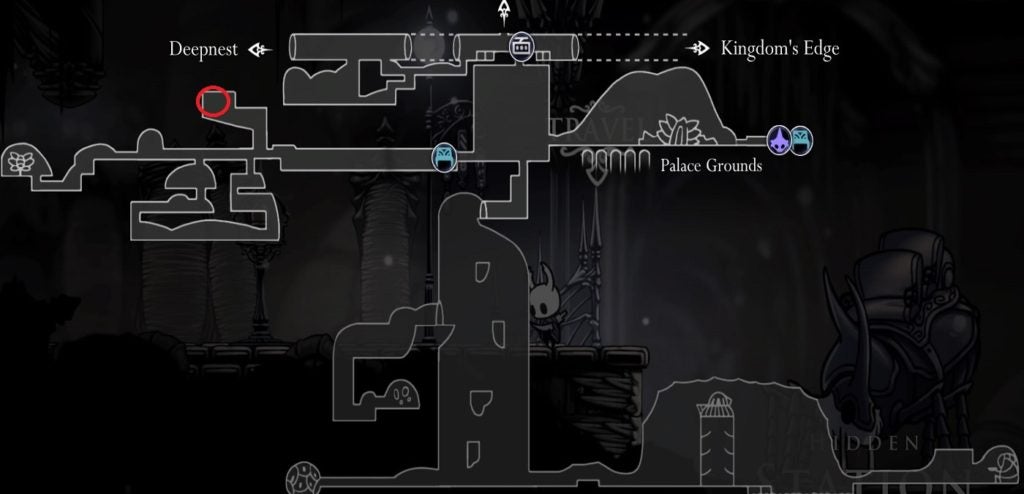
From the Ancient Basin bench, use Crystal Heart to power dash to the right. As soon as you enter the next room, you’ll find an opening on the ceiling. Jump up and continue navigating your way to the end of this room to find the Grub.
Grub in Resting Grounds
Grub #45:
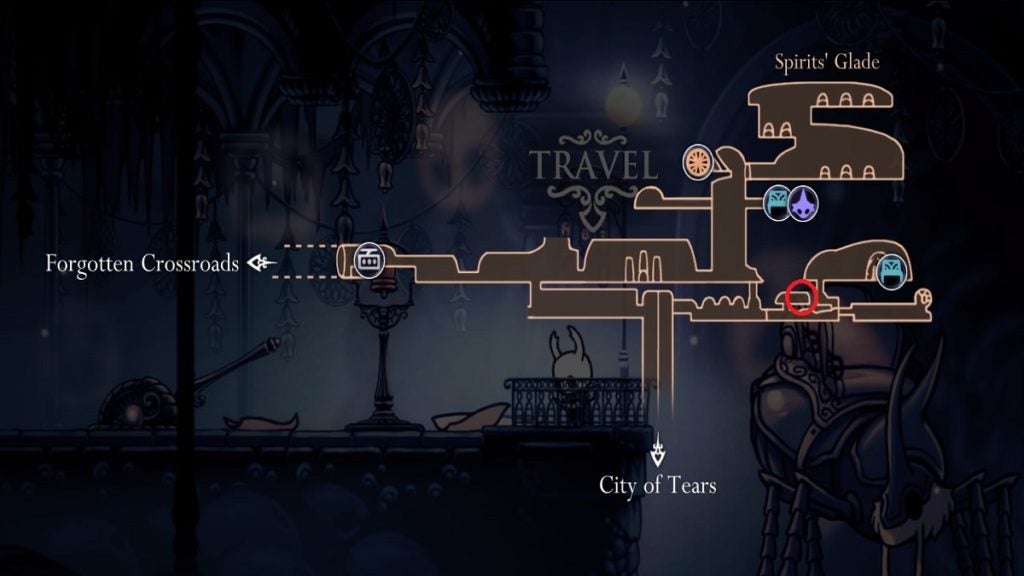
The Grub in the Resting Grounds is in the area just before where the Grey Mourner is. As you make your way to the Grey Mourner, you’ll spot a pathway above that you can climb on. The Grub is up there behind an Entombed Husk.
Grub in Howling Cliffs
Grub #46:
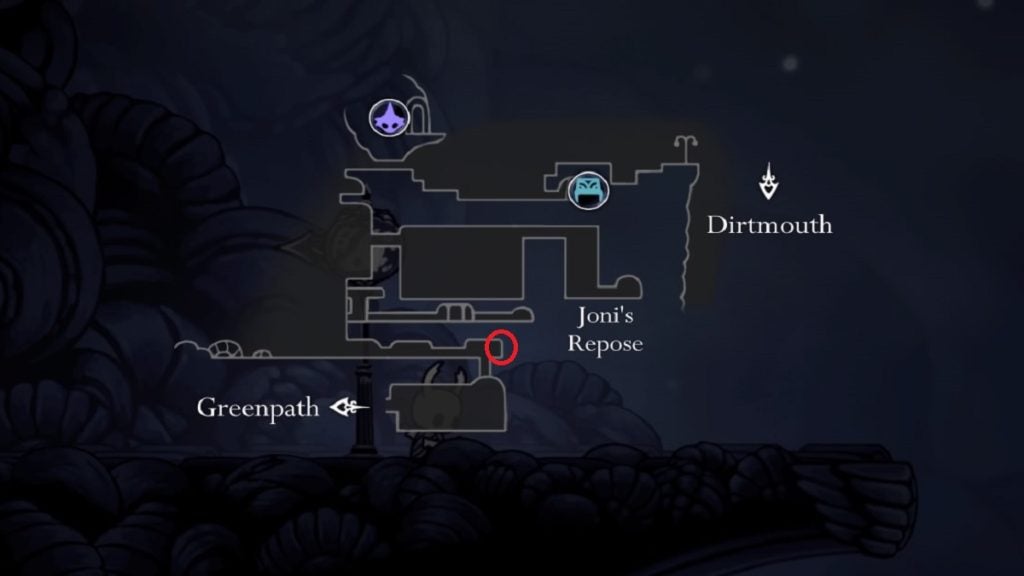
The Grub in the Howling Cliffs is at the southern-most part of the level. You can enter this area by entering a secret pathway that opens up from a Soul Totem.
Grub Rewards

Aside from earning the Grubfather’s gratitude and addicting optimism, you,ll also earn Geos, achievements, and a handful of rewards for freeing the Grubs. The Grubfather will throw a gift at you after freeing a certain number of Grubs. You’ll also receive a certain number of Geos for every Grub freed. Each number varies, but in the end, you’ll receive a total of 6,750 Geos for freeing all 46 Grubs in Hollow Knight. Here is every single reward you will get for setting all the Grubs free:
- 1 Grub – 10 Geos
- 2 Grubs – 20 Geos
- 3 Grubs – 30 Geos
- 4 Grubs – 40 Geos
- 5 Grubs – Mask Shard
- 6 Grubs – 50 Geos
- 7 Grubs – 60 Geos
- 8 Grubs – 70 Geos
- 9 Grubs – 80 Geos
- 10 Grubs – Grubsong Charm
- 11 Grubs – 90 Geos
- 12 Grubs – 100 Geos
- 13 Grubs – 110 Geos
- 14 Grubs – 120 Geos
- 15 Grubs – 120 Geos
- 16 Grubs – Rancid Egg
- 17 Grubs – 140 Geos
- 18 Grubs – 150 Geos
- 19 Grubs – 160 Geos
- 20 Grubs – 165 Geos
- 21 Grubs – 170 Geos
- 22 Grubs – 180 Geos
- 23 Grubs – Hallownest Seal
- 24 Grubs – 200 Geos
- 25 Grubs – 200 Geos
- 26 Grubs – 205 Geos
- 27 Grubs – 210 Geos
- 28 Grubs – 215 Geos
- 29 Grubs – 220 Geos
- 30 Grubs – 220 Geos
- 31 Grubs – Pale Ore
- 32 Grubs – 230 Geos
- 33 Grubs – 235 Geos
- 34 Grubs – 240 Geos
- 35 Grubs – 245 Geos
- 36 Grubs – 250 Geos
- 37 Grubs – 255 Geos
- 38 Grubs – King’s Idol
- 39 Grubs – 260 Geos
- 40 Grubs – 265 Geos
- 41 Grubs – 270 Geos
- 42 Grubs – 280 Geos
- 43 Grubs – 290 Geos
- 44 Grubs – 295 Geos
- 45 Grubs – 300 Geos
- 46 Grubs – Grubberfly’s Elegy Charm


