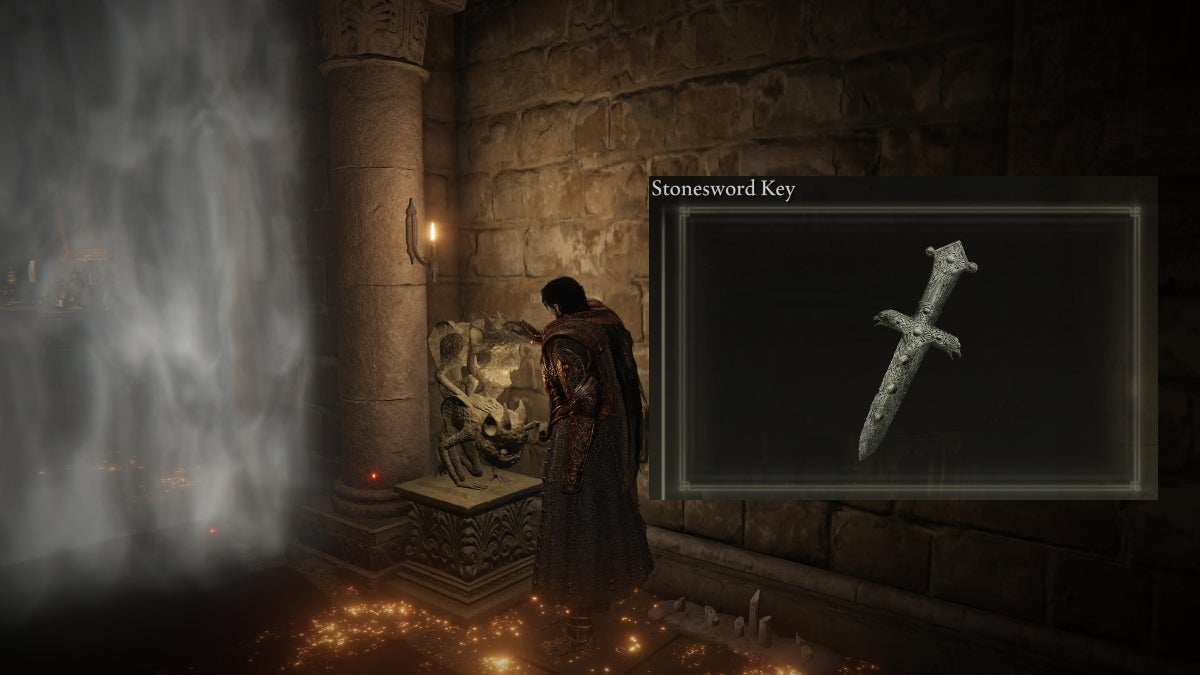
The Stonesword Key is an essential item to have in Elden Ring. There’s quite a number of this item in the game, too. Collect these and you’ll be able to clear up every single fog gate you’ll come across.
Table Of Contents
Stonesword Keys as a Keepsake
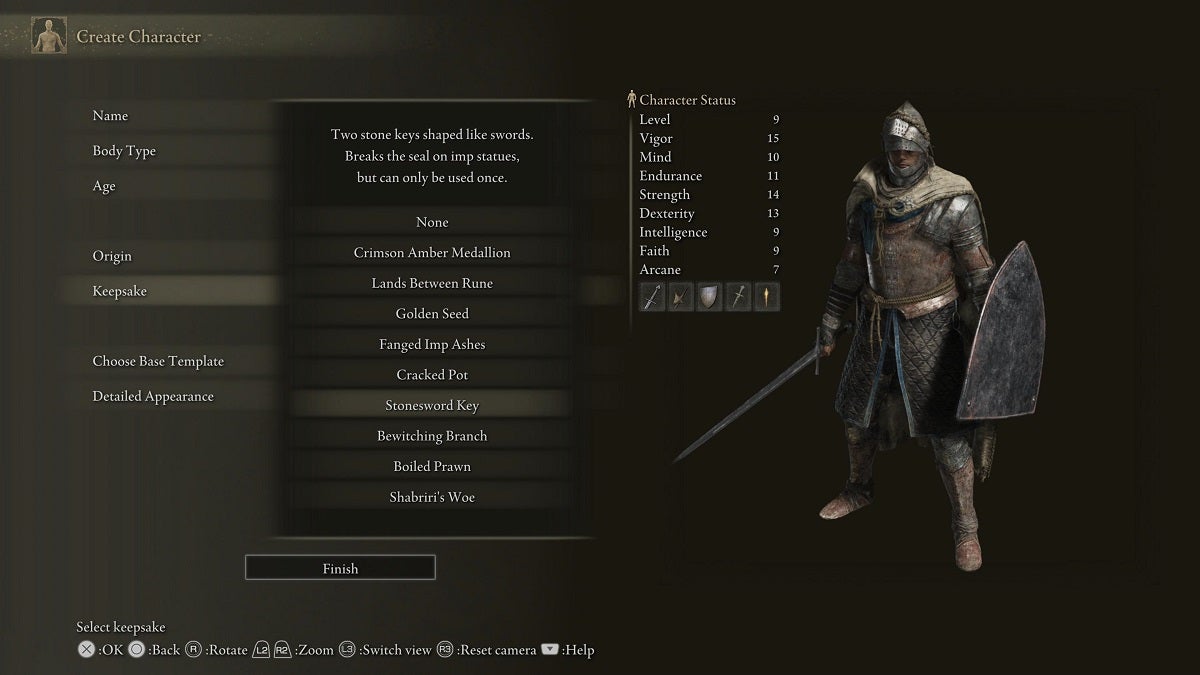
The very first Stonesword Keys you can acquire in Elden Ring are available in the creation menu. If you choose Stonesword Keys as your keepsake, you’ll receive two of them at the start of the game.
Every Stonesword Key in Limgrave
There are 13 Stonesword Keys in Limgrave that you can either loot or buy. Here are their locations.
Purchase from Patches
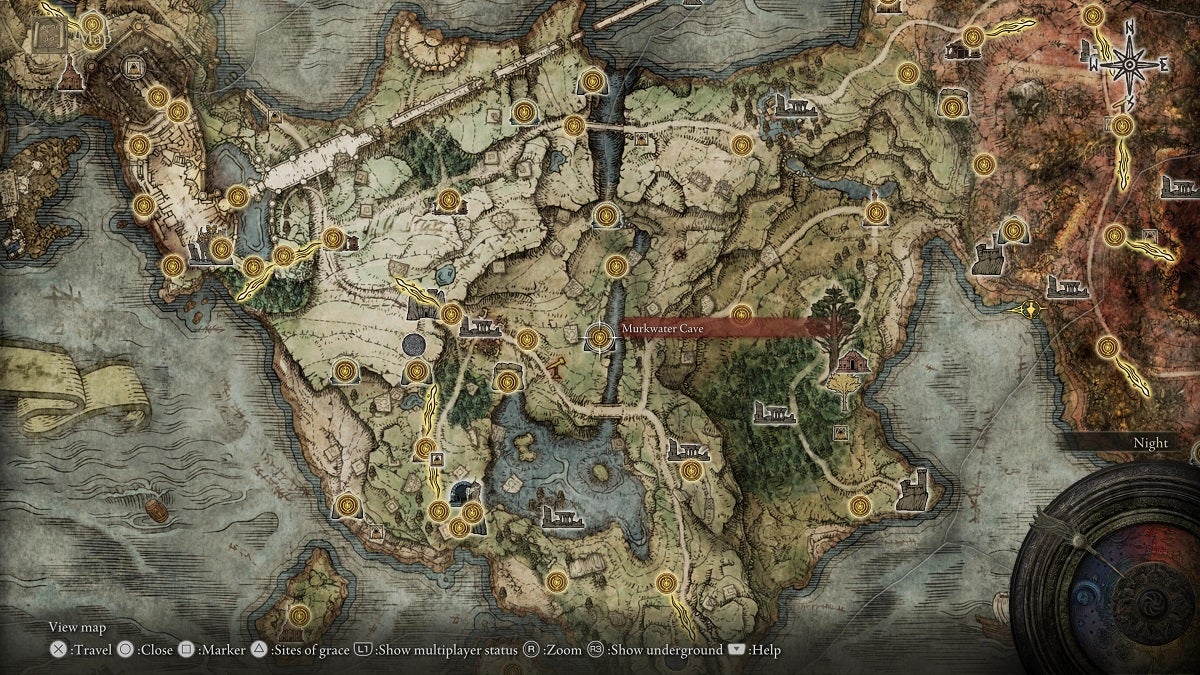
You can get your first Stonesword Key in Limgrave by buying it from Patches. You can buy items from him if you spare him after fighting him at the Murkwater Cave. He sells one Stonesword Key, along with many other items, for 5,000 Runes.
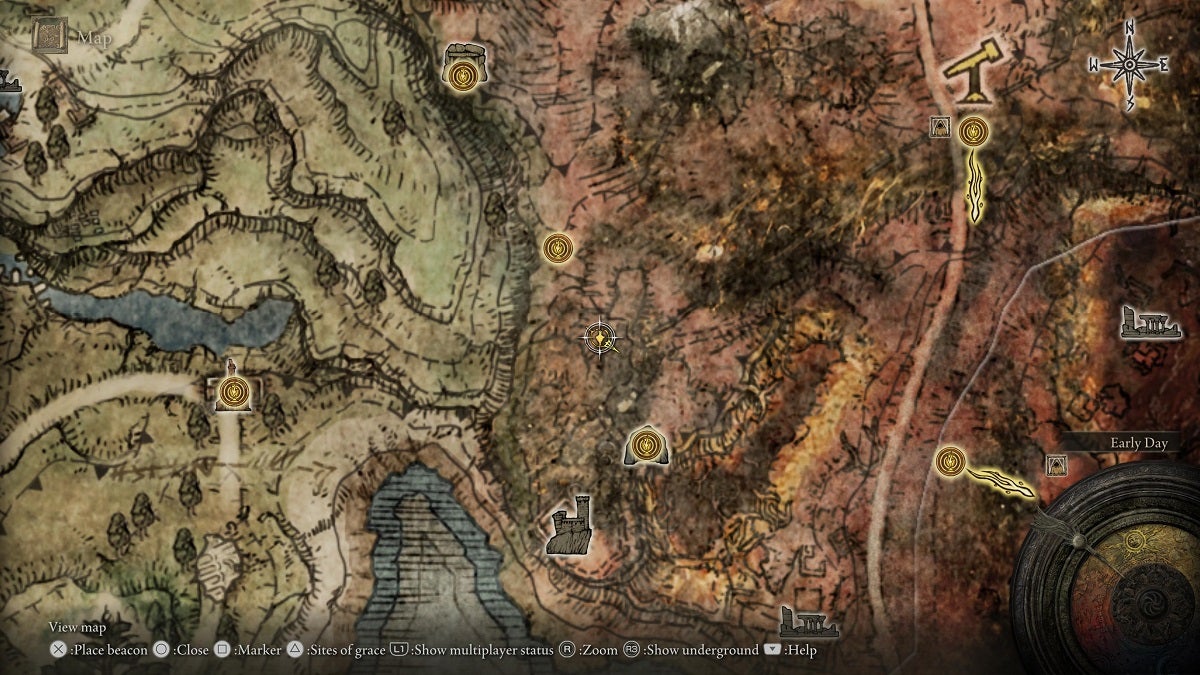
Dragon-Burnt Ruins
There’s one Stonesword Key in the Dragon-Burnt Ruins. It’s on a corpse in the tower marked on the image of the map above. The tower is situated next to the arc in the middle of the ruin and the stairway that leads to an underground room. There’s a lone Rat that’s guarding the corpse in this tower.
Stormhill Shack
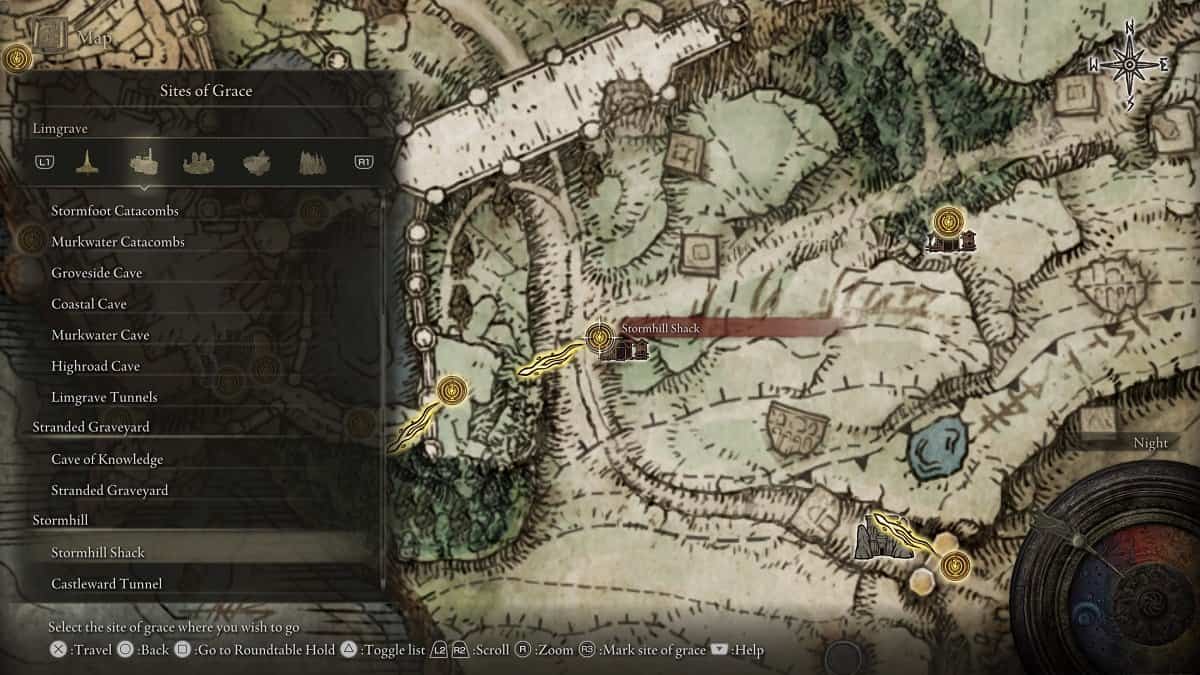
There’s another Stonesword Key held by the corpse that’s atop the wooden platforms southeast of the Stormhill Shack Site of Grace.
Fringefolk Hero’s Grave
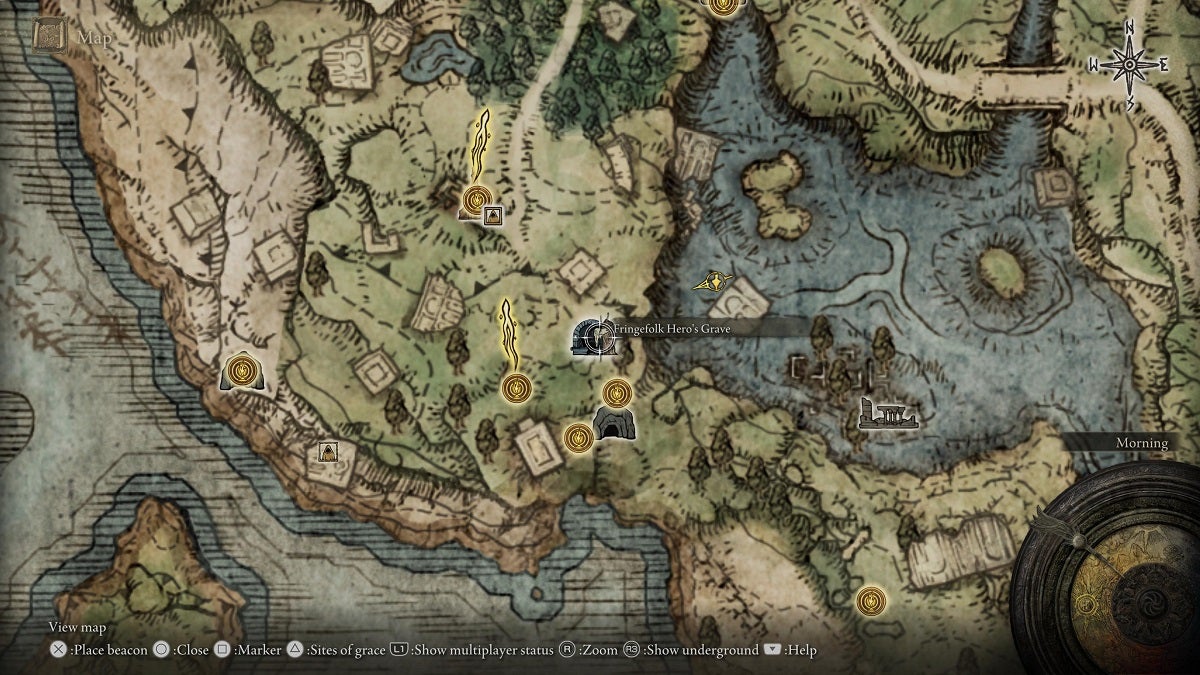
A body that’s slumped over a ledge above the path where the chariot runs hold a Stonesword Key. You can get to this area by continuing to descend the level until you reach the path where it becomes narrow. From here, you can drop from either side, but be sure to stick close to the side where the wide path ends so you can land safely on the floor below.
From here, keep going forward until you reach a chapel with two Grafted Scions. You can drop down to the bottom floor from here where you’ll find a stairway that leads to a lift. Proceed onwards and you’ll find the body that holds the Stonesword Key.
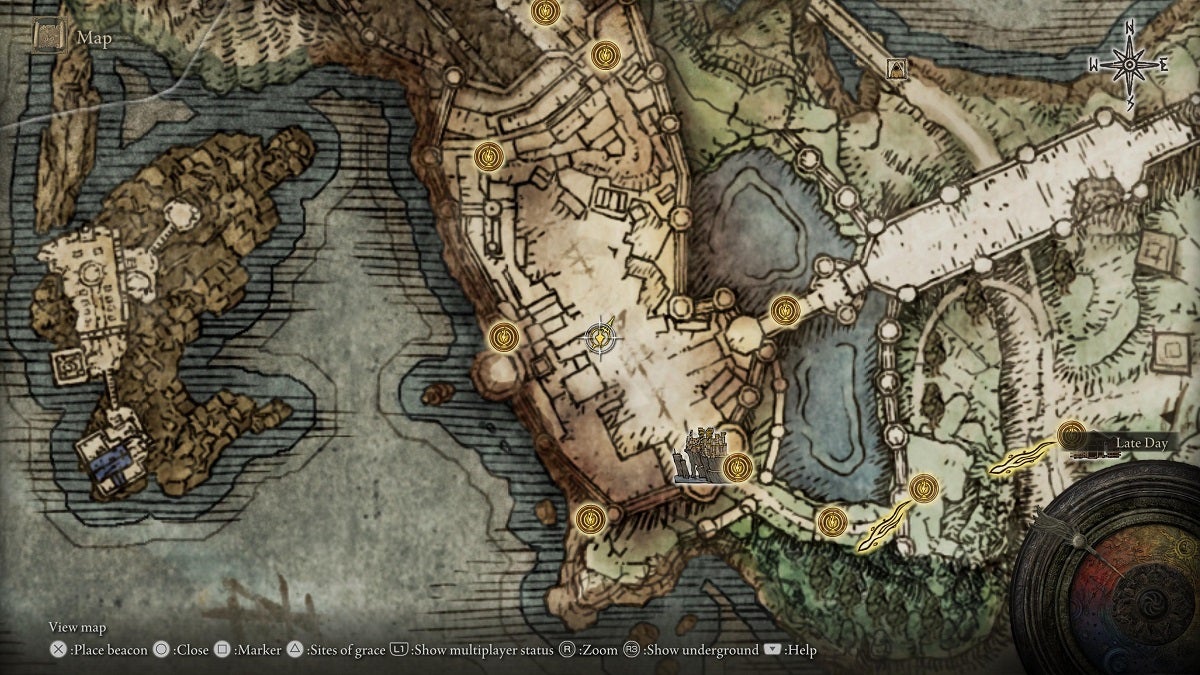
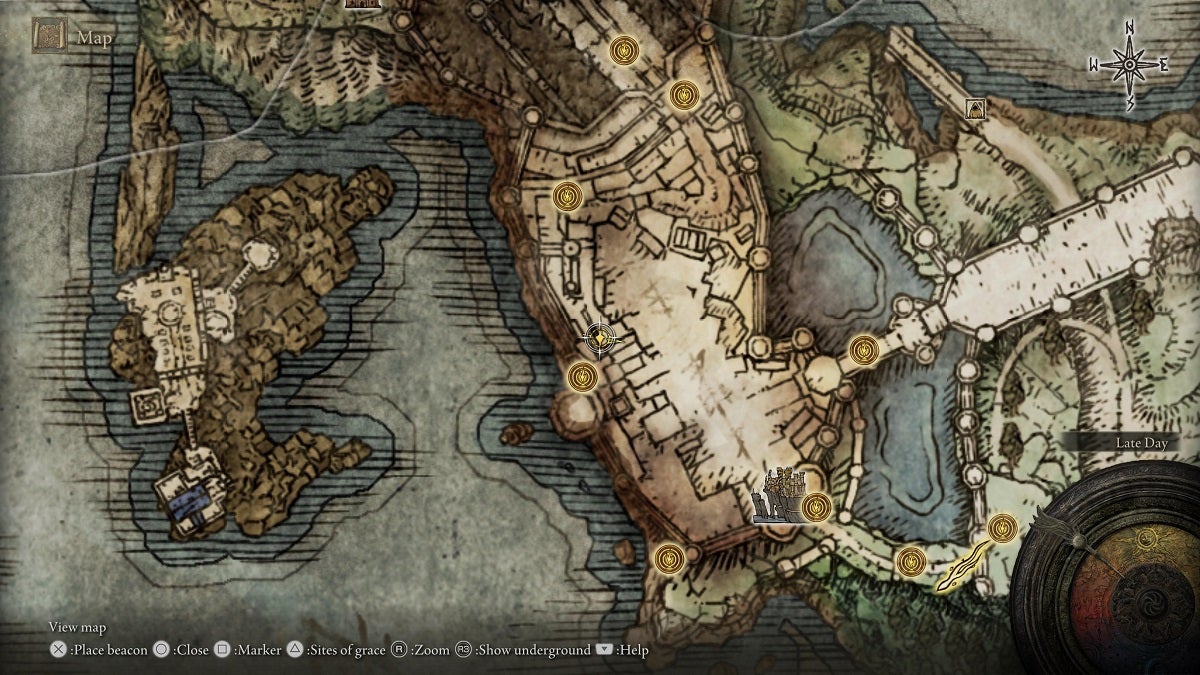
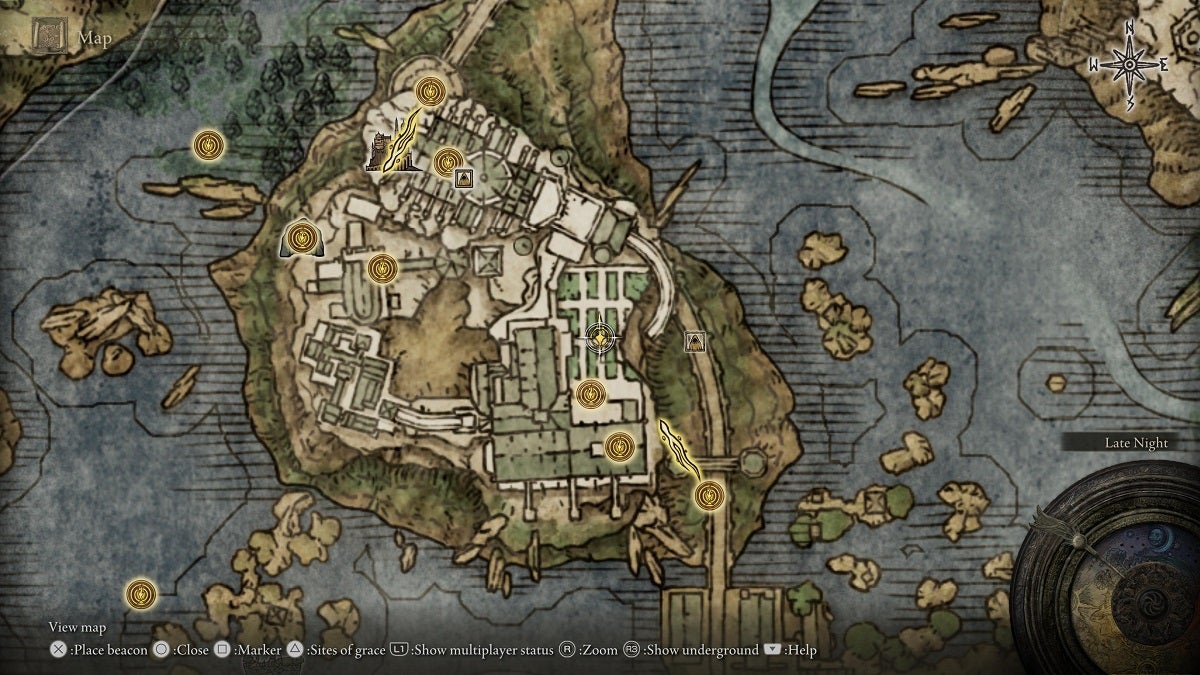
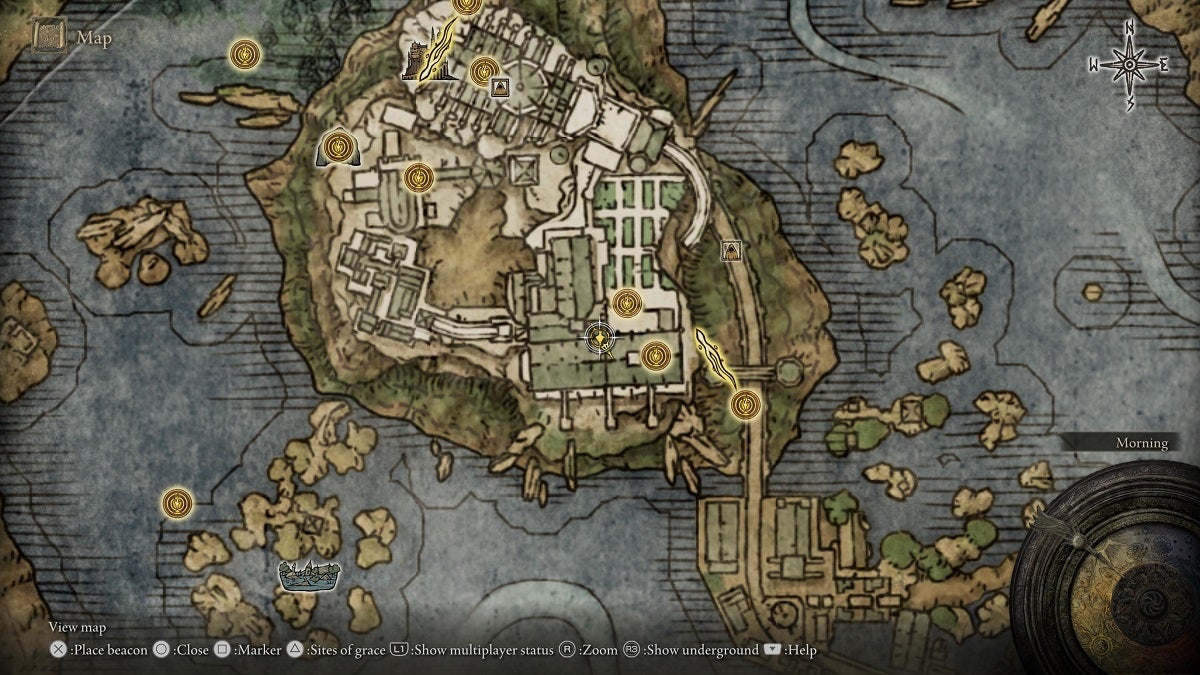
Stormveil Castle
There are three Stonesword Keys in Stormveil Castle. One is on the upper ledge of the hall where the Grafted Scion is. To get here, start from the open walkway that leads to the building the Grafted Scion is in. You’ll know you’re on the right walkway when you see the hanging troll on the east side of the walkway.
Look over to the right and you’ll see a sack pile you can walk on so you can jump over the railing ahead. Proceed onwards from here and use the wooden platform to go around the building until you find a ladder to the left at the end of it.
Climb the ladder then continue walking forward. Look down once you’re at the edge of the rooftop to find a platform with an Exiled Soldier you can land on below. Drop down and enter the massive open door ahead. This path will take you to the upper ledge where a corpse is sitting down facing the portrait of Godfrey. Loot the corpse the get a Stonesword Key.
There’s another Stonesword Key inside a tower that you can only enter from above. Start from the Rampart Tower Site of Grace, then pass through the door to the southeast. Look to your right and use the staircase here to get to the upper level of the tower. Continue onwards until you reach an open balcony.
As soon as you step into the open balcony, you’ll find a sack pile against the railing ahead of you. Walk over to this pile and jump atop the railing. Look over to the next tower to the east where its top part has been smashed open. This is the tower you’ll need to enter. Approach the tower and you’ll find a railing here that’s short enough for you to jump over. Enter the tower and make your way to the bottom to find the Stonesword Key.
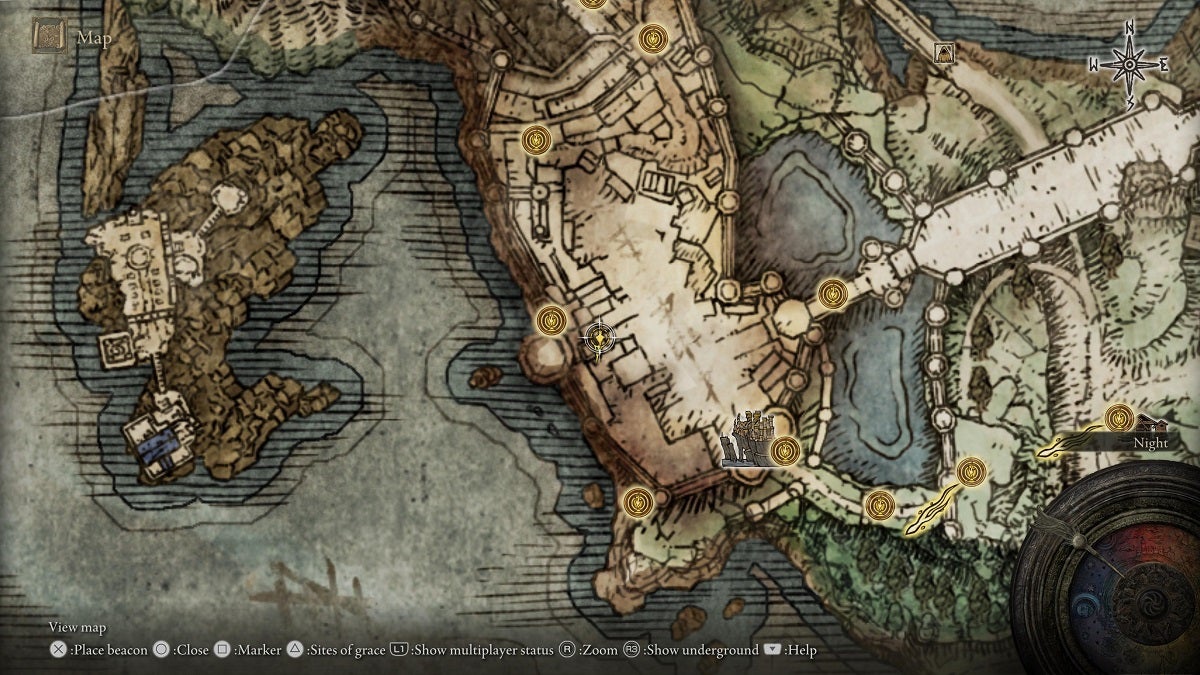
The last Stonesword Key in Stormveil Castle is on the same ground beneath the castle where an Ulcerated Tree Spirit spawns. You can get to this area by starting from the Liftside Chamber, then taking the eastern door. Make a hard right as soon as you exit the chamber and you’ll find a body that’s sitting by the ledge.
You can make your way to the ground from here by landing on the ledge below, then onto the broken buttress, and finally onto the wooden platforms that descend closer to the ground. Once you’re grounded, continue forward until you’re in the arena where the Tree Spirit spurts up from the ground. You can either fight this boss or simply ignore it as you loot the surrounding items — one of which is a Stonesword Key.
Bridge of Sacrifice
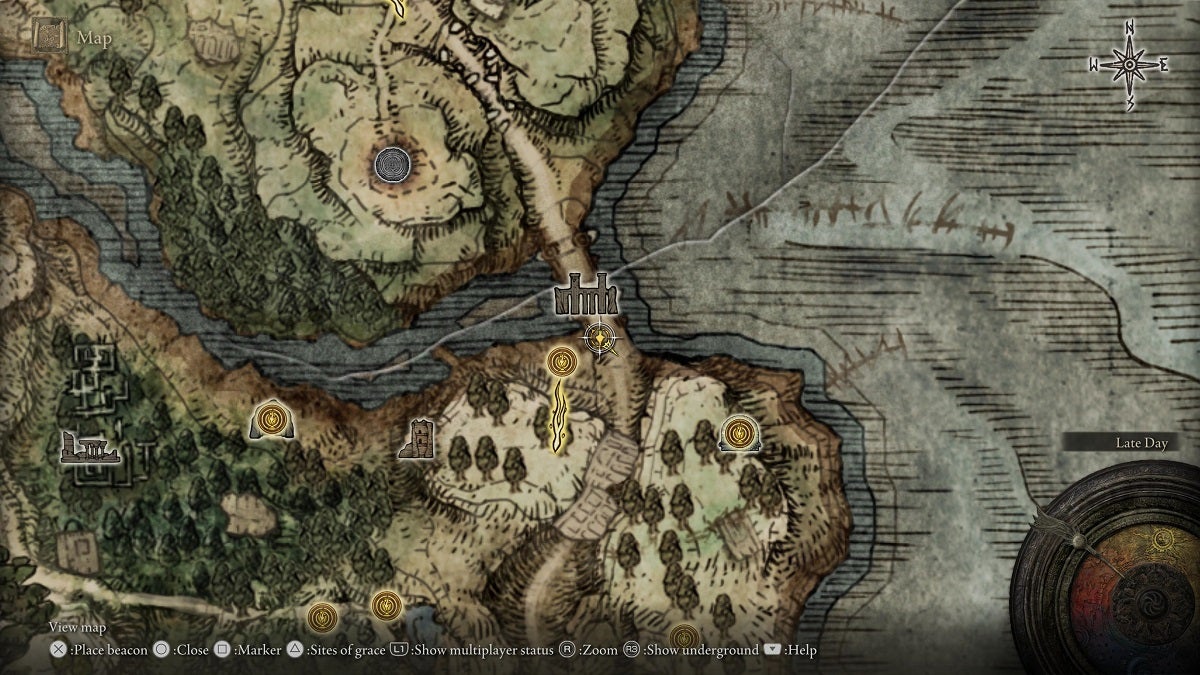
You’ll find another Stonesword Key on the Bridge of Sacrifice. It’s on the ground next to a wooden barricade at the southern end of the bridge.
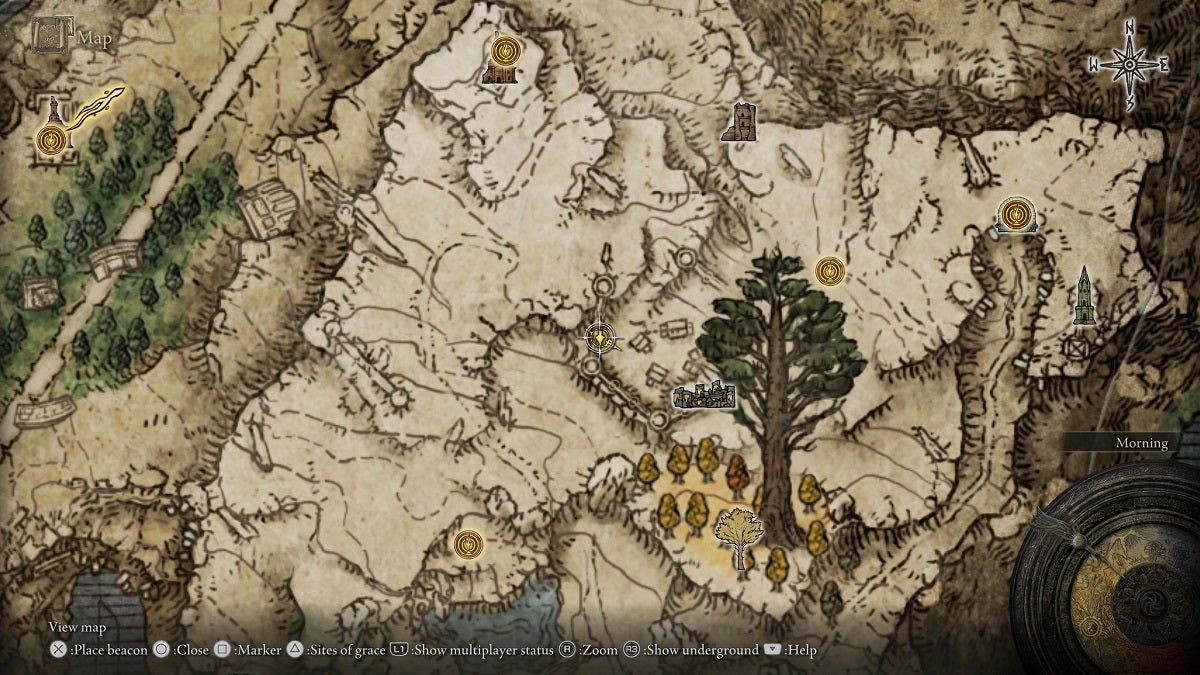
Northeast Weeping Peninsula
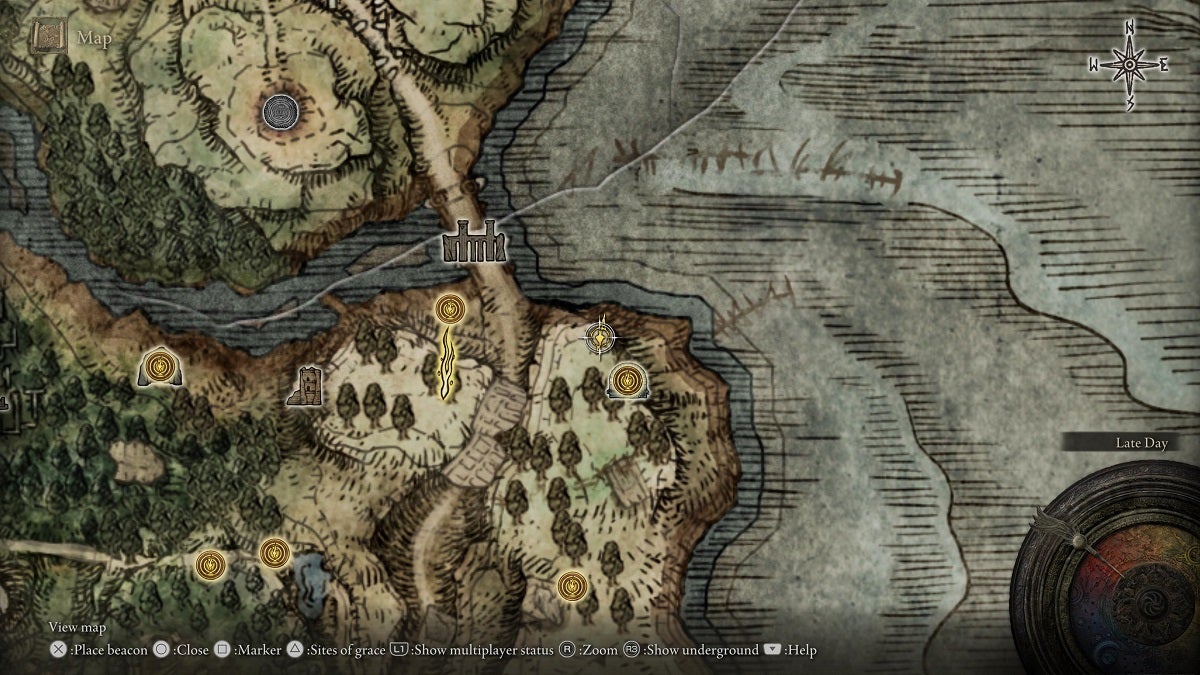
On the northern edge of the plateau on the northeastern area of the Weeping Peninsula, you’ll find a corpse that’s sitting on a chair facing the Erdtree. Loot this corpse to get a Stonesword Key.
Isolated Merchant at Weeping Peninsula
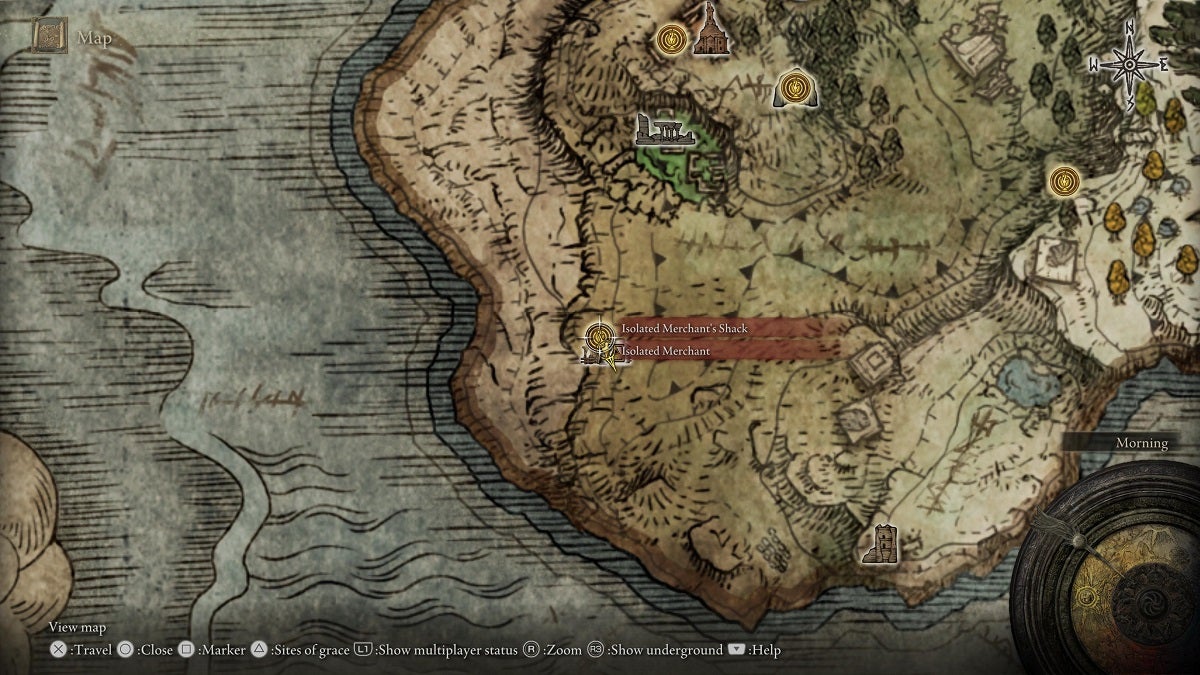
The Isolated Merchant at the Isolated Merchant’s Shack in the Weeping Peninsula sells three Stonesword Keys for 2,000 Runes each.
Castle Morne
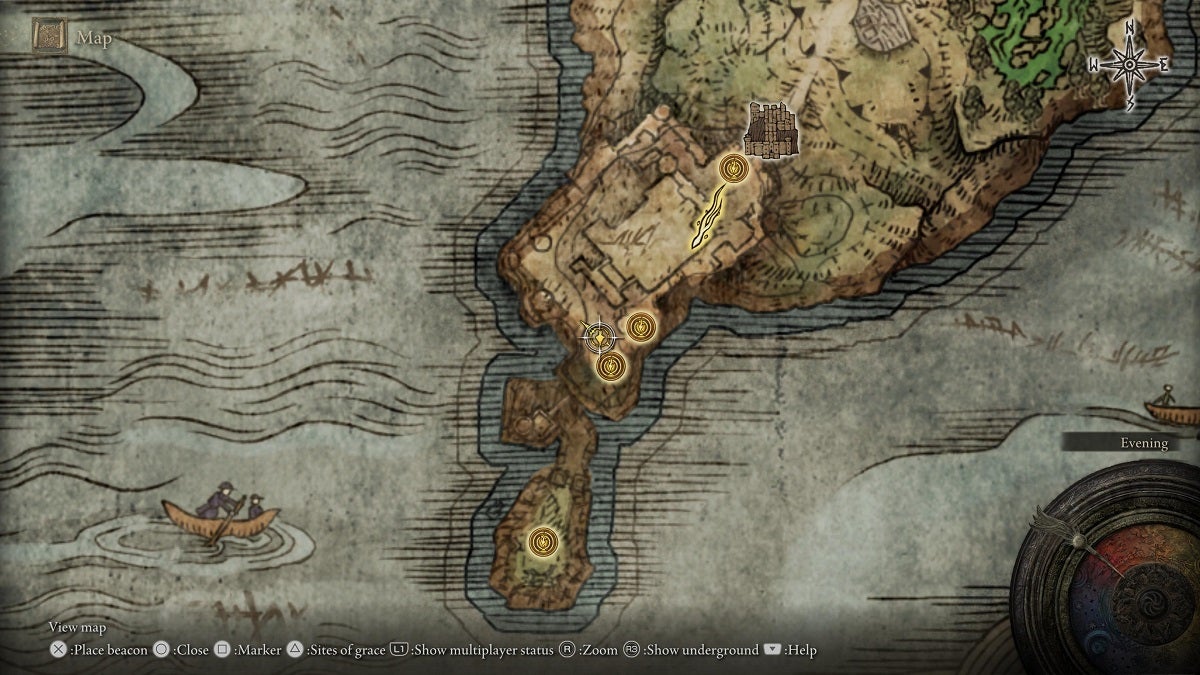
From the Behind the Castle Site of Grace, proceed to the west and land on the cliffs below until you’re on the roof of a castle rampart. Face southwest to see a broken section of the railings. Walk close to the edge and look down to see wooden platforms you can land on. There’s a corpse here that holds a Stonesword Key.
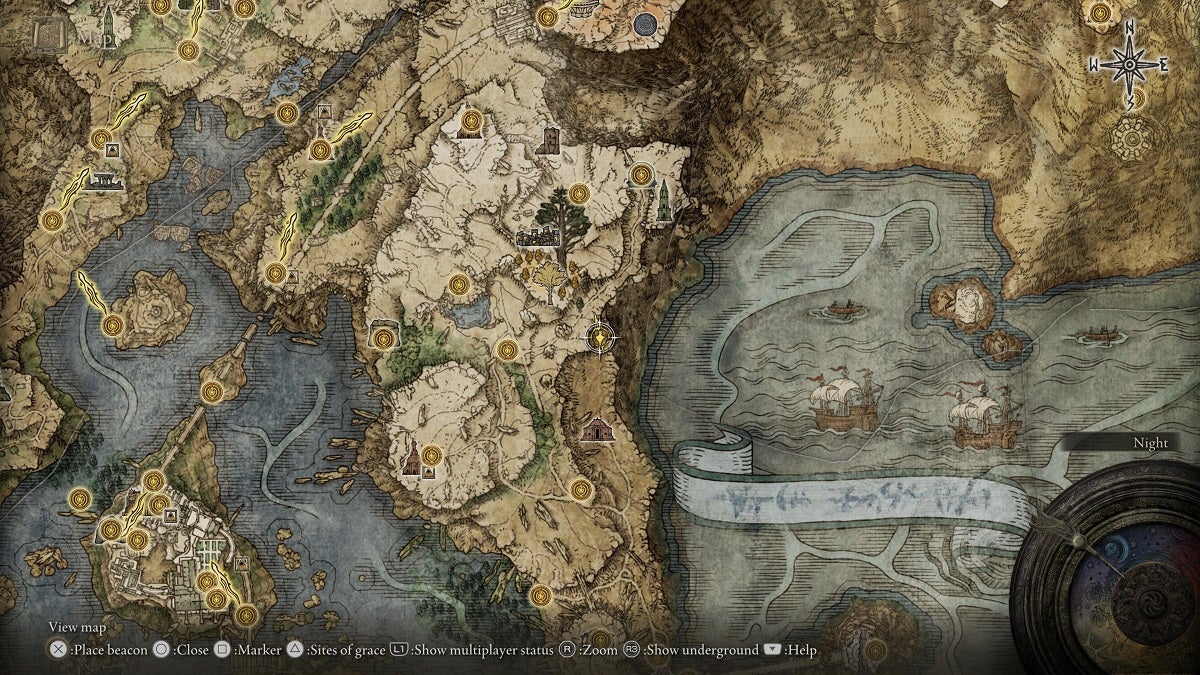
Every Stonesword Key in Liurnia
Liurnia of the Lakes hides eight Stonesword Keys. Here’s where you can find them all.
Academy Gate Town
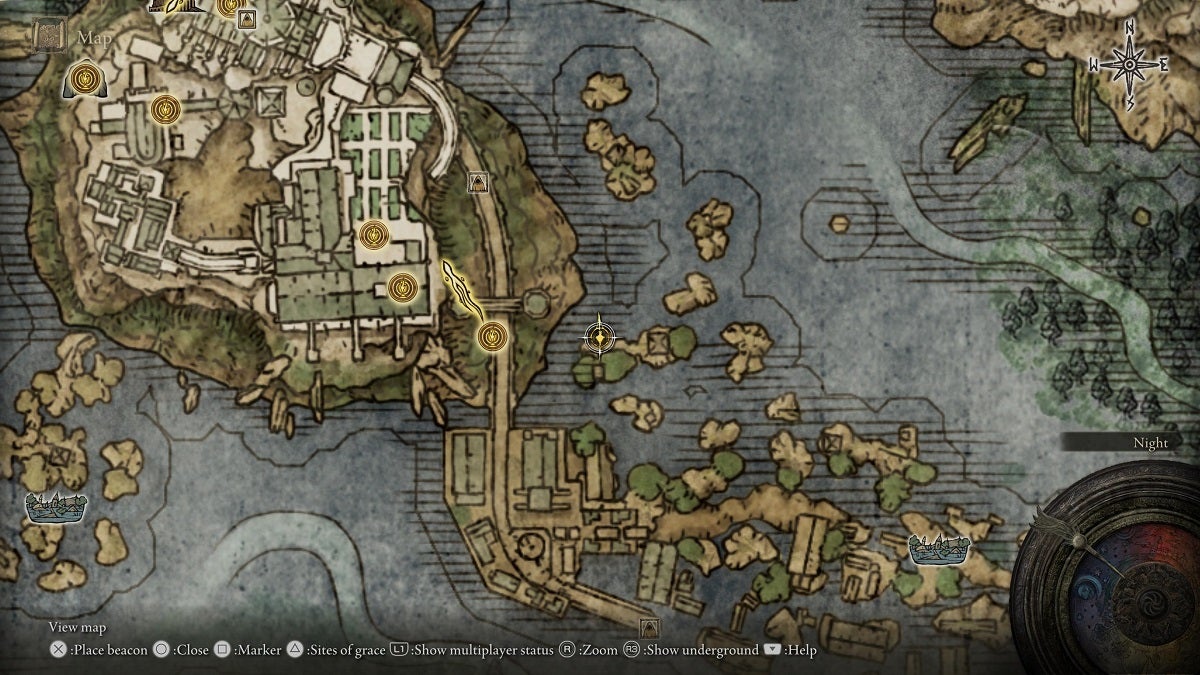
There’s one Stonesword Key in a chest that’s in a tower located on the northwestern corner of Academy Gate Town. You’ll need to mount Torrent and double jump while mounting to reach the chest.
Below Raya Lucaria
There’s a corpse that’s sitting on a chair under the northeastern Raya Lucaria bridge. Get to this area from the ground outside the Academy.
Eastern Raya Lucaria
Make your way north of the Ainsel River Well until you get close to the northern cliff. You’ll find a corpse here that’s sitting on a chair with an item you can loot. This item is a Stonesword Key.
Academy Crystal Cave

Enter the Academy Crystal Cave and keep moving onwards until you reach a room that’s filled with sorcerers. Stick close to the wall to the left and you’ll eventually find a descending pathway that leads to another room. There’s a cage here that houses a corpse. Loot the corpse to get a Stonesword Key.
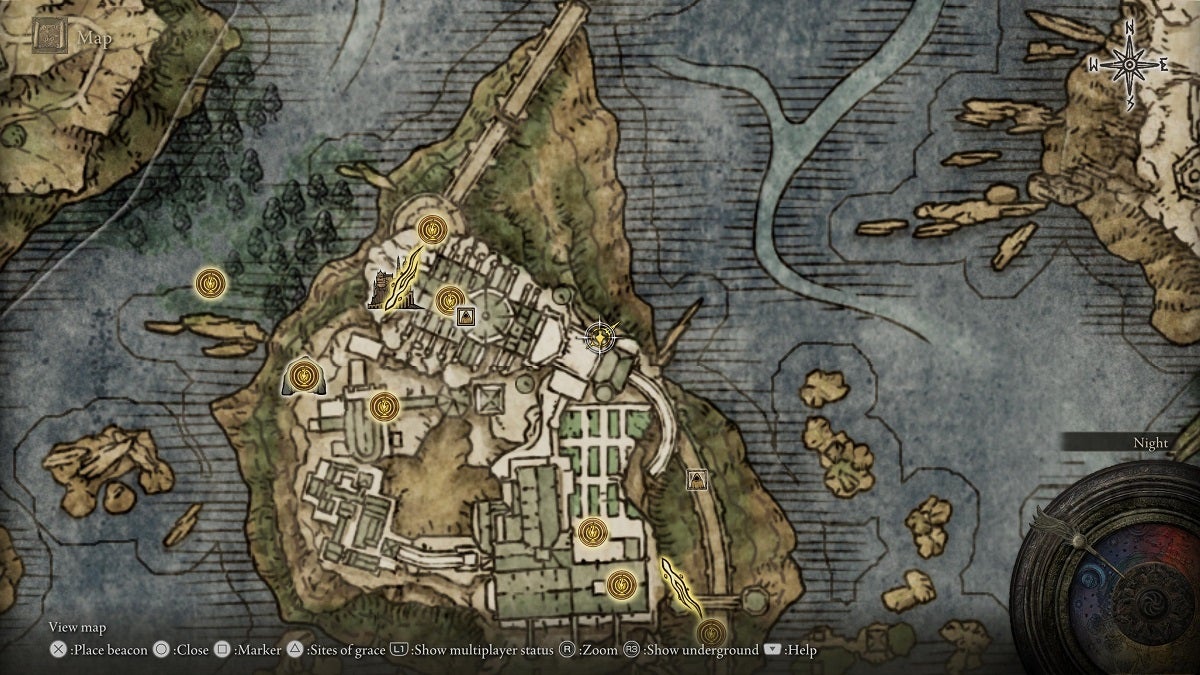
Raya Lucaria
There are two Stonesword Keys in Raya Lucaria and both of them are close to the Debate Parlor.
For the first one, take the northern exit to emerge onto an open courtyard. Head to the dried-up fountain in the middle of this courtyard to find one Stonesword Key on a corpse.
For the second Stonesword Key, return to the Debate Parlor and take the western exit. Upon reaching the area that has two wide arches that connect to staircases, head to the right side of the room and face the bookcase closest to the staircase. This surface is an illusory wall. Strike it to reveal the path ahead.
From here, move onwards until you reach a room with a chest next to an altar. There’s a corpse behind this altar. Loot it to get the Stonesword Key.
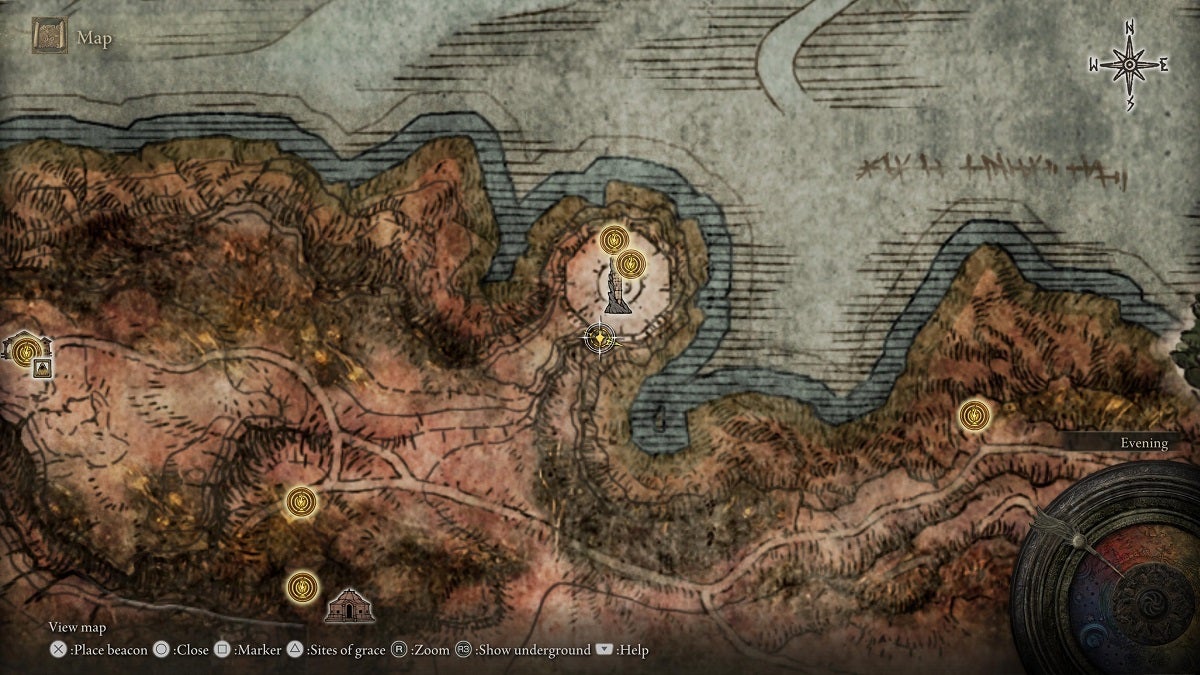
Frenzied Flame Village
There’s one found on top of the wall that’s barricading the Frenzied Flame Village. You can get on top of the wall by jumping down to it from the northwest of the village.
Caria Manor

This one is located on top of Caria Manor’s main gate. You can only get to this area by dropping down to the Caria Manor rooftops from the Three Sisters region to the north. Once you get here, there will be a Giant Crab guarding the corpse that’s holding the Stonesword Key. Either deal with this nuisance of an enemy or simply ignore it and loot the key before abandoning the area.
Every Stonesword Key in Caelid
There are only five Stonesword Keys in Caelid. Here’s how you can obtain them.
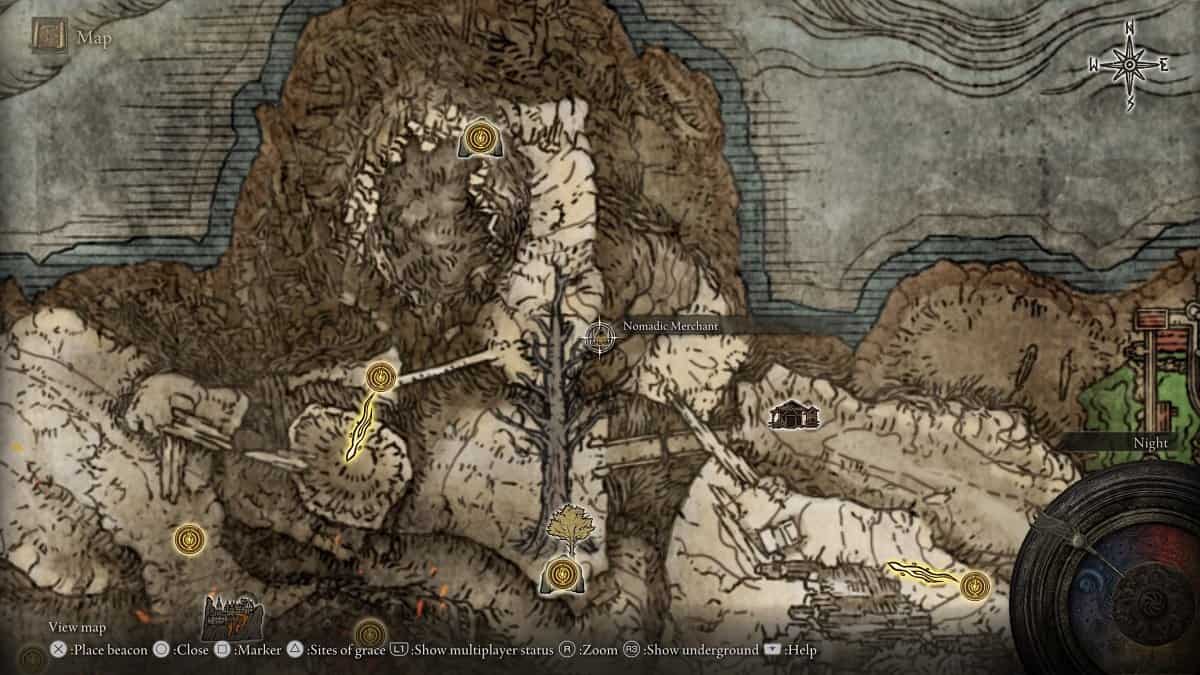
Caelid Nomadic Merchant
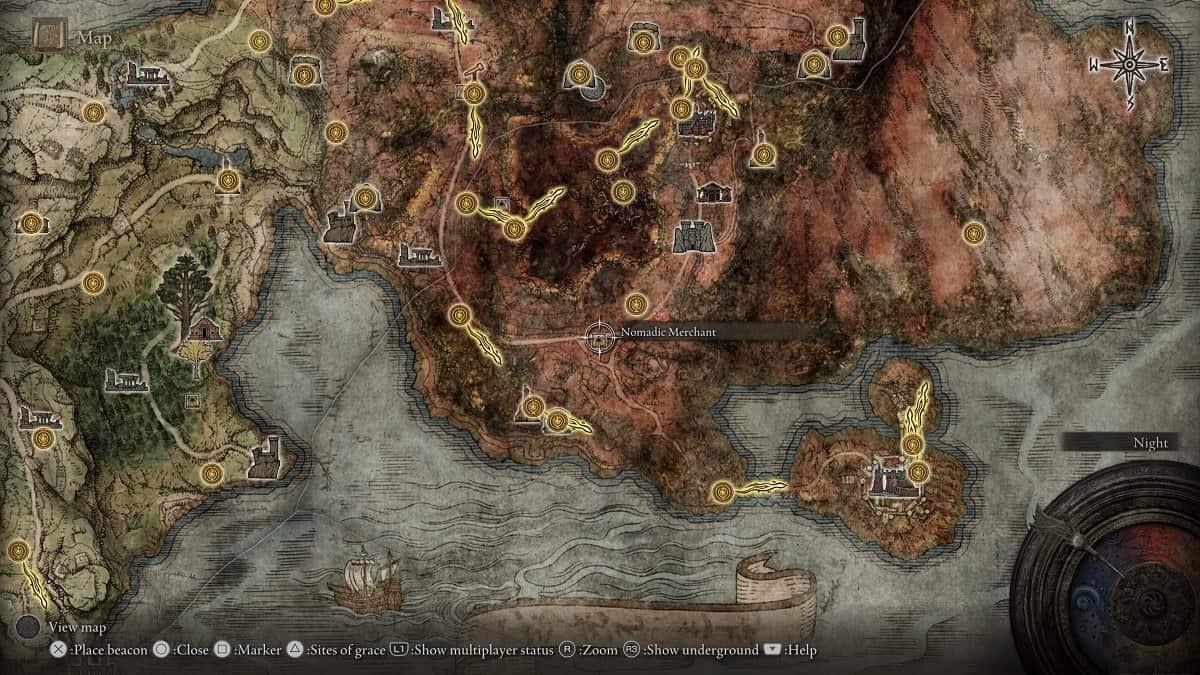
The Nomadic Merchant in southern Caelid sells one Stonesword Key for 4,000 Runes.
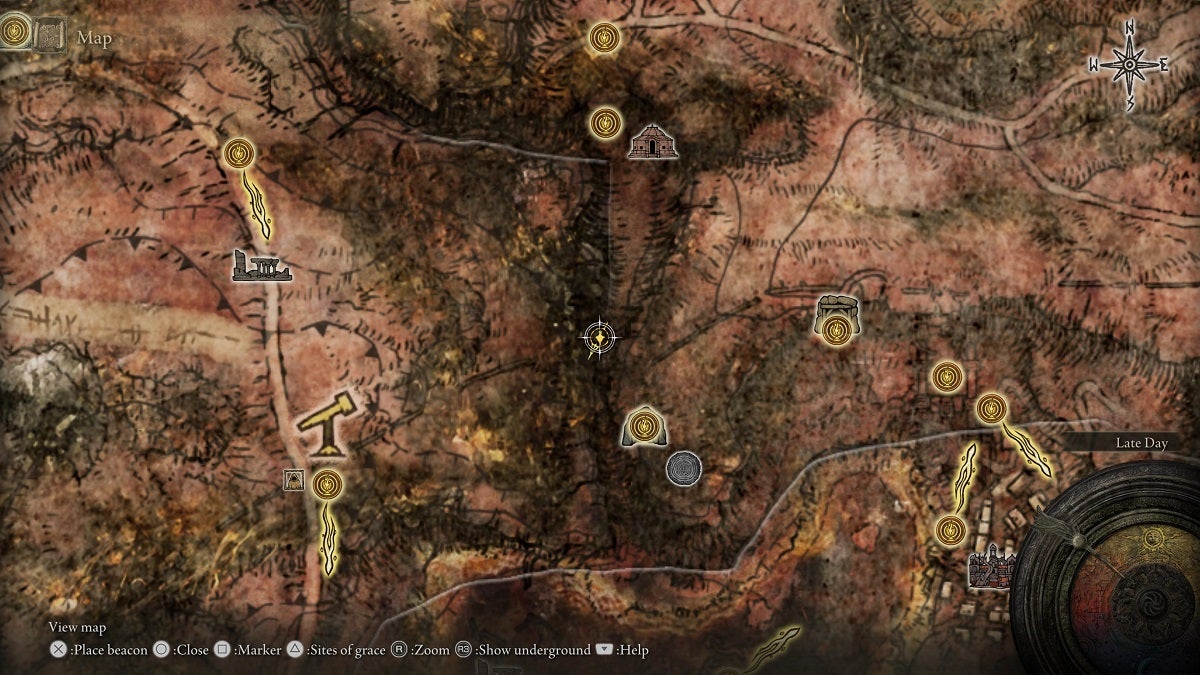
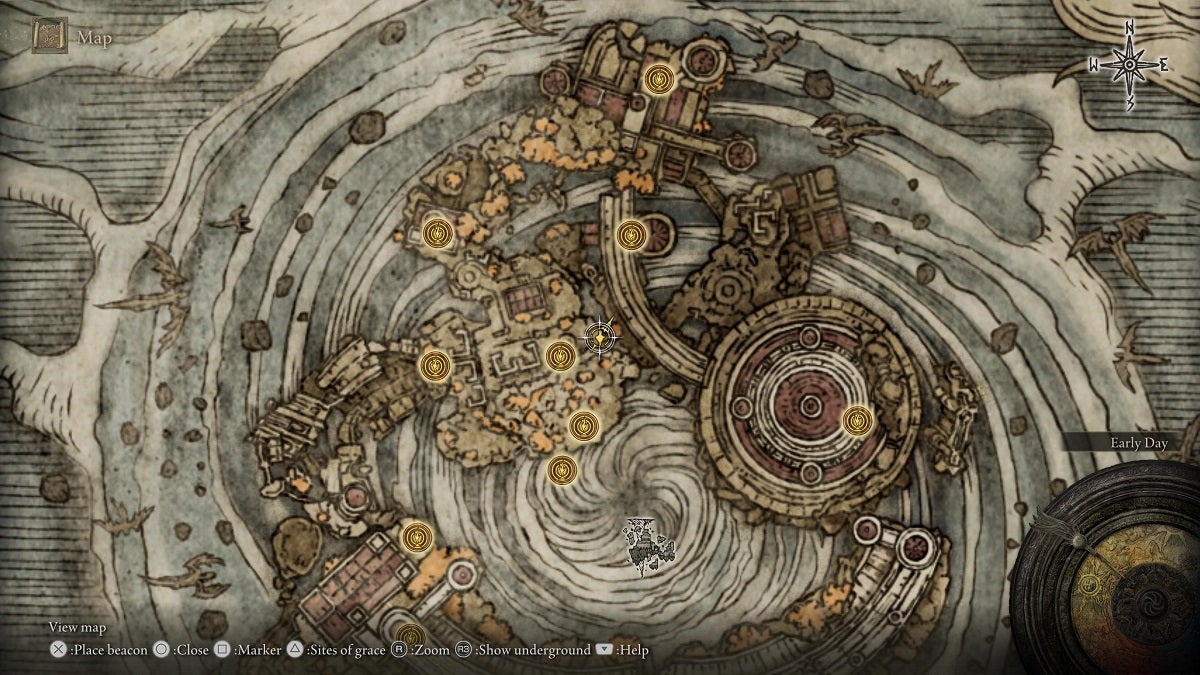
Gaol Cave
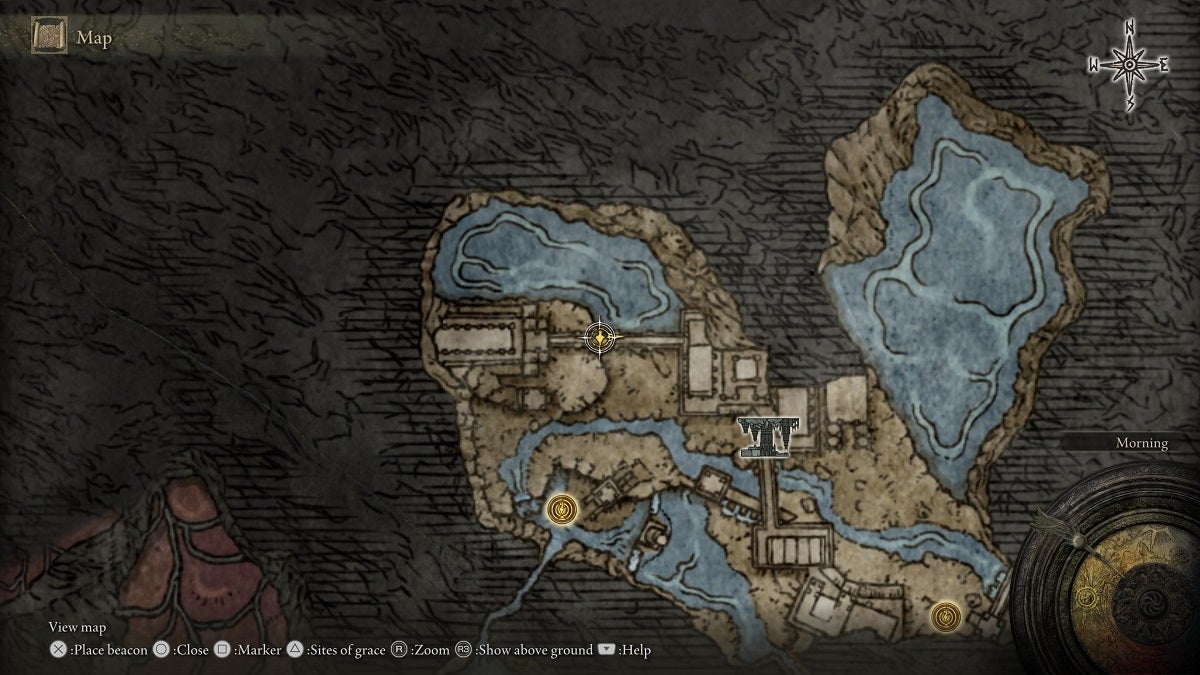
Progress through Gaol Cave until you’ve opened the cells here. You’ll be able to do so by flipping a lever that’s on the second level of a building within the cave. Once the cells have been opened, you’ll find the cell marked on the image of the map above. This cell houses three corpses. One of these corpses holds a Stonesword Key.
Sellia, Town of Sorcery

East of the southwestern brazier in Sellia, Town of Sorcery, you’ll find a corpse above an archway. This corpse can be looted for a Stonesword Key.
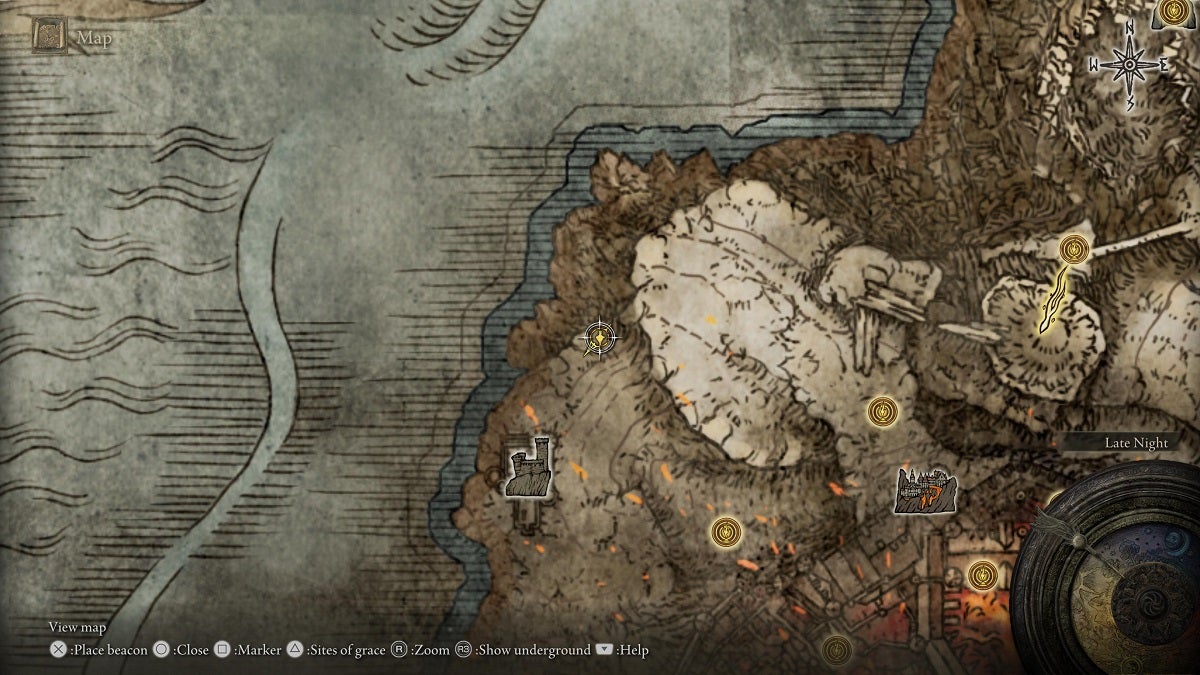
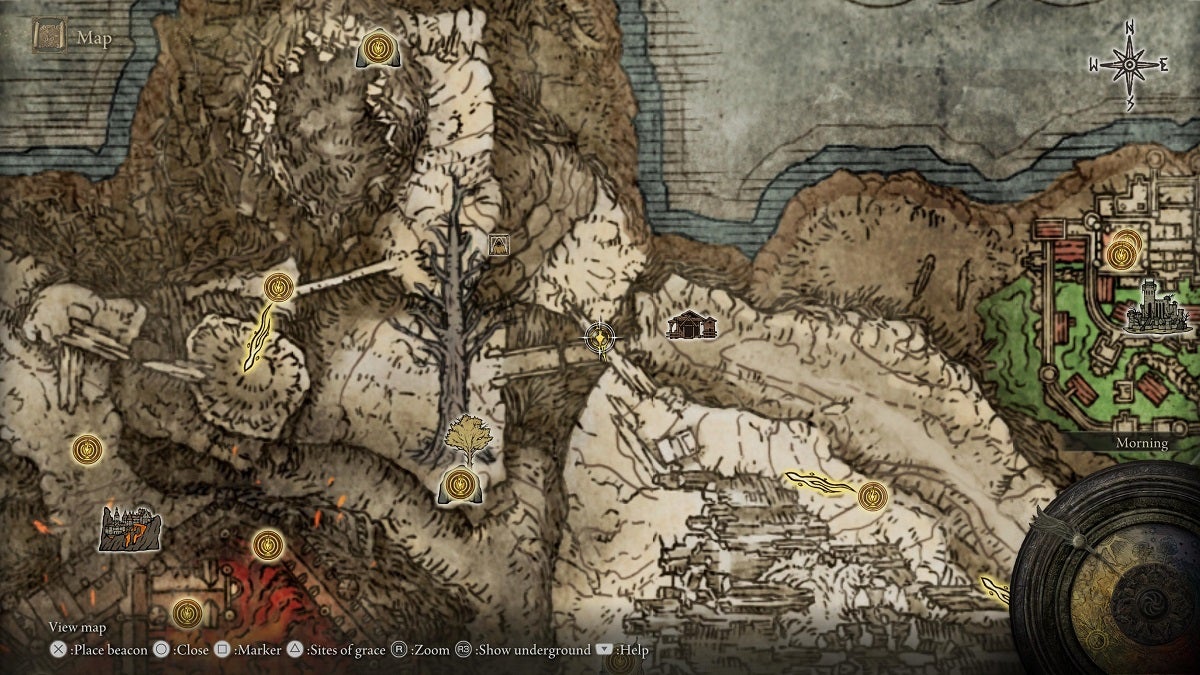
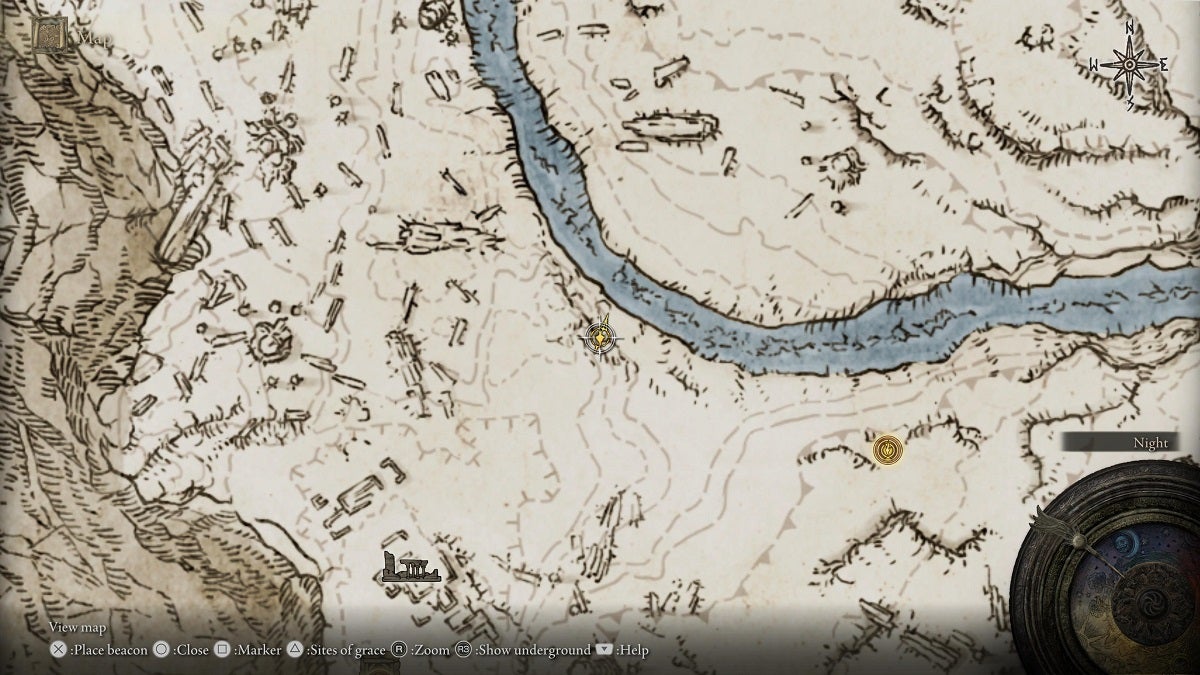
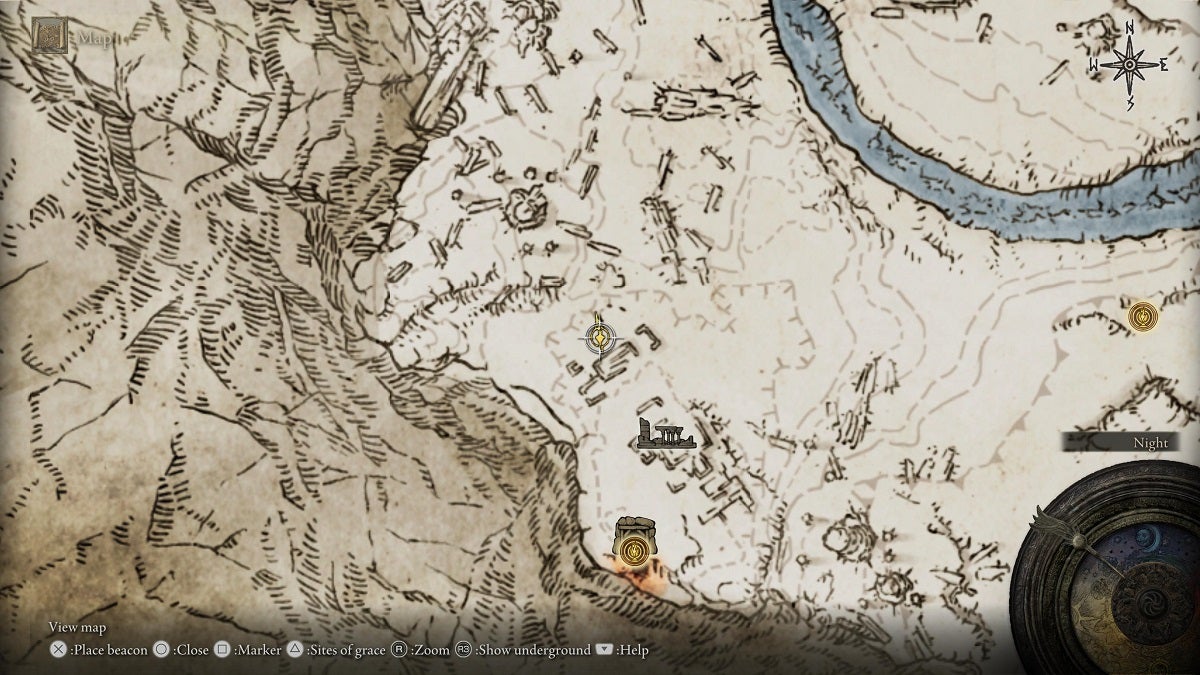
Divine Tower of Caelid
You’ll find one more Stonesword Key on an exterior ledge south of the Divine Tower of Caelid. To get here, get to the Divine Tower by running on the massive branch that points to the tower. You’ll find a ledge here that has a Radahn Soldier sitting under a ladder. From here, the top of the archway to the right forms a narrow ledge you can walk on.
Proceed to the top of the arch and proceed onwards. You’ll then find a corpse slumped over the ledge that’s guarded by a shielded Radahn soldier. This corpse holds a Stonesword Key.
Deep Siofra Well
Start from the Deep Siofra Well Site of Grace and make your way south. There’s a Runebear here so be sure to watch out for this enemy as it can be highly deadly. At the end of this path, there’s a corpse that’s sitting on the edge of the cliff. Loot the corpse to obtain a Stonesword Key.
Every Stonesword Key in Siofra River
The entire Siofra River territory includes Siofra River Main, Nokron, and Mohgwyn Palace. These areas contain over 12 Stonesword Keys.
Siofra River Abandoned Merchant
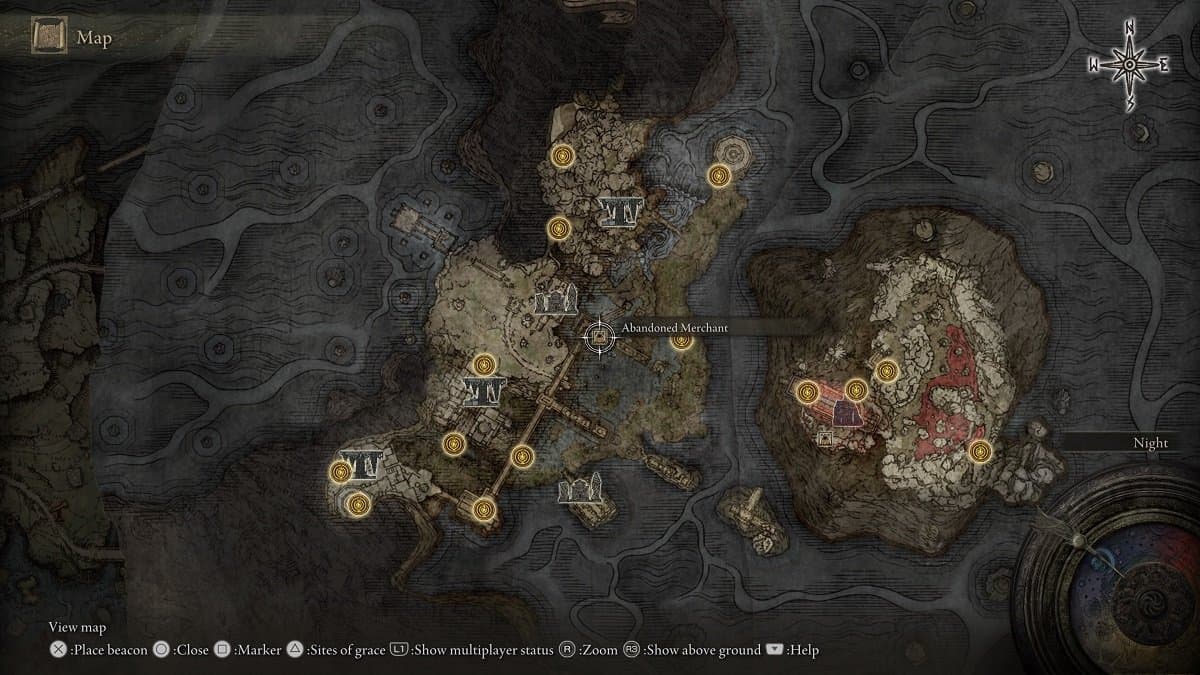
You can purchase three Stonesword Keys from the Abandoned Merchant in Siofra River for 3,000 Runes each.
Siofra River Main
Aside from buying from the merchant, there are two more Stonesword Keys in Siofra River. For the first one, head to the cliffs northeast of the Hallowhorn Grounds. You’ll find a Spirit Spring close to the edge of the cliff that’s facing the ruins to the east.
Use this Spirit Spring to reach the top of the ruins. Proceed onwards to the far eastern corner of this area to find a corpse that’s leaning against a wall. This corpse holds a Stonesword Key.
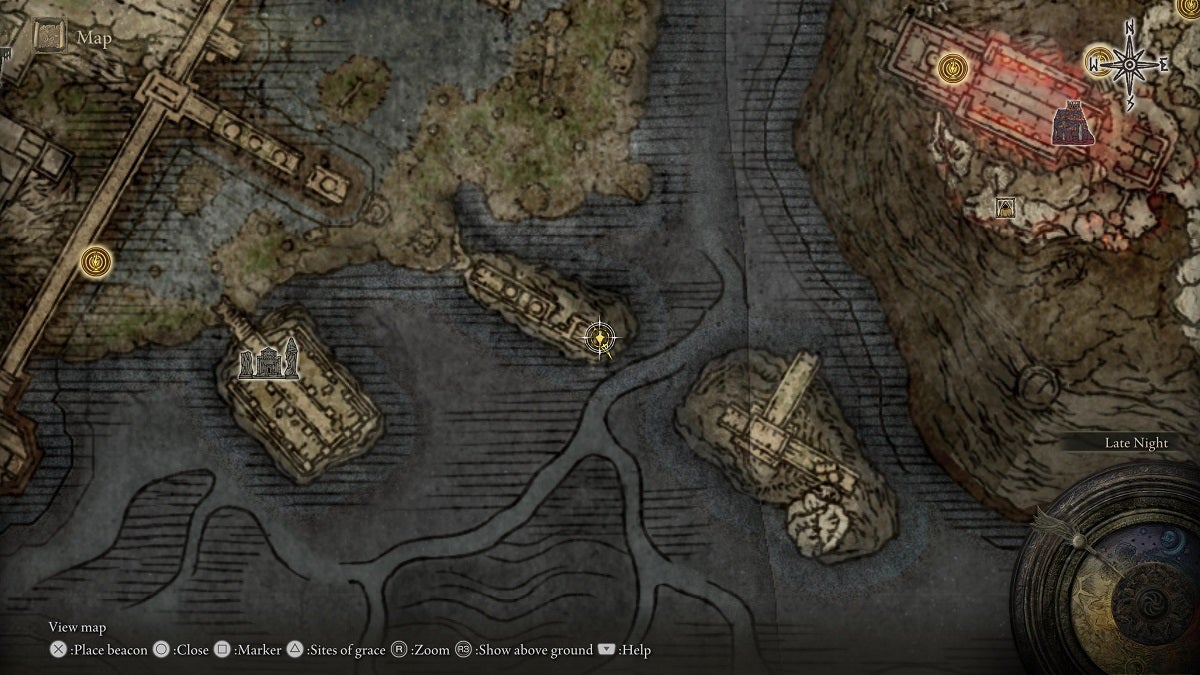
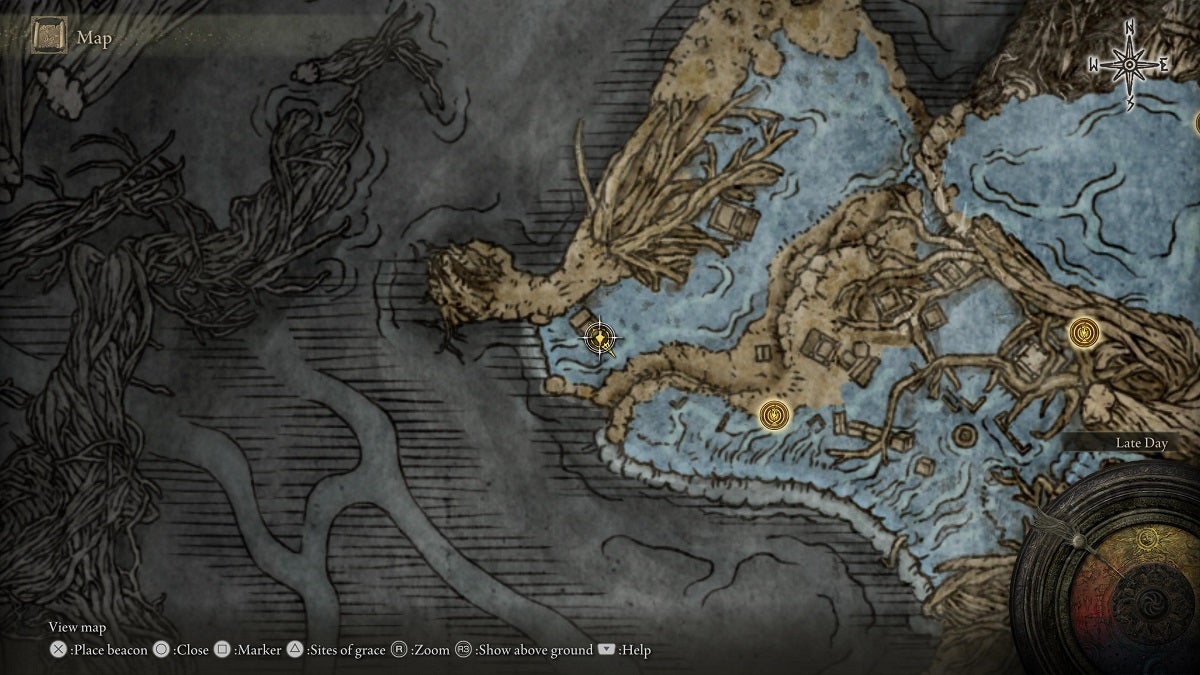
For the second Stonesword Key, make your way to the northern section of Siofra River main until you spot a couple of pillars and beams to the west. Make your way here and get to the pillar marked in the image of the area’s map below. You’ll find a corpse here that holds another Stonesword Key.

Nokron, Eternal City
Stick close to the edge of the cliff while heading south from the Aqueduct-Facing Cliffs Site of Grace in Nokron, Eternal City. At the end of this path, there’s a corpse on the ground that you can loot for one Stonesword Key.
Mohgwyn Palace
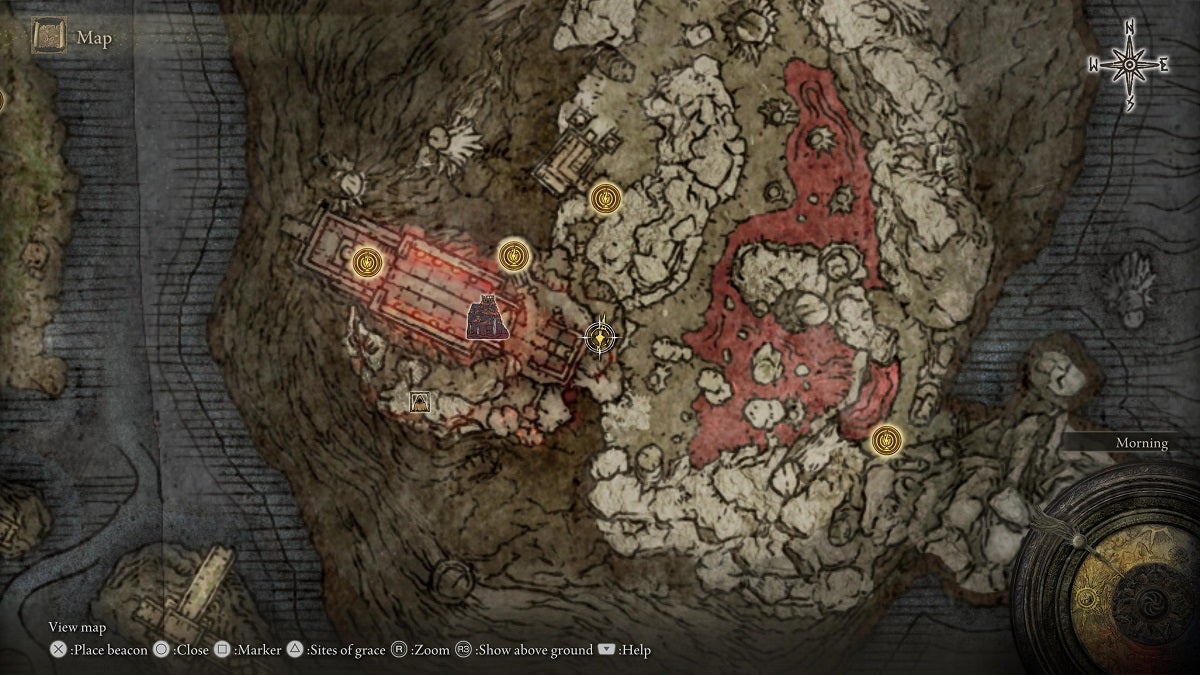
As you ascend the Mohgwyn Palace from the Dynasty Mausoleum Entrance Site of Grace, you’ll come across a massive blood blob before reaching the actual entrance of the mausoleum. You’ll find another path northeast of the entrance where you’ll find a handful of Putrid Corpses kneeling down. Behind them is a corpse that holds a Stonesword Key.
Mohgwyn Palace Imprisoned Merchant
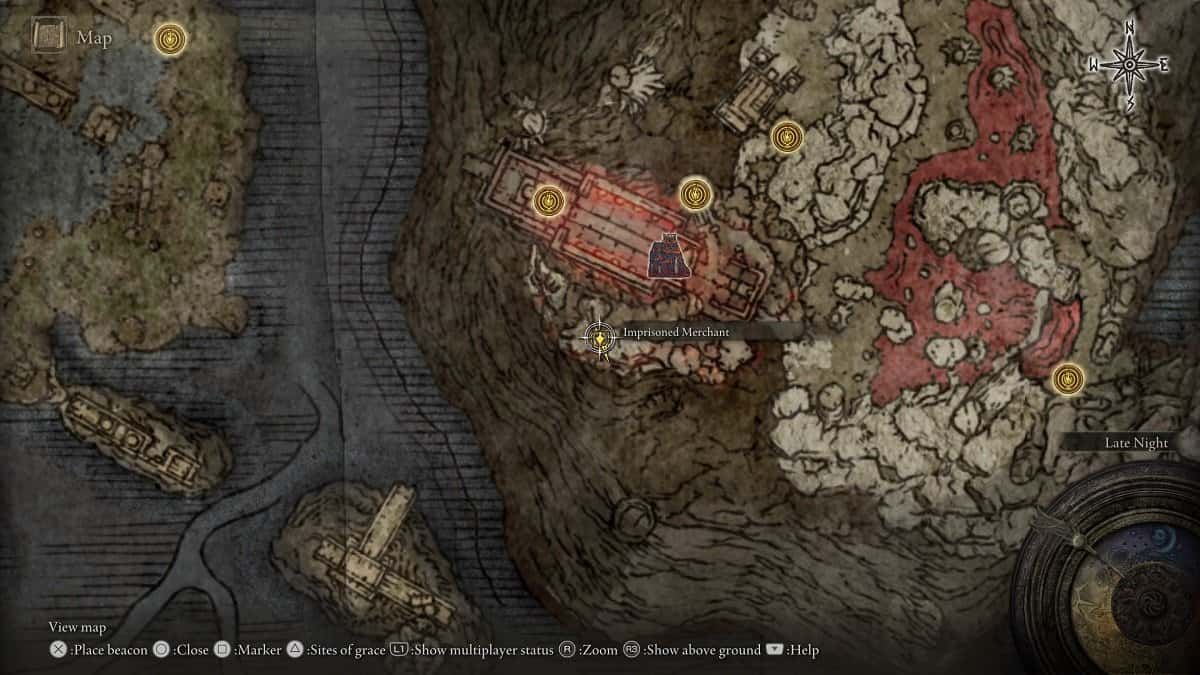
The Imprisoned Merchant in the mausoleum in Mohgwyn Palace sells five Stonesword Keys for 5,000 Runes each. This merchant is guarded by a Sanguine Noble.
Every Stonesword Key in Deeproot Depths
There’s only one Stonesword Key in the Deeproot Depths. It is located on top of a tower west of The Nameless Eternal City Site of Grace. You can get on top of this tower by riding the Spirit Spring behind it.
Every Stonesword Key in Ainsel River
There are only two Stonesword Keys in Ainsel River. Here is the location of both.
Uhl Palace Ruins

This Stonesword Key is in the northern region of the Uhl Palace Ruins. It is on a corpse that’s lying next to a Giant Miranda Sprout.
Nokstella, Eternal City
There’s another Stonesword Key on a corpse that’s slumped over the edge of a cliff on the ground level of Nokstella. It is on the northwest corner of the area.
Every Stonesword Key in Altus Plateau
The Altus Plateau is by far the most abundant in Stonesword Keys of all the regions in the game. The entire territory which includes the main Altus Plateau, Leyndell, and Mt. Gelmir contains over 23 Stonesword Keys.
Altus Plateau Nomadic Merchant

The Nomadic Merchant on the southern end of the Forest-Spanning Greatbridge sells three Stonesword Keys for 4,000 Runes each.
Sage’s Cave
Sage’s Cave contains a lot of illusory walls. One of them is in a camp that’s in a wide cavern with four Skeleton enemies. One of these skeletons is standing close to a wall while facing it. This wall is an illusory wall and it hides a chest that contains a Stonesword Key.
Grand Lift of Dectus Camp
There’s a camp east of the Grand Lift of Dectus that’s guarded by Misbegotten enemies. There’s a corpse in this camp that holds a Stonesword Key.
Central Altus Plateau
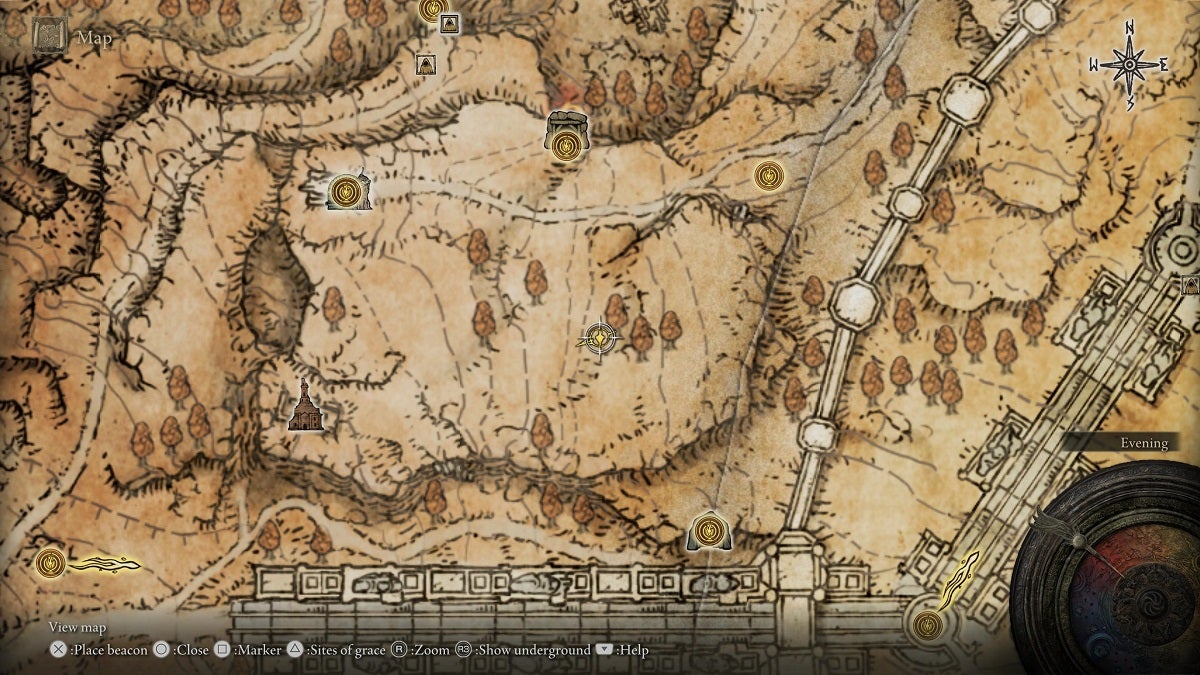
There’s a corpse that’s sitting on the edge of a structure southwest of the Rampartside Path Site of Grace. Loot this corpse to obtain one Stonesword Key.
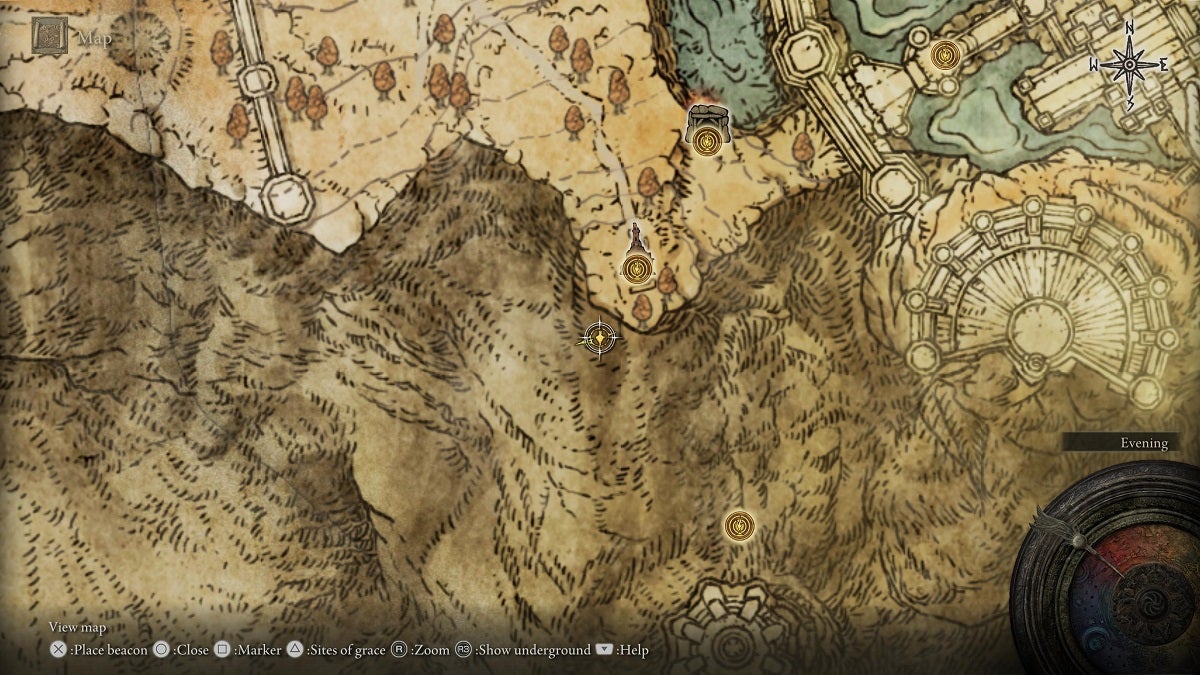
Shaded Castle
There’s a corpse that’s on a stone ledge at the side of the cliff northeast of the Shaded Castle Ramparts Site of Grace. You’ll need precise platforming to get to this stone ledge and loot the Stonesword Key from the corpse.
From the aforementioned Site of Grace, turn around and make your way down the staircase. Take the path to the left and you’ll come across a Depraved Perfumer. Deal with this enemy now as it will make the traversal you’re about to do much easier.
Notice how the railings to your left start to break off. The one at the end is low enough for you to be able to jump on top of it. Do so and proceed up the railing and onto the rock cliff to your right. There are certain parts of this rock that you can jump onto. Kee[ making your way up until you’re about a quarter to the top and you can go higher anymore.
The cliff you’re now on should be facing north. From here, continue facing west and look down. There’s a cliff ahead of you that you can jump on. Carefully make this jump. Once done successfully, face south and jump on top of the rock ahead of you. The corpse that holds the Stonesword Key is just behind it.
Sealed Tunnel
Progress through the Sealed Tunnel until you’ve descended the lift and dispelled two succeeding illusory walls. This next area is a tall cavern that has massive roots you can walk on. With the root branching away from the wooden platform you’re on, walk on it and make your way to the wooden platform south of this cavern.
Once you’re there, enter the tunnel to your right to find a corpse at the end of it, behind a Vulgar Militia enemy. Loot the corpse to get a Stonesword Key.
Auriza Hero’s Grave
Progress through Auriza Hero’s Grave until you’re in the area where there are three chariots roaming around in the same room. There are pillars at the bottom of the ramp where the first two chariots dash across from. Behind these pillars is a corpse that’s slumped over the ledge. Loot it to obtain a Stonesword Key.
Subterranean Shunning-Grounds
Start from the Underground Roadside Site of Grace. Exit the room and head northeast until you spot a hole in the ground where a grate should be. Drop down and proceed northwest. Enter the hole in the wall to the right as soon as you spot it.
Proceed onwards until you spot a hole in the ground. Jump into it and continue moving forward until you reach a flooded area. There’s a corpse at the end of this room that holds a Stonesword Key.
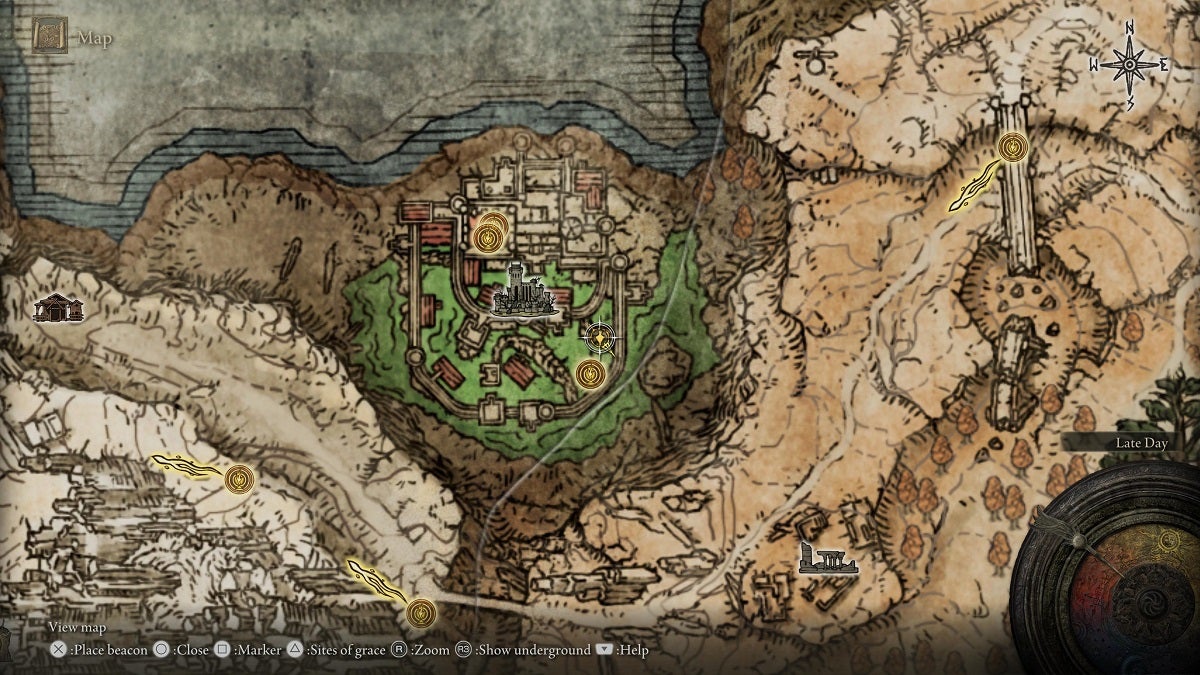
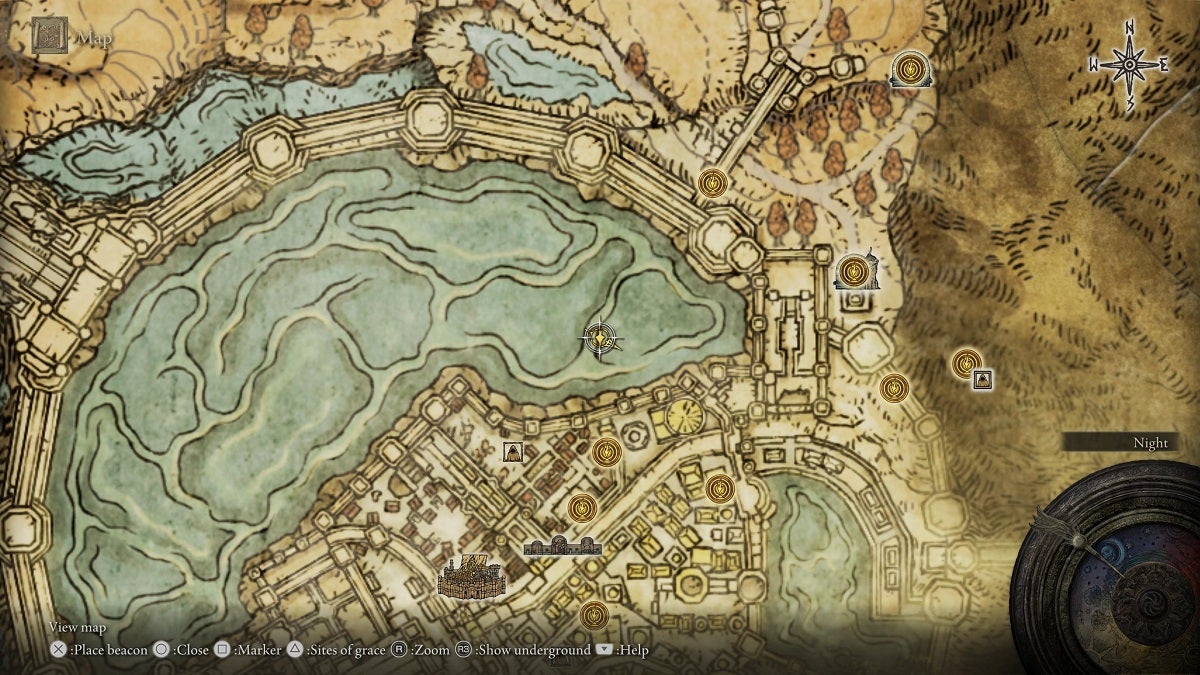
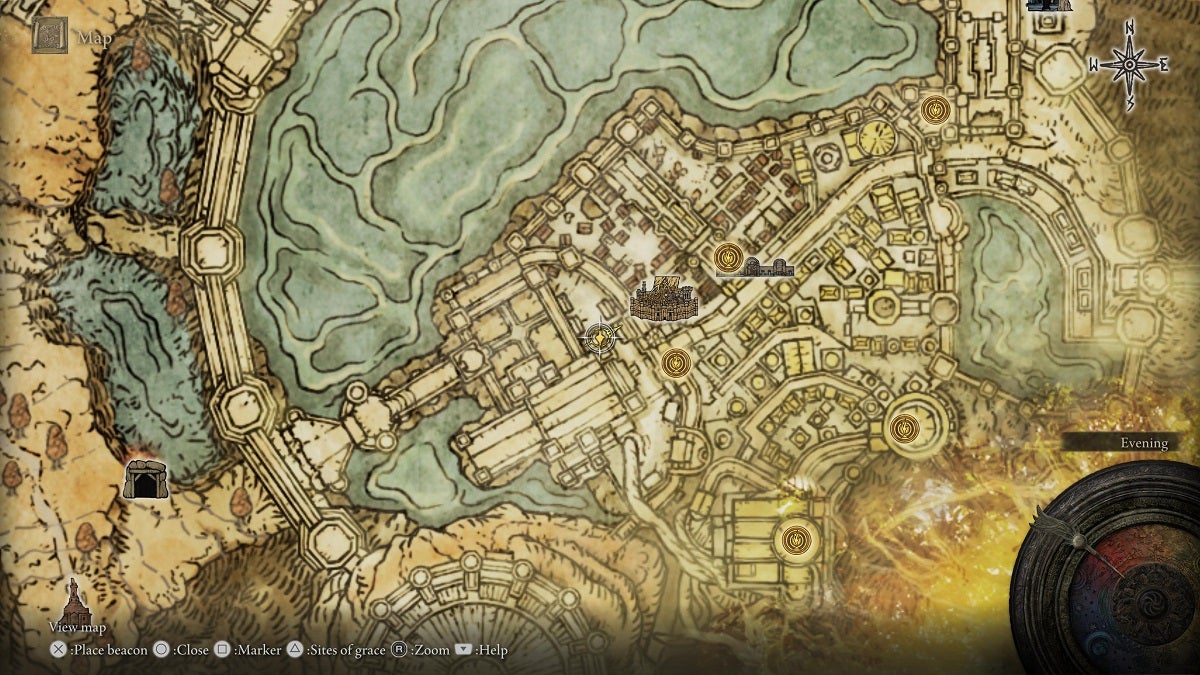
Leyndell Grave
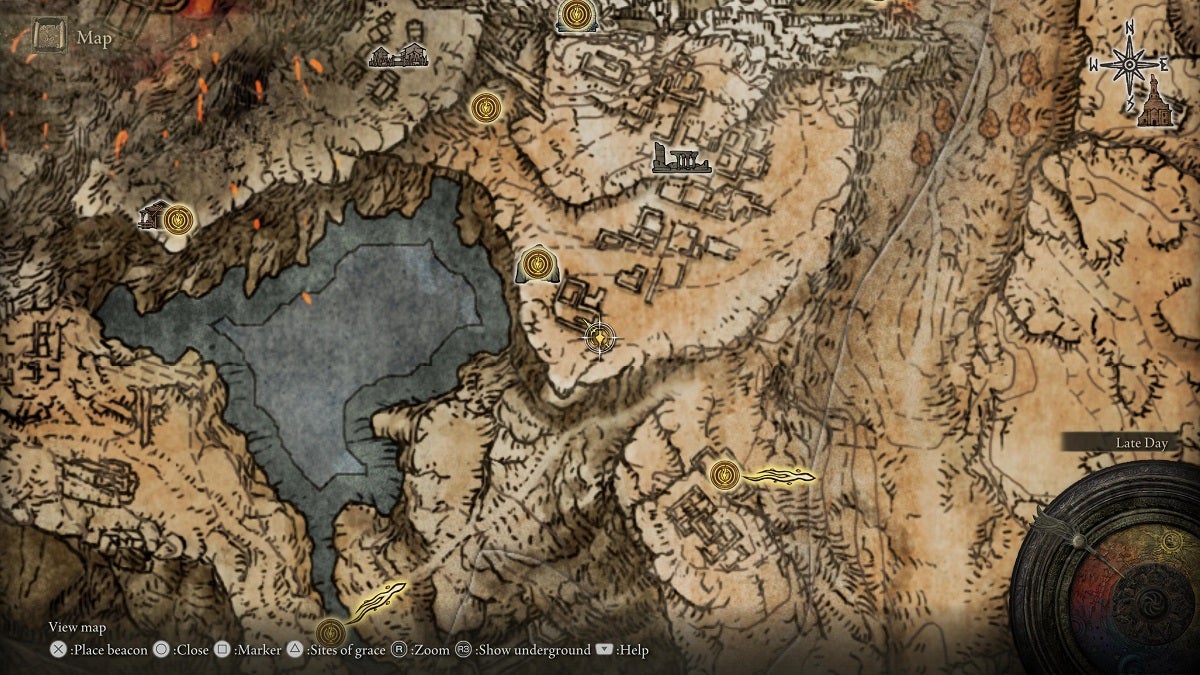
Start from the Avenue Balcony Site of Grace. Descend the flight of stairs next to the grace site and head out the door ahead. As soon as you cross the door, make a right and jump over the railings. You can make your way to the location marked on the image of the map above from here. The grave where the Stonesword Key is is guarded by three skeletons.
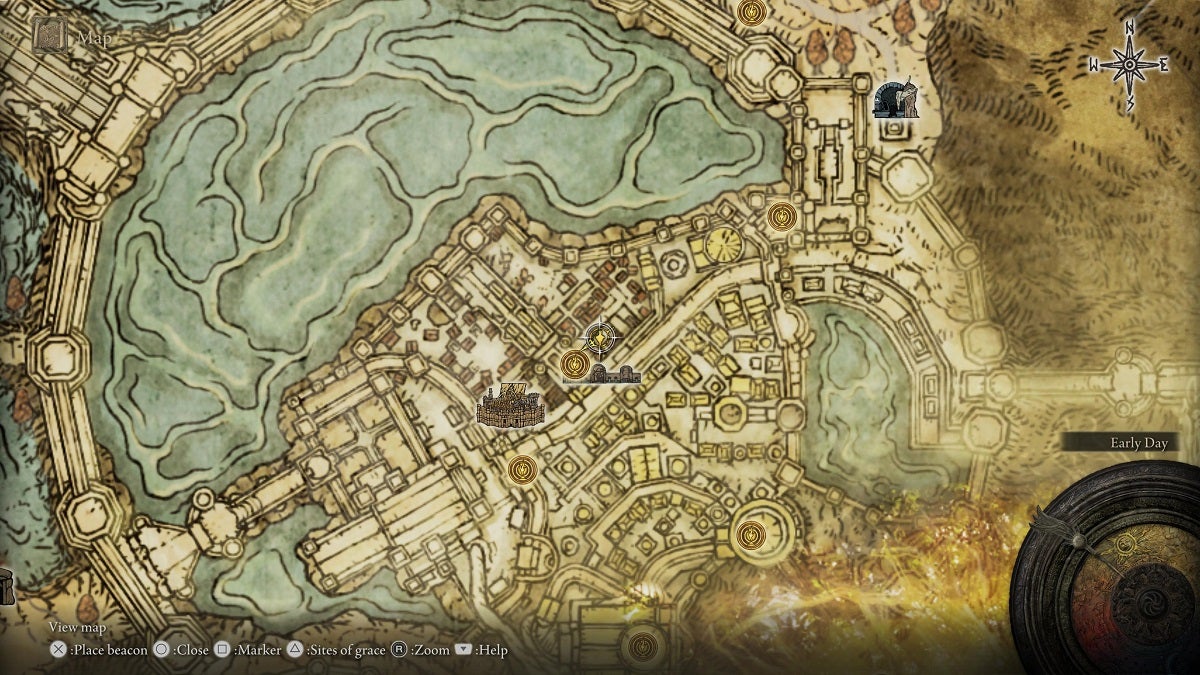
Leyndell Gazebo
For this Stonesword Key, you’ll want to start from the Avenue Balcony Site of Grace once again. This time, though, head up the flight of stairs to get to the main road.
Make your way to the southwest. Just before getting to the stairs where there are three soldiers waiting for you, make a left and go over to the stairs to the right.
This area is riddled with enemies so be careful here. Left of the gazebo ahead is a broken railing. Just ahead is the roof of another balcony below with a corpse on top of it. Jump on this roof and loot the corpse to obtain your Stonesword Key.
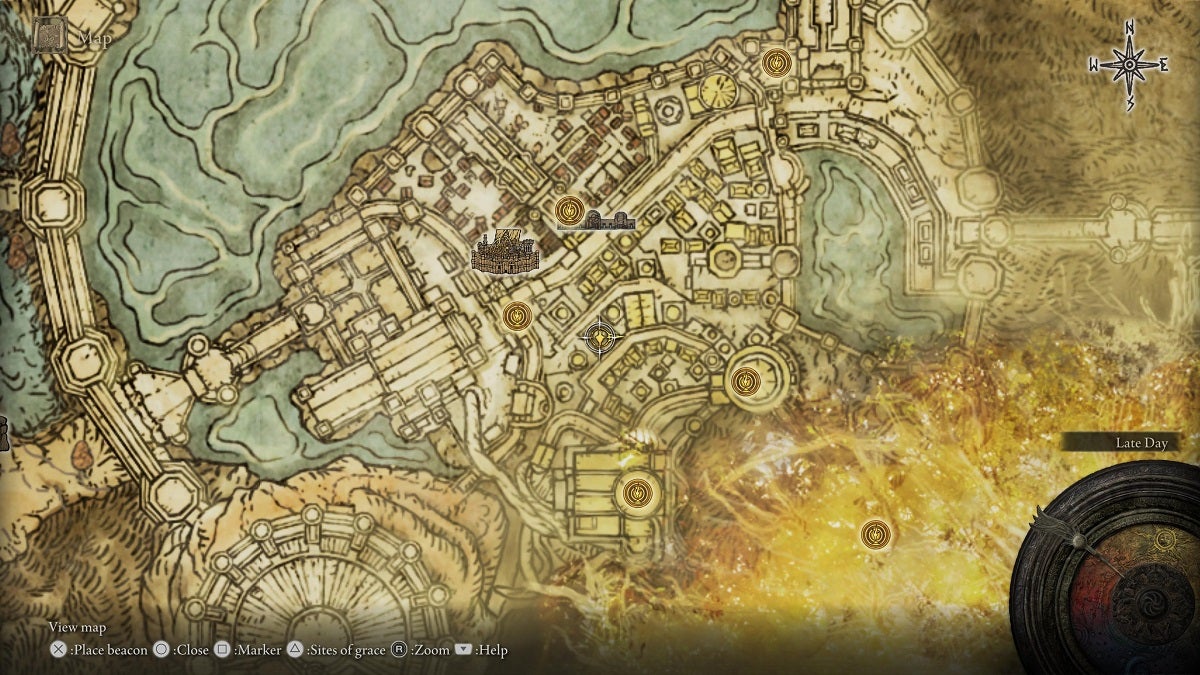
Outside the Fortified Manor
Get to the foot of the dead dragon in Leyndell by heading northwest from the Fortified Manor entrance. There are two Leyndell soldiers here so be sure to deal with them accordingly.
Get on top of the foot of the dragon and use it to jump onto the roof of a barn to the right. From here, you’ll be able to jump onto the upper level of the wooden structure next to the barn. There’s a corpse here that you can loot for a Stonesword Key.
Mt. Gelmir Nomadic Merchant
The Nomadic Merchant in northern Mt. Gelmir sells a Stonesword Key for 5,000 Runes.
Northwestern Mt. Gelmir
There’s a tree north of Fort Laiedd in Mt. Gelmir that’s surrounded by Spirit Jellyfish. At the foot of this tree is a corpse that you can loot for a Stonesword Key.
Corpse-Stench Shack Bridge
On the bridge west of the Corpse-Stench Shack in Mt. Gelmir, that’s a corpse that’s sitting against the railing to the right. Loot this corpse to obtain a Stonesword Key.
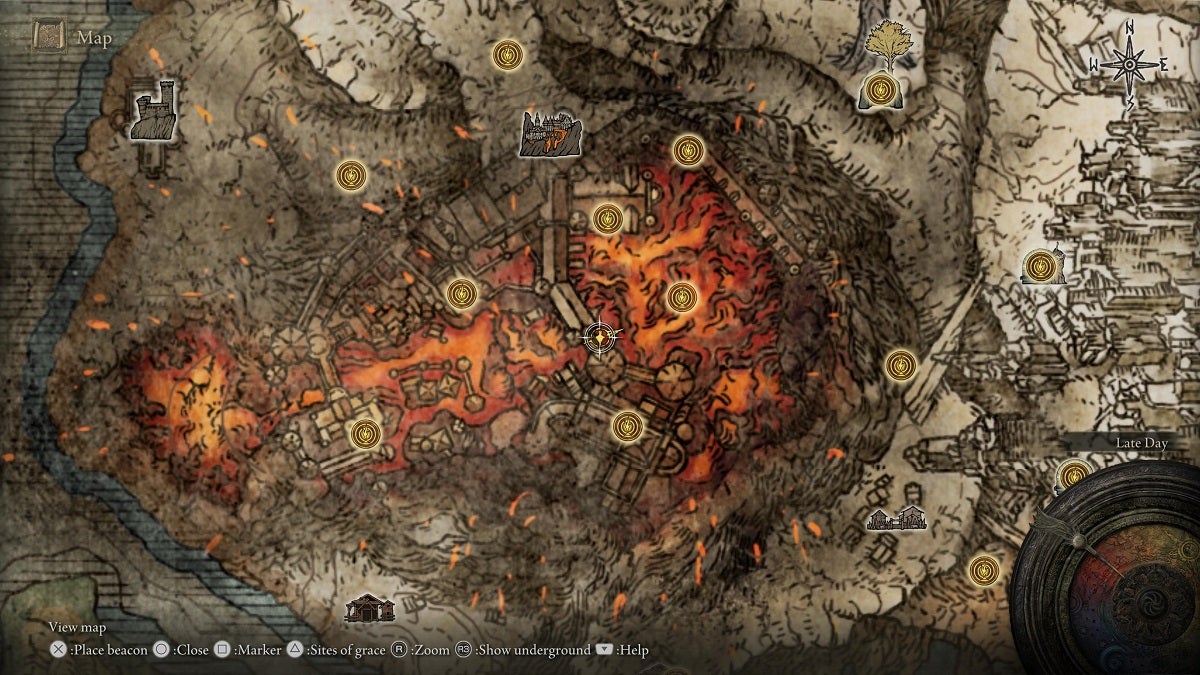
Volcano Manor
There are two Stonesword Keys at Volcano Manor. For the first key, start from the Prison Town Church Site of Grace. Exit this room and head right where you’ll come across a Man-Serpent.
Jump onto the rooftops to the left of the Man-Serpent. From this set of rooftops, keep heading west until you find another rooftop ahead below you. Jump down here, then turn around to find wooden stairs below you.
Jump down here and turn around. You’ll spot another wooden platform over the lava ahead. You’ll need to make a run before jumping onto this platform to successfully make it. The corpse that’s on this platform holds a Stonesword Key.
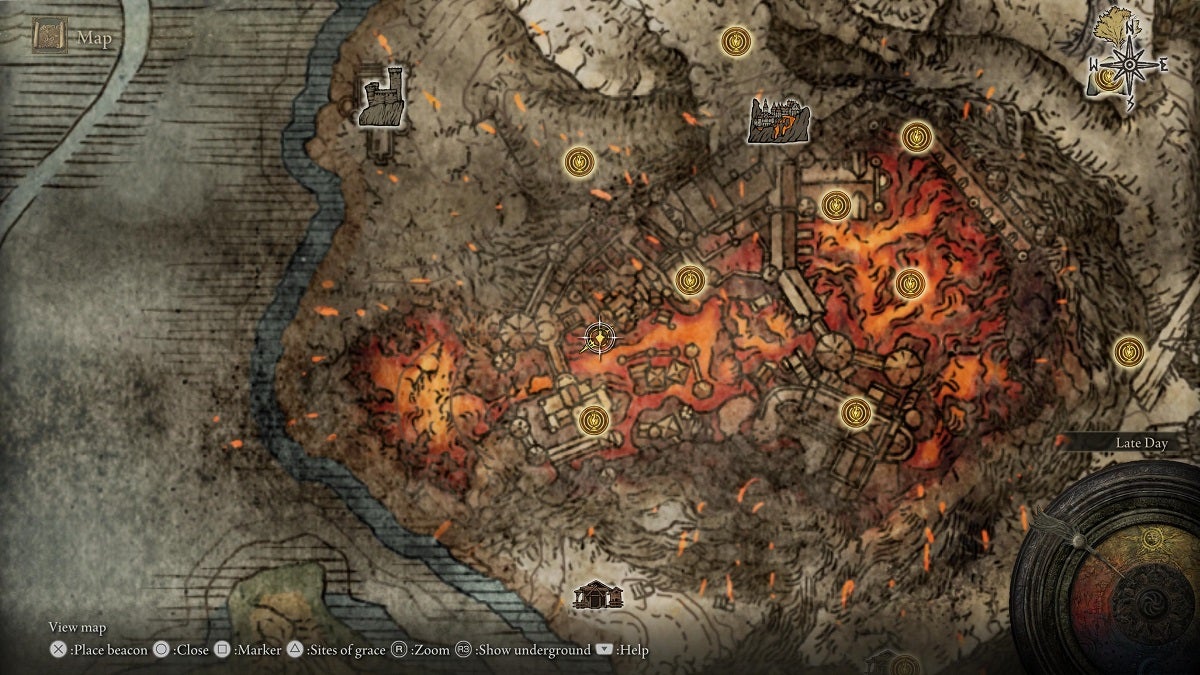
For the second Stonesword Key in the Volcano Manor, start from the Temple of Eiglay Site of Grace. Take the northern exit and continue onto the lift ahead. If this lift is still locked for you, you’ll need to go all the way around by taking the lift south of the altar in the temple.
Once you’re on the lift, ride it up while facing northwest. There’s an open door in this shaft just before reaching the top. Enter this door as soon as you spot it. There’s a corpse in this room that’s lying on a bed beside an enemy. Loot this corpse to obtain the second Stonesword Key in this area.
Every Stonesword Key in Mountaintops of the Giants
The Mountaintops of the Giants cover the main Montaintops region, the Consecrated Snowfield, and Miquella’s Haligtree. All in all, there are nine Stonesword Keys in this area.
Mountaintops of the Giants Hermit Merchant
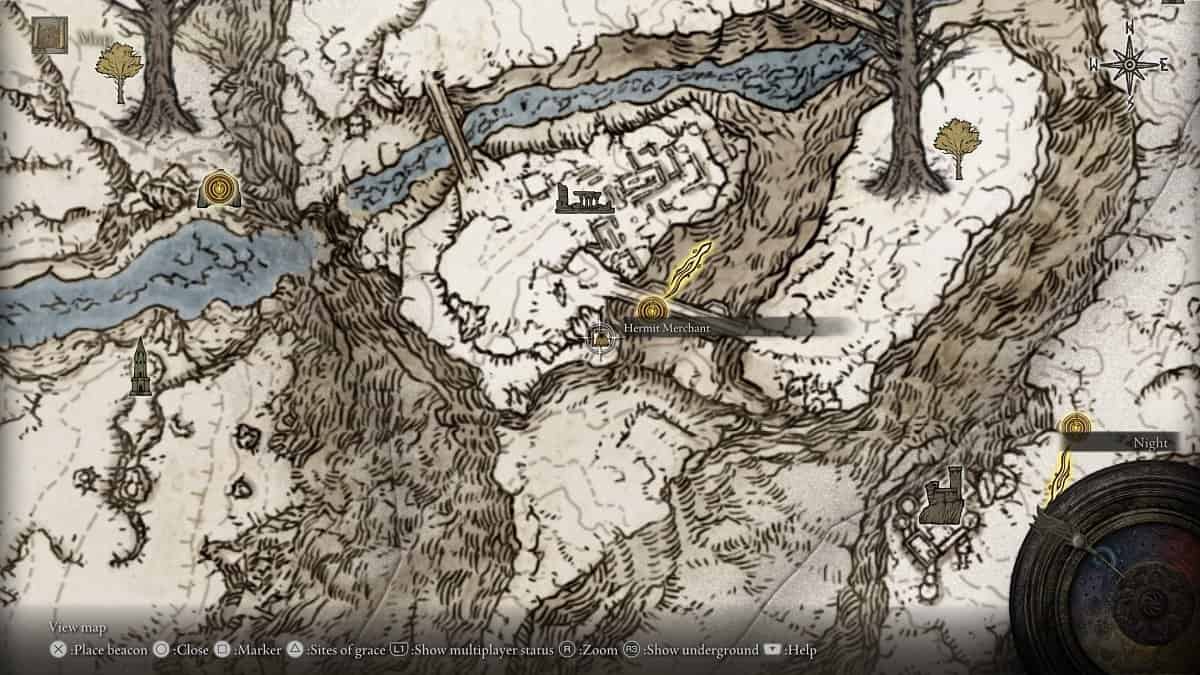
The Hermit Merchant in the Mountaintops of the Giants sells three Stonesword Keys for 5,000 Runes each.
Castle Sol
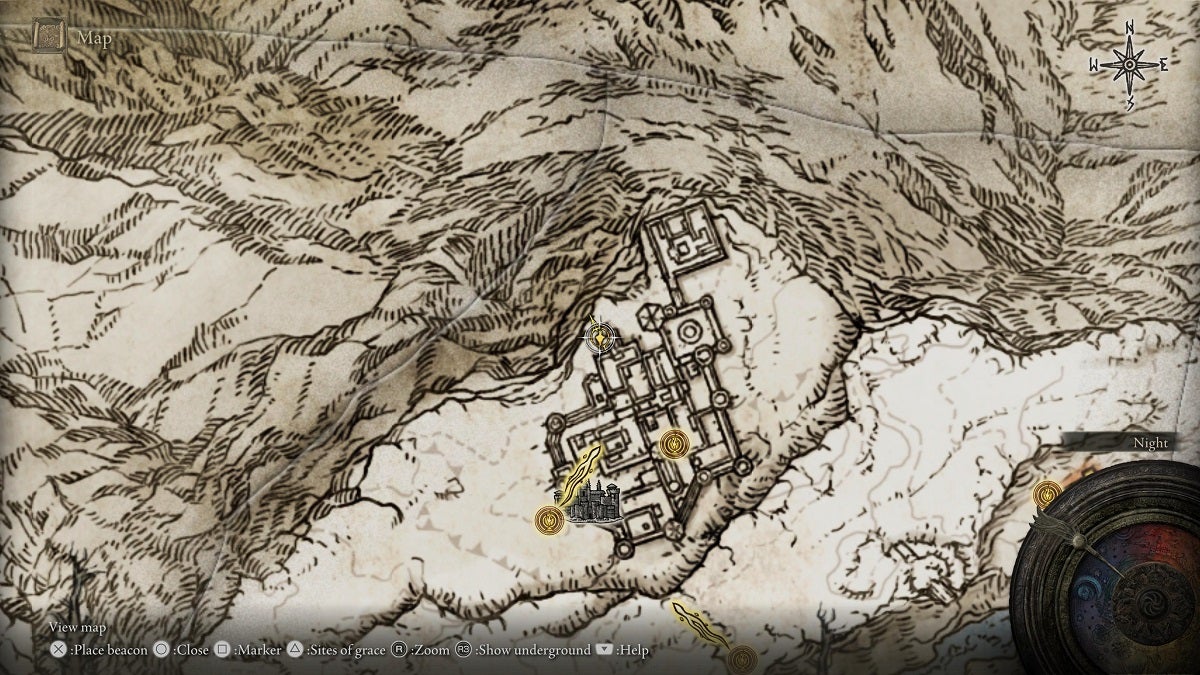
This Stonesword Key is on a corpse that’s hanging over a railing on a rooftop in northern Castle Sol.
Guardian’s Garrison
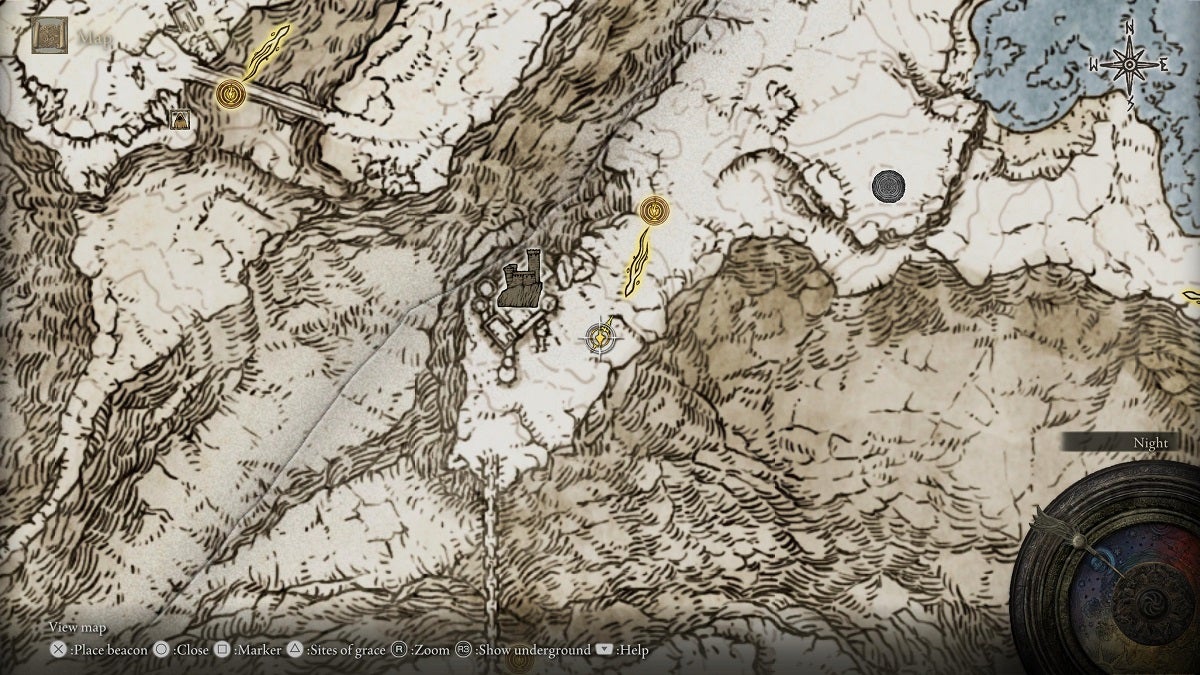
There’s a corpse outside the Guardian’s Garrison on the Mountaintops of the Giants that’s lying behind a Fire Prelate. This corpse holds a Stonesword Key.
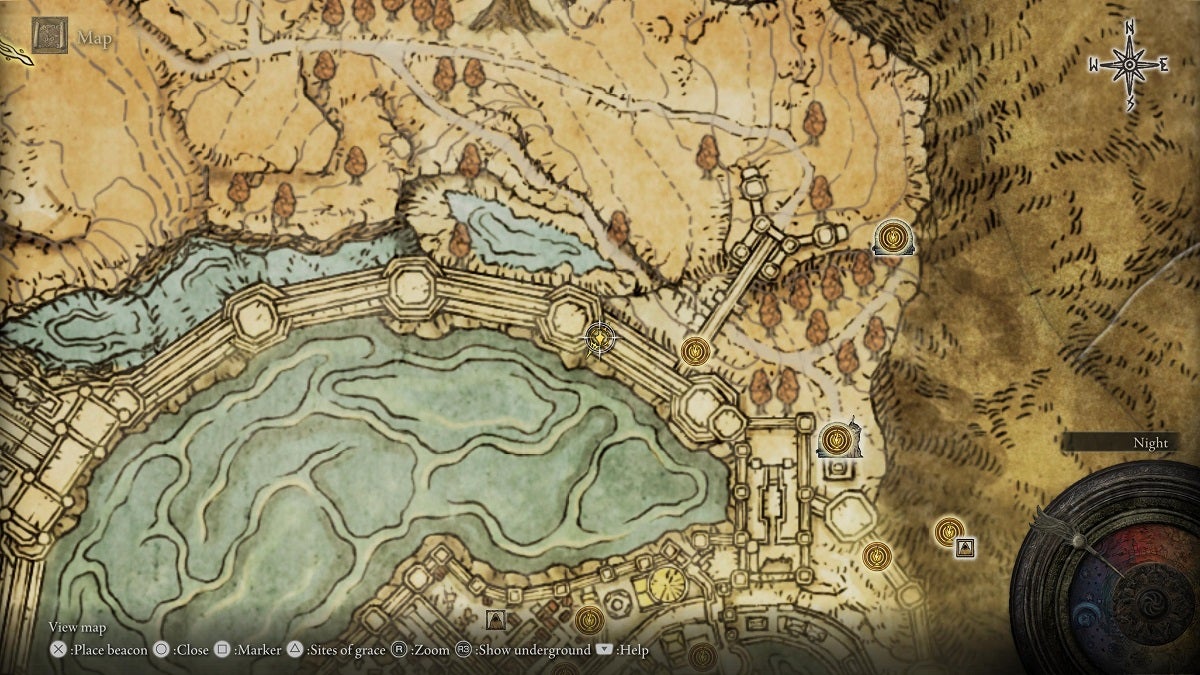
Consecrated Snowfield
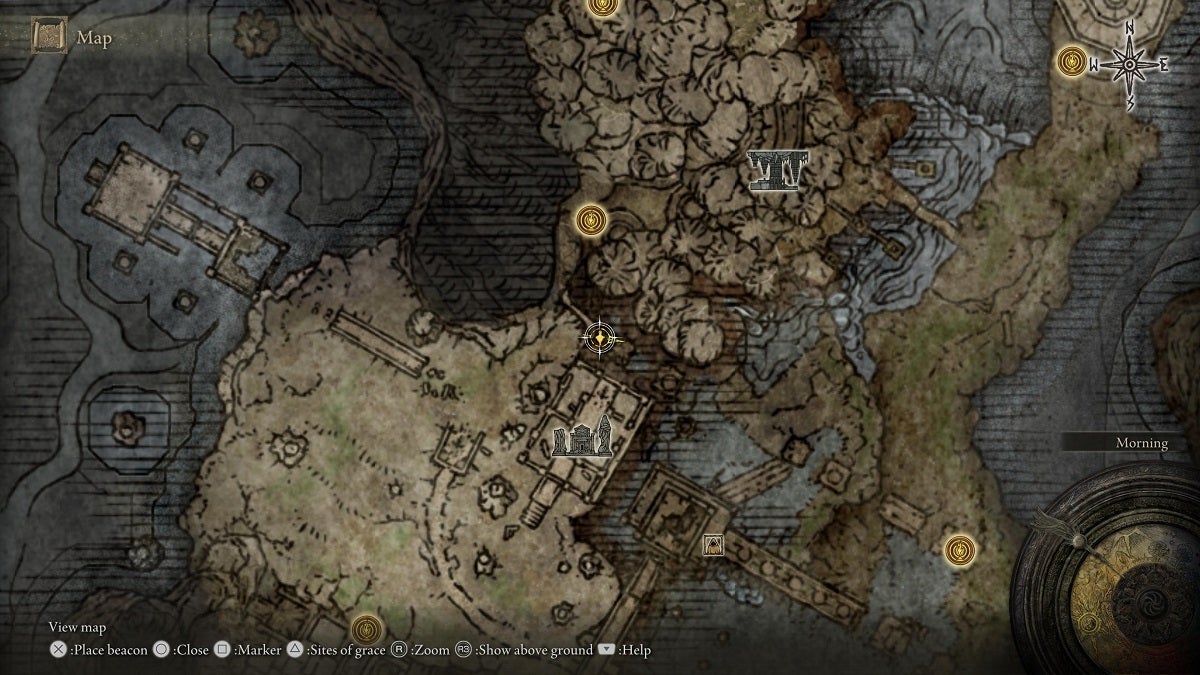
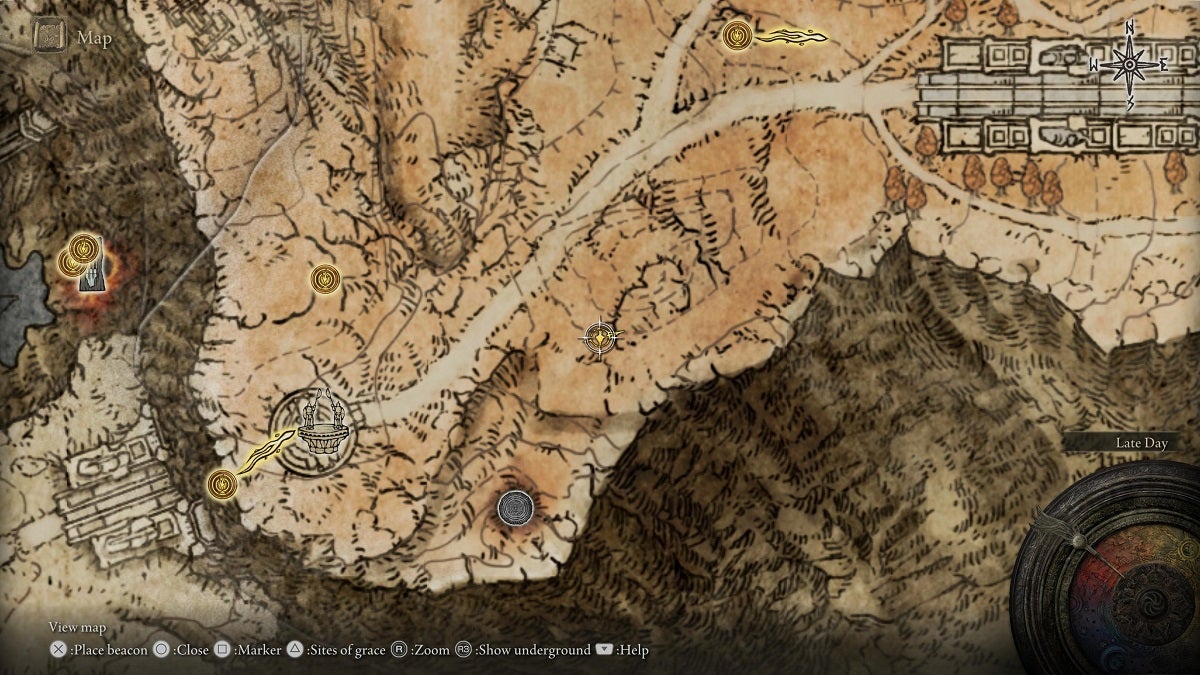
Start from the Inner Consecrated Snowfield Site of Grace and head west. Proceed to the area as shown on the image of the map above where you’ll find a corpse sitting on a chair with two electric orbs hovering above it. You won’t be able to attack these orbs, but they will disappear after firing lightning strikes at you three or four times. Once they’re gone, loot the corpse to obtain a Stonesword Key.
Yelough Anix Ruins
There is a tower in the northern section of the Yelough Anix Ruins that contains multiple madness-infested rats. There’s also a corpse here that holds a Stonesword Key.
Miquella’s Haligtree
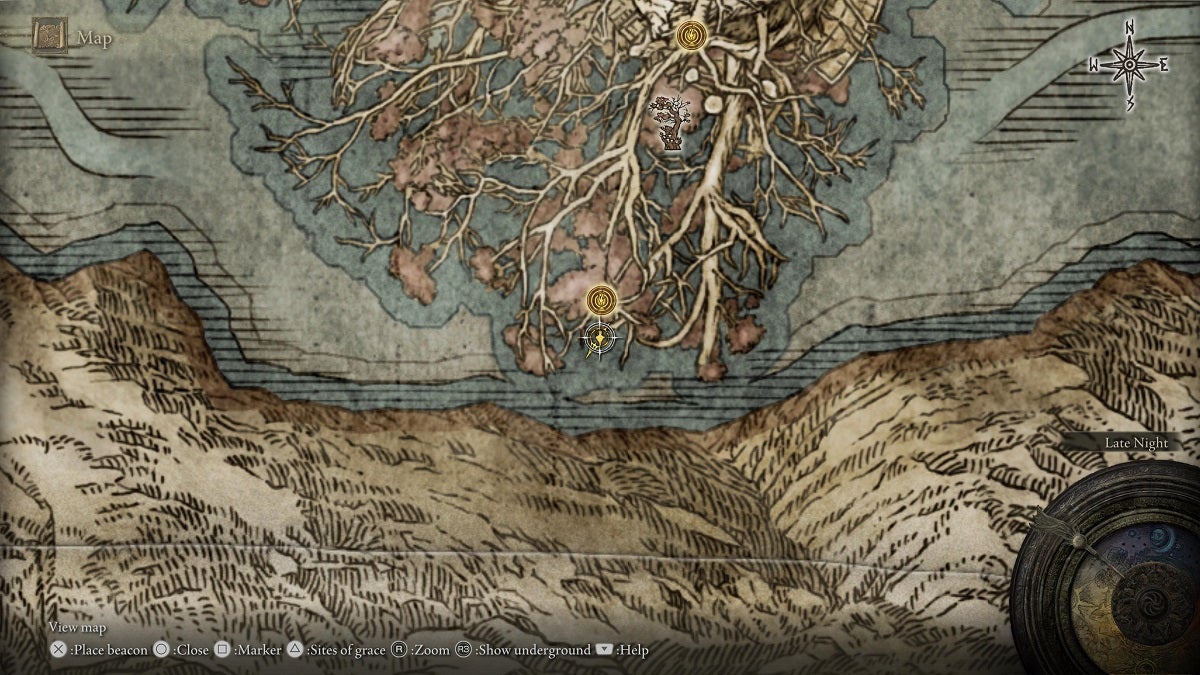
There are two Stonesword Keys in Miquella’s Haligtree. The first one is on the edge of the branch south of the Haligtree Canopy Site of Grace.
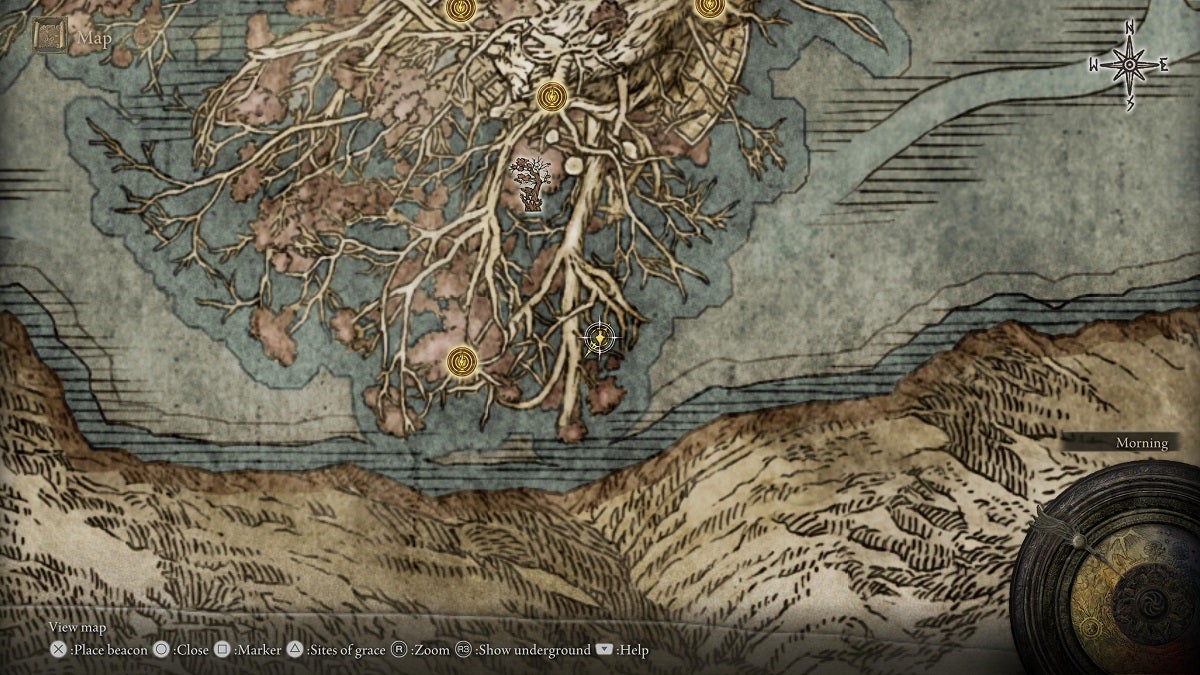
For the second one, return to the Site of Grace and start heading east from there. Continue on until you’re standing on top of a flower that’s above a branch you can drop to below. Drop to the lower branch and continue heading east.
Keep following this branch until you’re on top of the wider branch below. Drop down to the wider branch and proceed to the offshoot narrow branch to the east. From here, you’ll be able to spot the corpse that has an item on it on another branch ahead. You can make this jump if you do it carefully. Once successfully done, loot the corpse to obtain the area’s second Stonesword Key.
Every Stonesword Key in Crumbling Farum Azula
There’s only one Stonesword Key in Crumbling Farum Azula. To get to it, start from the Dragon Temple Site of Grace. Enter the temple and be prepared to either defeat or run past a string of powerful Banished Knights on the way.
Continue onwards until you’re in the area before the balcony that overlooks the temple altar. From here, head right then take the first door to the left. Continue down this path and you’ll eventually arrive at a dilapidated corner of the temple where one dual sword-wielding knight is standing while overlooking the great bridge. Beside the knight is a corpse lying on the ground. Loot this corpse to obtain the Stonesword Key.
Roundtable Hold Stonesword Keys
You can also purchase three Stonesword Keys from the Twin Maiden Husks at the Roundtable Hold for 4,000 Runes each.